Configuring HPE GreenLake SAML SSO Authentication with ADFS
Jump to:
- SAML Authentication workflows
- Prerequisites
- Environment setup and automated certificate renewal
- Step 1: Certificate Requirements for Federation Servers
- Step 2: Configuring an ADFS service user
- Step 3: Configuring AD user accounts and groups
- Step 4: Inviting an AD administrator user to HPE GreenLake
- Step 5: ADFS installation
- Step 6: ADFS configuration
- Step 7: Configuring ADFS for IdP-initiated SSO
- Step 8: HPE GreenLake configuration for SAML federation
- Step 9: Collecting the HPE GreenLake SAML attributes values
- Step 10: Adding HPE GreenLake as an ADFS relying party trust
- Testing step 1: Testing the ADFS sign on page
- Testing step 2: SP-Initiated test authentication
- Testing step 3: IdP-Initiated test authentication
- Troubleshooting SAML connectivity errors
In this blog post, I will walk you through the steps required to configure Microsoft Active Directory Federation Services as a SAML identity provider (IdP) for HPE GreenLake and HPE Compute Ops Management.
The motivation for using LDAP as a source for user/group information for HPE GreenLake is primarily driven by three factors:
-
Integration with existing Active Directory (AD) infrastructure: The need for end customers to have their AD integrated with HPE GreenLake Identity & Access Management (IAM) creates a single source of truth for user/group information. Any changes made to user/group information in AD, such as adding or removing users from groups, or adding/removing users from organizations, are replicated to the HPE GreenLake IAM system through mechanisms like System for Cross-domain Identity Management (SCIM) provisioning.
-
Simplification of synchronization processes: By using LDAP as a source for user/group information, the need for manual processes to synchronize this information across different systems is greatly reduced. This streamlines the management of user/group data and eliminates potential inconsistencies that can arise from manual synchronization.
-
Convenience for end users and improved security: With the spread of cloud-hosted Saas applications, users have to memorize a long list of passwords, which can lead to compromise, lost productivity and security breaches, as users will end up using easy-to-remember passwords. By having a single set of LDAP credentials, end users can access multiple systems seamlessly. This eliminates the need to remember and manage different sets of credentials for different systems, thereby improving user convenience, productivity and security.
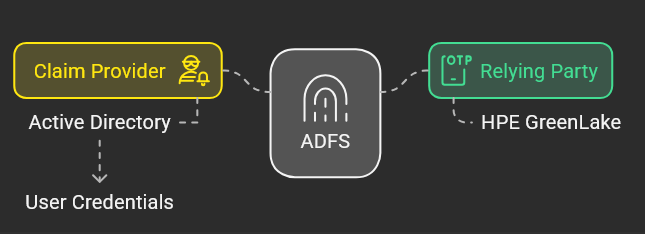
Active Directory Federation Services (ADFS), which is a feature of Windows servers, allows users to use their Active Directory (AD) credentials to authenticate themselves to trusted resources on external networks such as HPE GreenLake. In this setup, AD serves as the claim provider, issuing claims about user identities, while HPE GreenLake acts as the relying party, consuming these claims to grant access. This functionality is commonly referred to as a single sign-on (SSO) service.
Unlike Azure AD, the Microsoft cloud-native IAM service, ADFS utilizes your existing local Active Directory instance for single sign-on (SSO) functionality. It operates similarly to other SSO services, but instead of relying on a third-party SSO tool, you leverage your own local Active Directory for authentication and authorization purposes.
This integration enhances security and user convenience by leveraging existing AD credentials for seamless access to HPE GreenLake workspaces.
SAML Authentication workflows
The following diagrams describe the SAML authentication workflow used by HPE GreenLake when ADFS is used as the identity provider. Both Identity Provider (IdP) initiated and Service Provider (SP) initiated methods are supported by ADFS and HPE GreenLake.
Service Provider Initiated SSO
In a Service Provider initiated SSO workflow, the SSO request originates from the service provider, i.e., HPE GreenLake. When a user tries to access HPE GreenLake, a federation authentication request is created and sent to the ADFS server:
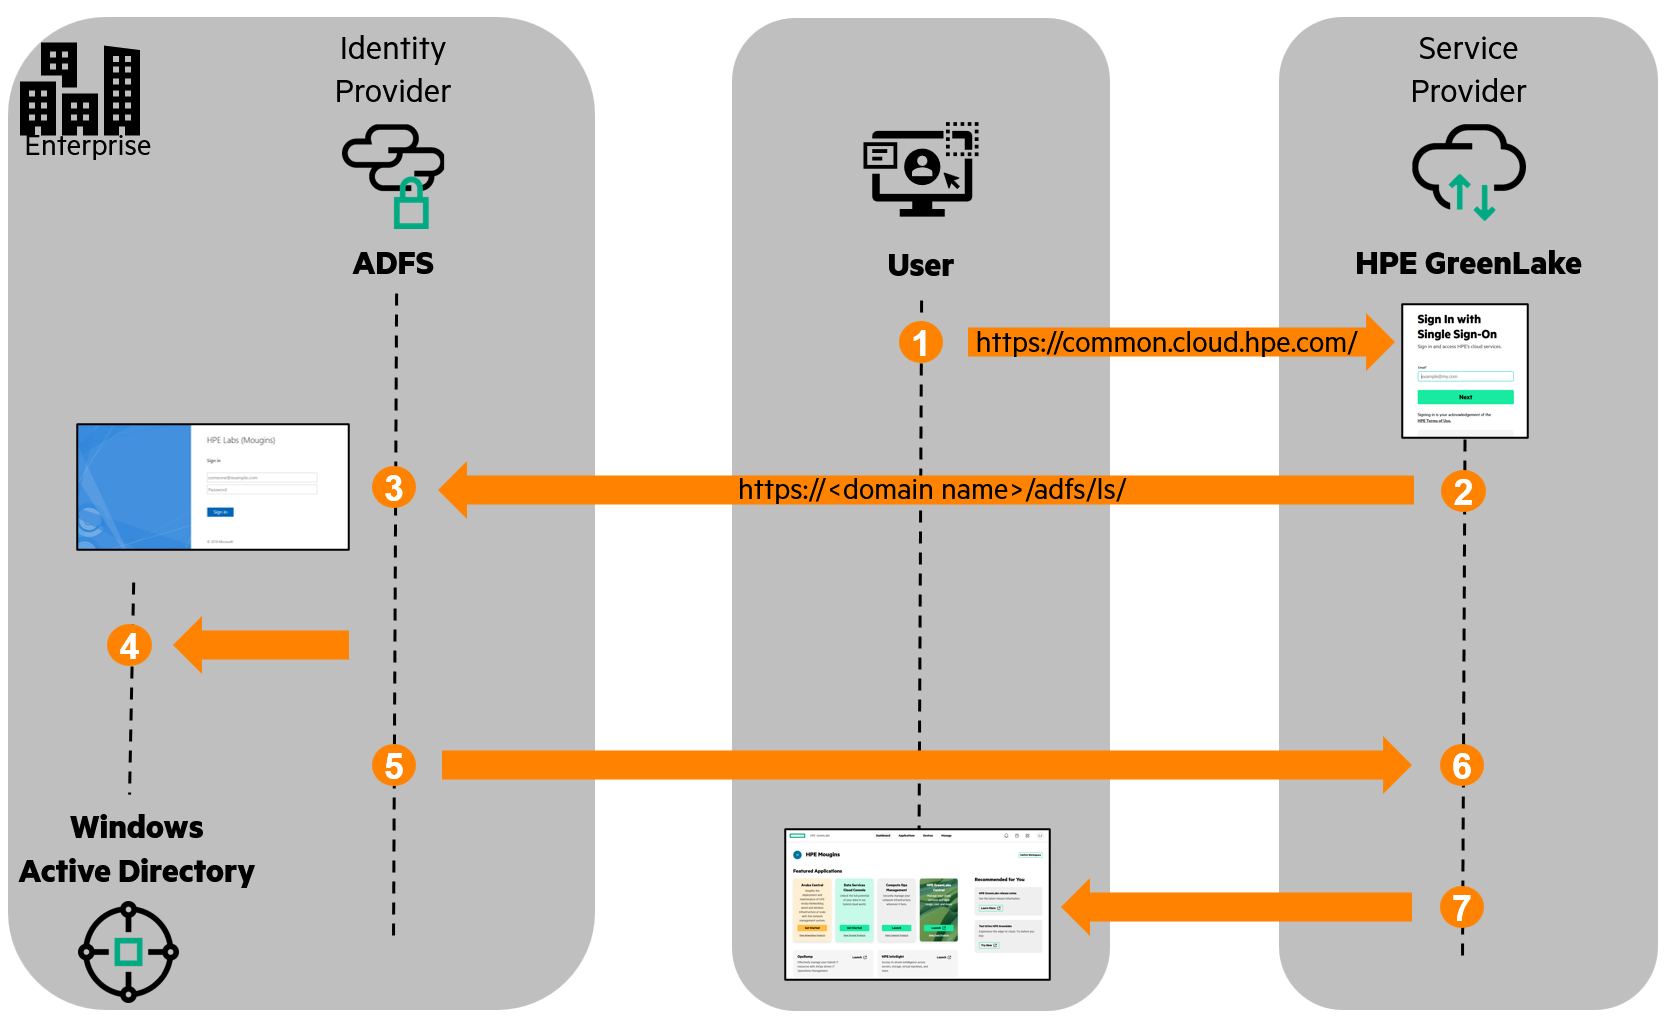
- A user accesses the HPE GreenLake UI and enters their primary email address in the SSO interface.
- HPE GreenLake generates a SAML 2.0 AuthN request and redirects the user’s browser to the ADFS sign-on page.
- When a user is not yet authenticated with ADFS, they will be prompted to authenticate. However, if the user is already authenticated with ADFS, they will not be required to authenticate again.
- ADFS authenticates the user against the Active Directory.
- Once the user is authenticated, a SAML response is generated by ADFS and posted back to HPE GreenLake via the user’s browser.
- HPE GreenLake verifies the SAML response.
- The authentication process completes, and the user is granted access to the HPE GreenLake resource(s).
Identity Provider Initiated SSO
In an Identity Provider initiated SSO workflow, the SSO request originates from the identity provider, i.e., ADFS. Users access a specific ADFS encoded URL which contains the HPE GreenLake SSO URL, and enter their Active Directory credentials. Then ADFS creates a SAML response and redirects the users to the HPE GreenLake user interface:
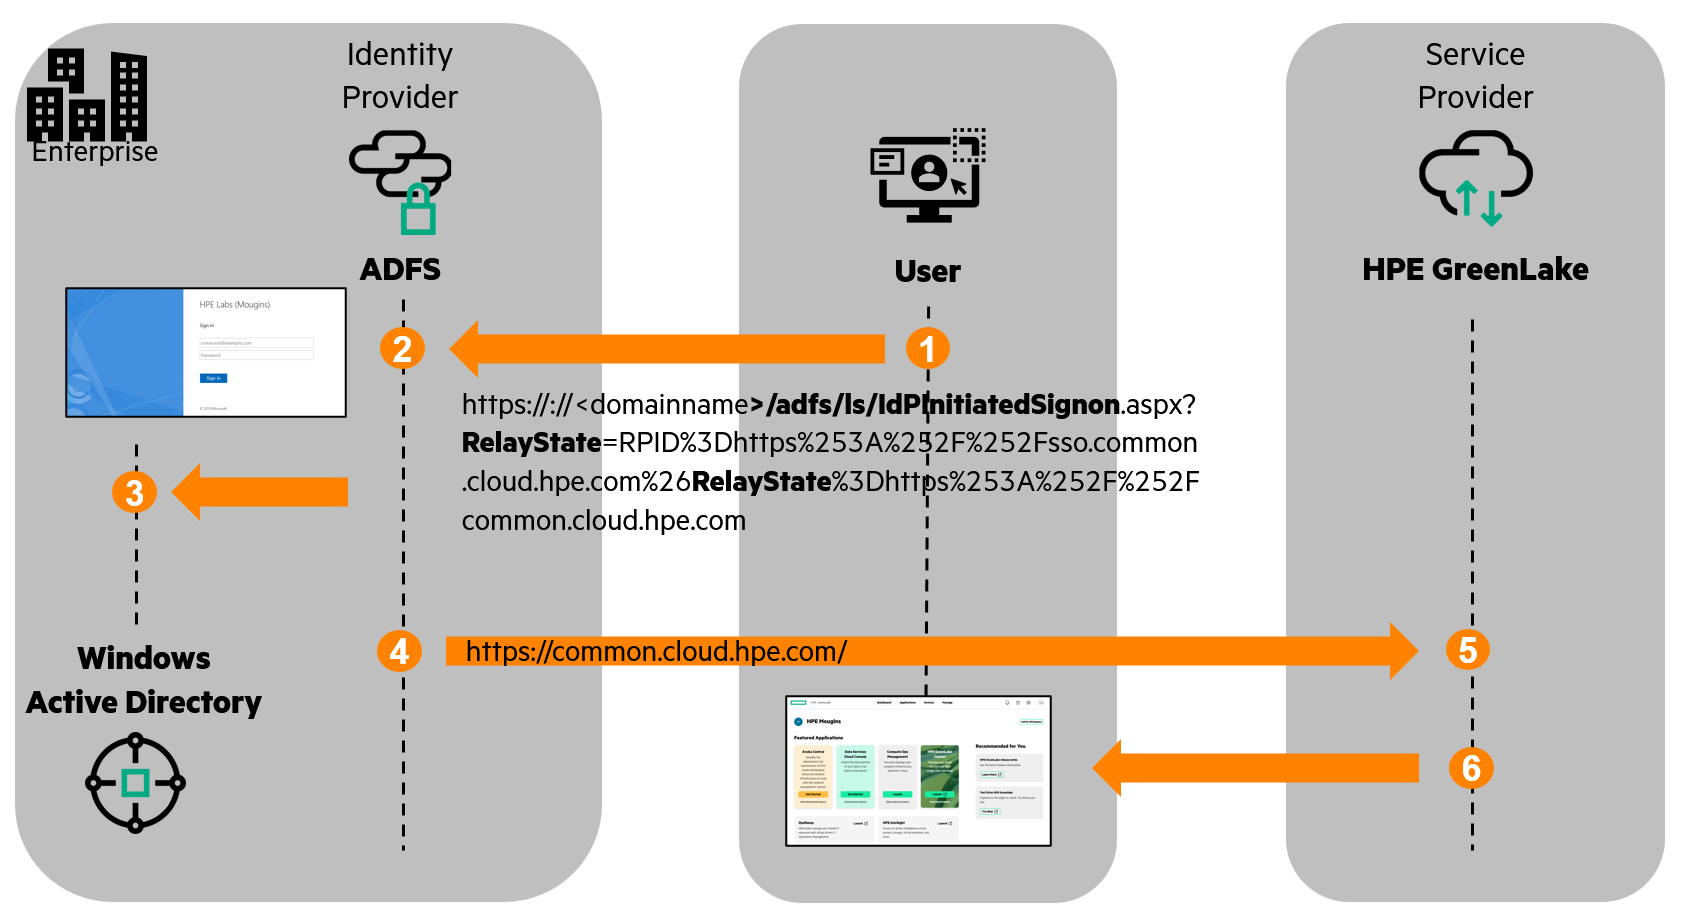
- A user accesses the ADFS encoded URL sign-on page
- The user enters their Active Directory credentials.
- ADFS authenticates the user against the Active Directory.
- ADFS generates a SAML assertion which is sent to the selected HPE GreenLake application via the user’s browser.
- HPE GreenLake accepts the request, establishes the identity of the user from the ‘NameID’ element of the SAML assertion, and discovers the user’s effective roles in the ‘hpe_ccs_attribute’ element.
- The authentication process completes, and the user is granted access to the HPE GreenLake resource(s) encoded in the ADFS URL, also known as the RelayState.
Prerequisites
- Subscribe to HPE GreenLake from your organization, see Sign up with HPE GreenLake
- Make sure you have an admin role for HPE GreenLake
- An Active Directory instance
- A server running Microsoft Windows Server 2022 (or 2016)
Environment setup and automated certificate renewal
Here are the key components I’m using in my lab environment to support ADFS services and automate certificate renewal:
-
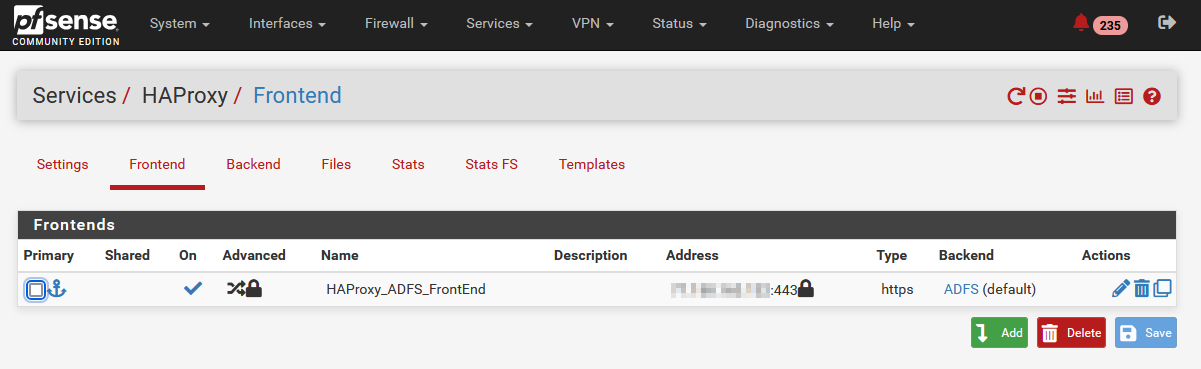
pfSense as my firewall/router. It provides a wide range of network security solutions, including firewalling, routing, VPN, and intrusion detection and prevention.
-
HAProxy package in pfSense to publish ADFS, providing load balancing, high availability, and enhanced security for ADFS services. See Andreas Helland’s excellent article: Publishing ADFS through pfSense with HAProxy
-
Acme package in pfSense to automatically generate a free Let’s Encrypt signed certificate for my domain every 60 days (Let’s Encrypt certificates expire after 90 days).
-
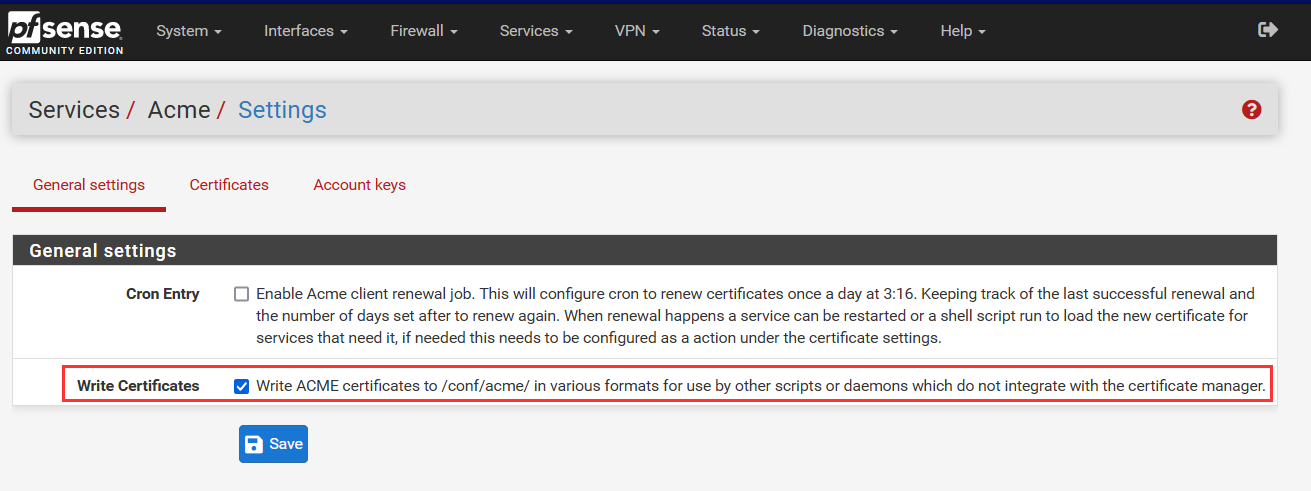
With the Write Certificates option checked in Acme settings, to save the Let’s Encrypt-signed certificate in pfSense’s local /cf/conf/acme folder. This option is important because it allows a script to retrieve the new certificate and initiate all the necessary steps for renewing the ADFS server certificates.
-
With a shell command added to the Actions list to restart HAProxy after the certificate has been renewed:
/usr/local/etc/rc.d/haproxy.sh restart. This ensures that the ADFS sign-on webpage uses the new Let’s Encrypt certificate once it is renewed.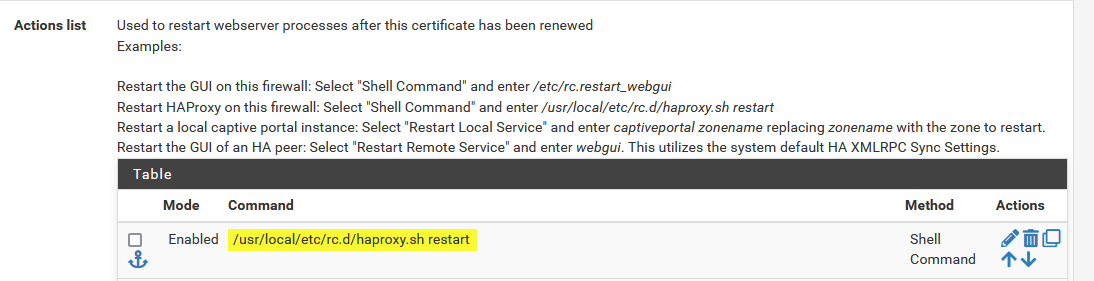
-
-
-
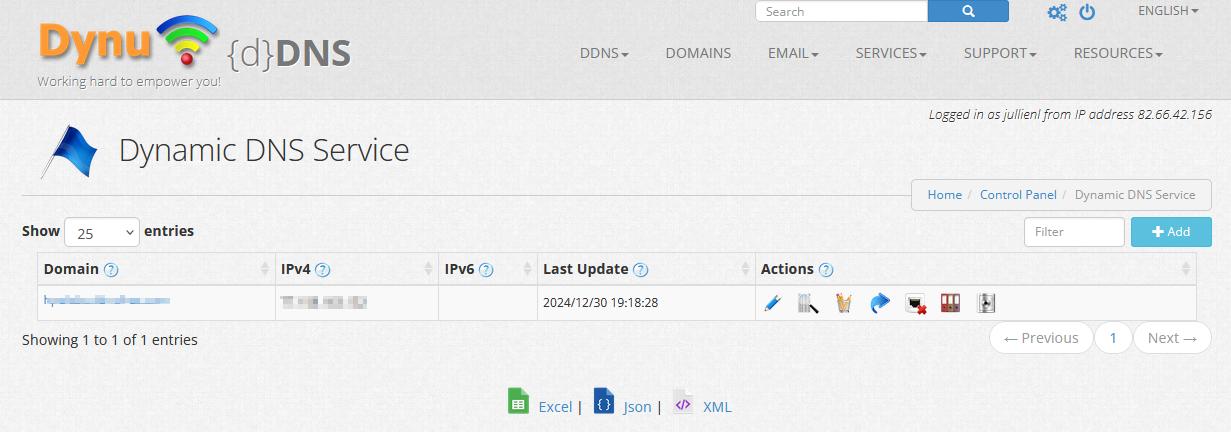
To register my domain name for free.
You can register your domain name with Dynu by visiting their website, creating an account, and following the domain registration process.
-
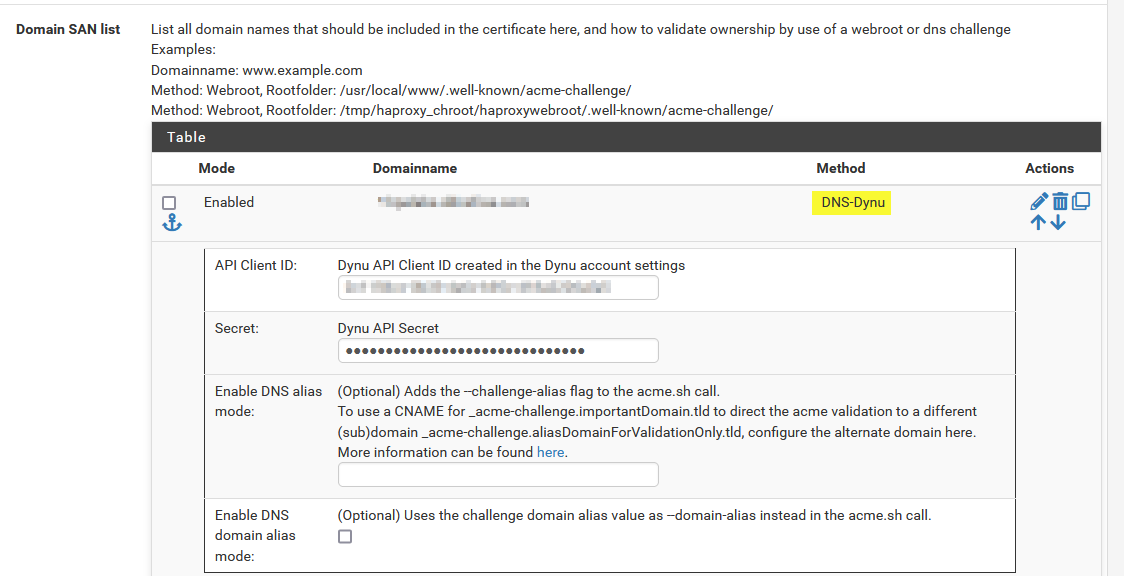
To prove to Let’s Encrypt that I control the domain for which I’m requesting an SSL/TLS certificate. This proof of ownership is fully supported by the DNS_Dynu method in the ACME service within pfSense:
-
-
A script that is scheduled to run every 60 days (so before the Let’s Encrypt certificate expires) and includes all the necessary steps required after the certificate is renewed. This script should be executed on all ADFS servers in an ADFS farm and includes:
- Downloading the ADFS certificate from pfSense (generated from Let’s Encrypt using the Acme package/service).
- Updating the ADFS certificates:
- Verifying that the new and existing certificates in the ADFS server’s personal trust store are identical.
- If they are not identical, removing the existing certificate and importing the new one into the ADFS server’s personal trust store.
- Assigning full control permissions to the new certificate’s private key for the ADFS service account.
- Updating the ADFS service communication, token-signing, and token-decrypting certificates with the new Let’s Encrypt certificate.
- Restarting the ADFS service.
- Updating HPE GreenLake workspace SAML SSO details with the new ADFS certificate:
- Connecting to the HPE GreenLake workspace using the SAML SSO recovery email (the only user who can update the SAML SSO domain).
- Checking that the HPE GreenLake SAML SSO Domain is set with the correct ADFS server certificate.
- If different, modifying the SAML SSO domain with the new ADFS certificate using the HPECOMCmdlets PowerShell module.
- Updating the ADFS Relying Party with the HPE GreenLake certificate:
- Retrieving the X509 certificate thumbprint of the Service Provider (i.e., HPE GreenLake).
- Comparing it with the one configured in ADFS.
- If different, updating the ADFS Relying Party set for HPE GreenLake with the new HPE GreenLake certificate.
Step 1: Certificate Requirements for Federation Servers
Active Directory Federation Services (ADFS) requires a certificate for Secure Socket Layer (SSL) server authentication on each federation server in your federation server farm so before you start the ADFS installation, you need to meet two important requirements:
-
Ensure that a trusted certificate is installed on the Windows server. This certificate is used to secure the communication and facilitate user authentication between HPE GreenLake and the federation server(s). You must have both the certificate and its private key available. Microsoft recommends not to use self-signed certificates for this certificate.
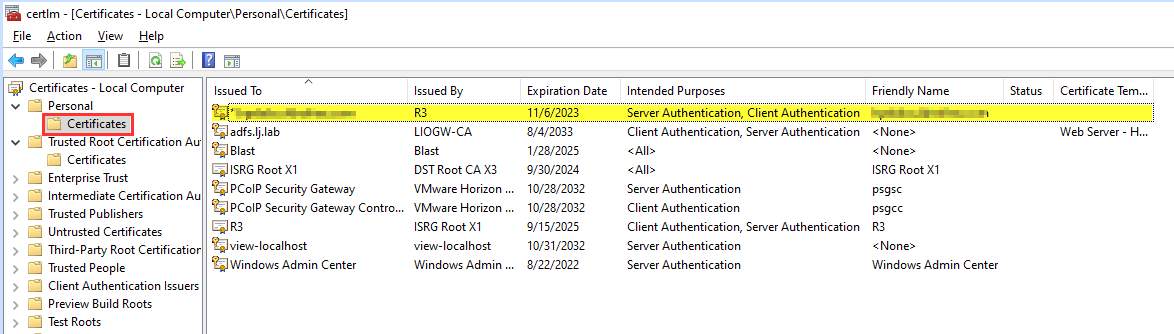
See Certificate Requirements for Federation Servers and Enroll an SSL Certificate for AD FS
For the initial ADFS configuration (so before you run Step 6: ADFS configuration), a p12 certificate must be generated from the certificate files supplied by the Acme package. The following command can be run from a pfSense shell console:
openssl pkcs12 -export -in /cf/conf/acme/<name>.all.pem -inkey /cf/conf/acme/<name>.key -out /cf/conf/acme/<name>.p12 -passout pass:password -name <name>.com -caname rootThen to import the p12 certificate into ADFS, open the Start menu on the ADFS server and search for Manage Computer Certificates then import the p12 file available in pfSense in /cf/conf/acme into the Personal store.
-
Ensure that the Fully Qualified Domain Name (FQDN) of your certificate is correctly mapped to the public IP address of your ADFS server.
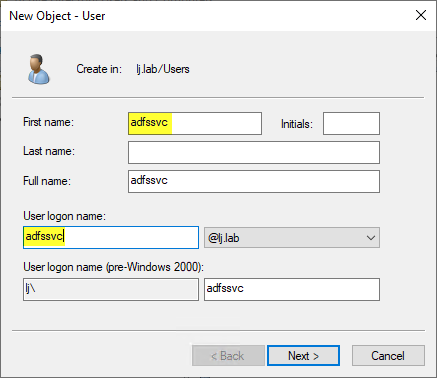
Step 2: Configuring an ADFS service user
From the Active Directory Users and Computers, create a new Active Directory (AD) user account:
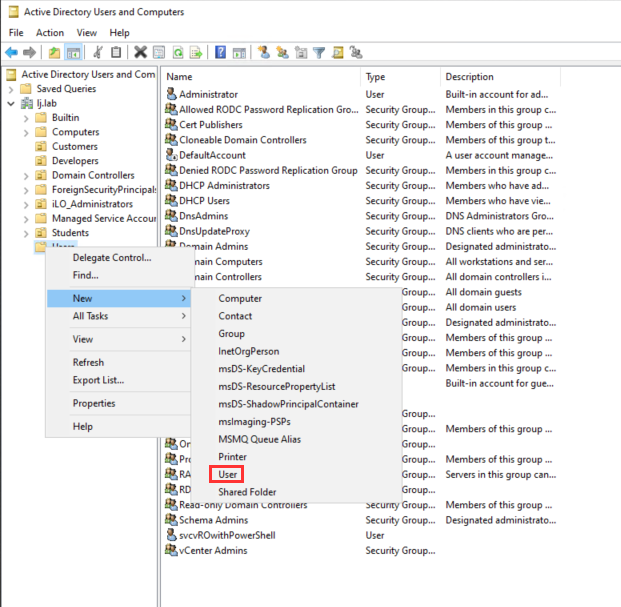
You can name it adfssvc:
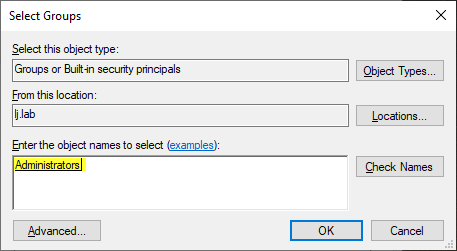
Add admin right to adfssvc
Step 3: Configuring AD user accounts and groups
The idea for users and groups is to create two AD user accounts to illustrate how roles and privileges works between ADFS and HPE GreenLake, so you will create a first user account with a read-only role and another with a full administrator role.
So create a first AD user account, for example Mike, for the Observer role on the HPE GreenLake platform, this will include both HPE Compute Ops Management and HPE GreenLake roles:
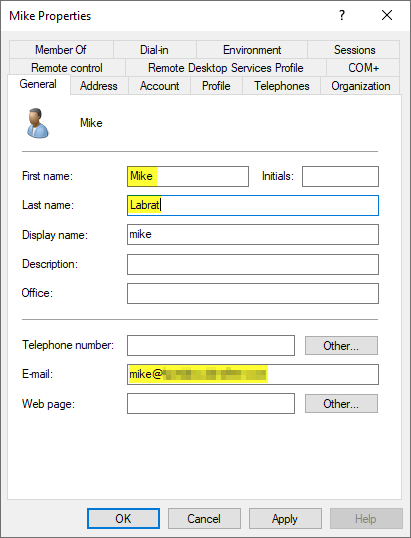
Ensure to provide the e-mail address of the external domain name in the E-mail field! This is important because the user will be authenticated on the HPE GreenLake platform by this e-mail address.
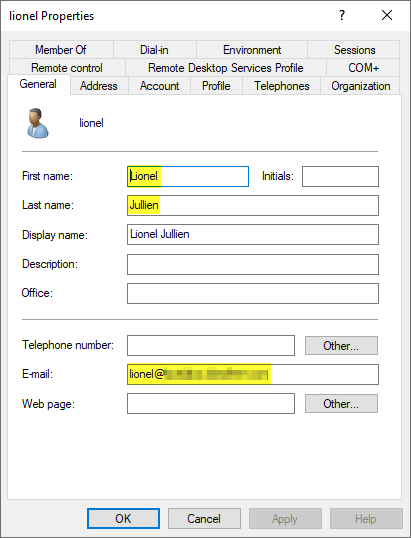
Then create a second AD user account for the Administrator role:
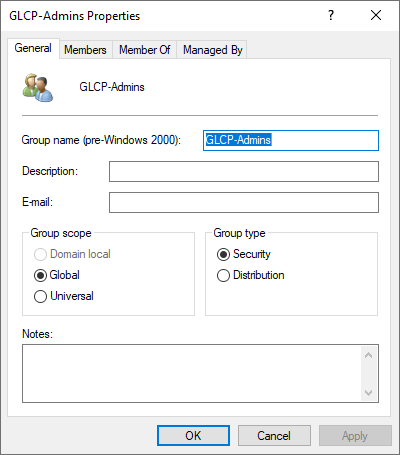
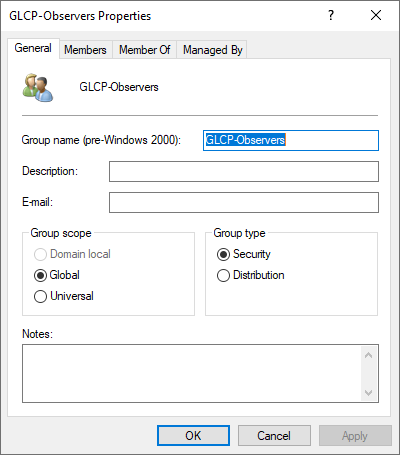
The next step is to create two AD groups.
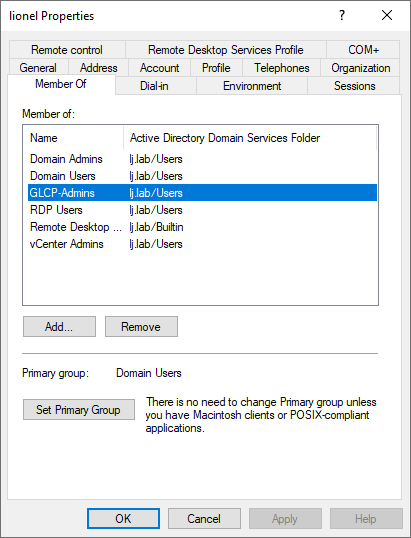
Create a first group GLCP-Admins for the Administrator role:
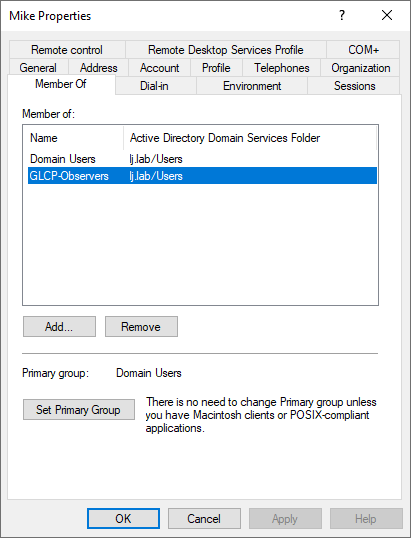
and a second group GLCP-Observers for the Observer role:
Then add Lionel to the GLCP-Admins group:
And add Mike to the GLCP-Observers group:
Step 4: Inviting an AD administrator user to HPE GreenLake
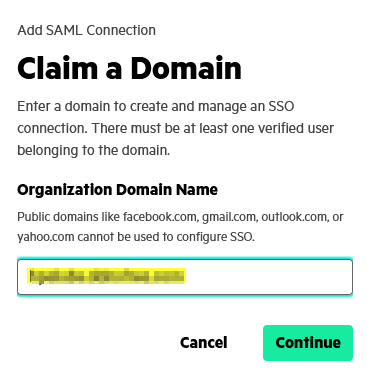
The configuration of HPE GreenLake SAML SSO requires at least one verified user from the SAML domain you want to claim. For example, to claim an acme.com domain, the user must be logged in to HPE GreenLake with an @acme.com email address.
So if you are not connected to HPE GreenLake with an email from your SAML domain, do so now.
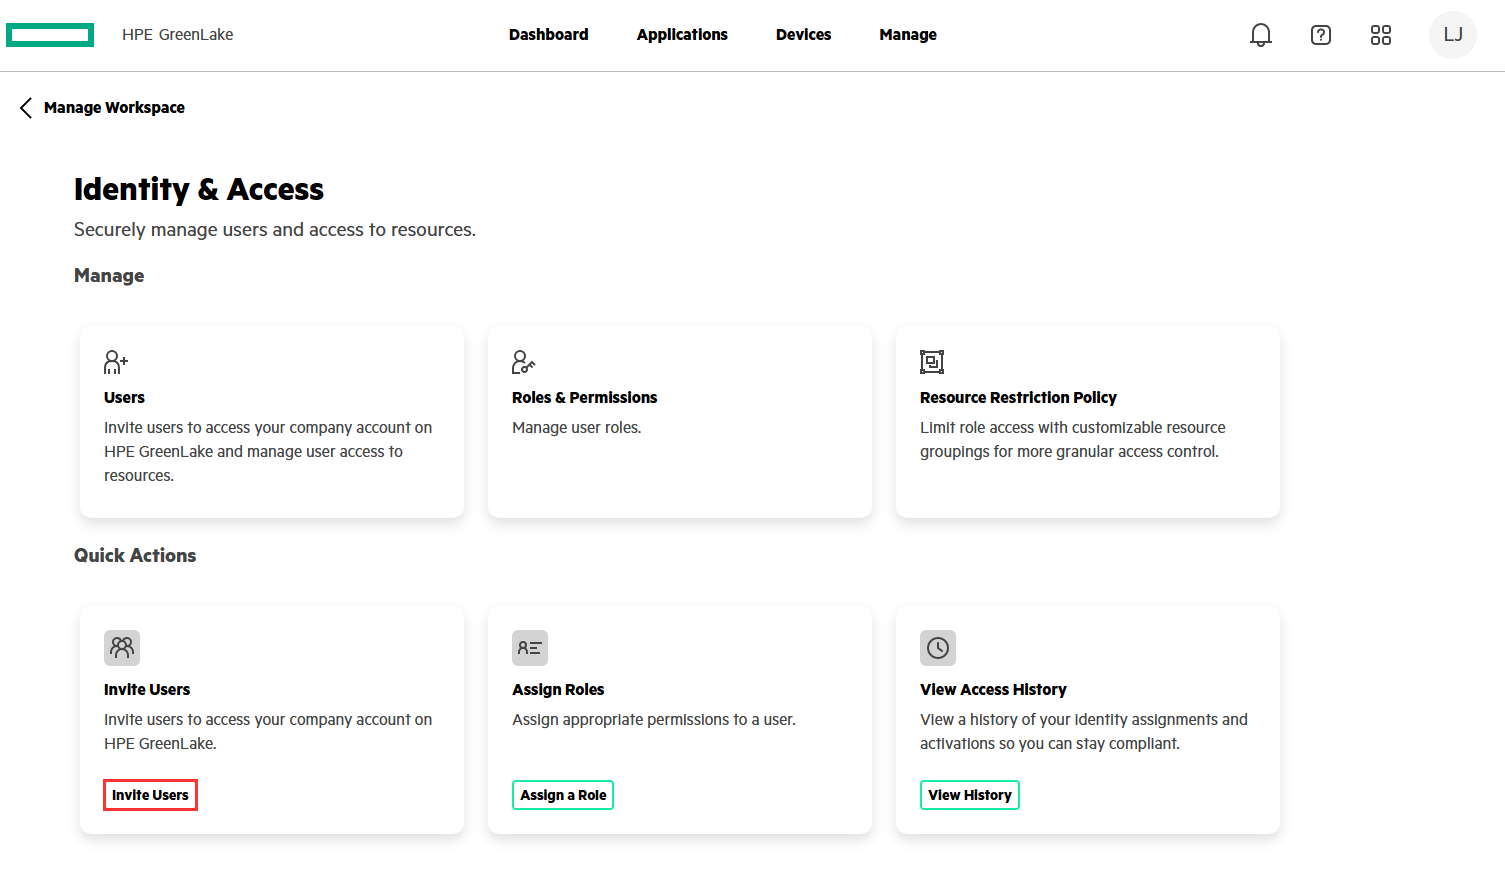
If you haven’t yet added a user from your SAML domain to the HPE GreenLake platform, you can send an invitation from Manage / Identity & Access / Invite Users:
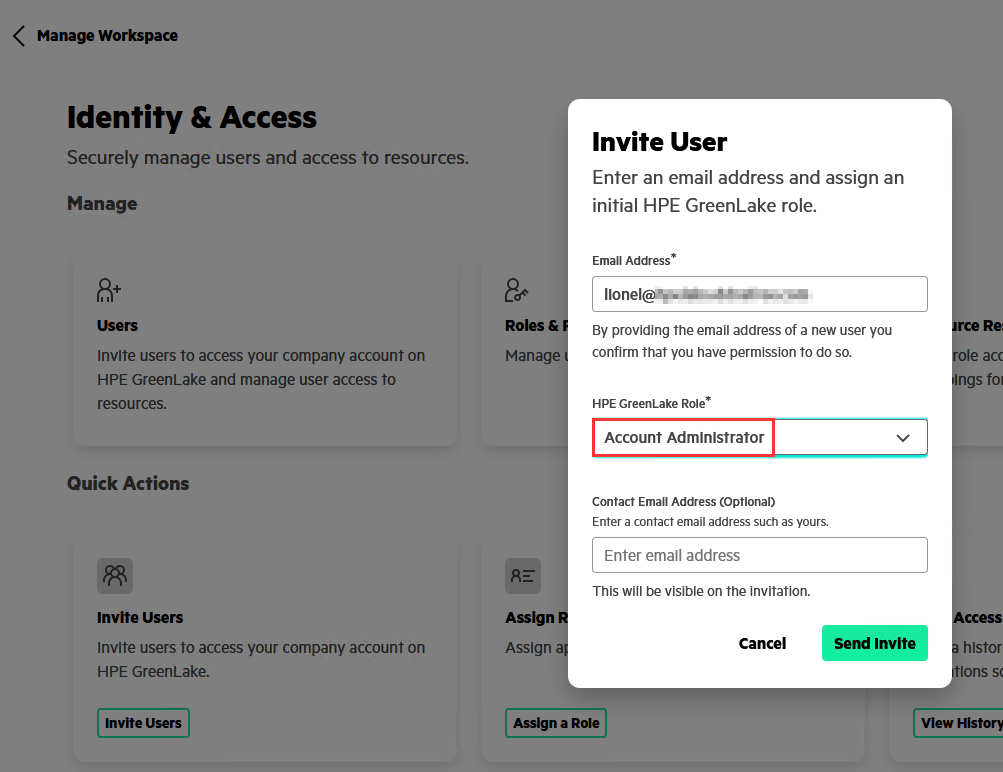
Enter the email address associated with your AD user account and select the Account Administrator role:
The administrator role will be needed to configure SAML authentication in your workspace, which will be done later.
Then click on Send Invite. This will send an email invitation to the mailbox of your AD user.
Note that you don’t necessarily need to accept the invitation by clicking on the email accept invitation button because once the invitation is sent, the user is granted access to the workspace.
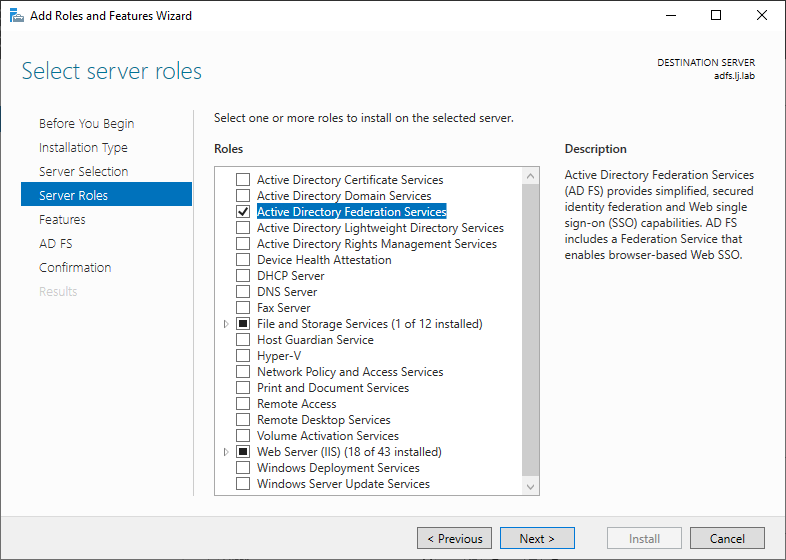
Step 5: ADFS installation
The next step is to install Active Directory Federation Services role on the Windows Server.
In my environment, I use a Windows Server 2022.
Open the Add Roles and Features Wizard and select the Active Directory Federation Services role:
Keep all default settings until you reach the confirmation section:
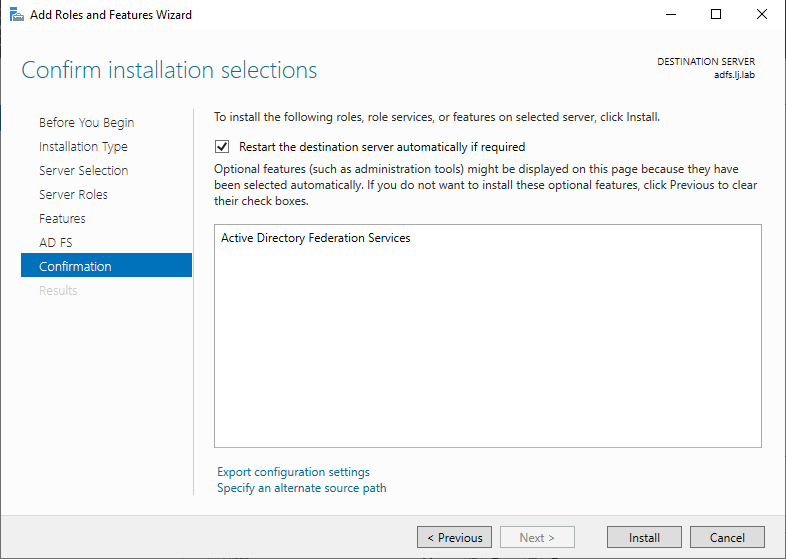
Then click on Install.
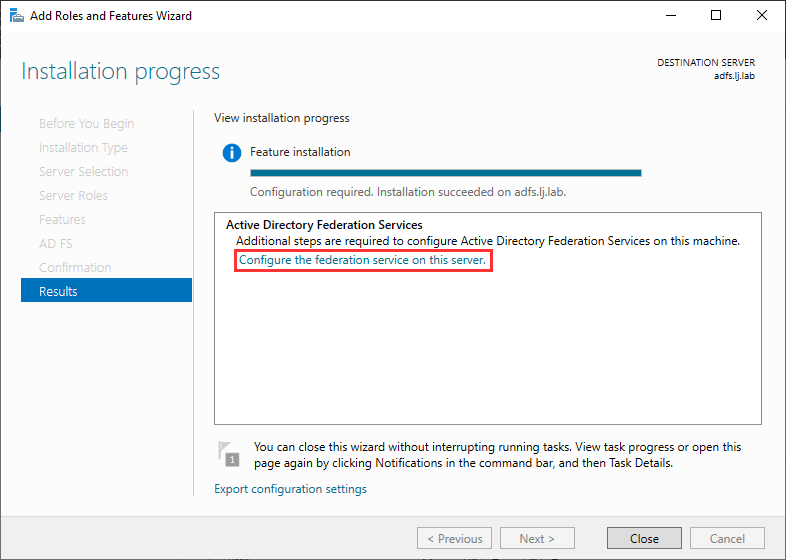
When the installation is complete, click on Configure the federation service on this server.
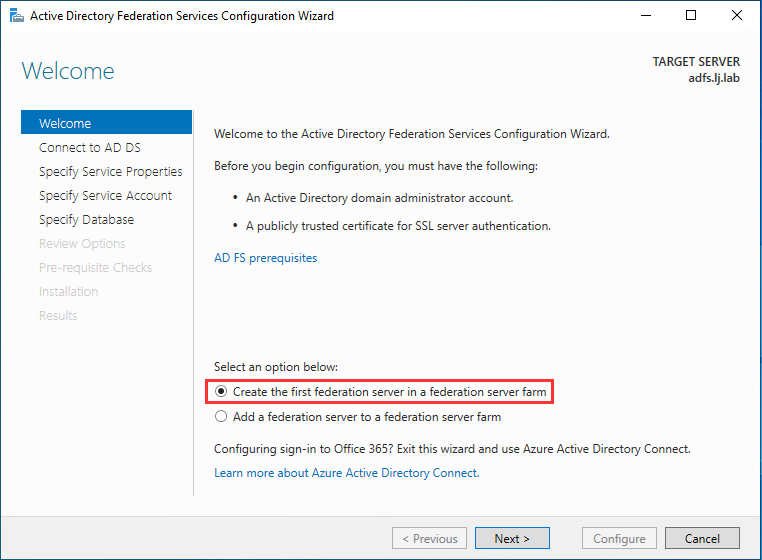
Step 6: ADFS configuration
In the new window, select Create the first federation server in a federation server farm then click Next:
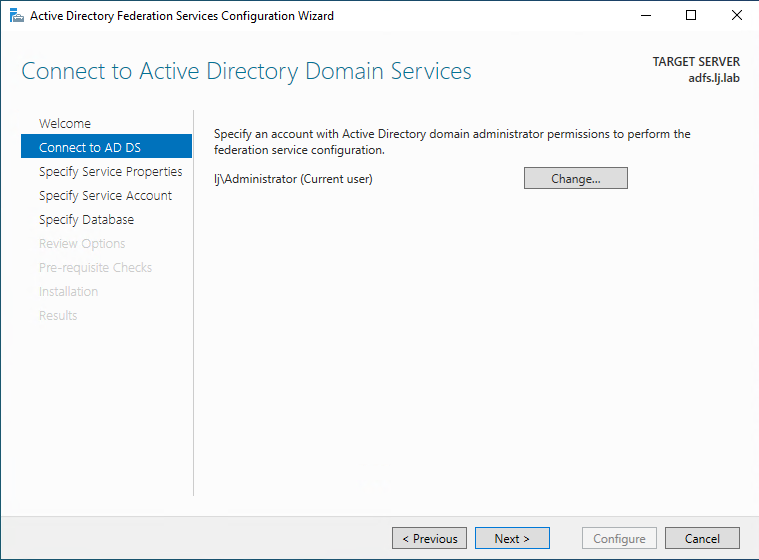
Select an AD user account with administrative privileges then click Next:
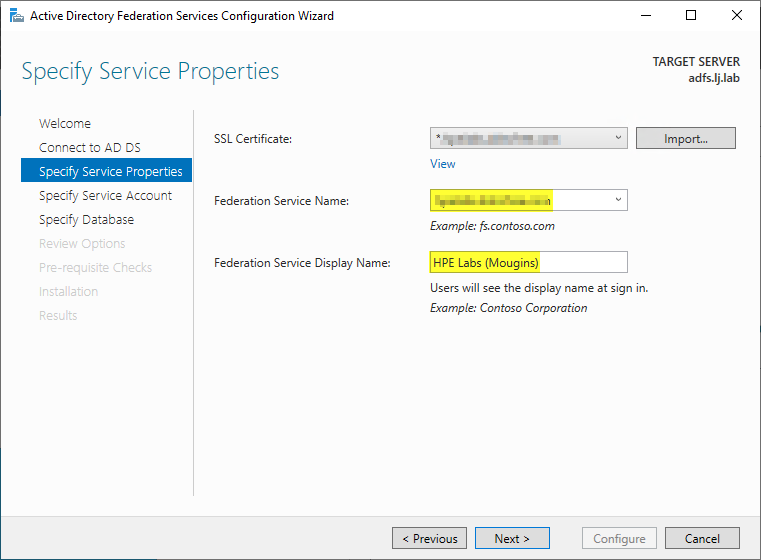
Select the certificate associated with your external domain name for your federation services. Note that the Federation service name should be automatically generated from the selected certificate.
This is where the initial import of the trusted certificate into the ADFS server takes place, as described in step 1.
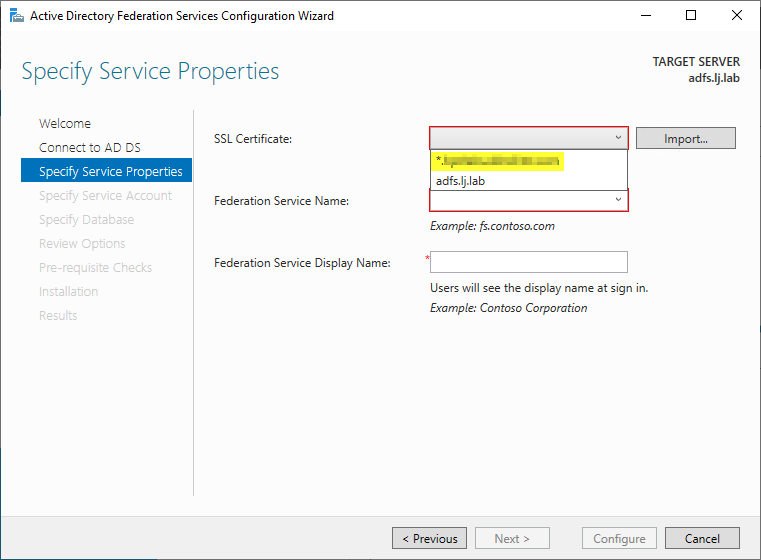
If you don’t see your trusted public certificate in the dropdown list, make sure you’ve followed all the recommendations in step 1.
Enter the display name of the federation service. This is the name that will be display on the ADFS sign in web page, so you can enter any name you like.
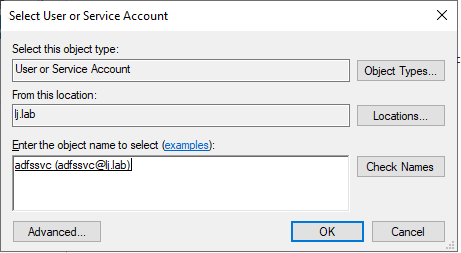
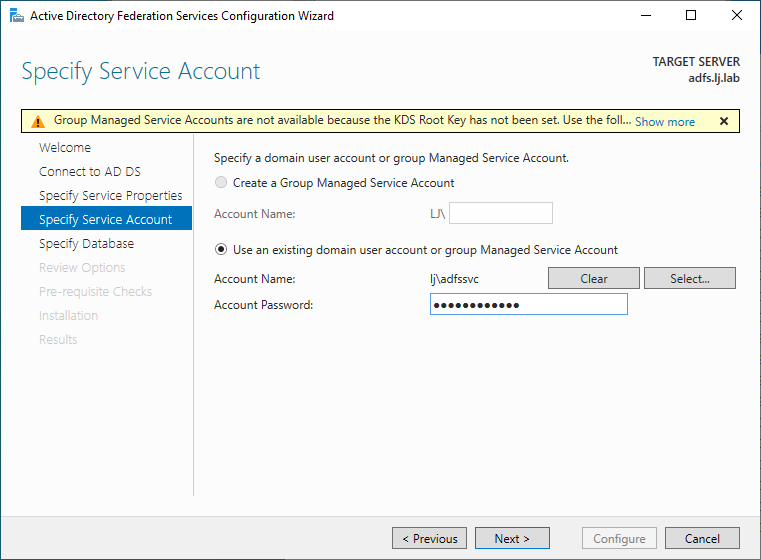
In the next page, click on Select to select the AD account we created earlier for the ADFS service:
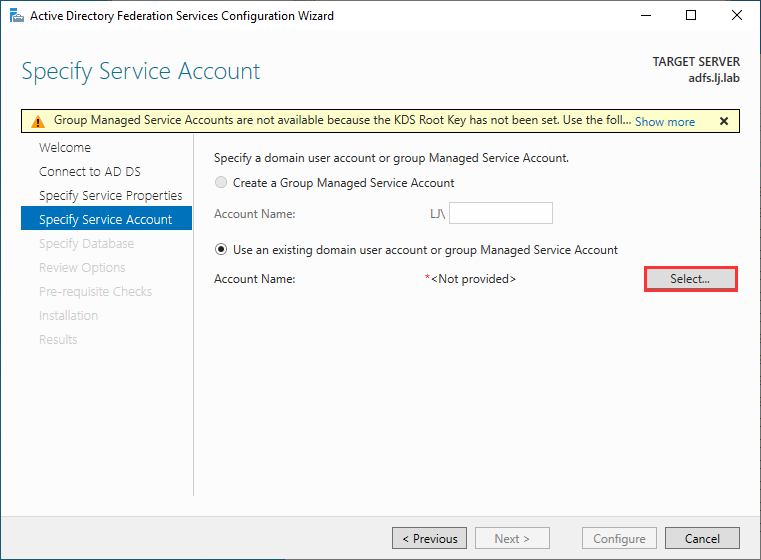
Enter the adfssvc account:
Enter the password that you defined earlier:
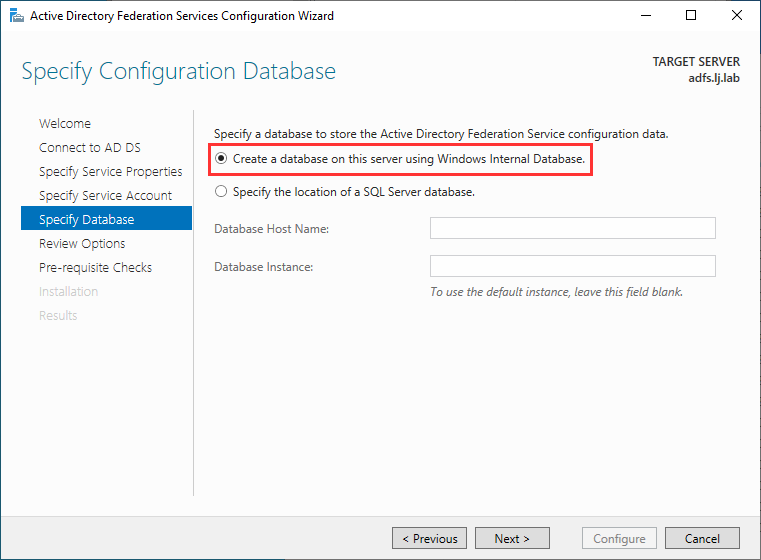
On the next page, if you have a SQL server, provide the SQL details or select Create a database on this server using Windows Internal Database:
On the next page, a summary of the ADFS options is display, click Next:
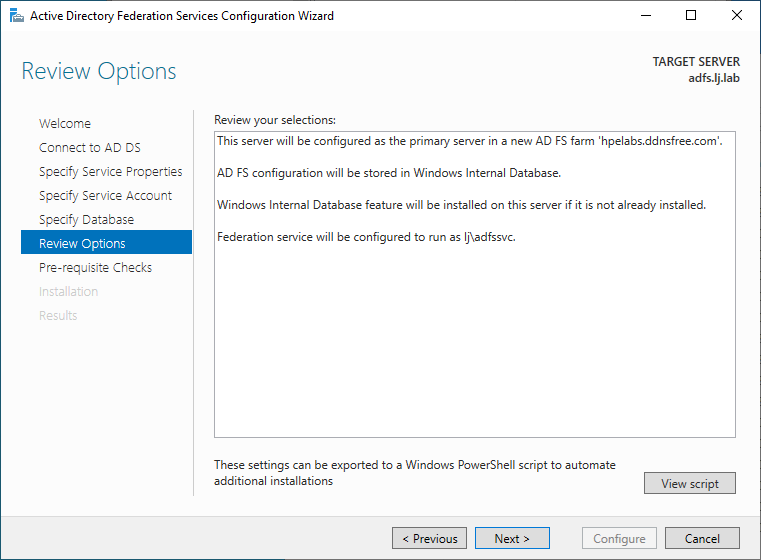
Once the prerequisites checks are complete, click Configure:
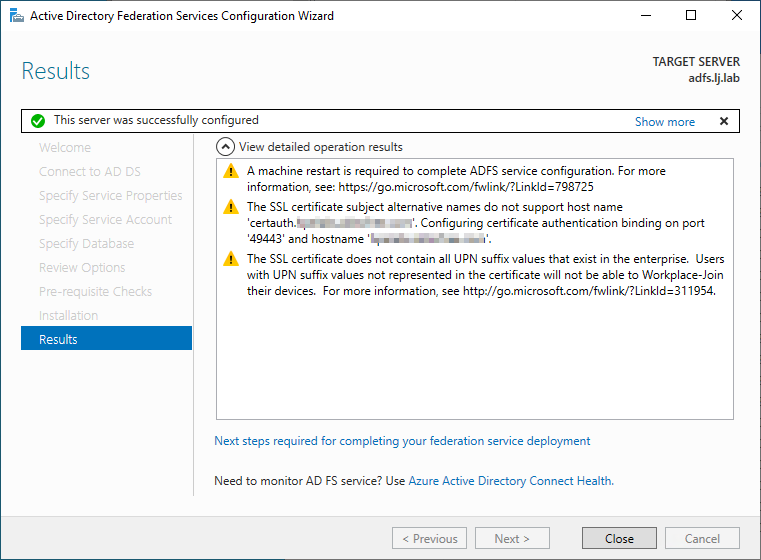
In the results page, you might have a few warnings. You can then close the wizard. Note that a restart might be needed after the installation.
If you get an SPN error message, you can run the following command from a PowerShell console:
setspn -a host/localhost <service-account>where <service-account> corresponds to adfssvc in our case.
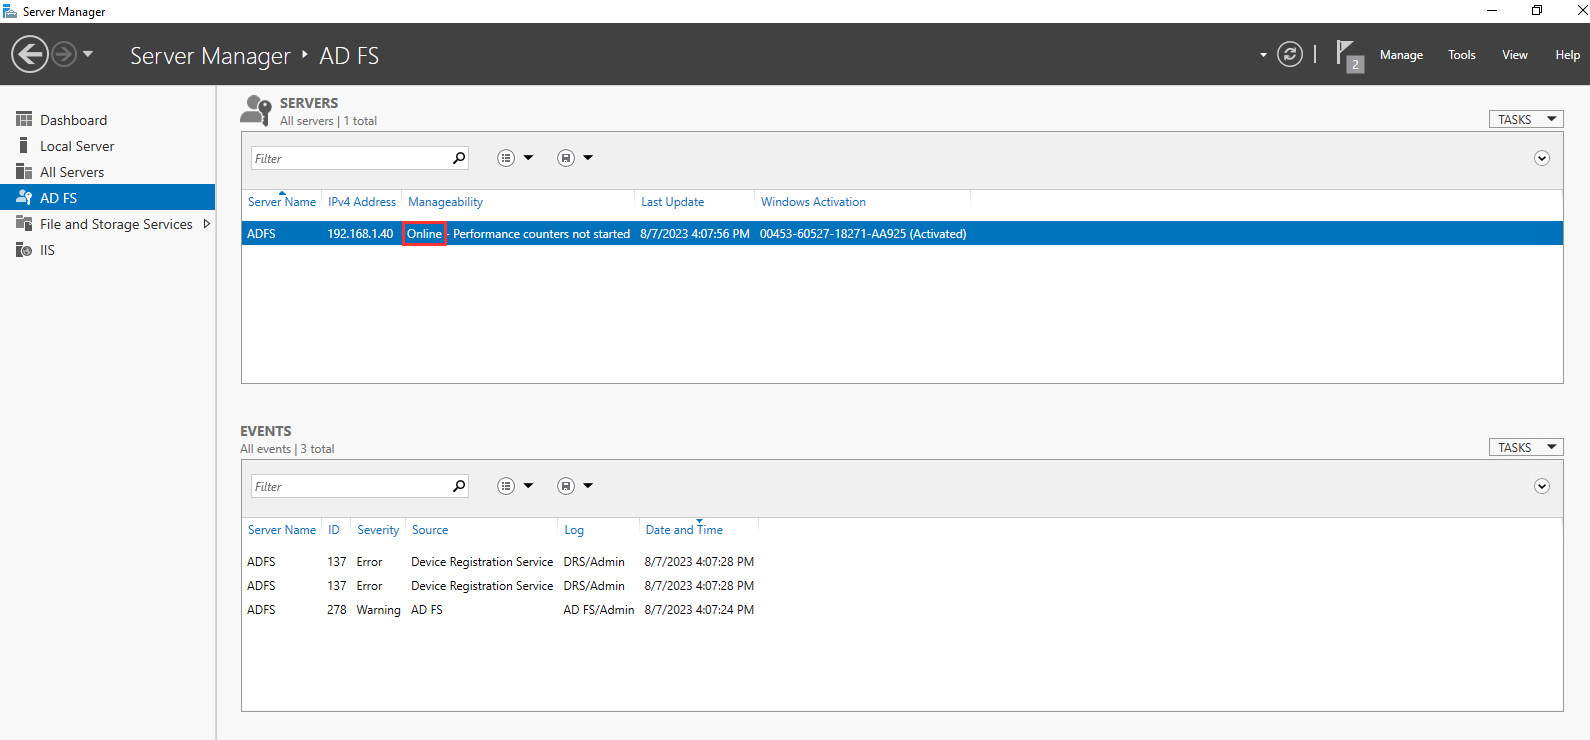
AD FS service should be running now, make sure the status is online in the Server Manager console:
The last step is to download the ADFS server’s federation metadata XML that will be imported later in the HPE GreenLake platform. You can use the following URL from the ADFS server:
https://localhost/federationmetadata/2007-06/federationmetadata.xml
Save the file as ADFS_federation_metadata.ping.xml and keep it for later.
Step 7: Configuring ADFS for IdP-initiated SSO
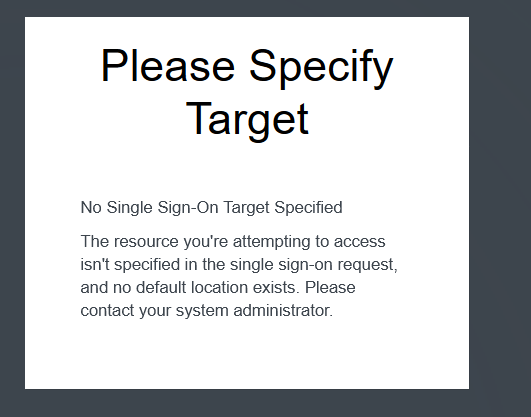
By default ADFS is not configured for RelayState, a parameter of the SAML federation protocol which is required for IdP-initiated SSO.
For more information, see Enable the Idp-initiated sign on page and AD FS 2.0 RelayState
If you don’t enable RelayState and don’t use the special encoded url with RelayState, you will get the following error from HPE GreenLake when using the IdP-initiated SSO:
There are two steps to this configuration:
-
Enabling RelayState for IdP-Initiated SSO in ADFS:
You need to run the following Powershell command from the ADFS server to enable RelayState for IdP-Initiated SSO:
Set-AdfsProperties -EnableRelayStateForIdpInitiatedSignOn $TrueTo see the current status of EnableRelayStateForIdpInitiatedSignOn, you can use:
Get-adfsproperties | select RelayStateForIdpInitiatedSignOnEnabled -
Building the URL required at the ADFS sign on page:
In addition, RelayState requires an encoded URL for the IdP-initiated login. To generate this encoded URL, you can use an ADFS RelayState generator tool such as https://jackstromberg.com/adfs-relay-state-generator/ using the following URLs:
-
IdP URL String: https://<FQDN>/adfs/ls/IdPInitiatedSignon.aspx with <FQDN> the fully qualified domain name (FQDN) host name of your ADFS server.
-
Relying Party Identifier: https://sso.common.cloud.hpe.com
-
For Relay State, you can use different URL depending on your needs:
- https://common.cloud.hpe.com if you want to get to the HPE GreenLake home page.
- Any HPE GreenLake application such as https://us-west2.compute.cloud.hpe.com if you want for example get to the US-West Compute Ops Management home page.
If you use https://us-west2.compute.cloud.hpe.com as the RelayState, after logging on, you will be redirected to the home page of Compute Ops Management.
It is not recommended to use an application RelayState if you have more than one application on the HPE GreenLake platform.
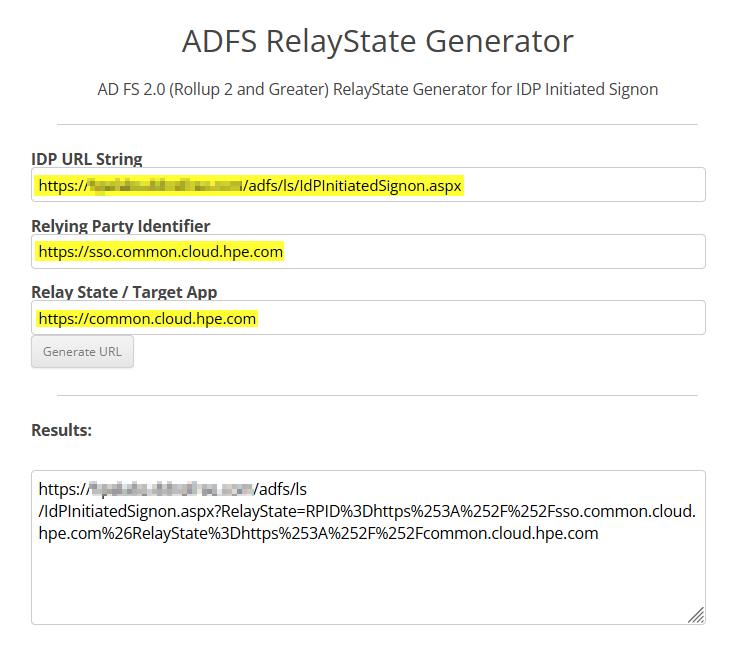
Your encoded URL will then look like:
https://<FQDN>/adfs/ls/IdPInitiatedSignon.aspx?RelayState=RPID%3Dhttps%253A%252F%252Fsso.common.cloud.hpe.com%26RelayState%3Dhttps%253A%252F%252Fcommon.cloud.hpe.com%252FLater, in the Testing step 3: IdP-Initiated test authentication section, you’ll test your IdP-initiated SSO settings.
-
Step 8: HPE GreenLake configuration for SAML federation
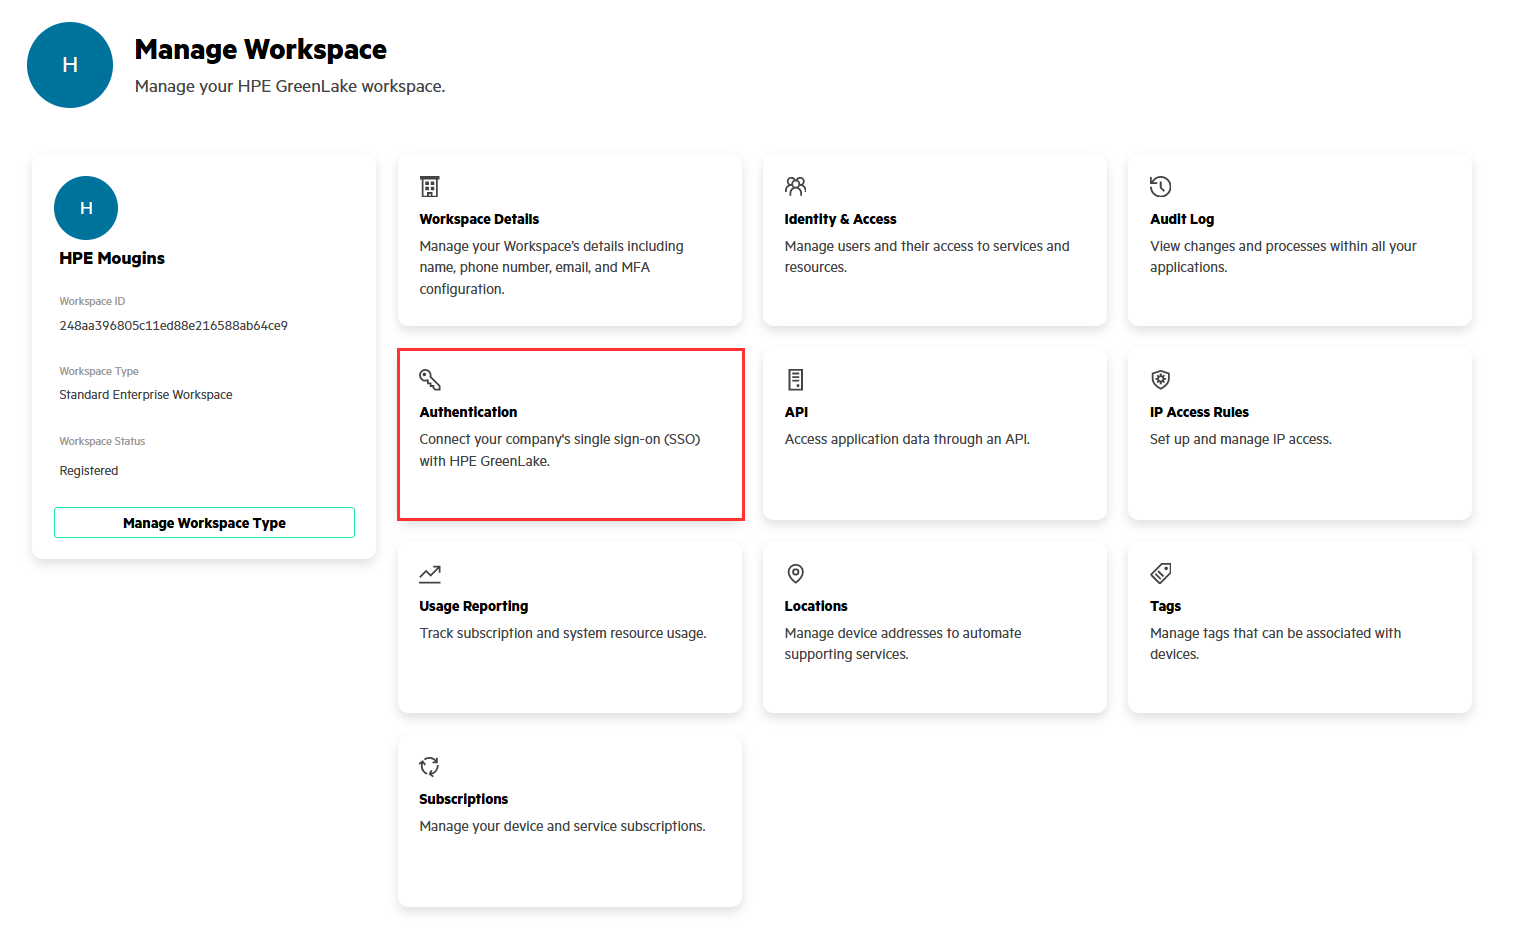
Now it’s time to configure your HPE GreenLake environment for SAML SSO authentication. Log in to your HPE GreenLake workspace using your AD administrative user account (i.e. lionel@<your_domain_name.com> created above).
Then go to Manage / Authentication
Important note: If you have several workspaces defined on the platform and wish to configure SAML SSO for each of them, you need to run this SAML configuration procedure on each workspace.
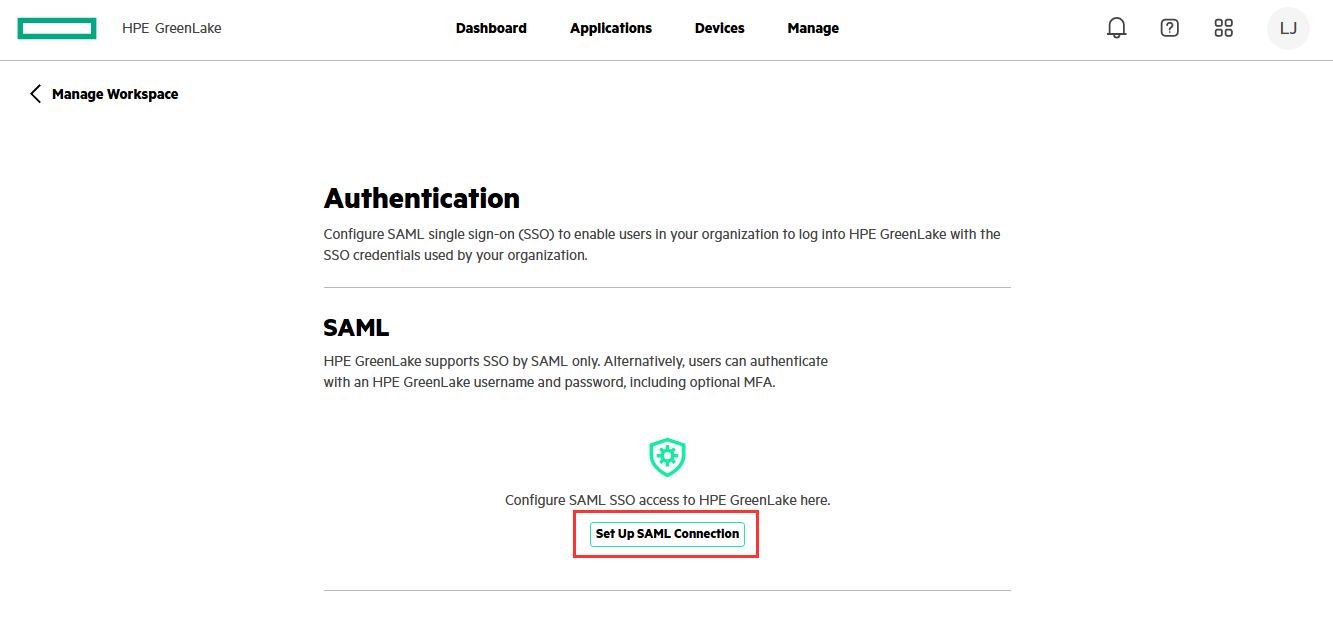
Click on Set Up SAML Connection to set up your workspace for SAML.
Enter your domain name:
On the next page, you need to decide how to configure SSO authentication based on whether you choose session-based or static local authorization:
-
Static Local Authorization: This method involves managing user access directly within the HPE GreenLake platform by the workspace administrator. User roles and access permissions are assigned and maintained locally, independent of the SSO session duration.
-
Session-Based Authorization: This method relies on the Identity Provider (IdP, i.e., ADFS) to manage user access through SAML attributes. User access is valid only for the duration of the SSO session, and changes to access must be made by updating these attributes in the IdP.
The key difference is where and how user access is managed. Session-based authorization is dynamic and managed externally by the IdP for the duration of the session, while static local authorization is managed locally within the platform and remains consistent regardless of session state.
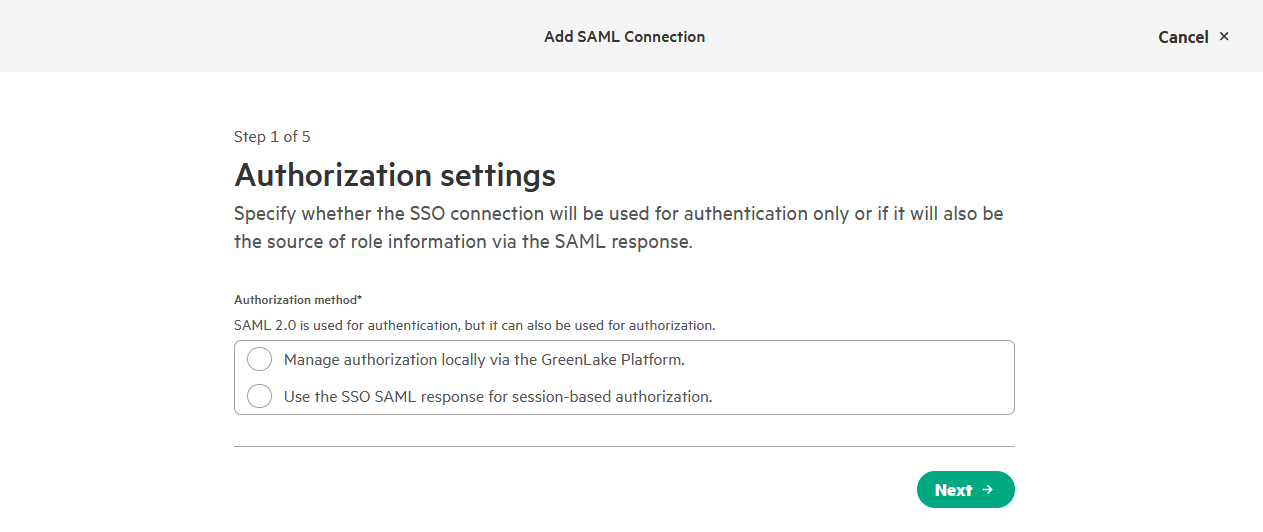
-
If you choose Static Local authorization, select Manage authorization locally via the GreenLake Platform in the wizard. You will then skip the Building hpe_ccs_attribute value section. The workspace administrator manages user access and assigns roles directly in HPE GreenLake under Manage Workspace / Workspace identity & access / Roles & Permissions.
-
If you choose Session-based authorization, select Use the SSO SAML response for session-based authorization in the wizard. Here, the IdP administrator creates users and configures their access to HPE GreenLake workspaces and roles through a SAML attribute (default: hpe_ccs_attribute). This will be configured later in the Building hpe_ccs_attribute value section.
Once selected, press Next.
Then select the Metadata File method and upload the Federation Metadata XML file ADFS_federation_metadata.ping.xml from the previous section.
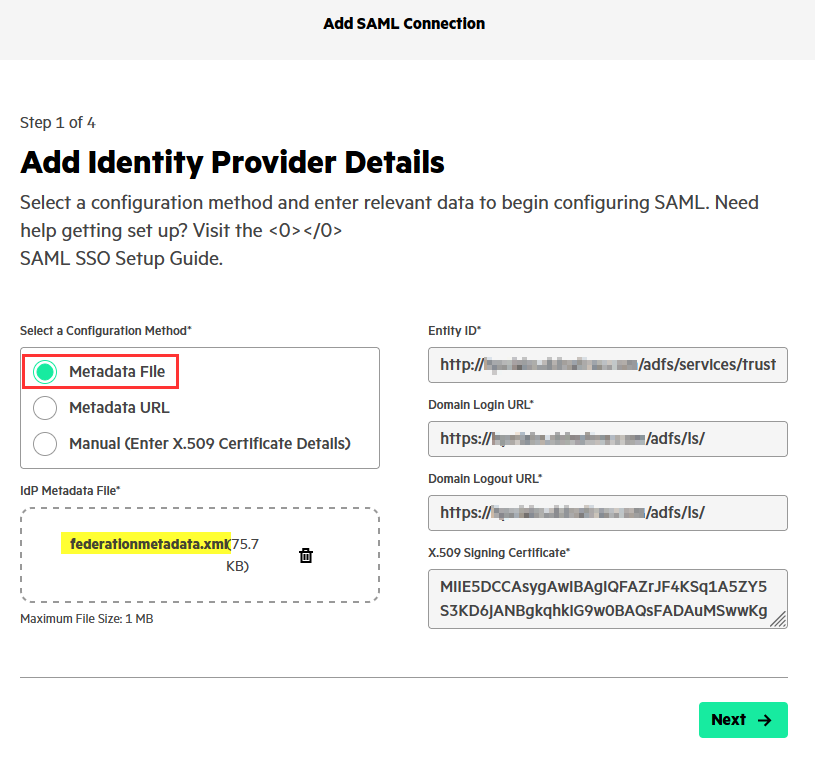
Another method you can use is the Metadata URL. The default URL for ADFS is
https://<domainName>/federationmetadata/2007-06/federationmetadata.xml.
The next screen displays the default SAML mapping attributes.
SAML mapping attributes are used to map user information from the identity provider (IdP, i.e., ADFS) to the service provider (SP, i.e., HPE GreenLake) during the SAML authentication process. These attributes define how user data, such as email, name, and roles, are transferred and interpreted between the IdP and SP to ensure proper user identification and access control. You can keep all the proposed default values:
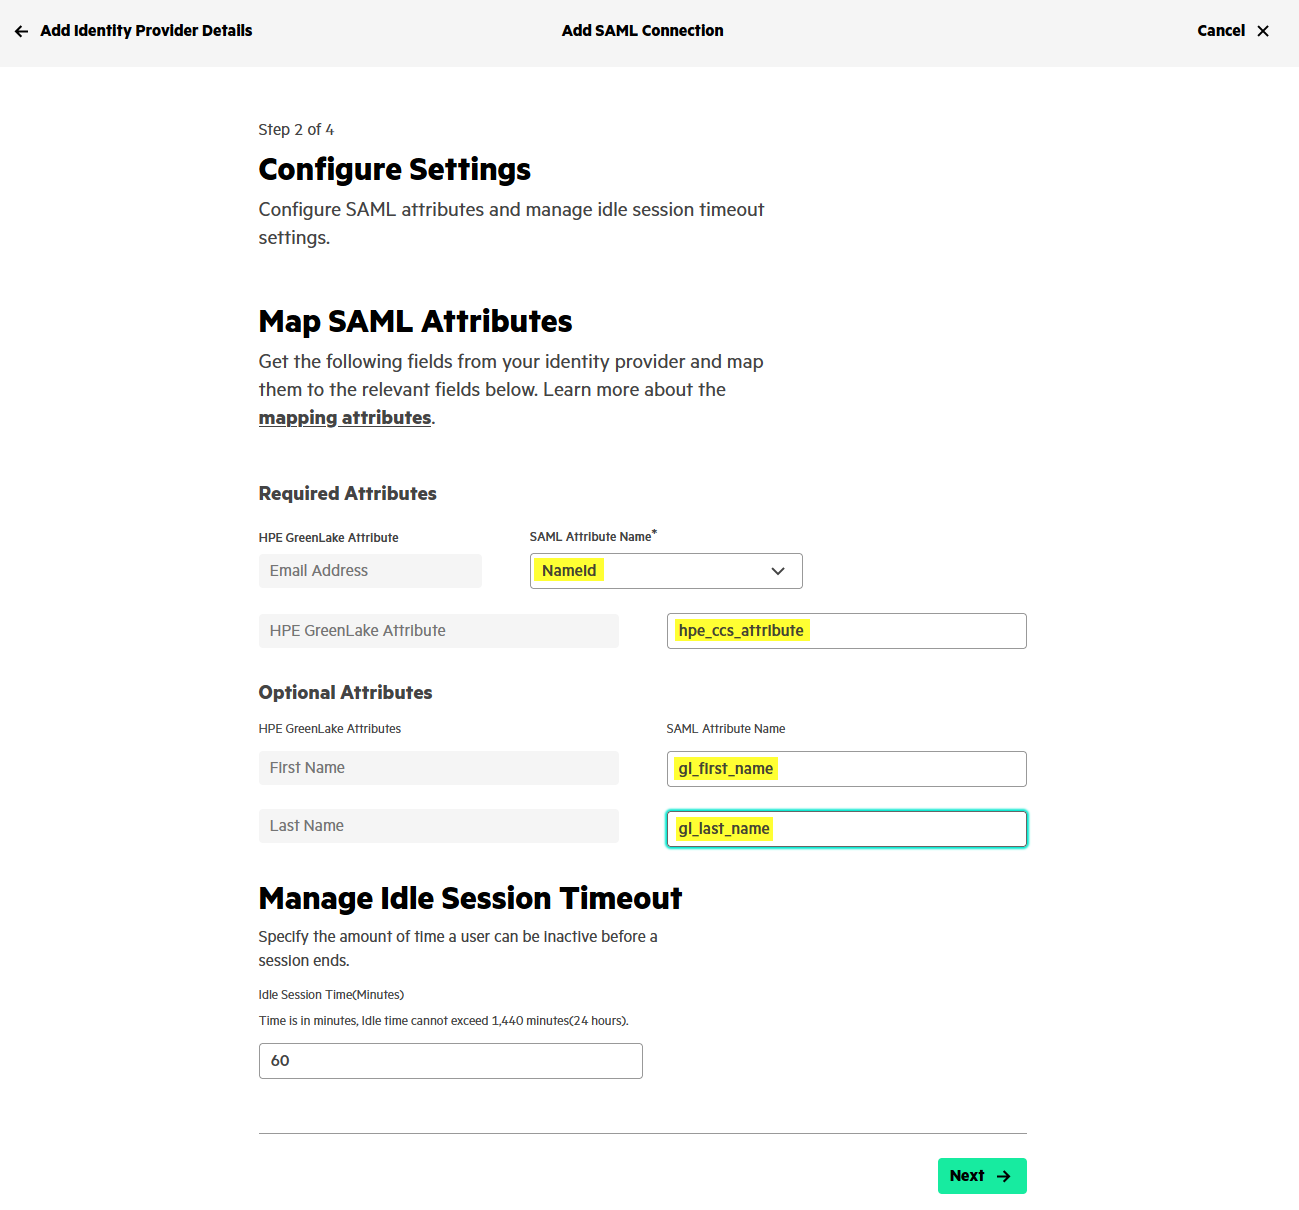
NameID is used to identify the user. This is typically a unique identifier, such as a username or email address. For HPE GreenLake, the platform uses the email address to identify a user.
hpe_ccs_attribute is a mandatory attribute available only with session-based authorization. It represents the user’s roles and permissions. For example, a user might have the role of “administrator” or “observer” in the HPE GreenLake platform for certain applications in different workspaces.
The first and last name are optional attributes, but it is recommended to keep the default values. If they are not defined, users in the HPE GreenLake user account details will appear with Unknown as their first and last names.
The SAML idle session timeout can be changed to a different time. 60 minutes is the default time a user can be inactive before the session ends.
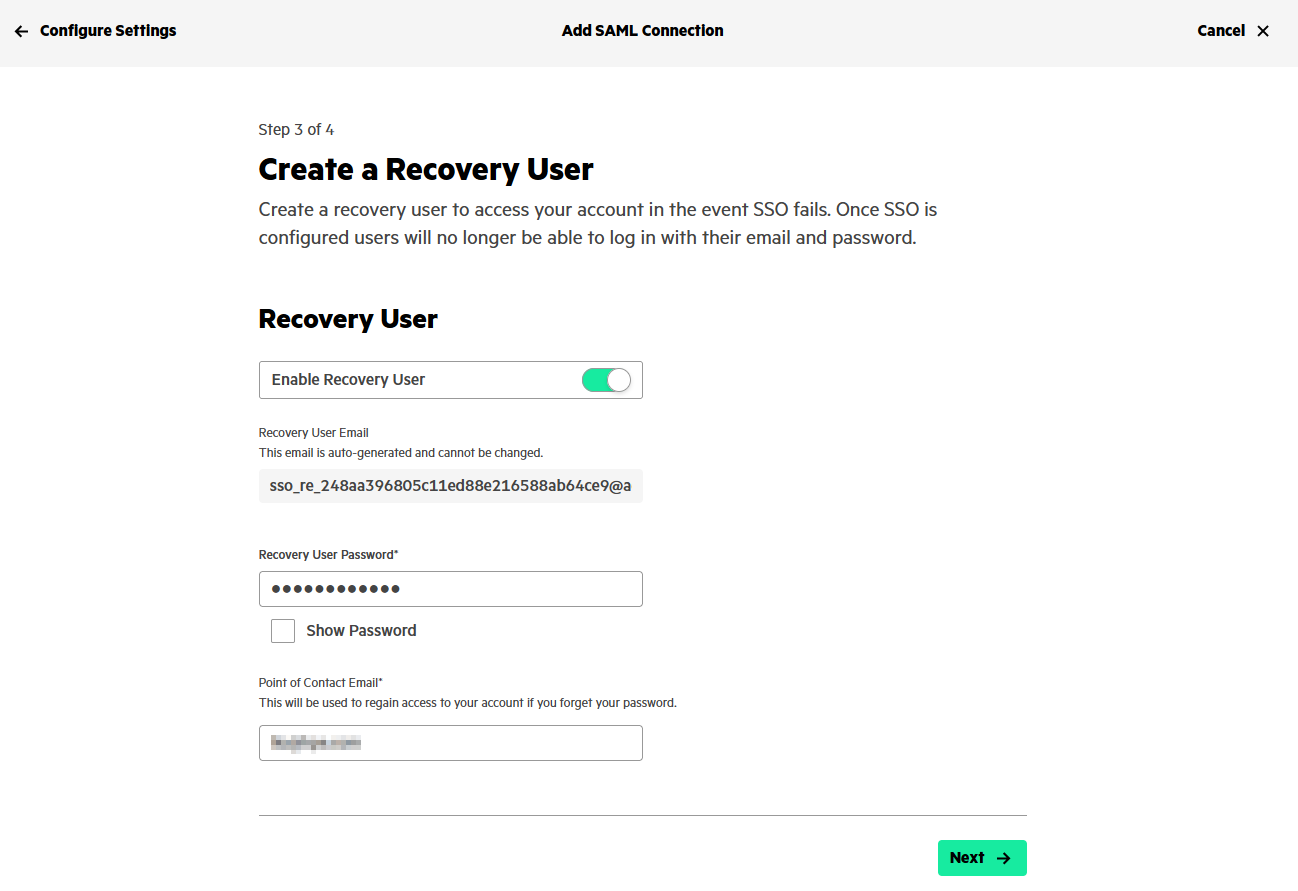
In the next screen, you can create a recovery user. A recovery user is needed to access to the HPE GreenLake workspace in the event of SSO failure because once SSO is configured, all users belonging to this SSO domain will no longer be able to log in with their email and password.
The recovery user email is auto generated and you cannot change it. It uses the template sso_re_<workspace_ID>@<domainName>, e.g., sso_re_1234562ff0317711ec9bc096872580fd6d@yourdomain.com.
Keep the Enable Recovery User option to enable and enter a password for the recovery user. It must have atleast 8 characters and include upper-case, lower-case, number and symbol. Copy and store the recovery user details in a safe place.
Validate the settings are correct:
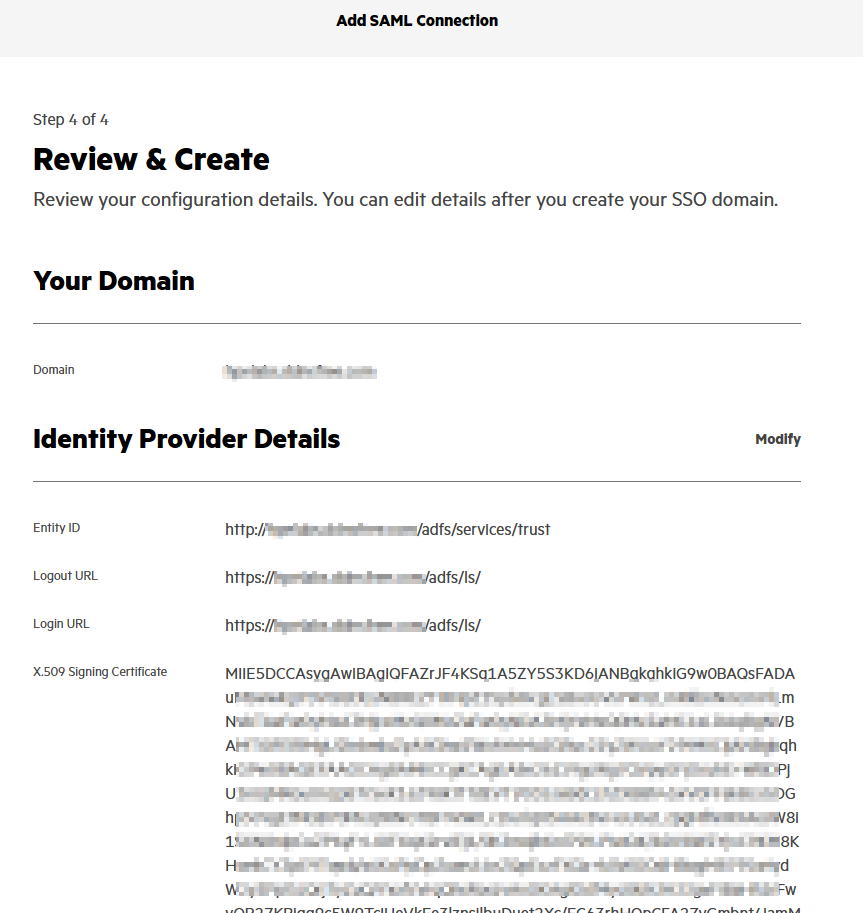
Then click on Finish to save the configuration.
Once the SSO domain configuration is completed, only users who log in to the HPE GreenLake platform using the SSO credentials for that domain can access the workspace. For example, if SSO is configured for the domain acme.com, only users with an acme.com email address can access the workspace. Users with existing HPE GreenLake platform usernames and passwords will not be able to access the SSO-enabled workspace if they log in using those credentials.
Finally click on Download Metadata File and save the file as HPE_GreenLake_federation_metadata.ping.xml.
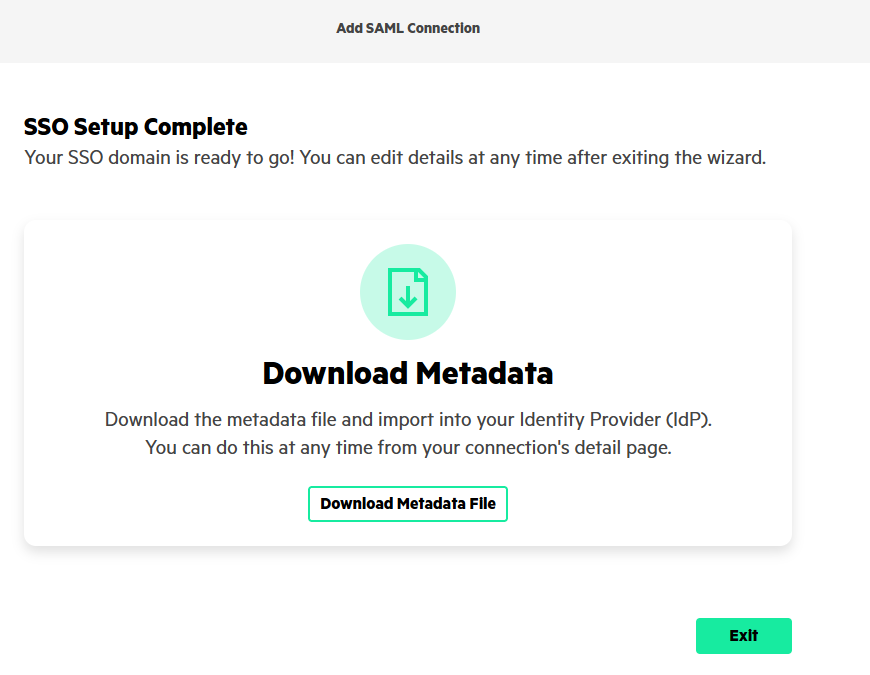
Alternatively, you can retrieve the HPE GreenLake metadata using the HPECOMCmdlets PowerShell module with the following command:
Get-HPEGLWorkspaceSAMLSSODomain -DomainName your_domain_name -DownloadServiceProviderMetadata metadata.xml
If you configure SAML Federation for more than one workspace, it is not necessary to save this file for each workspace, as only one workspace metadata file is required.
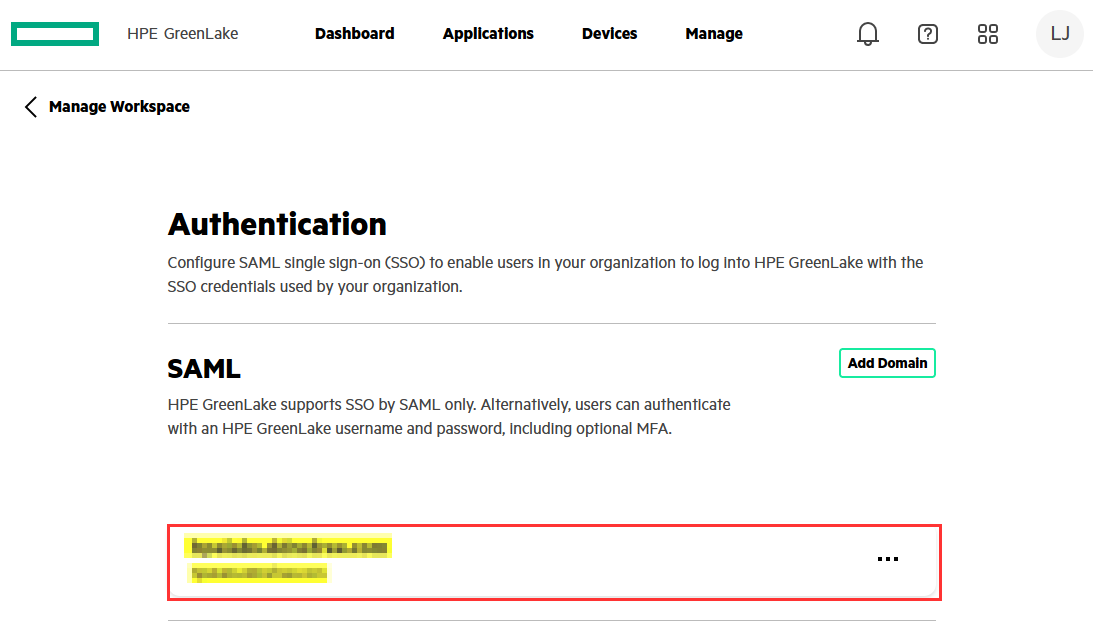
You should now have a new SAML configuration available on your Authentication page:
If you want to support multiple workspaces in HPE GreenLake with SSO, you must follow the same procedure for each HPE GreenLake workspace you want to support through SSO authentication. This means you need to rerun Step 4: Inviting an AD administrator user to HPE GreenLake and Step 8: HPE GreenLake configuration for SAML federation for each workspace.
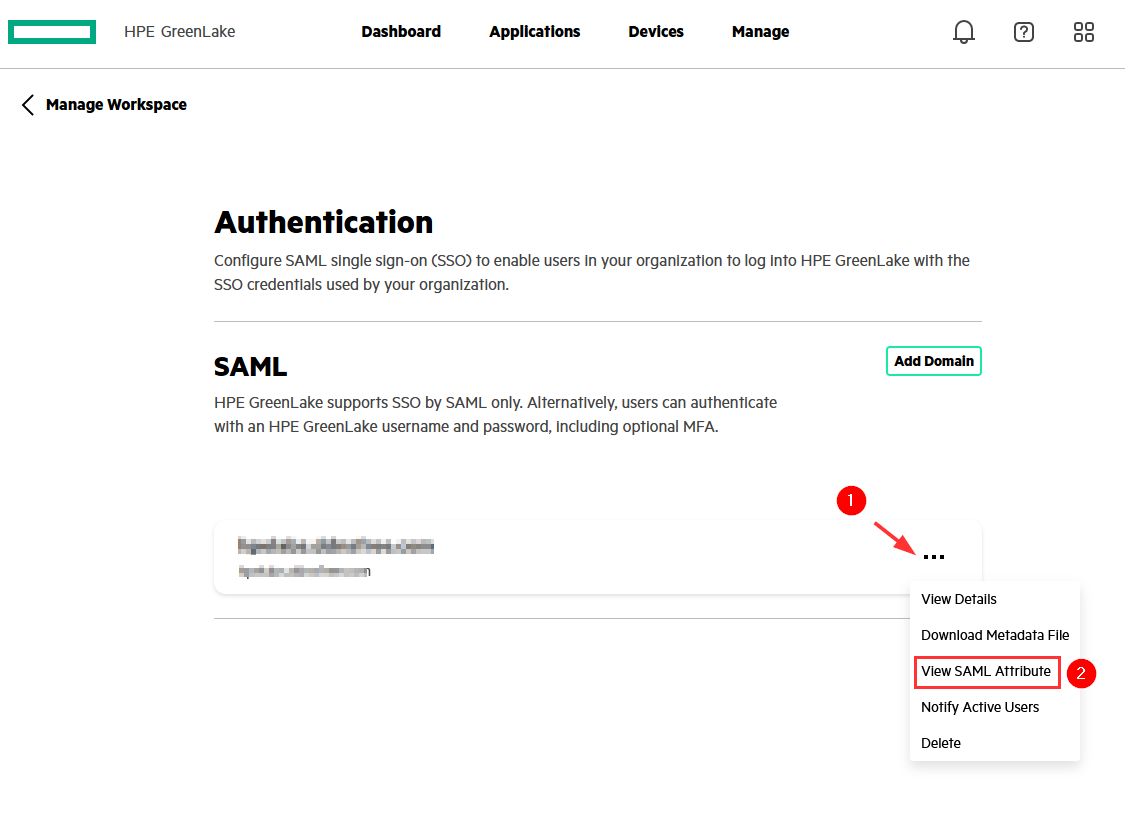
Step 9: Collecting the HPE GreenLake SAML attributes values
The SSO domain configuration in HPE GreenLake is now complete.
-
If you are using static local authorisation, you can skip this section.
-
If you are using session-based authorisation, you can access the various SAML attribute values required in step 10 to build the user’s roles and permissions using the hpe_ccs_attribute as part of the group membership claim rules in ADFS. Click the ellipsis of your SAML SSO configuration and select View SAML Attribute to display SAML attribute values:
Alternatively, you can retrieve the SAML attribute values using the HPECOMCmdlets PowerShell module with the following command:
Get-HPEGLWorkspaceSAMLSSODomain -DomainName your_domain_name -ShowSAMLAttributes
You must record:
-
The HPE GreenLake platform Customer ID for each workspace you own
This name is misleading, but it represents the workspace ID, which is therefore unique for each workspace
-
The ID of each application you wish to access from your AD users. Note that the HPE GreenLake platform ID is always 00000000-0000-0000-0000-000000000000
These application IDs are identical for all workspaces.

-
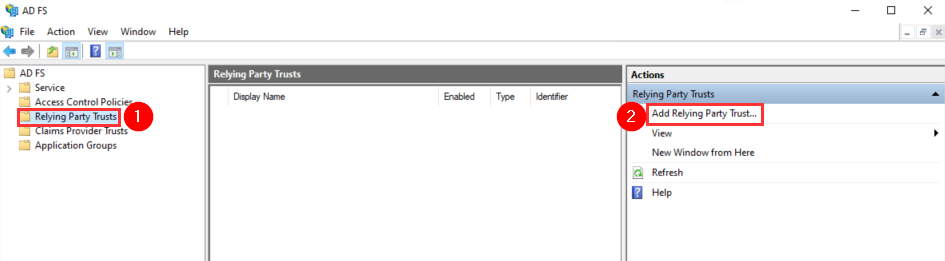
Step 10: Adding HPE GreenLake as an ADFS relying party trust
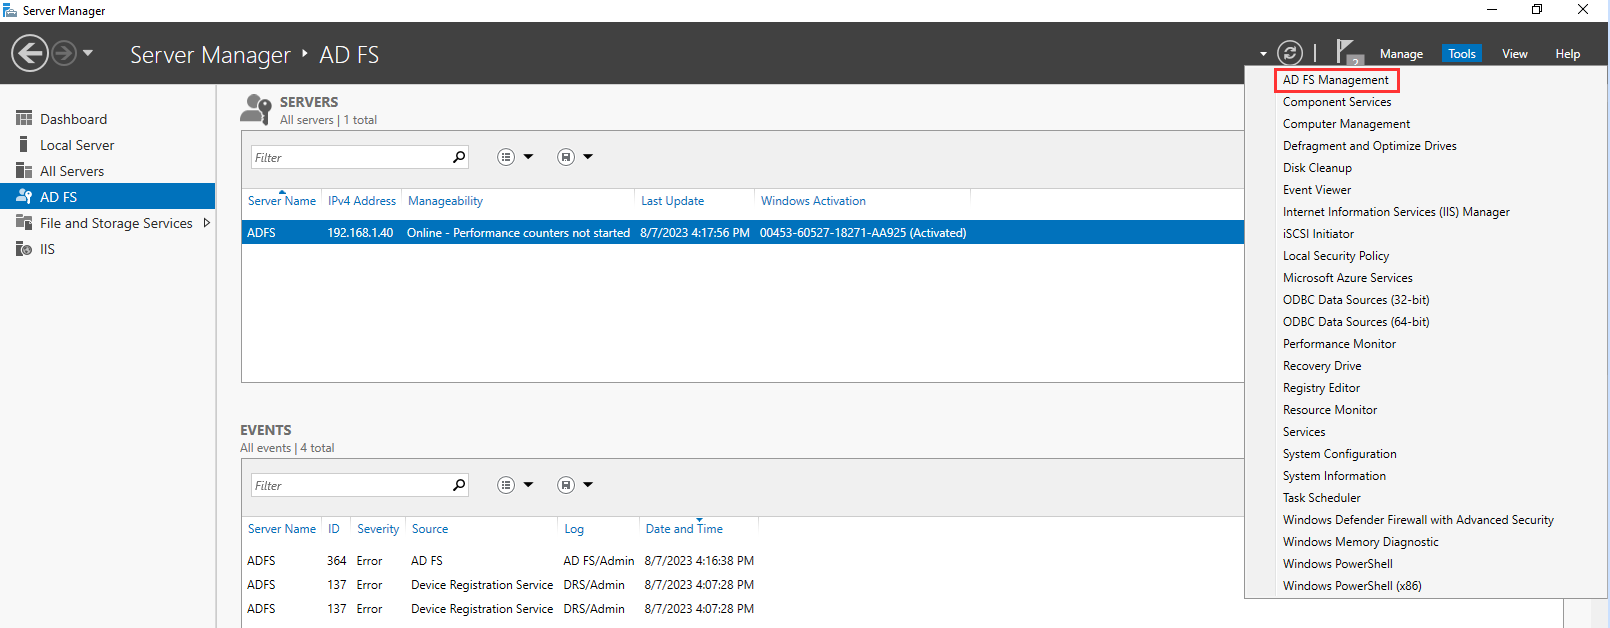
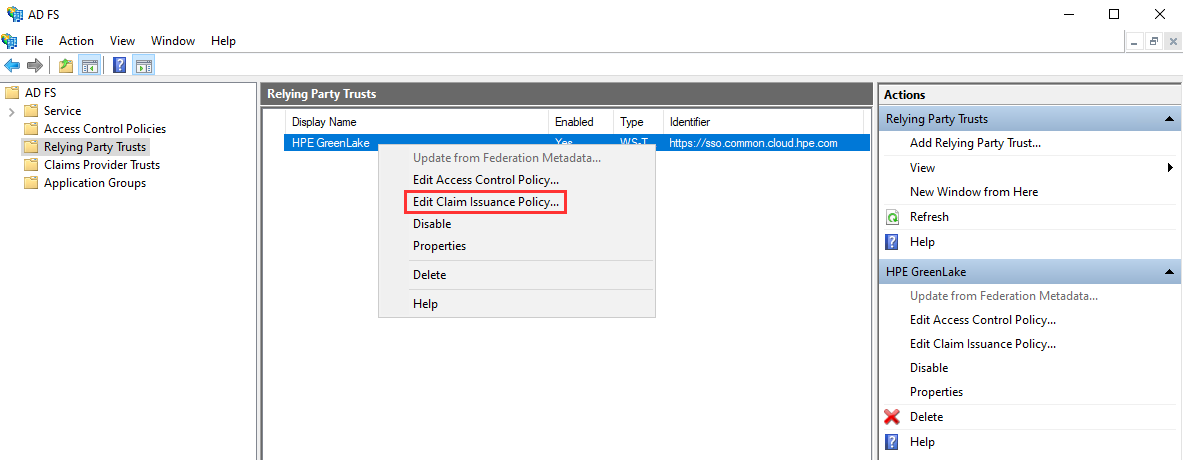
The next step involves configuring HPE GreenLake as a relying party trust in ADFS. Open the AD FS Management console:
And click on the Add Relying Party Trust actions from the Relying Party Trusts folder:
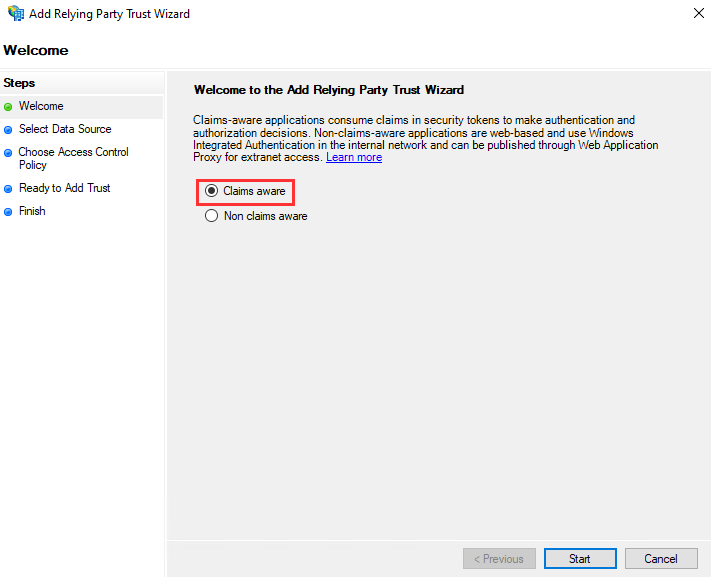
One the welcome page, select Claims aware:
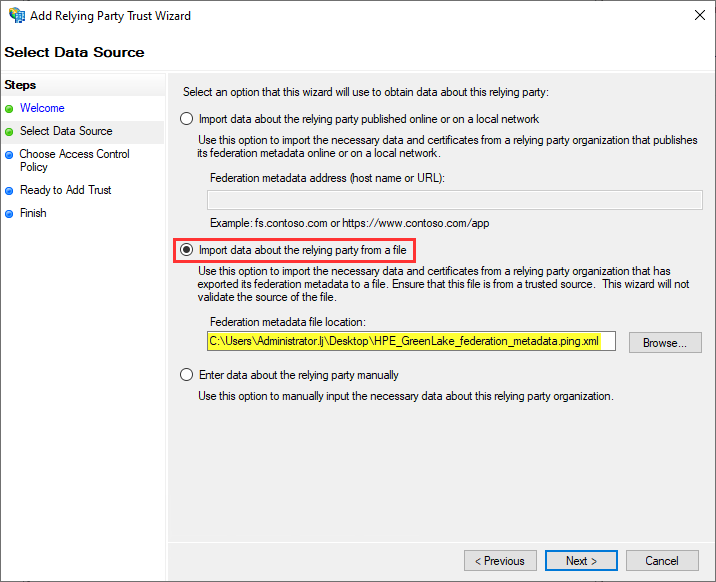
Select Import data about relying party from a file and provide the location of the HPE_GreenLake_federation_metadata.ping.xml file downloaded a the end of step 6.
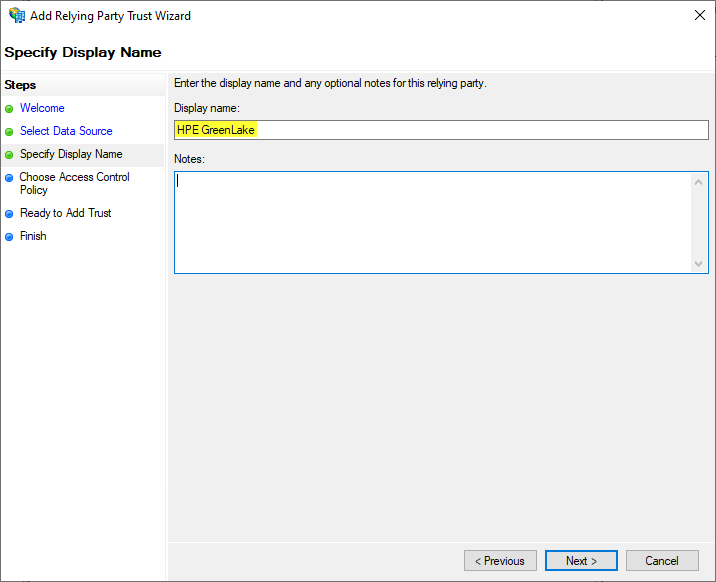
Enter a name for the relying party such as HPE GreenLake:
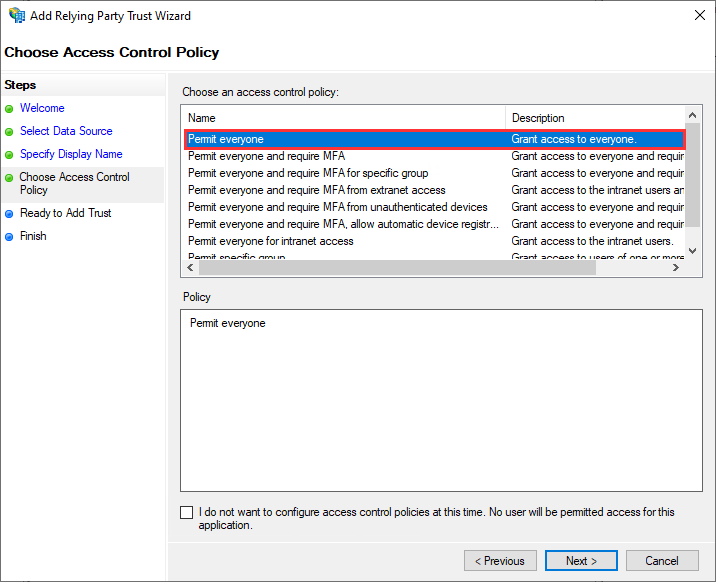
Then select Permit everyone:
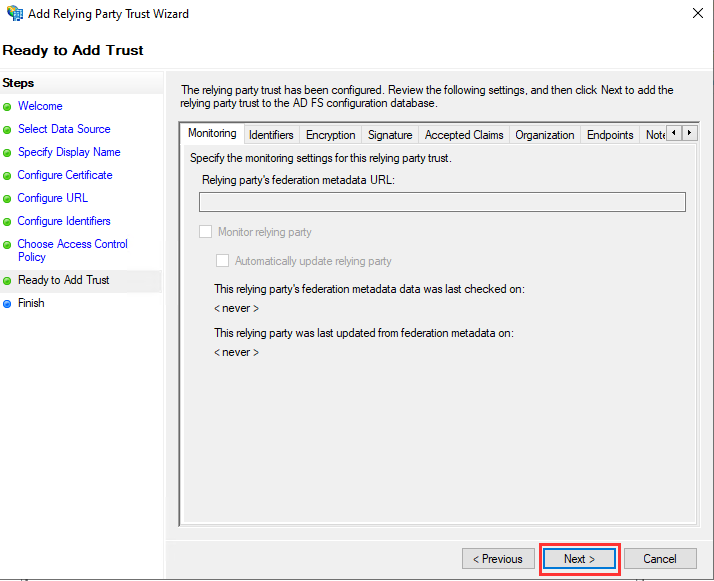
Click Next:
Then click Close.
LDAP Attributes Mappings
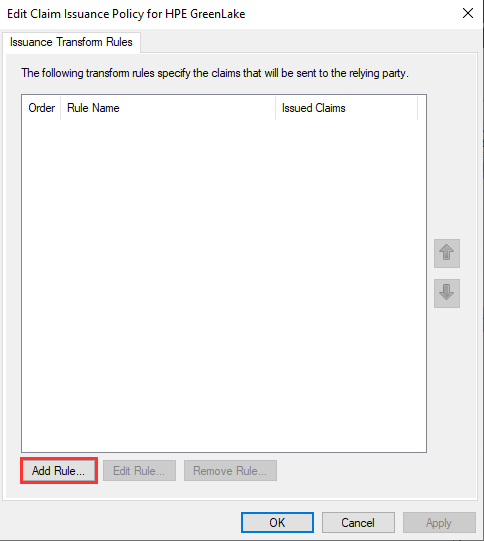
Once the HPE GreenLake relying party has been created, you’ll need to create the claim issuance policies, right click on HPE GreenLake and select Edit Claim Issuance Policy:
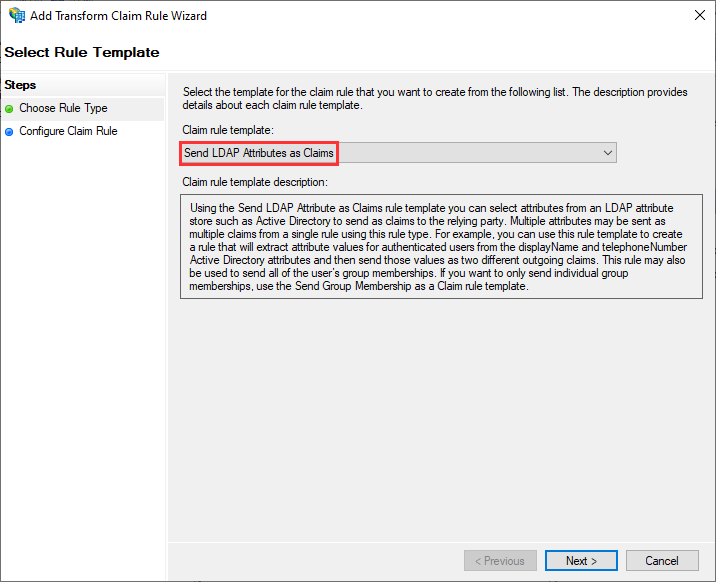
The first step required for SAML authentication with HPE GreenLake is the definition of the mapping, known as a Send LDAP Attributes as Claims rule in ADFS, which defines the mapping between the various LDAP attributes (e.g. first name, last name, e-mail-addresses) and the outgoing claim types supported by HPE GreenLake (e.g. name, e-mail address, optional attributes, etc.).
To create this rule, click Add Rule:
Then select Send LDAP Attributes as Claims:
Enter a name such as Send LDAP Attributes as Claims and select Active Directory for Attribute store.
Then, enter the following mapping of LDAP attributes to HPE GreenLake attributes:
| LDAP Attribute | Outgoing Claim Type |
|---|---|
| E-Mail-Addresses | Name ID |
| Give-Name | FirstName |
| Surname | LastName |
The rule should look like the following:
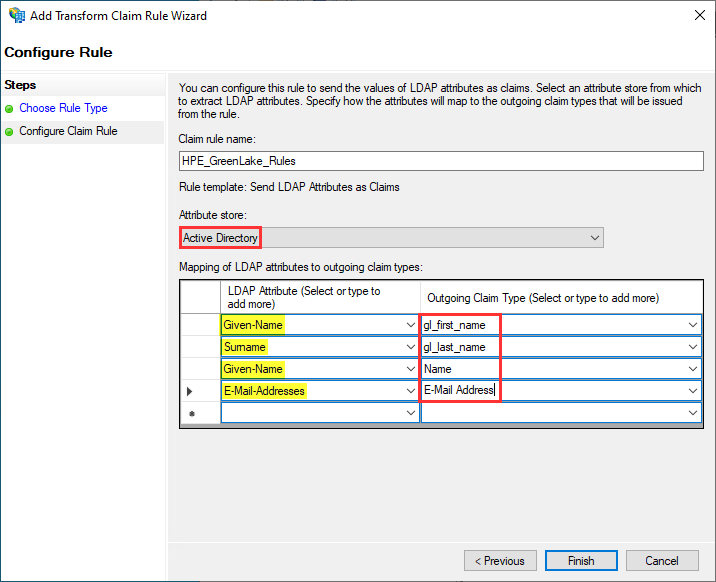
These settings should match the SAML attributes set in the HPE GreenLake SAML configuration at step 8.
Then click OK to save this new rule.
Roles and permission attribute
The next step is to define roles and permissions using the hpe_ccs_attribute attribute used by HPE GreenLake.
If you are using static local authorization, you can skip this section as hpe_ccs_attribute is only used with session-based authorization.
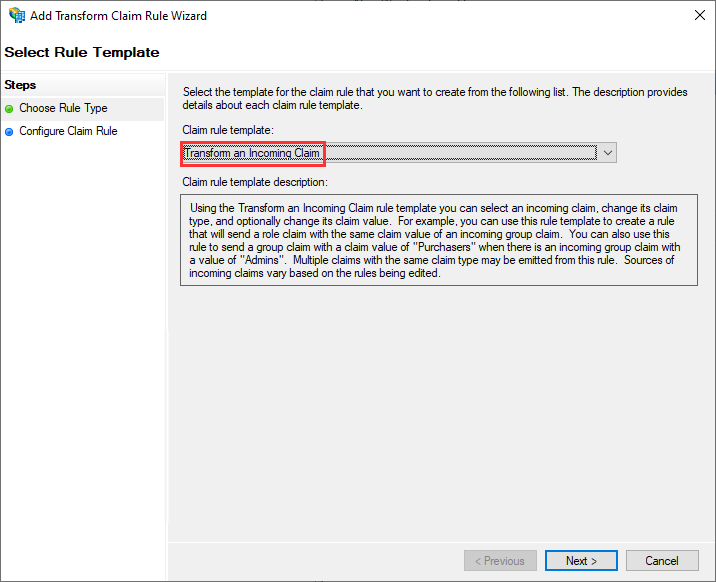
Other rules must be defined to create user roles mapping rules for the various HPE GreenLake applications with an existing Active Directory security group (e.g., GLCP-Admins created earlier in step 3). This will allow you to define, for example, that the GLCP-Admins group will have administrator rights for both the GreenLake application and the Compute Ops Management application, while the GLCP-Observers group will have read-only roles for both.
To create the first rule for the administrators, click on Add Rule again, but this time select Send Group Membership as a Claim as the template:
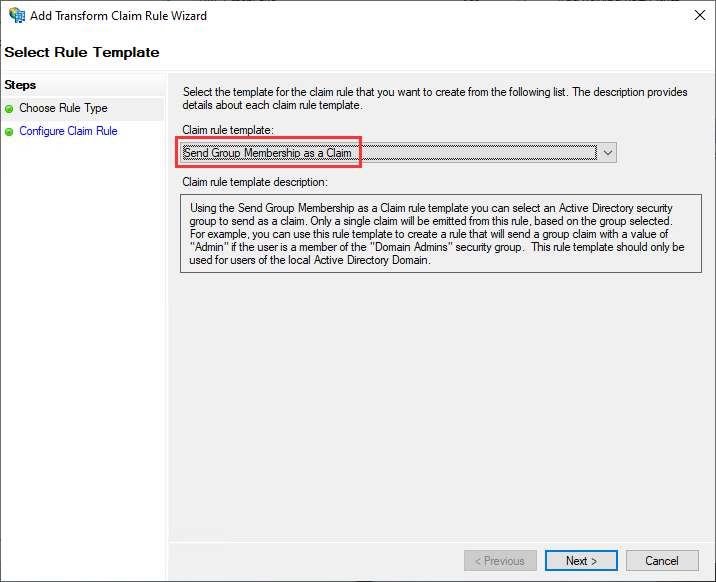
On the next screen:
-
Enter a rule name such as GLP_Admins_group
-
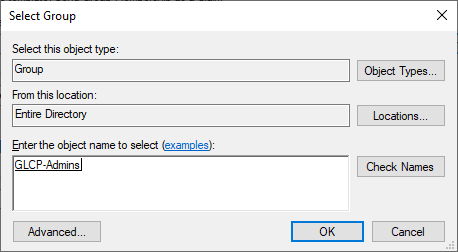
Select the Active Directory group GLCP-Admins for User’s group:
-
For the Outgoing claim type, enter hpe_ccs_attribute:
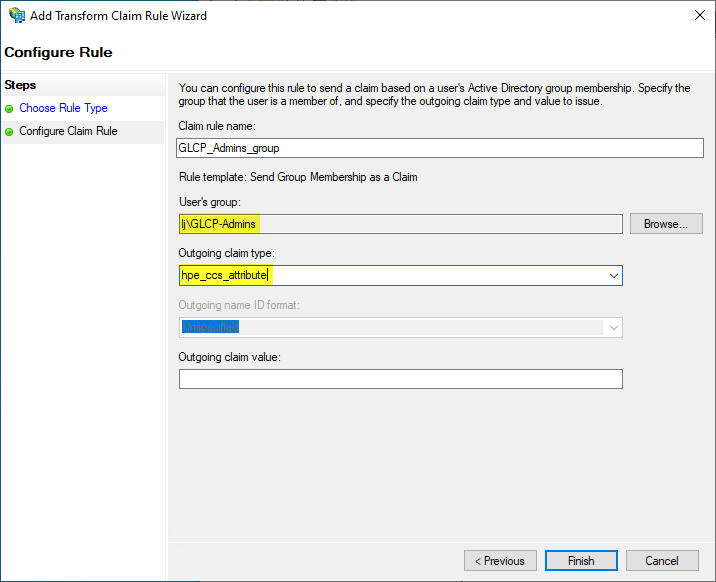
This name should match the HPE GreenLake Attribute sets in the HPE GreenLake SAML configuration at step 8.
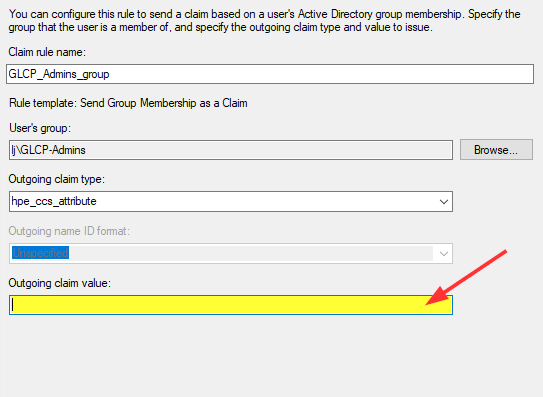
Building hpe_ccs_attribute value
For the Outgoing claim value, there is a special SAML format that must be used to define the HPE GreenLake platform’s roles and permissions using hpe_ccs_attribute.
It must comply with the following SAML attribute format:
version_1#{workspace_id}:{application_id}:{role_name}:{resource_restriction_policy_name}SAML Syntax
| Syntax | Description |
|---|---|
| workspace_id | Workspace ID found in Manage tab. If you have several workspaces, define the attributes separately for each workspace ID with a hash (#) delimiter. |
| application_id | Application ID found in Manage / Authentication / … / View SAML Attributes. If you have several applications, define the attributes separately for each application ID with a colon (:) delimiter. |
| role_name | Role name (or access level) for a particular application ID. Defines the user’s roles. Role names are found in Manage / Identity & Access / Roles & Permissions. |
| resource_restriction_policy_name | Resource restriction policy name (RRP). Defines the user’s permissions. When a RRP is specified, the user can only manage the devices in that RRP group and can read-only all other resources. RRPs are found in Manage / Identity & Access / Resource Restriction Policies. If not defined, then by default resource_restriction_policy_name is set to ALL_SCOPES which means you are not restricted by a resource restriction policy. |
-
With several applications, you can define each application ID with a colon (:) delimiter, such as:
version_1#{workspace_id}:{application_id_1}:{role_name}:{resource_restriction_policy_name}:{application_id_2}:{role_name}:{resource_restriction_policy_name} -
With several workspaces, you can define each workspace ID with a hash (#) delimiter, such as:
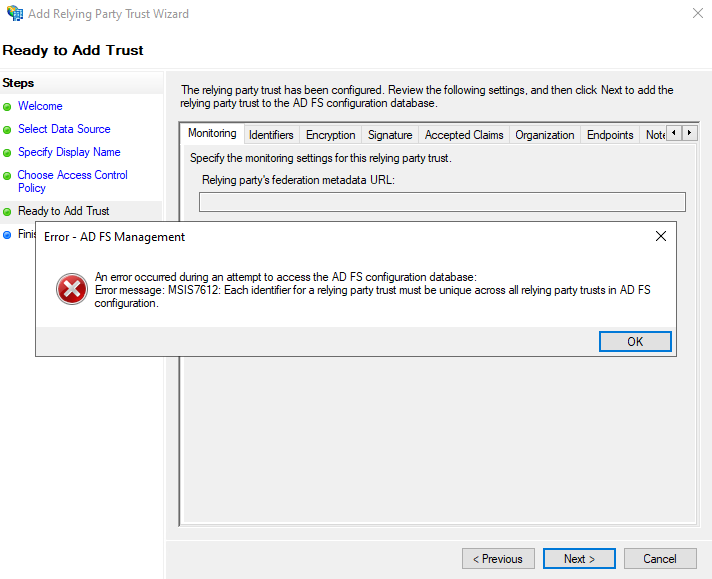
version_1#{workspace_id_1}:{application_id}:{role_name}:{resource_restriction_policy_name}#{workspace_id_2}:{application_id}:{role_name}:{resource_restriction_policy_name}With several workspaces, you don’t add another relying party trust in ADFS but instead you modify the existing one by adding an additional workspace definition in hpe_ccs_attribute.
Adding a relying party trust for an additional HPE GreenLake workspace in ADFS when one already exists, returns the following error message: “MSIS7612: Each identifier for a relying party trust must be unique across all relaying party trusts in AD FS configuration.”. So it is required to modify the existing HPE GreenLake relying party trust as indicated above.
-
With multiple workspaces and multiple applications:
version_1#{workspace_id_1}:{application_id_1}:{role_name}:{resource_restriction_policy_name}:{application_id_2}:{role_name}:{resource_restriction_policy_name}#{workspace_id_2}:{application_id_1}:{role_name}:{resource_restriction_policy_name}:{application_id_2}:{role_name}:{resource_restriction_policy_name}
Where can I find the different values of these fields?
To substitute your own custom value for {workspace_id} and {application_id}, refer to your workspace IDs and application IDs previously recorded in step 8 on the HPE GreenLake platform.
Then for:
-
{Role_name}: found in the HPE GreenLake interface in Manage / Identity & Access / Roles & Permissions.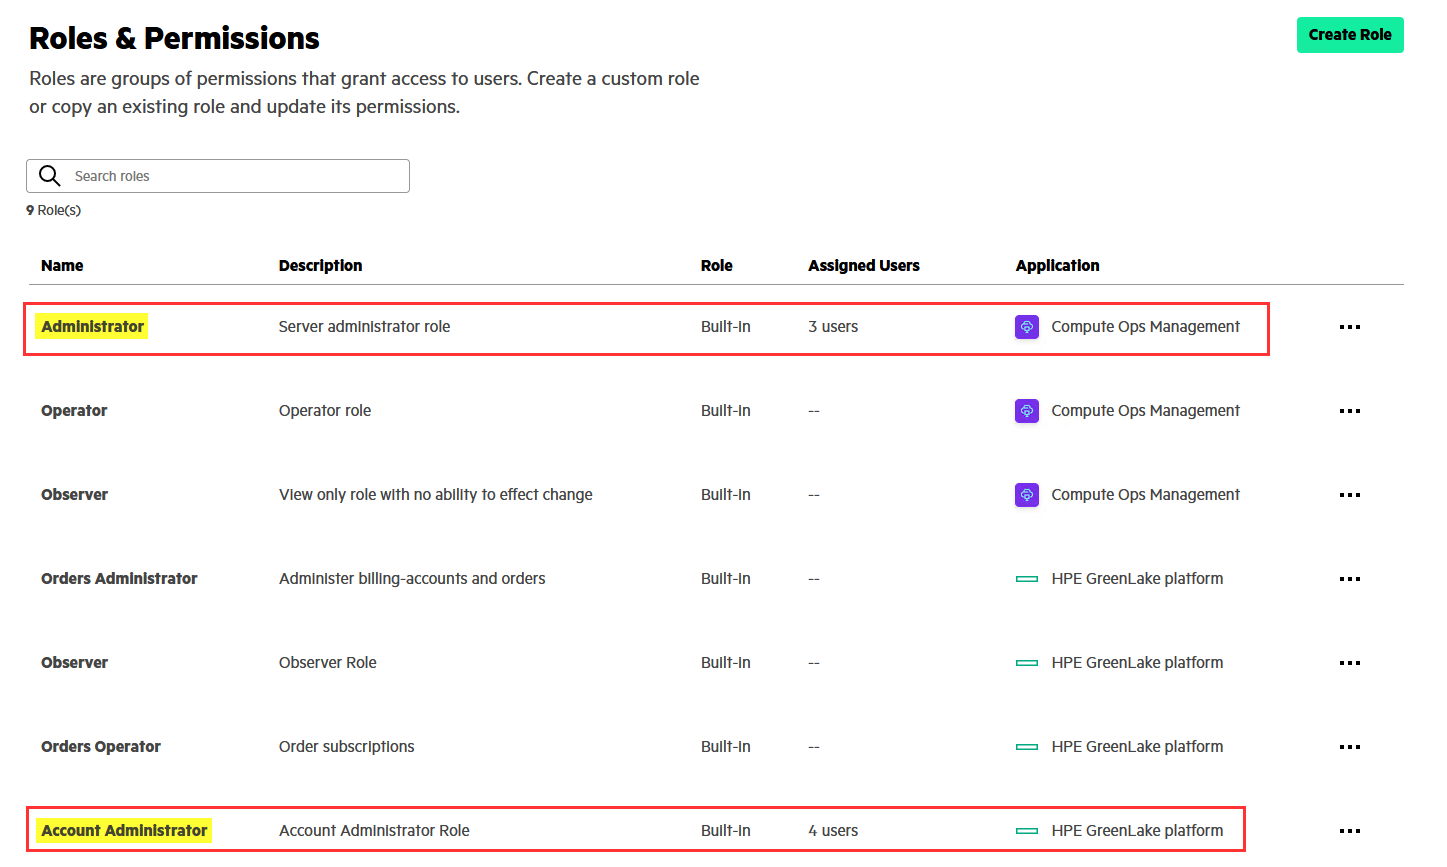
As illustrated above, the administrative role name for Compute Ops Management is Administrator but Account Administrator for the HPE GreenLake platform.
-
{resource_restriction_policy_name}: found in Manage / Identity & Access / Resource Restriction Policies.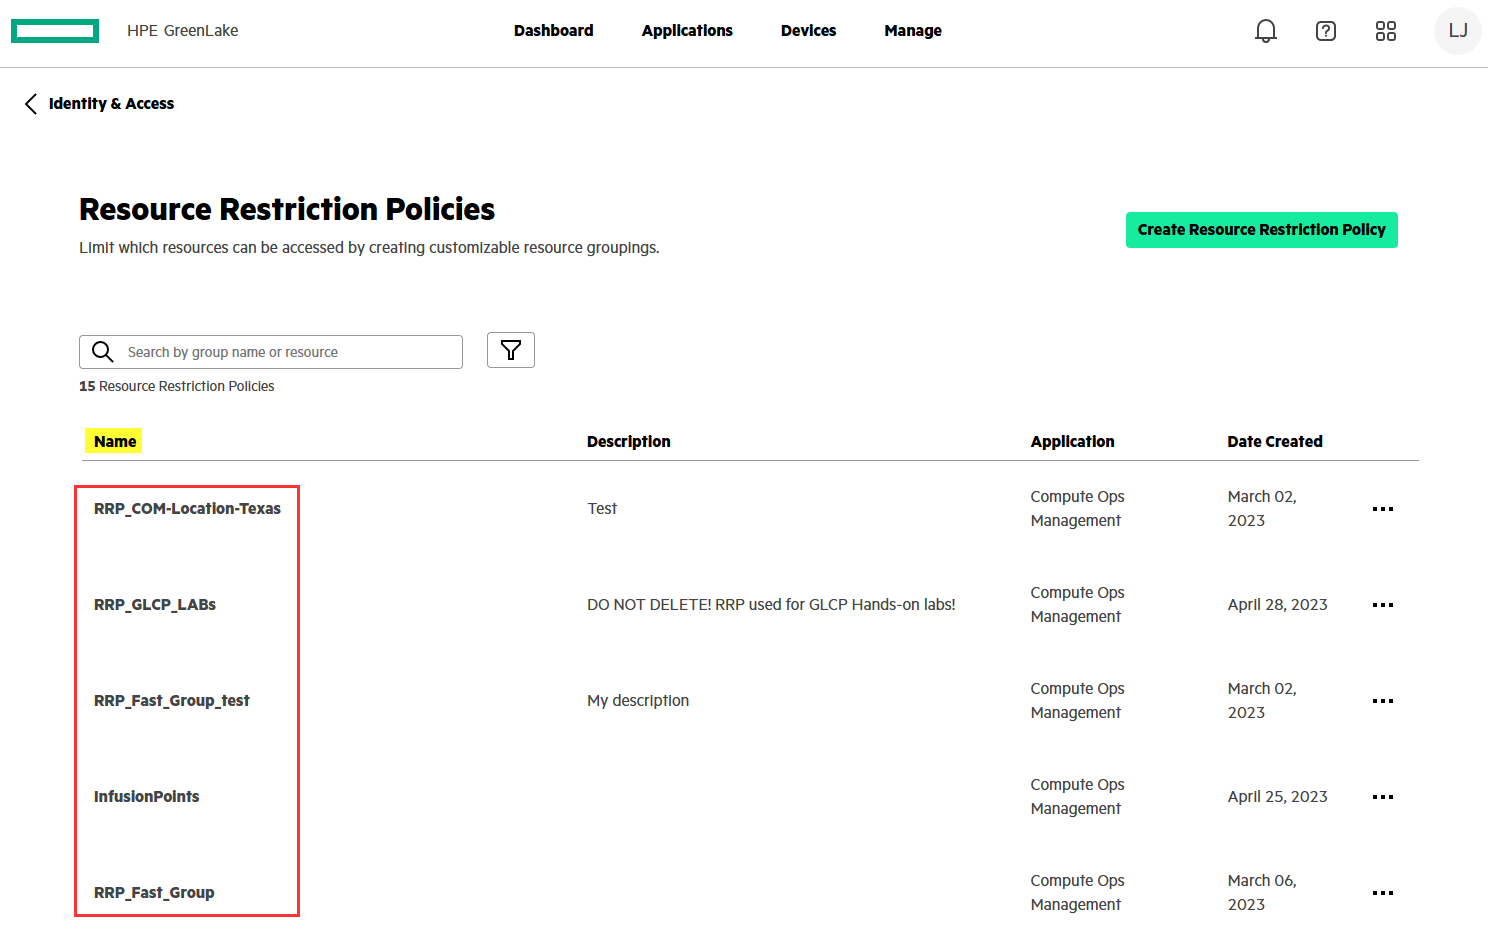
hpe_ccs_attribute examples
-
For one workspace and two applications (HPE GreenLake and Compute Ops Management) with administrative privileges:
version_1#248aa396805c11ed88e216588ab64ce9:00000000-0000-0000-0000-000000000000:Account Administrator:ALL_SCOPES:b394fa01-8858-4d73-8818-eadaf12eaf37:Administrator:ALL_SCOPES -
For two workspaces and two applications (HPE GreenLake and Compute Ops Management) with administrative privileges:
version_1#248aa396805c11ed88e216588ab64ce9:00000000-0000-0000-0000-000000000000:Account Administrator:ALL_SCOPES:b394fa01-8858-4d73-8818-eadaf12eaf37:Administrator:ALL_SCOPES#34652ff0317711ec9bc096872580fd6d:00000000-0000-0000-0000-000000000000:Account Administrator:ALL_SCOPES:b394fa01-8858-4d73-8818-eadaf12eaf37:Administrator:ALL_SCOPES -
For two workspaces and two applications (HPE GreenLake and Compute Ops Management) with read only privileges:
version_1#248aa396805c11ed88e216588ab64ce9:00000000-0000-0000-0000-000000000000:Observer:ALL_SCOPES:b394fa01-8858-4d73-8818-eadaf12eaf37:Observer:ALL_SCOPES#34652ff0317711ec9bc096872580fd6d:00000000-0000-0000-0000-000000000000:Observer:ALL_SCOPES:b394fa01-8858-4d73-8818-eadaf12eaf37:Observer:ALL_SCOPES -
For one workspace with Resource Restriction policy with Compute Ops Management with administrative privileges:
version_1#34652ff0317711ec9bc096872580fd6d:00000000-0000-0000-0000-000000000000:Observer:ALL_SCOPES:b394fa01-8858-4d73-8818-eadaf12eaf37:Administrator:ESX-Farm-Admins
To see more hpe_ccs_attribute examples, see SAML-SSO Appendix
For more information on how to build hpe_ccs_attribute, see HPE GreenLake SAML attributes
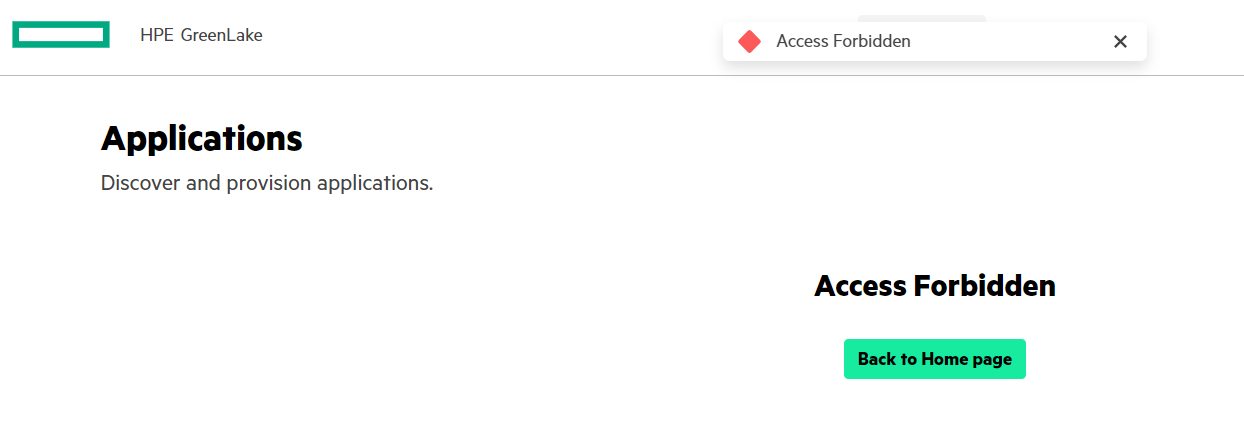
Important note: There seems to be a bug, because if you define a SAML HPE GreenLake attribute with a resource restriction policy name but without at least the HPE GreenLake observer role (i.e. 00000000-0000-0000-0000-00000000:Observer:ALL_SCOPES) you won’t have access to your applications.
The hpe_ccs_attribute value ‘version_1#34652ff0317711ec9bc096872580fd6d:b394fa01-8858-4d73-8818-eadaf12eaf37:Administrator:ESX-Farm-Admins’ will return the following error when accessing the application tab:
Once your have your own custom values for hpe_ccs_attribute, put the value in the Outgoing claim value field corresponding to the administrative privileges:

Then click Finish.
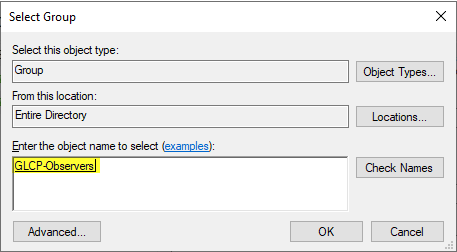
To create the second rule for the observers, click again on Add Rule and select again Send Group Membership as Claim as the template:
On the next screen:
-
Enter a rule name such as GLP_Observer_group
-
Select the AD group GLCP-Observers for User’s group:
-
For the Outgoing claim type, enter hpe_ccs_attribute

-
Enter your values in the Outgoing claim value field for the hpe_ccs_attribute corresponding to the read only privileges:
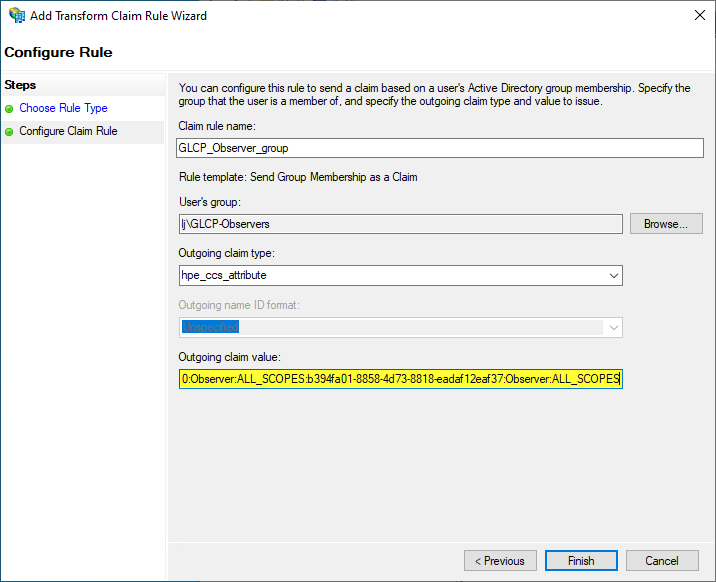
Finally, click Finish.
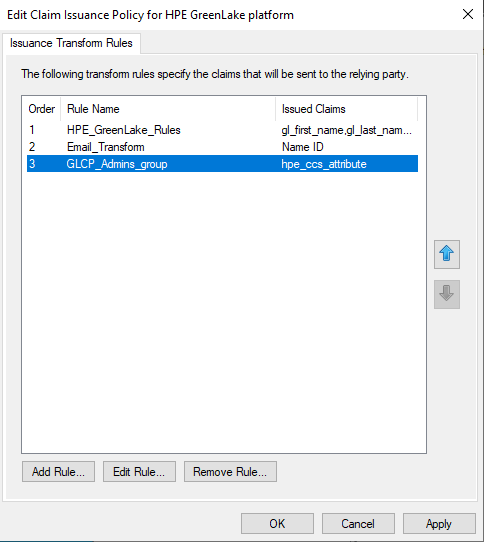
You should now have two group membership claim rules in ADFS: one for the administrative role and one for the read-only role:
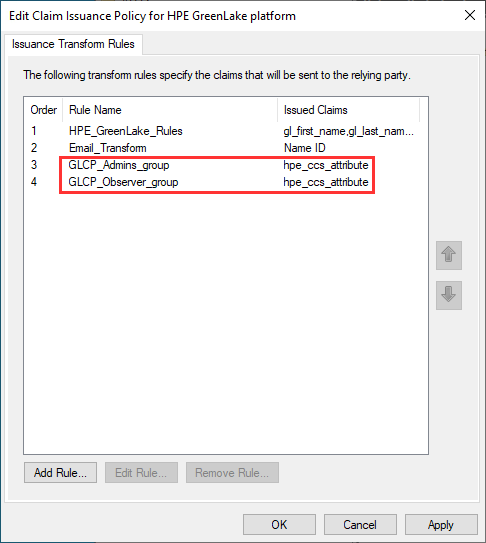
You can now click Ok to complete the claim issuance policy definition for HPE GreenLake.
Testing step 1: Testing the ADFS sign on page
Installation is now complete, you can start testing your configuration.
To test your ADFS sign on page, open a web browser, and go to https://<FQDN>/adfs/ls/IdPInitiatedSignon.aspx with <FQDN> the fully qualified domain name (FQDN) host name of your ADFS server.
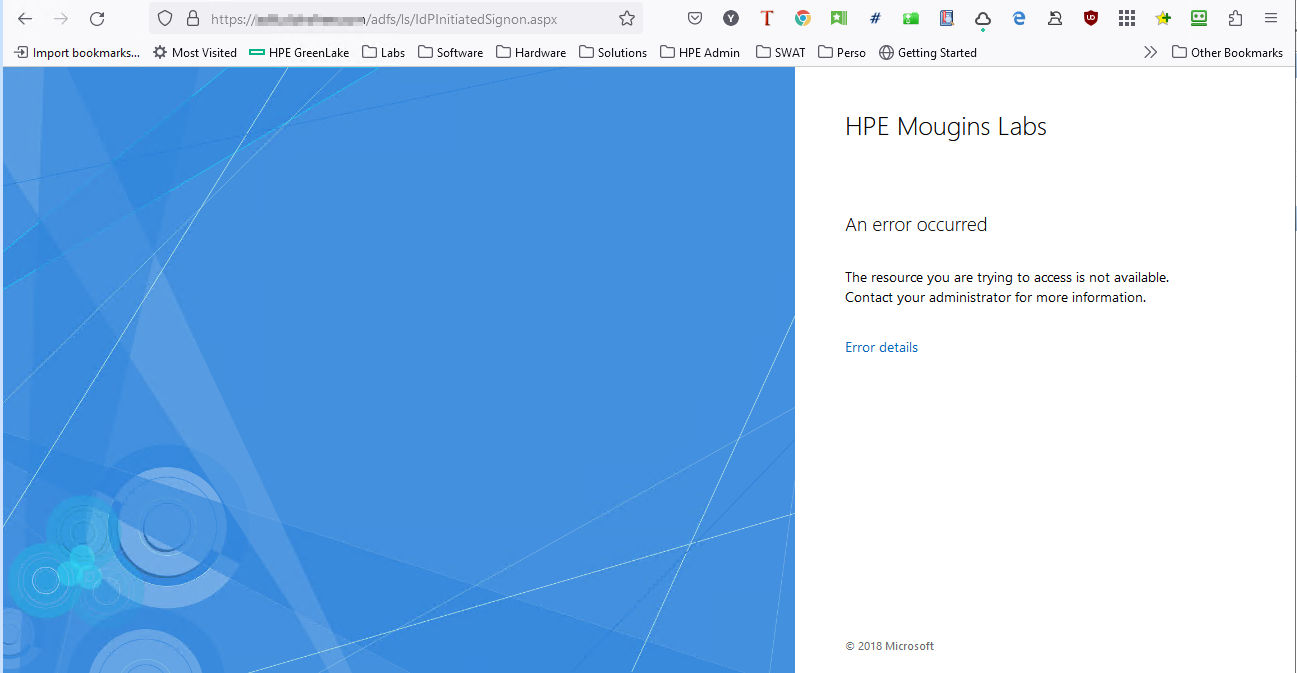
If you get an error like the one in the screenshot above, launch a PowerShell administrative console from the ADFS server and run the following command:
Set-AdfsProperties -EnableIdPInitiatedSignonPage $TrueRefresh the page in your browser and the problem should be corrected:
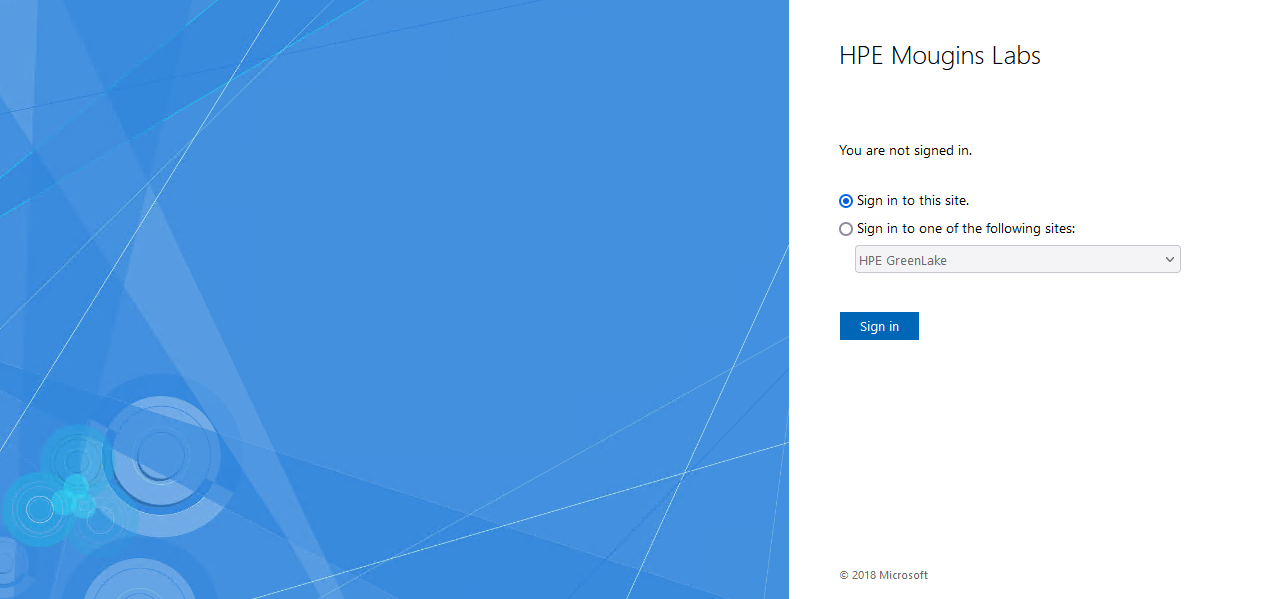
You can then close this page for now.
Testing step 2: SP-Initiated test authentication
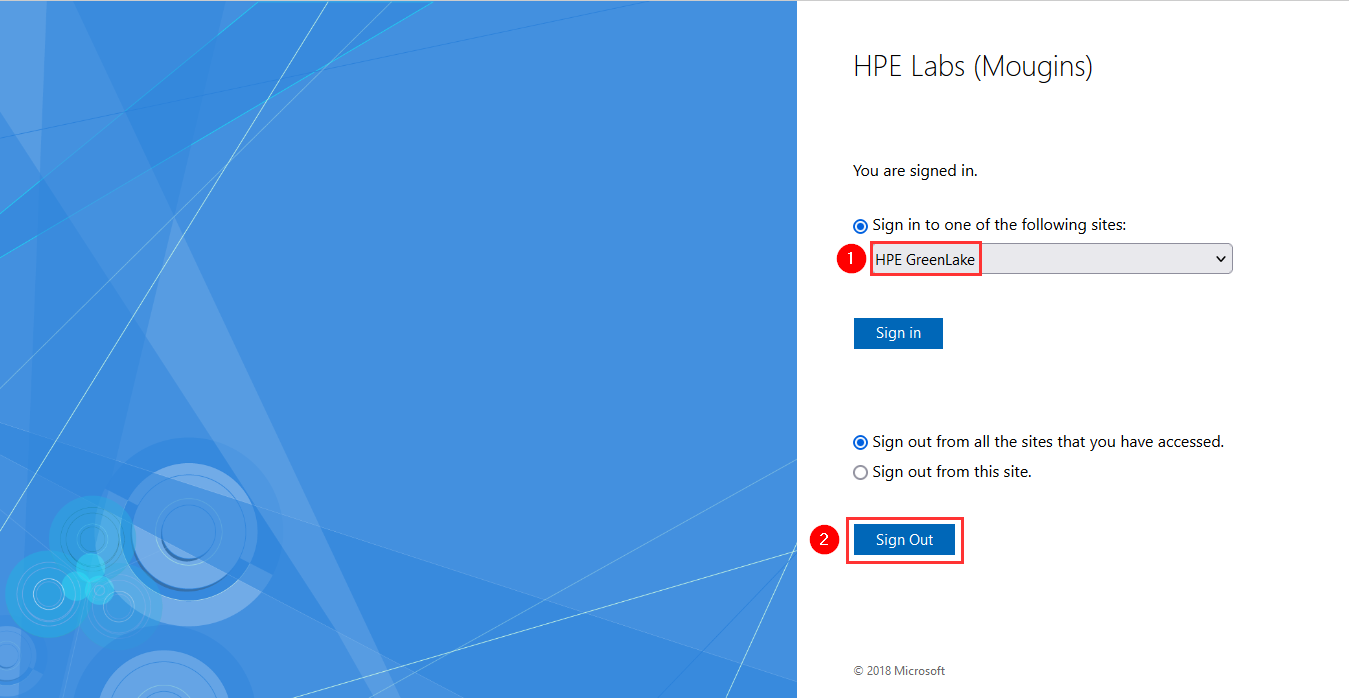
Prerequisite: Before continuing and testing the SSO connection, make sure you are disconnected from the HPE GreenLake platform.
This test consists of testing the authentication initiated by the Service provider, i.e. HPE GreenLake.
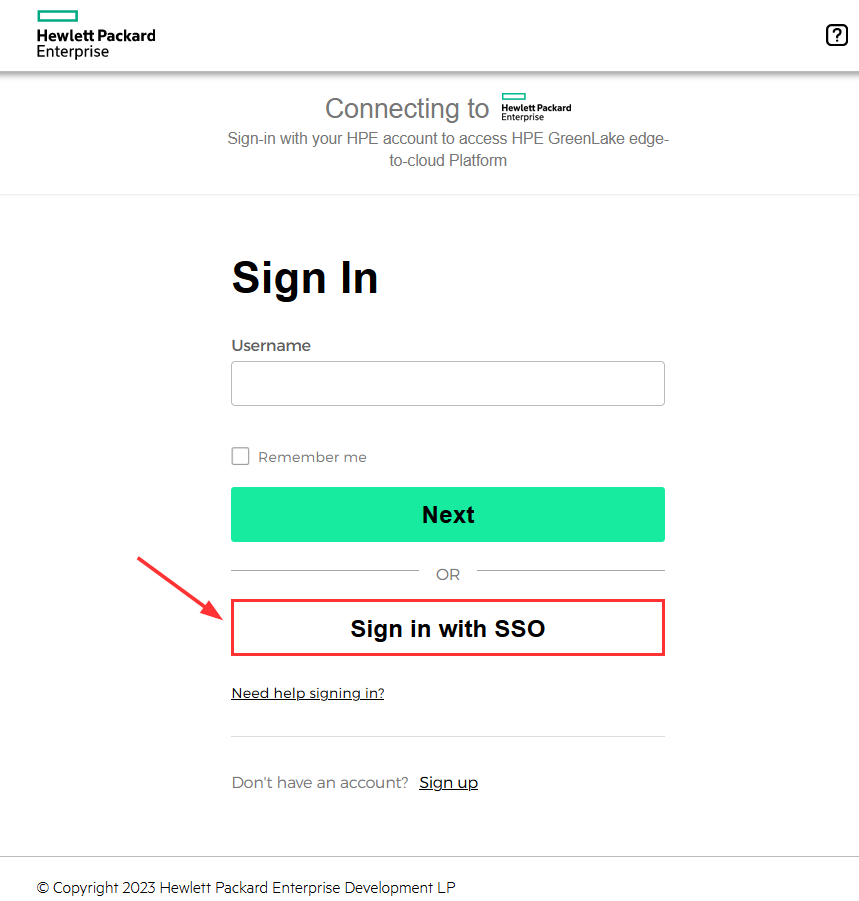
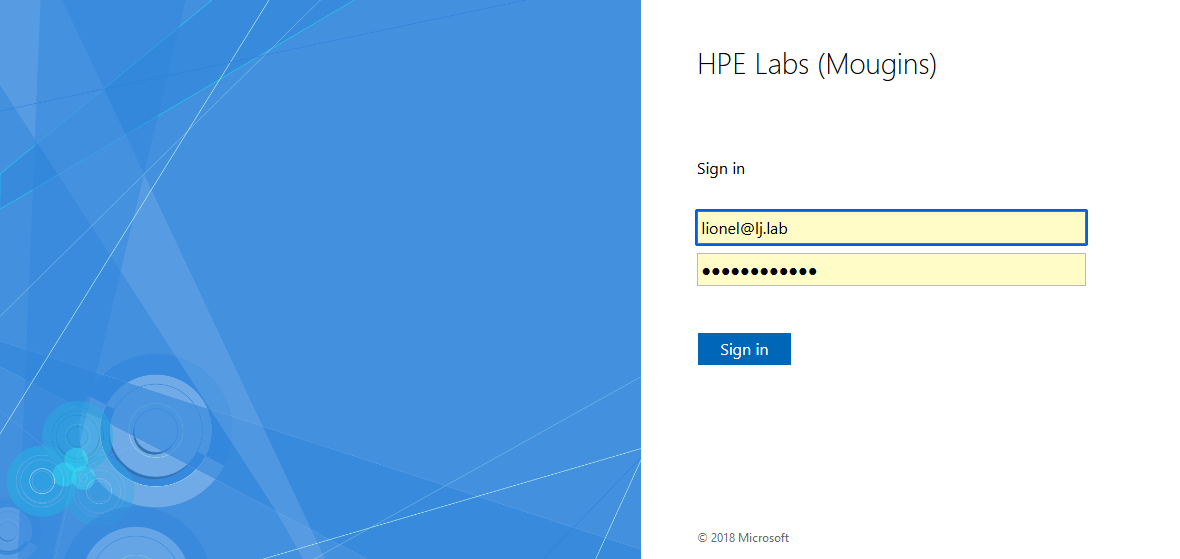
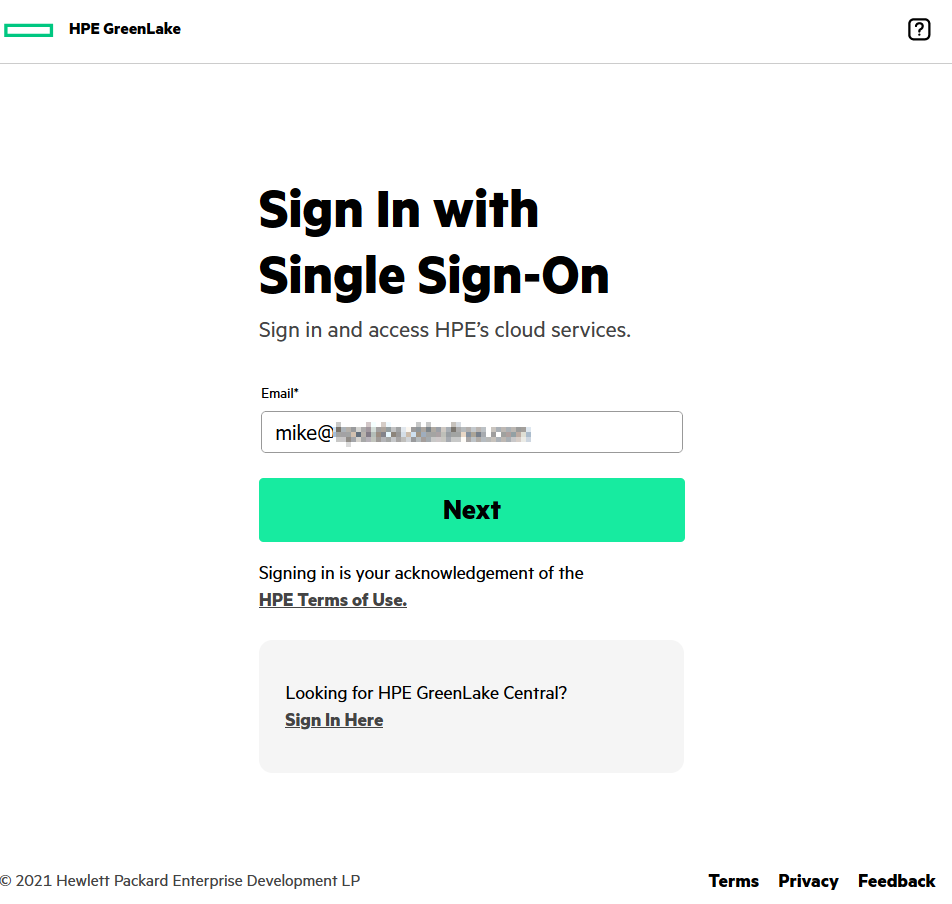
Open a web browser, and go to the HPE GreenLake interface at https://common.cloud.hpe.com/ and click the Sign in with SSO button:
Test authentication with an AD administrator user
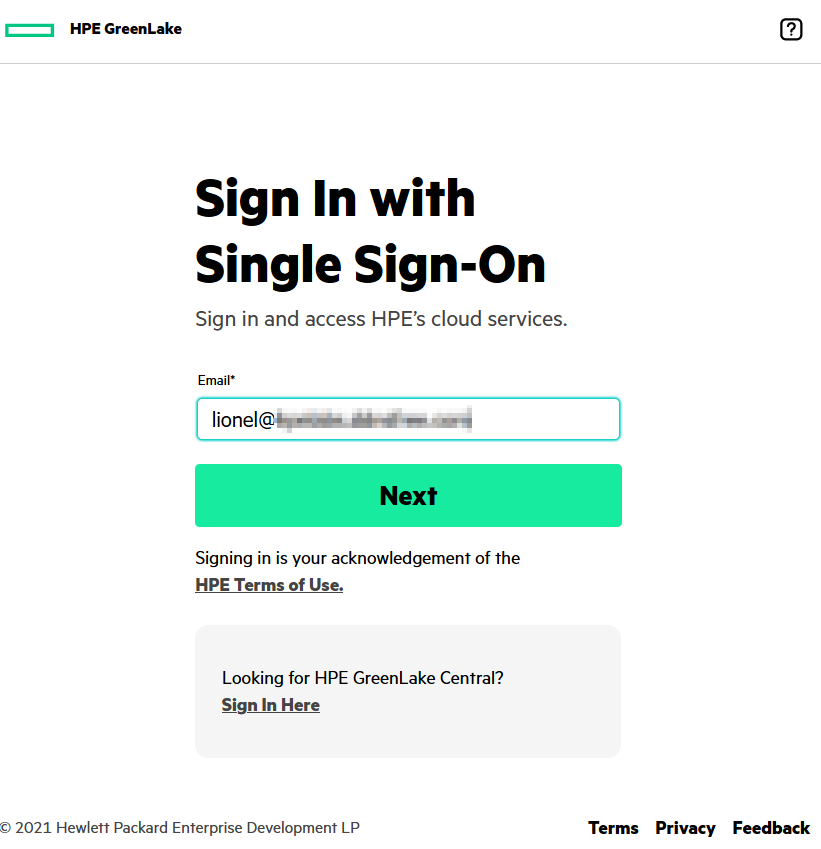
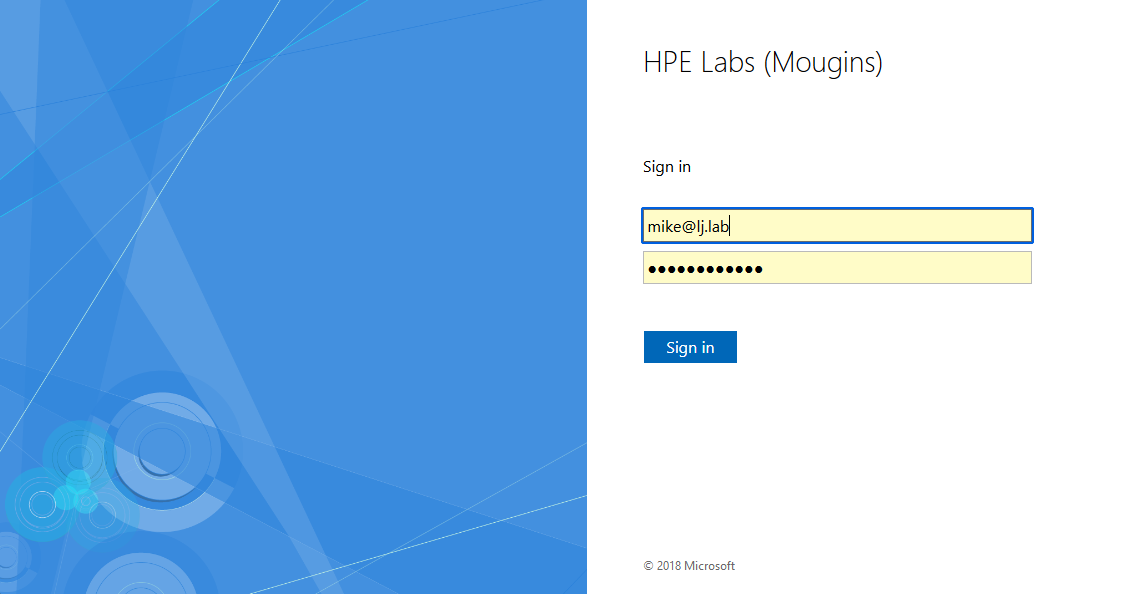
To test an AD user with administrative role, provide the Active Directory e-mail address of the admin user created at step 3 in our example (i.e. lionel) then click Next:
The ADFS sign on page opens, enter the Active Directory user credentials and click Sign in:
It is worth noting that having a different internal Active Directory domain name from the public one accessible from outside is completely valid and acceptable.
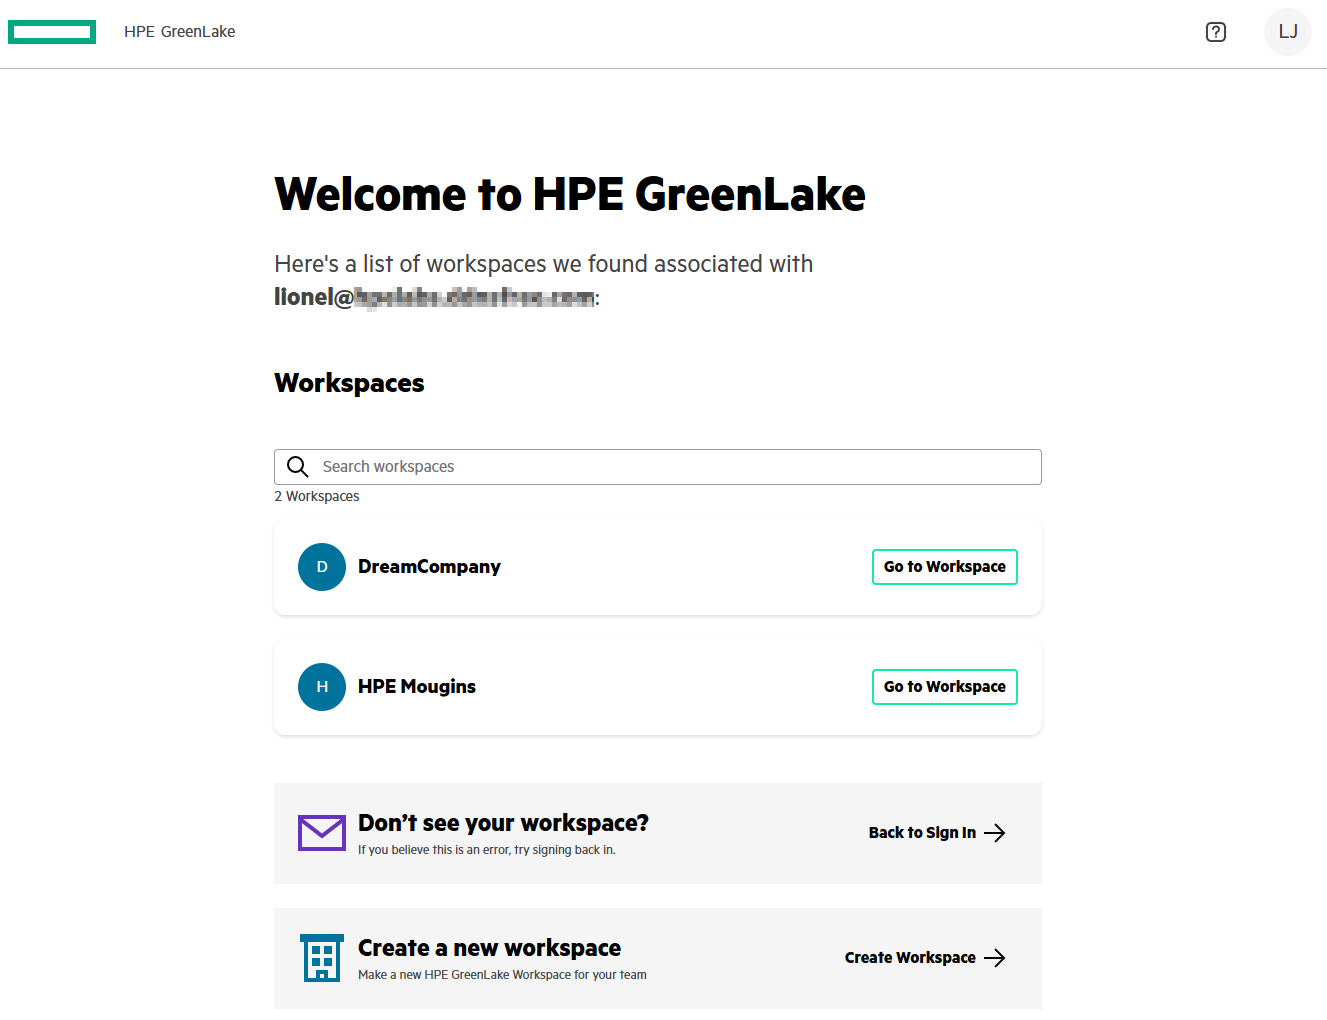
If everything is working correctly, the window should then switch to the HPE GreenLake user interface. You are now logged in to the platform !
If you have configured multiple workspaces in hpe_ccs_attribute, you should see all your workspaces listed in the first page:
Select a workspace and check that you have administrative rights in Manage / Identity & Access / Users by selecting your user account:
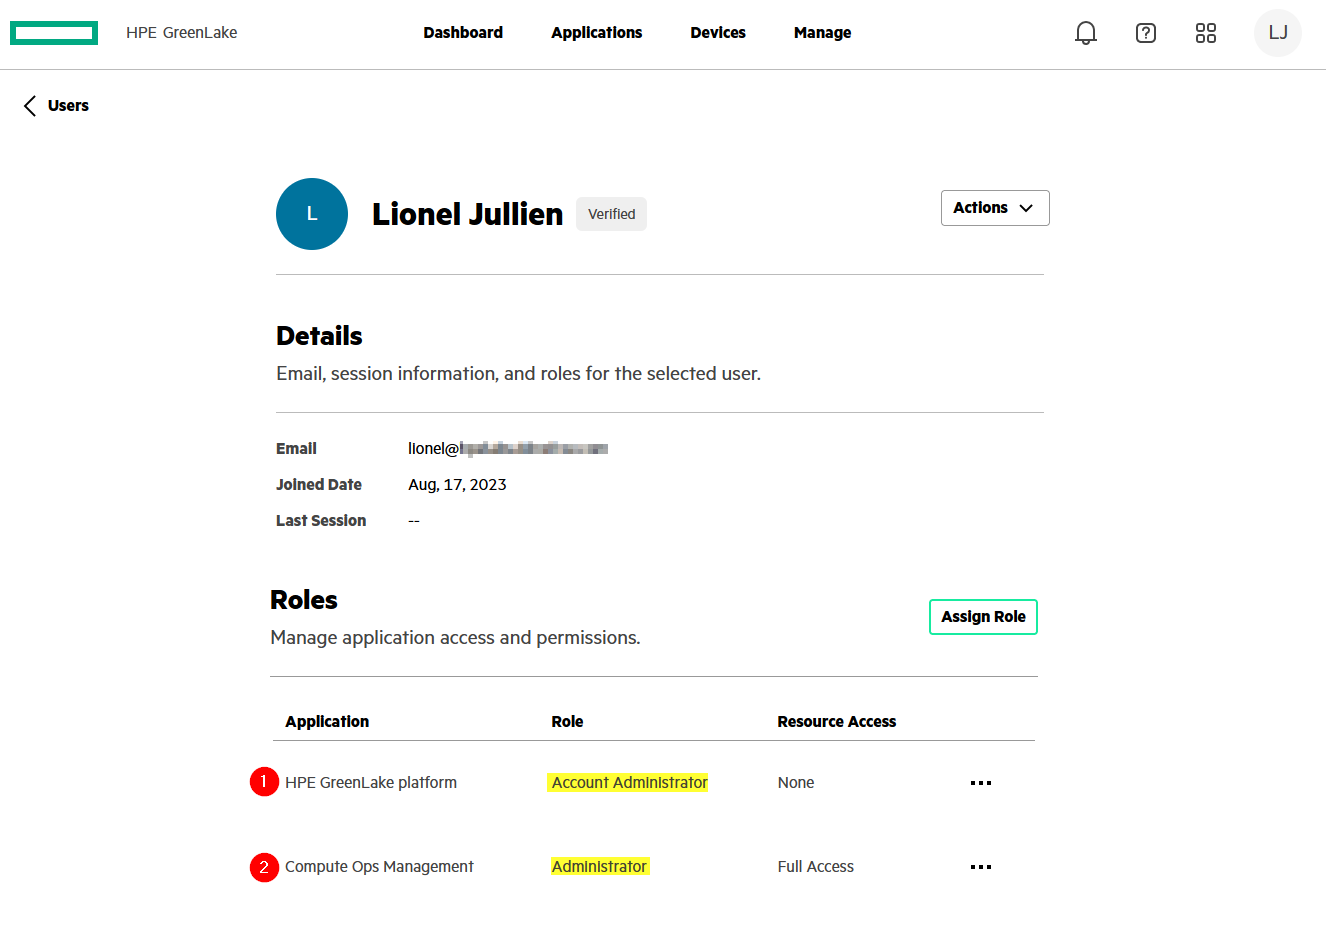
The administrative role should be listed for all application defined in hpe_ccs_attribute.
If a user is a member of several AD security groups, the group with the highest SAML HPE GreenLake hpe_ccs_attribute is always used when connecting to the platform.
Test authentication with an AD observer user
To test the next AD user with the observer role, it is first necessary to disconnect from the HPE GreenLake platform:
And to also disconnect from HPE GreenLake in the ADFS sign on page at https://<FQDN>/adfs/ls/IdPInitiatedSignon.aspx:
Once you’ve logged out from both, you can click on the Sign in with SSO button again and provide the Active Directory e-mail address of the observer user created at step 3 in our example (i.e. mike) then click Next:
The ADFS sign on page opens again, enter this time the Active Directory observer user credentials and click Sign in:
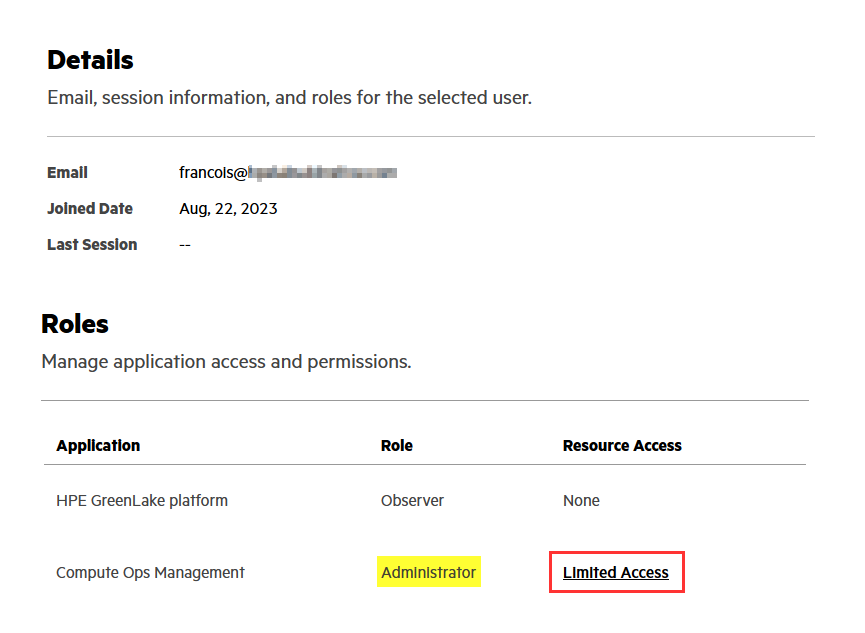
And check that you have observer rights in Manage / Identity & Access / Users by selecting your user account.
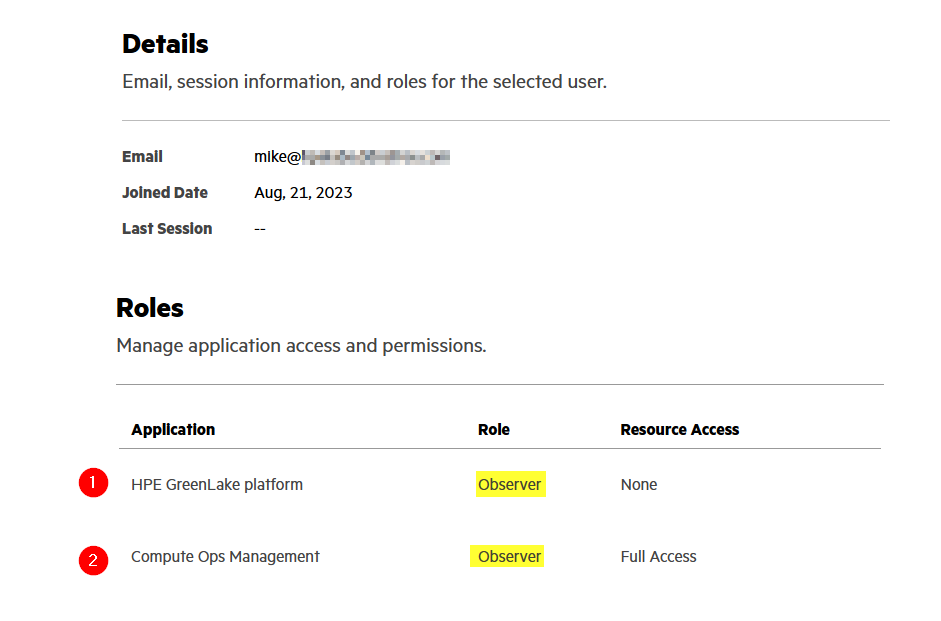
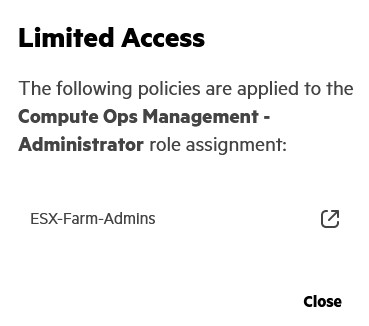
With a resource restriction policy set in hpe_ccs_attribute, the HPE GreenLake user account resource access information is defined as Limited Access:
You can click on Limited Access to obtain the name of the resource restriction policy used:
Testing step 3: IdP-Initiated test authentication
This time, you want to test the authentication initiated by the identity provider, i.e. ADFS.
Prerequisite: Before running this test, make sure you are disconnected from the HPE GreenLake platform and from the ADFS sign on page.
Open a web browser, and go to the encoded URL you have build earlier in step 7, the URL might look like:
https://<FQDN>/adfs/ls/IdPInitiatedSignon.aspx?RelayState=RPID%3Dhttps%253A%252F%252Fsso.common.cloud.hpe.com%26RelayState%3Dhttps%253A%252F%252Fcommon.cloud.hpe.com%252F
You should be prompted to sign-in. Enter your credentials.
If you are redirected to the HPE GreenLake platform, the process succeeds, you’re signed in.
Troubleshooting SAML connectivity errors
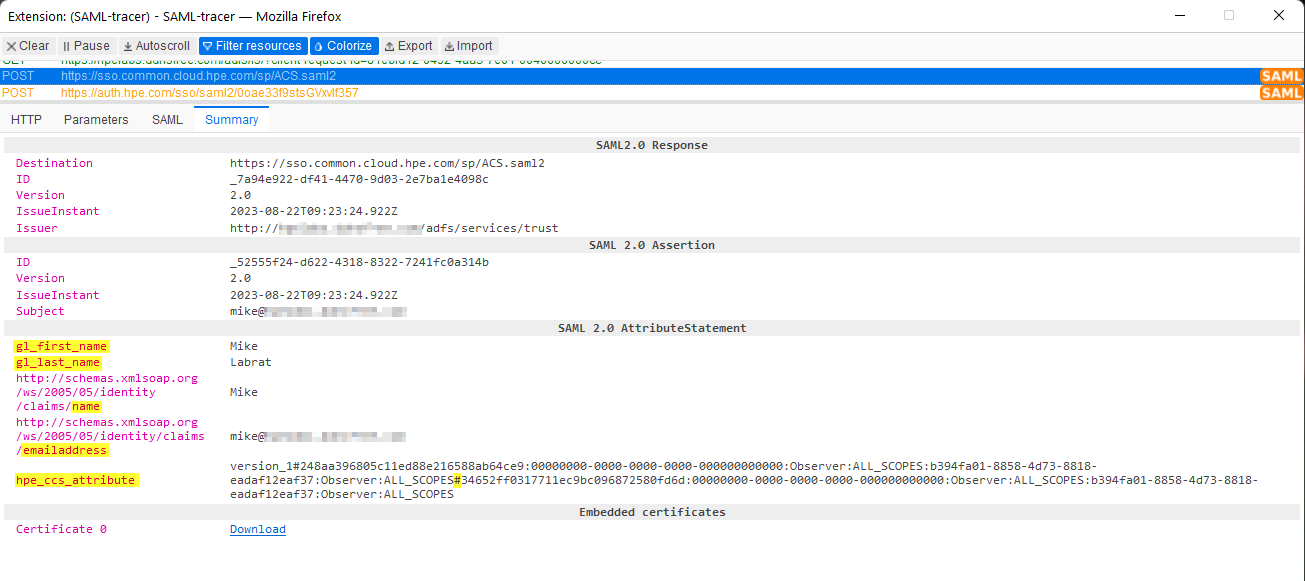
If you’ve diligently followed all the steps in this blog, you shouldn’t be far from successful SAML authentication, but if you still encounter problems, there are a number of tools that can be used to analyze SAML connections. One of the most popular tool is SAML Tracer. SAML Tracer is a browser extension that allows you to view and debug SAML requests and responses. It is available for Chrome, Firefox, and Edge.
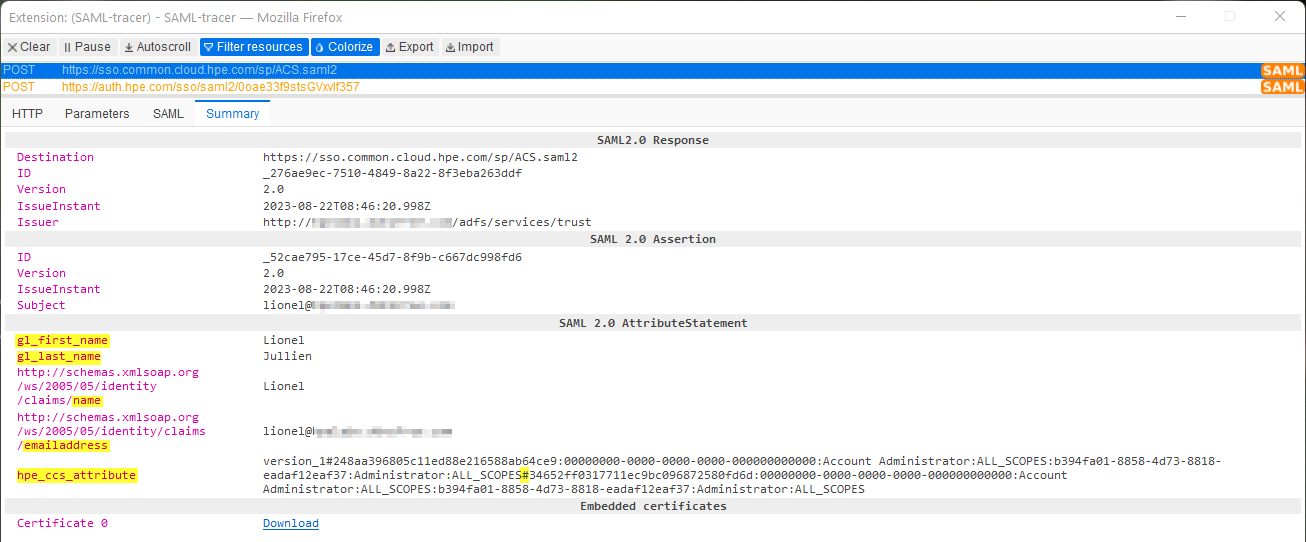
Below are examples of typical SAML POST requests with the correct attributes (with two workspaces):
-
IdP-initiated SSO (from ADFS to HPE SSO):
-
SP-initiated SSO (from HPE GreenLake SSO):
Request one:
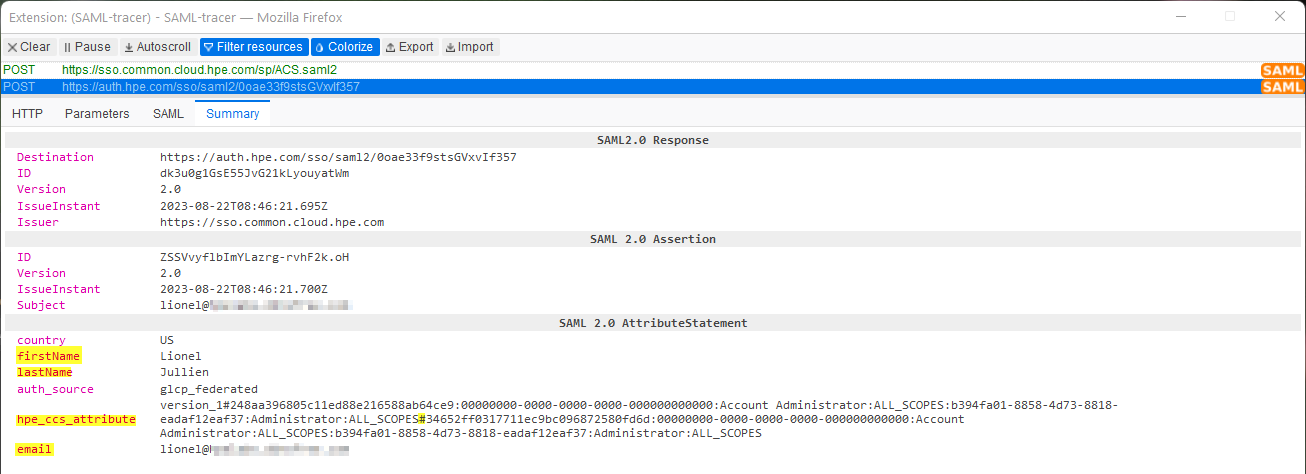
Request two:
Lack of SAML attributes
If you don’t find the same SAML attributes in your traces, like illustrated below:
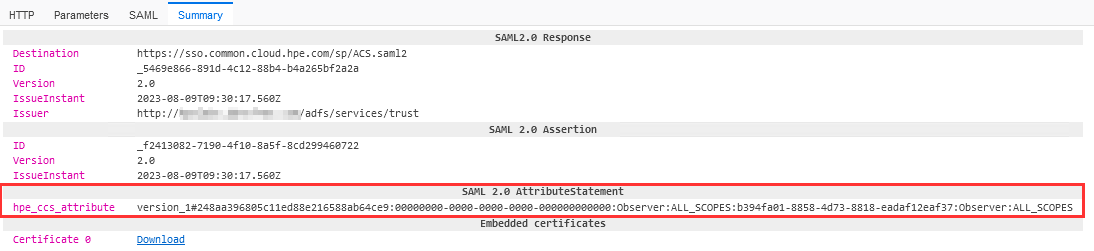
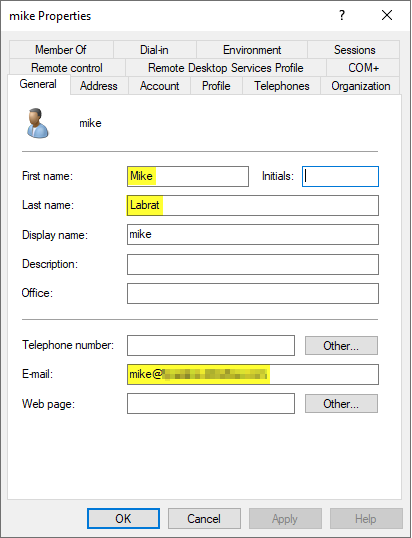
Make sure your ADFS claim rules are correct and that your AD user account includes a first name, last name and e-mail address:
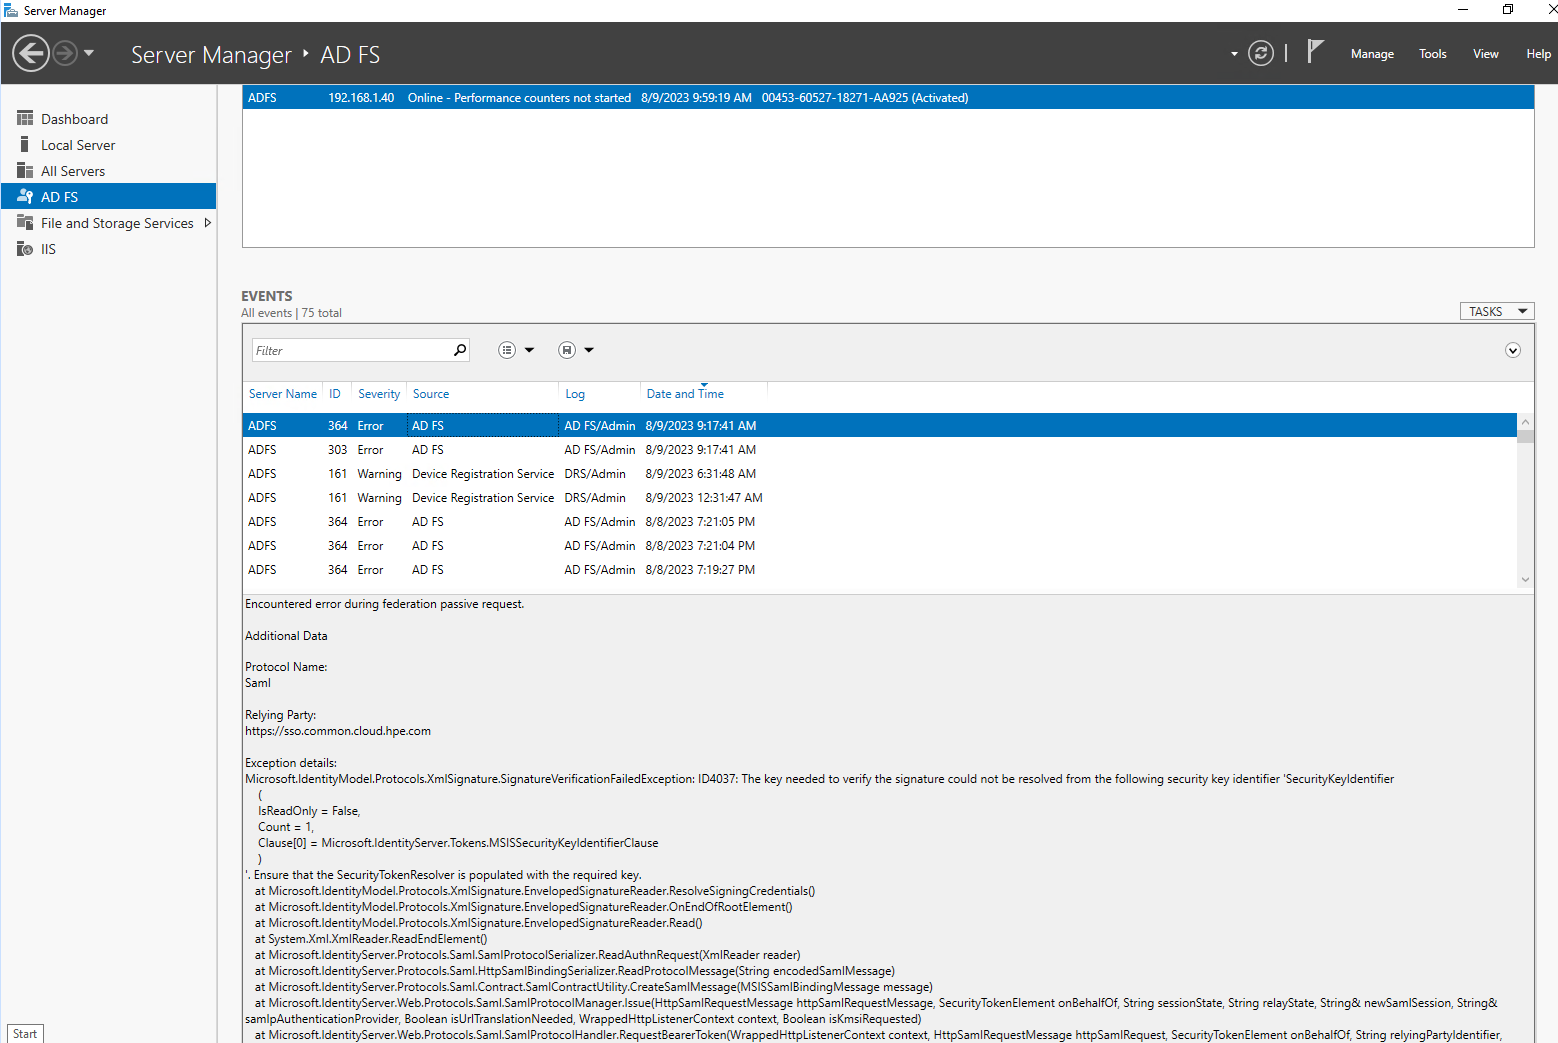
ADFS logs
Another place to troubleshoot a SAML connection is to check the logs of the ADFS server.
The logs can provide valuable information about the errors that are occurring during the SAML handshake.
More ADFS troubleshooting information can be found here.
This concludes this blog post. I hope you find it useful and should you have any feedback, please send me a message.
your hub for all HPE software-related content!