Configuring SAML SSO Authentication with HPE GreenLake: A Guide for the Top 3 Identity Providers and Passwordless Integration for HPECOMCmdlets
Jump to:
- Introduction
- Why SAML SSO?
- Scope of This Guide: Organization Users (Internal SSO)
- Prerequisites
- HPECOMCmdlets SAML SSO Authentication Support
- Part 1: Configuring SAML SSO with Microsoft Entra ID
- Part 2: Configuring SAML SSO with Okta
- Part 3: Configuring SAML SSO with Ping Identity
- Troubleshooting Common Issues
- Conclusion
- Additional Resources
Configuration steps verified with Okta, Microsoft Entra ID, and PingOne as of November 2025.
In this comprehensive blog post, I will guide you through the process of configuring SAML Single Sign-On (SSO) authentication with HPE GreenLake using the three most popular enterprise identity providers, and show you how to set up passwordless authentication for seamless integration with the HPECOMCmdlets PowerShell module.
Introduction
As organizations increasingly adopt cloud-based infrastructure management solutions like HPE GreenLake, the need for robust, secure, and user-friendly authentication mechanisms becomes paramount. SAML (Security Assertion Markup Language) SSO provides a standardized way to enable single sign-on across multiple applications, reducing password fatigue and improving security posture.
This guide covers:
- Configuring SAML SSO with the three major identity providers:
- Microsoft Entra ID
- Okta
- Ping Identity
- Setting up passwordless authentication for the HPECOMCmdlets PowerShell module
- Troubleshooting tips
What You’ll Learn:
- Configure SAML SSO with Entra ID, Okta, or Ping Identity
- Set up passwordless authentication for PowerShell automation
- Test and troubleshoot your SSO implementation
- Enable seamless HPECOMCmdlets module integration
Time Required: 45-60 minutes per identity provider
Reading Time: ~60-75 minutes (complete guide)
Skill Level: Intermediate (identity management experience recommended)
Why SAML SSO?
The motivation for implementing SAML SSO with HPE GreenLake is driven by several key factors:
- Centralized identity management: Integration with existing enterprise identity infrastructure creates a single source of truth for user authentication and authorization
- Enhanced security: Eliminates the need for multiple passwords across different systems, reducing the risk of credential compromise
- Improved user experience: Users authenticate once and gain seamless access to multiple applications
- Simplified administration: Changes to user access rights in the identity provider are automatically reflected in HPE GreenLake
- Compliance: Centralized authentication logging and audit trails support regulatory compliance requirements
Scope of This Guide: Organization Users (Internal SSO)
HPE GreenLake supports two distinct SSO configuration scenarios:
- Organization Users (Internal SSO) - The focus of this guide
- External Users - Brief overview provided below
What This Guide Covers: Internal SSO for Organization Users
This guide focuses exclusively on configuring SSO for organization users—employees and internal users whose email addresses belong to domains your organization owns and controls (e.g., @yourcompany.com).
Configuration Requirements:
- Domain Claiming: Prove ownership by adding a DNS TXT record to your domain
- SSO Connection: Configure SAML 2.0 integration with your identity provider (Entra ID, Okta, or Ping Identity)
- Authentication Policy: Link your claimed domain to the SSO connection
Use Case Example: Your employees with email addresses like john@acme.com and sarah@acme.com authenticate through your organization’s IdP (Identity Provider) (Entra ID, Okta, or Ping Identity) to access your HPE GreenLake workspace.
What This Guide Does NOT Cover: External SSO for Partner/Contractor Access
If you need to grant HPE GreenLake access to external users (partners, contractors, consultants from other organizations), the configuration process is different and simpler:
External SSO Characteristics:
- No Domain Claiming Required: You don’t need to prove ownership of external domains
- No SSO Connection Setup: The external organization manages their own identity provider
- Authentication Policy Only: Simply create an authentication policy for the external domain
Use Case Example: A consultant from partner-company.com needs access to your workspace. They authenticate through their own company’s identity provider (already configured in their own HPE GreenLake workspace), but access your workspace’s resources with permissions you control.
Learn More About External SSO: For detailed instructions on configuring SSO for external users, refer to the HPE GreenLake User Guide - Configuring SSO using authentication policies.
Prerequisites
Before you begin, ensure you have:
HPE GreenLake Requirements:
- An active HPE GreenLake workspace with Workspace Administrator access
- A verified domain for SSO (you’ll claim this during configuration)
Identity Provider Requirements: Choose ONE of the following:
- Microsoft Entra ID: Global Administrator or Application Administrator role
- Okta: Super Administrator or Organization Administrator role
- Ping Identity: Environment Administrator access to PingOne
Optional (for HPECOMCmdlets):
- PowerShell 7+
- HPECOMCmdlets module v1.0.18 or later
- Mobile device for authenticator app (Microsoft Authenticator, Okta Verify, or PingID)
HPECOMCmdlets SAML SSO Authentication Support
While configuring SAML SSO with an identity provider is a crucial step, the authentication methods you implement are equally critical, especially if you plan to use the HPECOMCmdlets PowerShell module for HPE GreenLake automation and management.
Note: SAML SSO authentication with identity providers is supported in HPECOMCmdlets module version 1.0.18 and later.
The HPECOMCmdlets module is designed for modern security standards and requires passwordless authentication for SAML SSO-enabled workspaces. This method replaces traditional passwords with more secure and user-friendly alternatives, such as push notifications from an authenticator app or biometric verification.
Why Passwordless Authentication?
When you run Connect-HPEGL -SSOEmail user@company.com, the HPECOMCmdlets module intentionally does not support password-based credentials. This design aligns with modern security frameworks from Microsoft, NIST, and the FIDO Alliance, which advocate eliminating traditional passwords in favor of cryptographic authentication methods.
Key Benefits:
- Enhanced Security: Eliminates attack vectors including phishing, credential stuffing, and password reuse
- Streamlined Experience: Provides faster, more convenient authentication for both interactive sessions and automated workflows
- Compliance: Meets modern security standards and regulatory requirements
This guide, after walking you through SAML SSO configuration with your identity provider, demonstrates how to enable compatible passwordless authentication methods that work seamlessly with the HPECOMCmdlets module while maintaining enterprise-grade security.
Compatible Authentication Methods
Not all passwordless methods work with PowerShell automation. The following table identifies which authentication methods are compatible with the HPECOMCmdlets module:
| Authentication Method | Browser Support | PowerShell Support | Technical Implementation | User Experience |
|---|---|---|---|---|
| Push Notifications | ✅ Yes | ✅ Yes | Mobile authenticator apps send approval requests to registered devices | Tap to approve notification on mobile device |
| TOTP (Time-based codes) | ✅ Yes | ✅ Yes | RFC 6238-compliant authenticator apps generate rotating codes | Enter 6-digit time-sensitive code |
| FIDO2 Security Keys | ✅ Yes | ❌ No | Hardware tokens (YubiKey, Titan Security Key) using WebAuthn protocol | Insert key and tap physical button |
| Platform Authenticators | ✅ Yes | ❌ No | Windows Hello, Touch ID, Face ID using device biometrics | Biometric scan or device PIN |
| Passkeys | ✅ Yes | ❌ No | FIDO2-based credentials (device-bound or cloud-synced) | Touch/scan device or approve on synced device |
Key:
- ✅ Supported - Works with HPECOMCmdlets PowerShell module
- ❌ Not Supported - Browser only, incompatible with PowerShell automation
Technical Limitation Explained:: FIDO2, biometric, and passkey methods rely on browser-native WebAuthn APIs that PowerShell cannot access. PowerShell operates in a non-interactive context without access to:
- Hardware security module integration
- Browser authentication frameworks
- Device biometric sensors
- Platform credential managers
For successful PowerShell automation with HPECOMCmdlets, ensure that either push notifications or TOTP (Time-based One-Time Password) is enabled as an available authentication method.
Configuration Guidance: Step 4 in each identity provider section of this guide covers the detailed verification and configuration of these supported passwordless authentication methods.
Part 1: Configuring SAML SSO with Microsoft Entra ID
Microsoft Entra ID (formerly Azure Active Directory) is Microsoft’s cloud-based identity and access management service that helps organizations manage user identities and secure access to applications. As one of the most widely adopted enterprise identity platforms, Entra ID provides robust SAML 2.0 support for single sign-on integration with thousands of SaaS applications, including HPE GreenLake.
Key capabilities relevant to HPE GreenLake integration include:
- Enterprise application gallery: Pre-configured and custom SAML application templates
- Conditional Access policies: Granular control over authentication requirements and security policies
- Multi-factor authentication: Support for various authentication methods including passwordless options
- Group-based access control: Simplified user management through security groups
The following steps will guide you through creating a custom SAML 2.0 application integration in Entra ID, configuring the required SAML attributes for seamless integration with HPE GreenLake, and establishing passwordless authentication policies. While HPE GreenLake itself supports standard password-based SAML authentication, this guide will also demonstrate how to configure passwordless authentication methods that are essential for users who plan to leverage the HPECOMCmdlets PowerShell module for automation and management tasks.
Quick Start Checklist
For experienced administrators familiar with Entra ID and SAML configuration, here’s the high-level workflow:
Entra ID Configuration:
- ☐ Create security group:
HPE GreenLake - ☐ Create enterprise application (non-gallery)
- ☐ Configure SAML: Entity ID, ACS URL, RelayState
- ☐ Configure claims: NameId, FirstName, LastName, (optional) hpe_ccs_attribute
- ☐ Copy Federation Metadata URL
HPE GreenLake Configuration:
- ☐ Claim and verify domain (DNS TXT record)
- ☐ Create SSO connection (use metadata URL)
- ☐ Create authentication policy (link domain to SSO connection)
- ☐ Test SP (Service Provider)-initiated and IdP (Identity Provider)-initiated flows
Passwordless Setup (for HPECOMCmdlets):
- ☐ Enable Microsoft Authenticator authentication method
- ☐ Create enrollment tracking group:
HPE-GreenLake-Enrollment - ☐ Create two Conditional Access policies (grace period + enforcement)
- ☐ Enroll users via https://aka.ms/mysecurityinfo
Estimated Time: 45-60 minutes for initial setup
Note: Detailed step-by-step instructions with screenshots follow below.
Step 1: Register HPE GreenLake in Entra ID
Before configuring the HPE GreenLake enterprise application in Entra ID, it’s essential to create a security group that will control which users can access the HPE GreenLake application. This group will be used for authentication purposes and can optionally be leveraged for role-based access control (RBAC) through SAML attributes, allowing you to map Entra ID groups to specific HPE GreenLake roles and permissions. Alternatively, if you prefer to manage user authorization directly within the HPE GreenLake platform, you can configure your SAML domain to use local authorization instead of SAML-based RBAC.
1. Create a security group
-
Go to Groups → Overview → New group
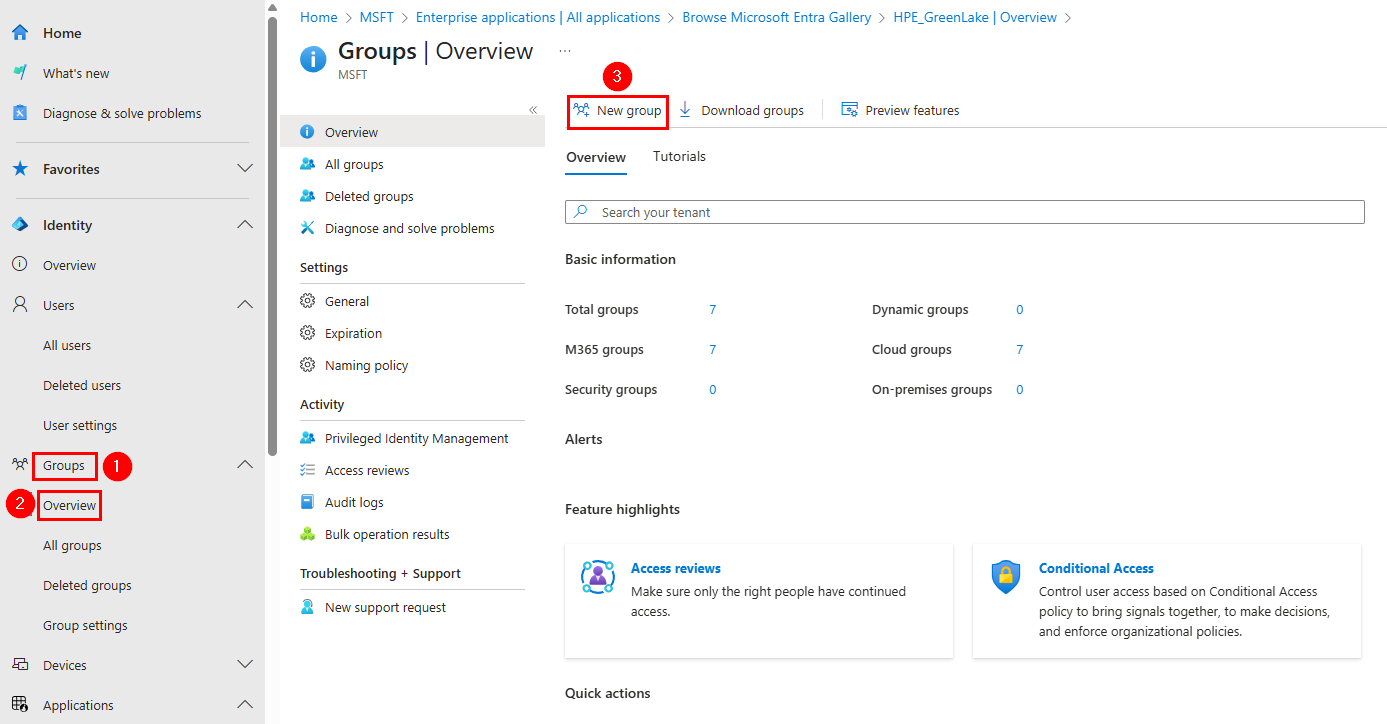
-
Create a Security group for the HPE GreenLake application. Name it
HPE GreenLakeand add the members who will be granted access to the application.
2. Create a new SAML Enterprise Application
With the security group created, you can now proceed to register the HPE GreenLake application in Entra ID. This involves creating a custom SAML 2.0 enterprise application that will serve as the connection point between Entra ID and HPE GreenLake.
-
Go to Applications → Enterprise Applications → New Application
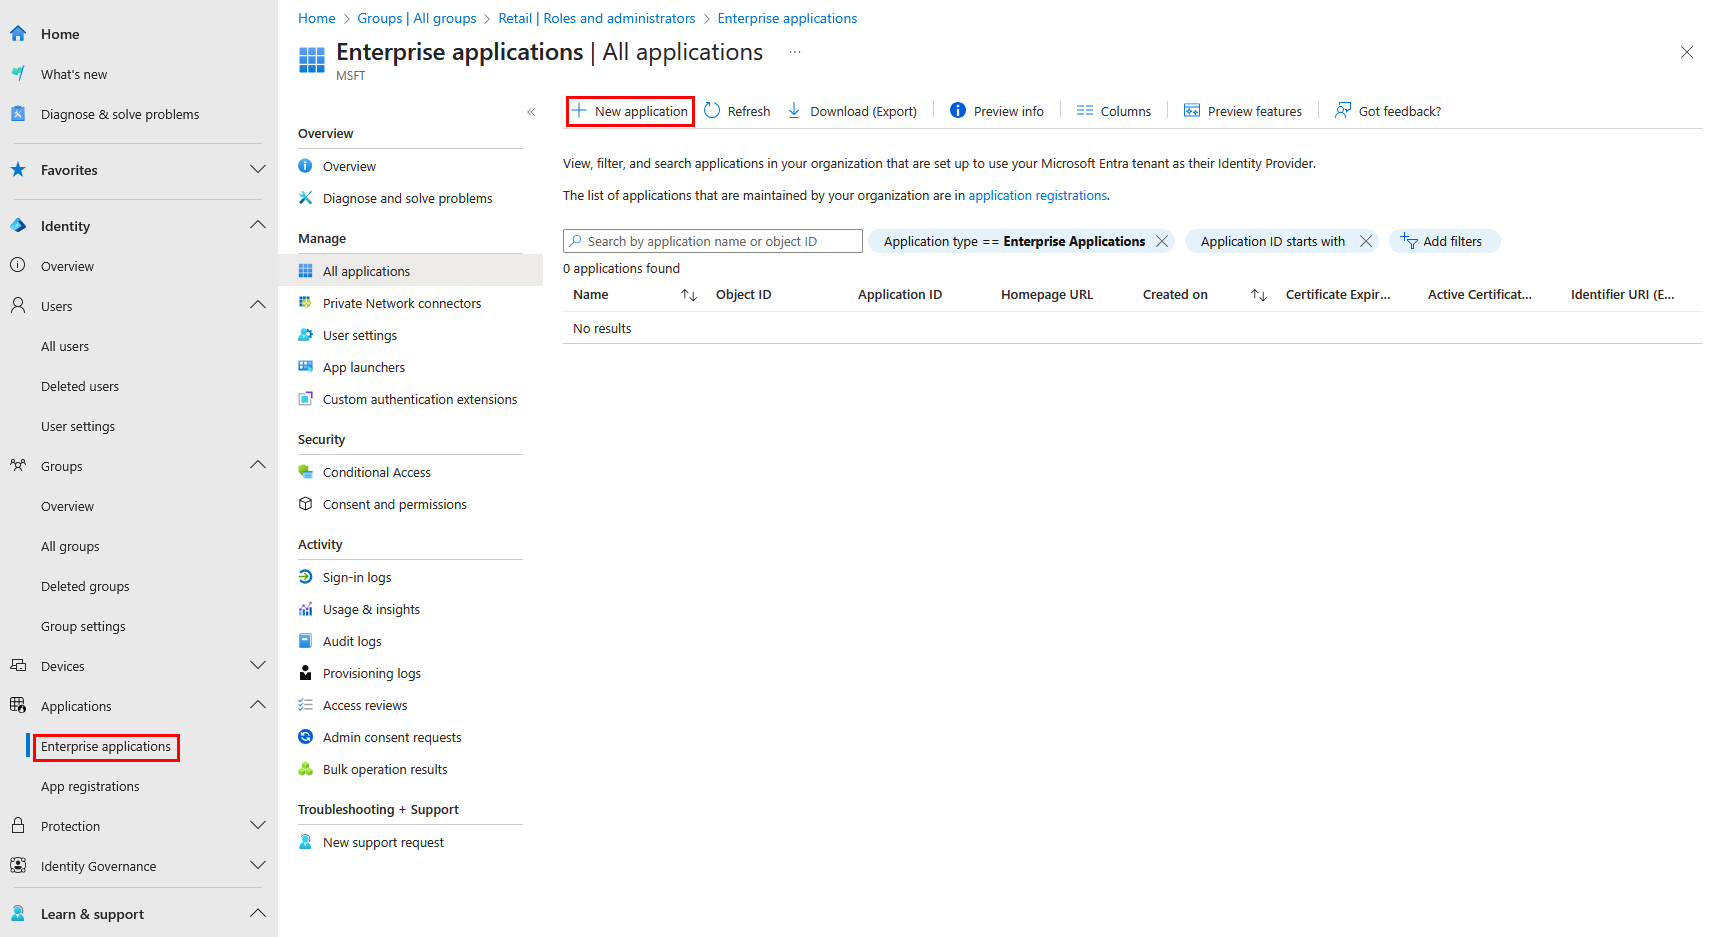
-
Click Create your own Application
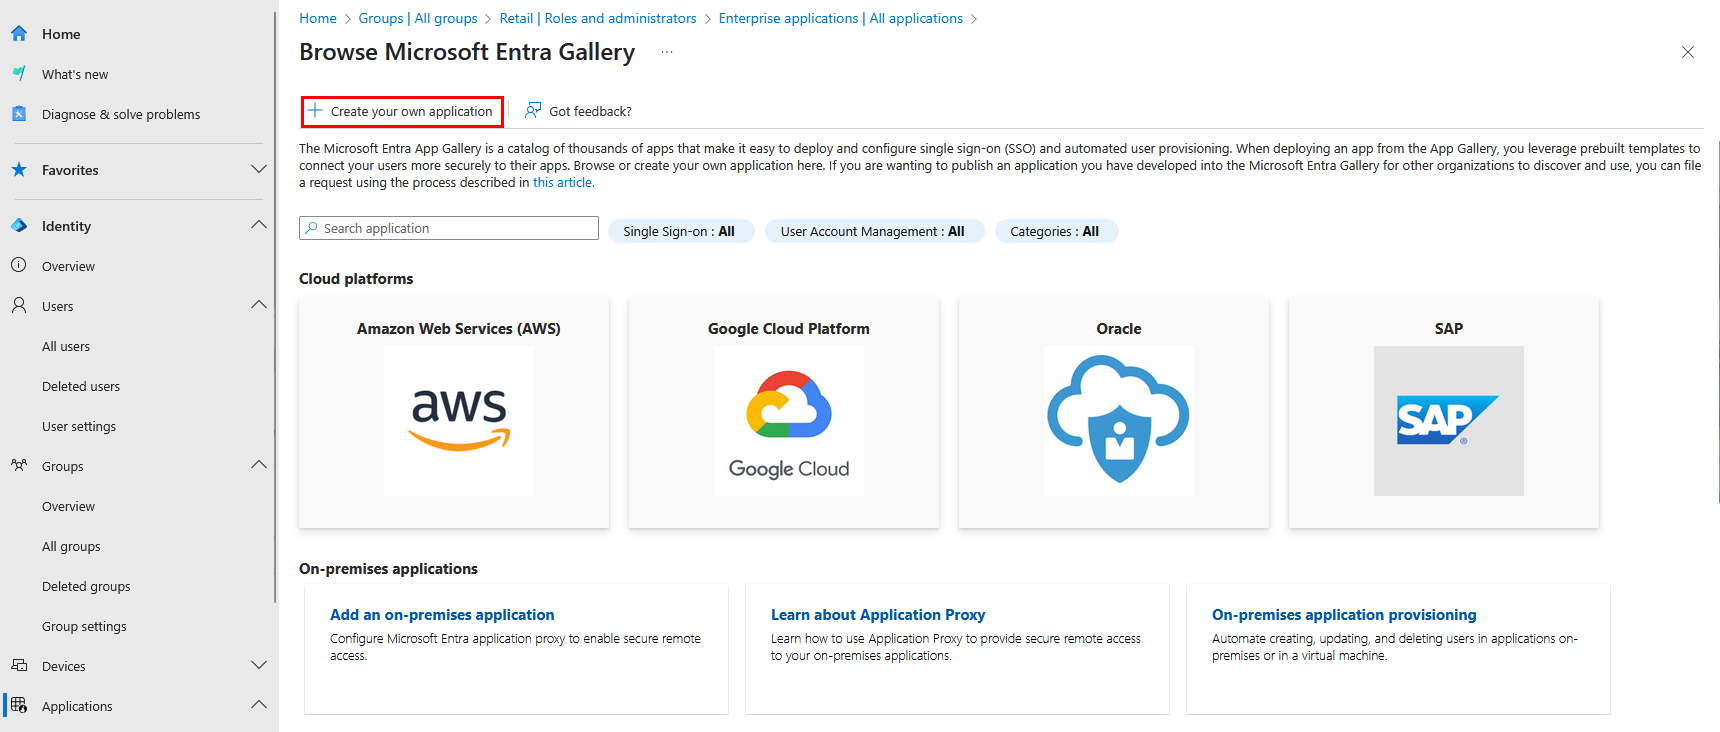
-
Enter the name of your application (e.g. HPE GreenLake)
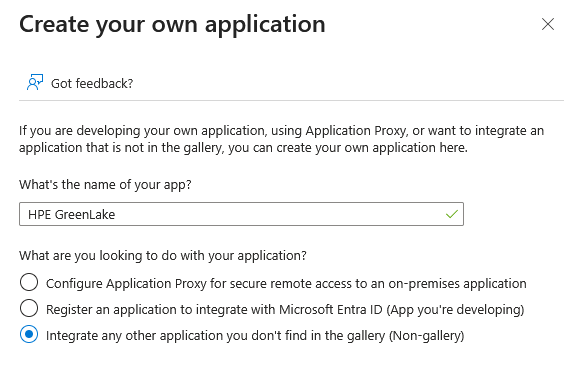
-
Select Integrate any other application you don’t find in the gallery (Non-gallery) then click Create.
-
From 1: Assign users and groups, click on Assign users and groups
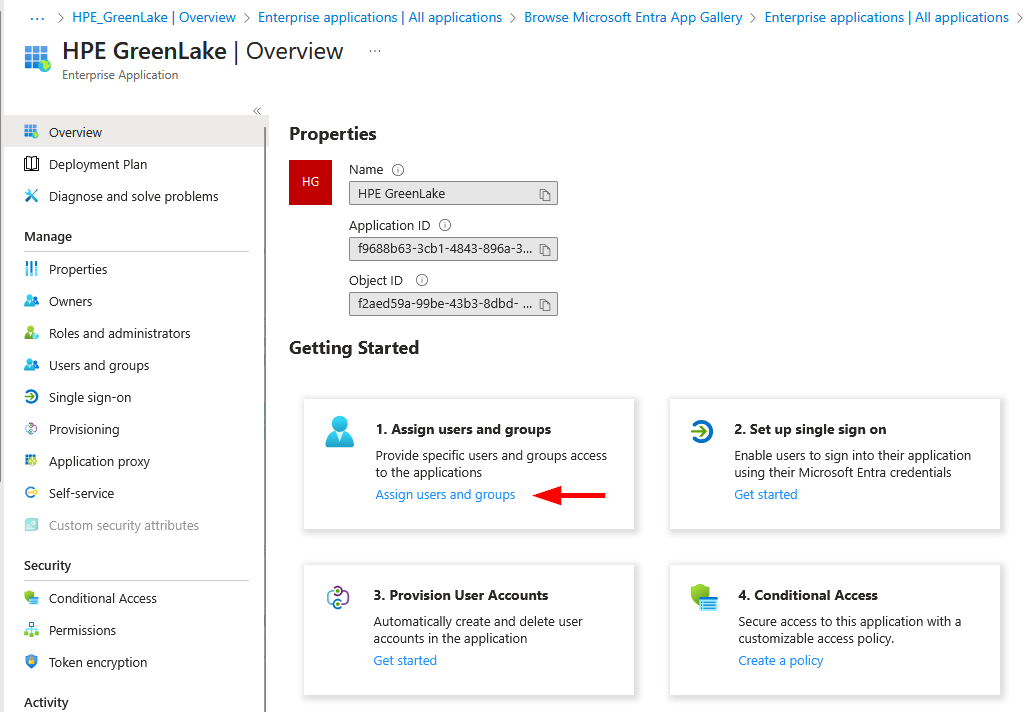
-
Click on Add user/group
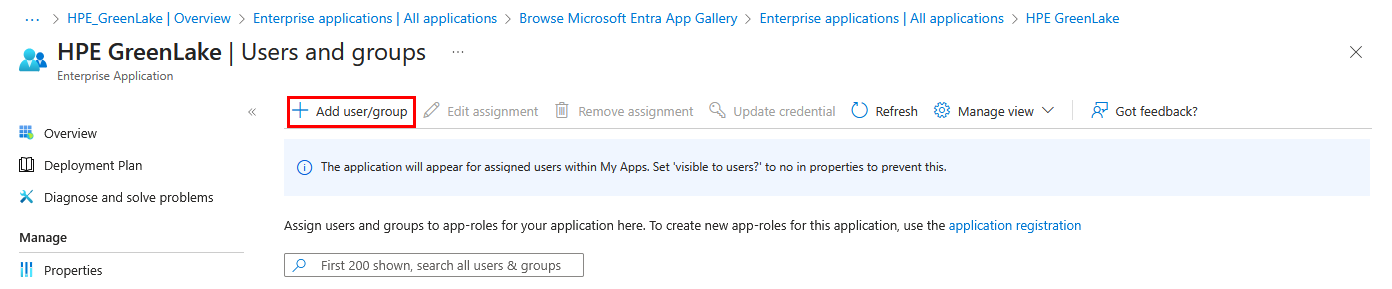
-
Add a group using the None Selected link then select the HPE GreenLake group
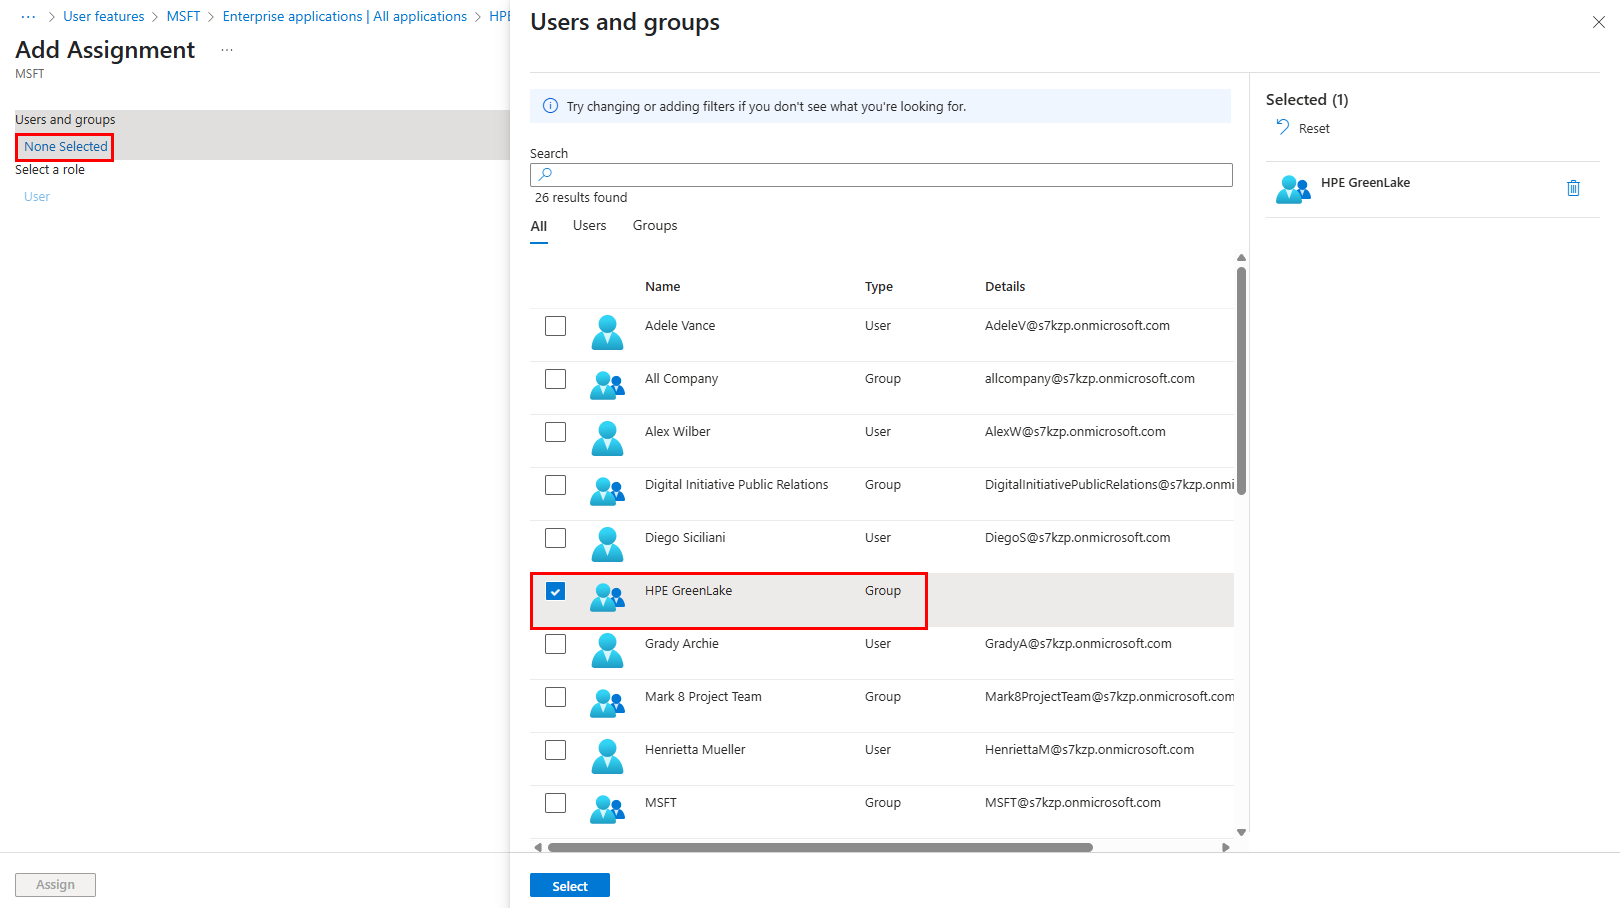
-
Then click Select then Assign
-
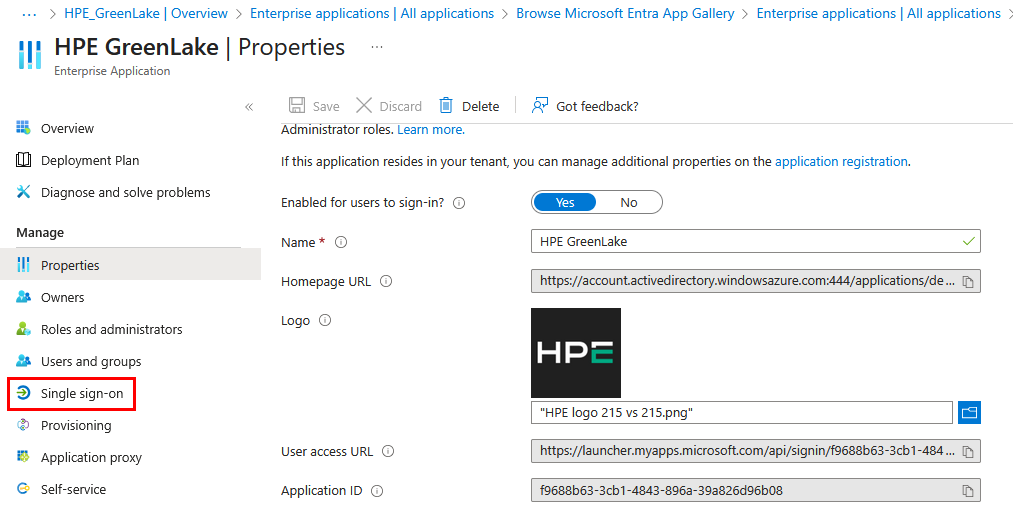
To make the app visible to users to enable IDP-Initiated SSO logins, go to Properties, and make sure Visible to Users is enabled
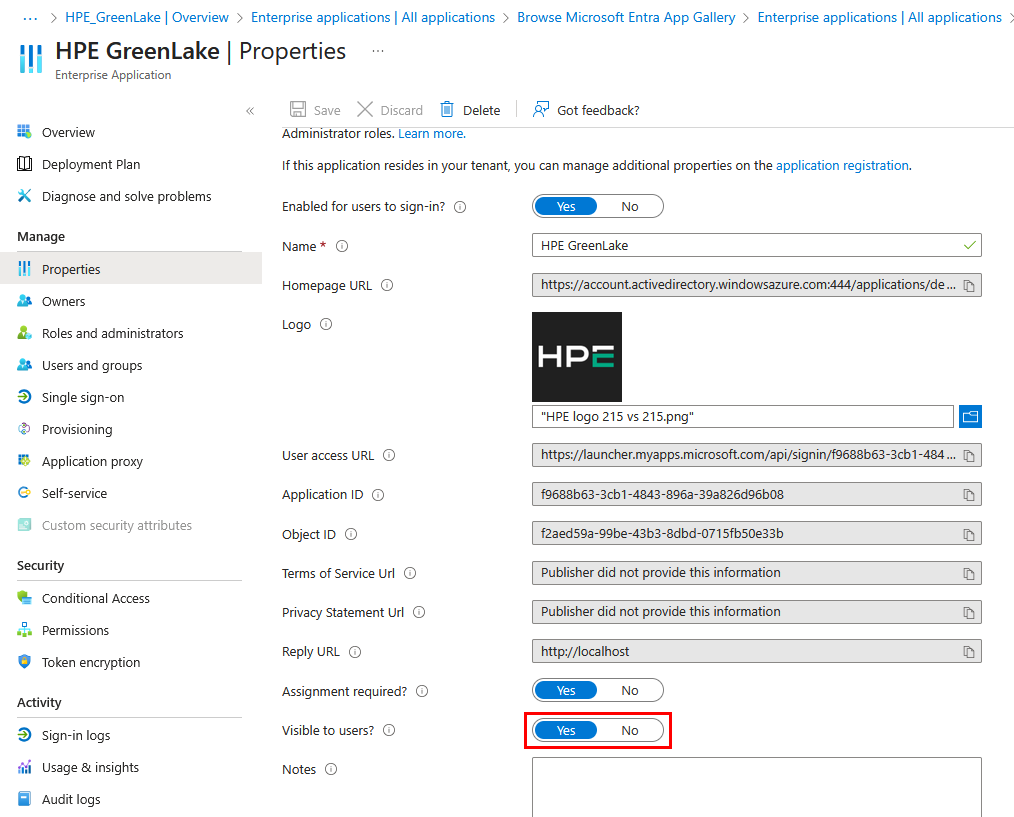
- This setting controls whether the HPE GreenLake application appears in users’ MyApps portal (https://myapps.microsoft.com)
- If set to No, users won’t see the app tile and can only use SP-initiated SSO (starting from HPE GreenLake login page)
Tip: For better visual integration, consider uploading the HPE logo to make the application easily identifiable in your users’ app launchers.
-
To configure SSO, go to Single sign-on
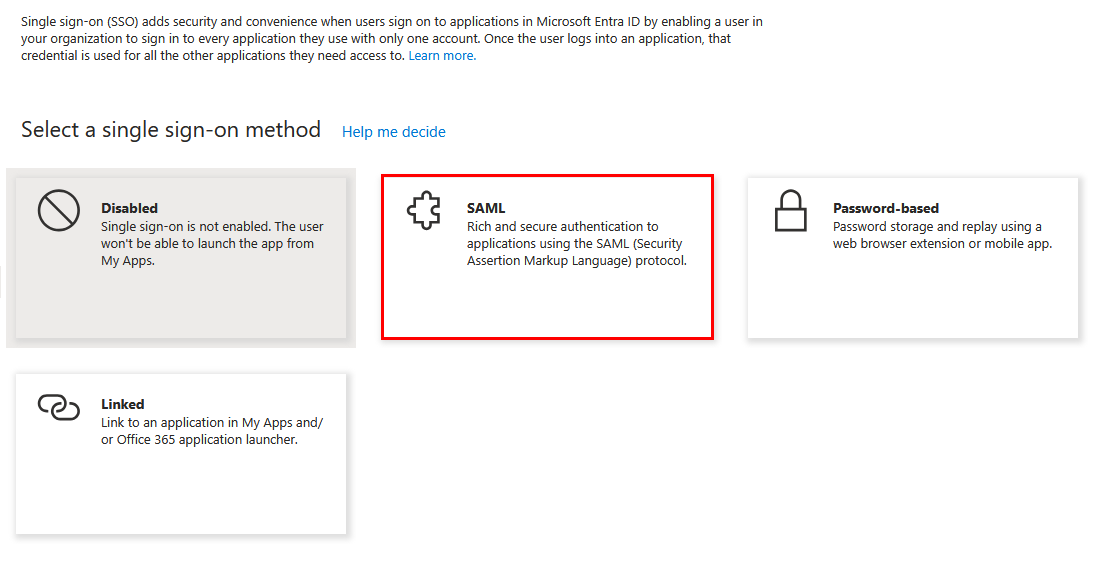
-
By default the SSO method is disabled. Select SAML
-
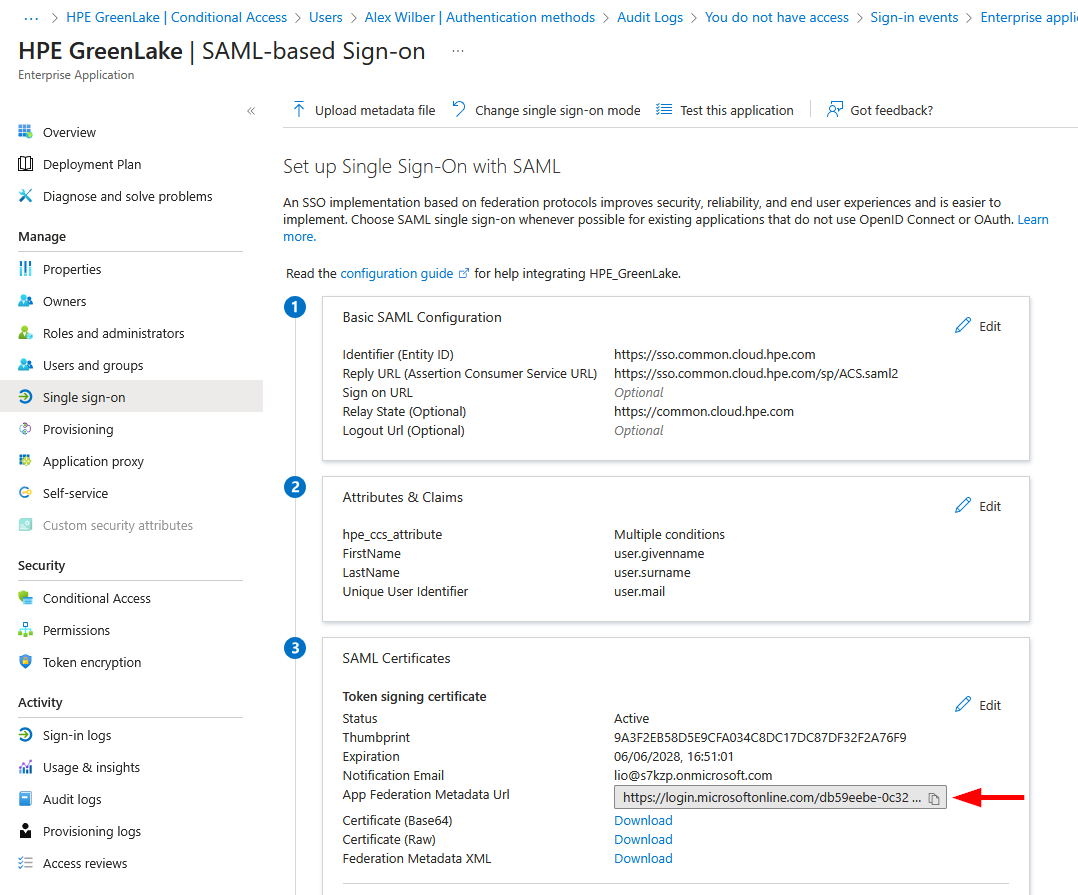
Under Basic SAML Configuration, click Edit
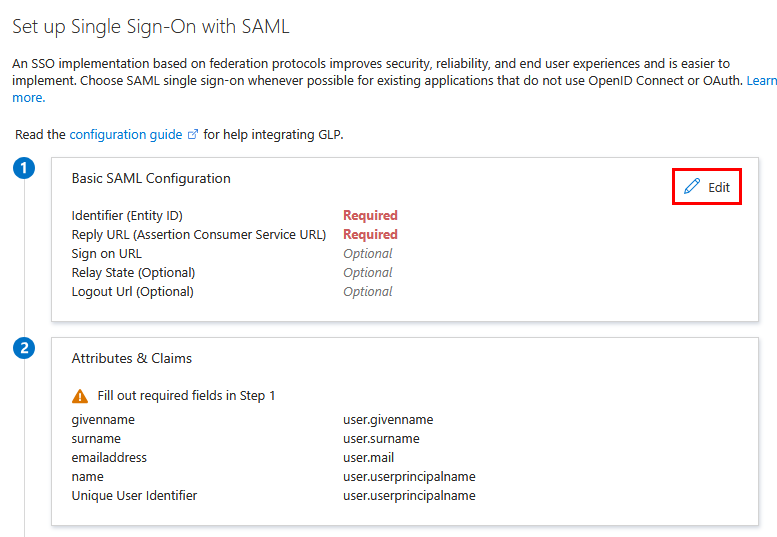
-
Then enter:
Field Value Identifier (Entity ID) https://sso.common.cloud.hpe.comReply URL (Assertion Consumer Service URL) https://sso.common.cloud.hpe.com/sp/ACS.saml2Relay State https://common.cloud.hpe.com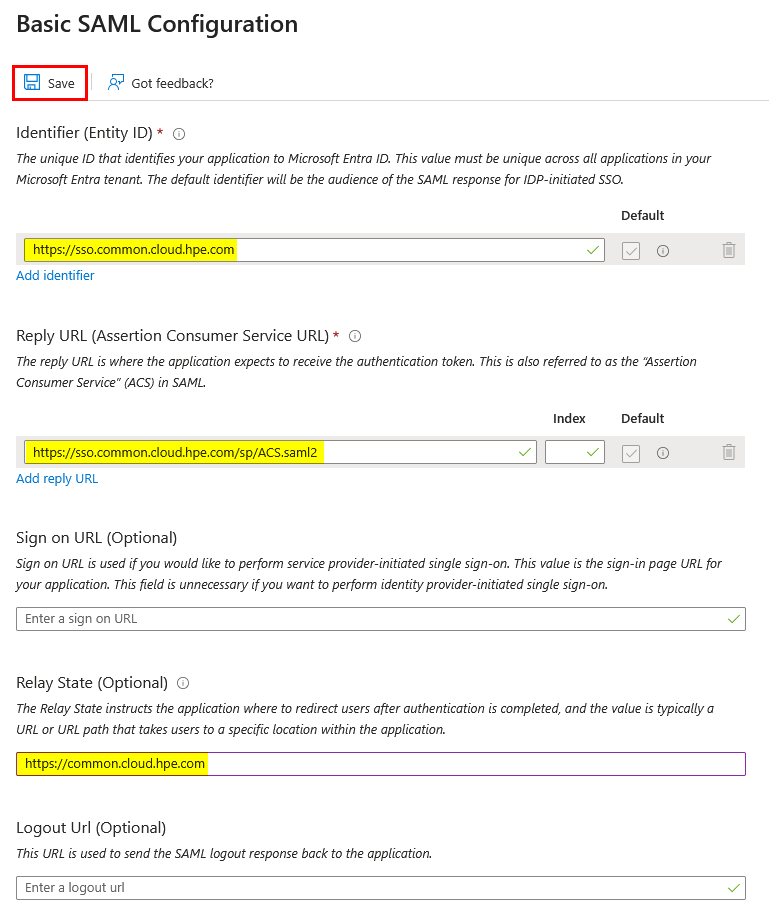
These fields are critical for establishing the SAML connection between your identity provider and HPE GreenLake. Each serves a specific purpose in the authentication flow:
- Identifier (Entity ID): Uniquely identifies HPE GreenLake as the service provider in the SAML federation
- Reply URL (Assertion Consumer Service URL): The endpoint where your identity provider sends SAML authentication responses
-
Relay State: Defines the destination URL where users land after successful authentication. This parameter enables Identity Provider initiated SSO (IdP-Initiated), allowing users to launch HPE GreenLake directly from your identity provider’s application portal without first navigating to the HPE GreenLake login page.
Important: The Relay State parameter is required for IdP-Initiated SSO functionality. Without this value configured, users attempting to access HPE GreenLake from your identity provider will encounter the error: “Please Specify Target - No Single Sign-On Target Specified”
-
Then click Save and close (X):
-
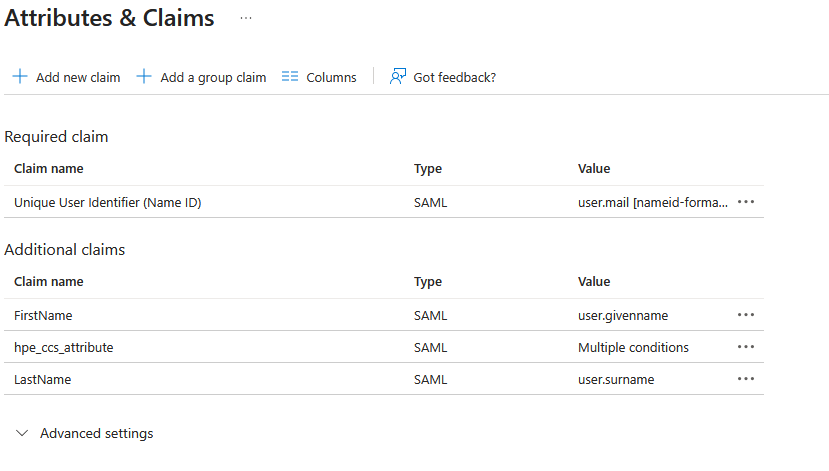
Under Attributes & Claims, click Edit:
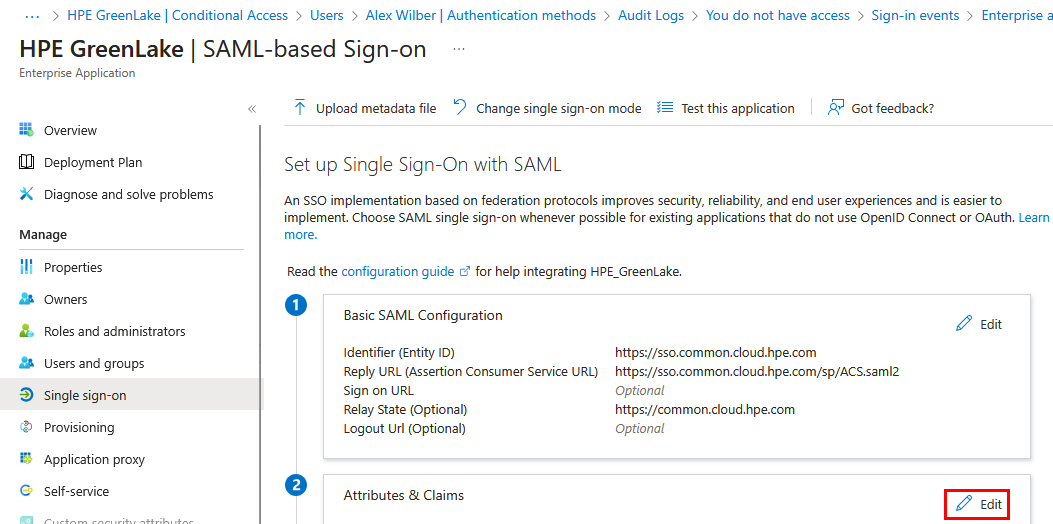
Important: Entra ID creates default SAML claims when you add a new enterprise application. Before configuring the required attributes, you must remove all default claims except for the Unique User Identifier (Name ID). These typically include claims with URIs like
http://schemas.xmlsoap.org/ws/2005/05/identity/claims/givenname,emailaddress,name, etc. Click the … menu next to each unwanted claim and select Delete to remove them.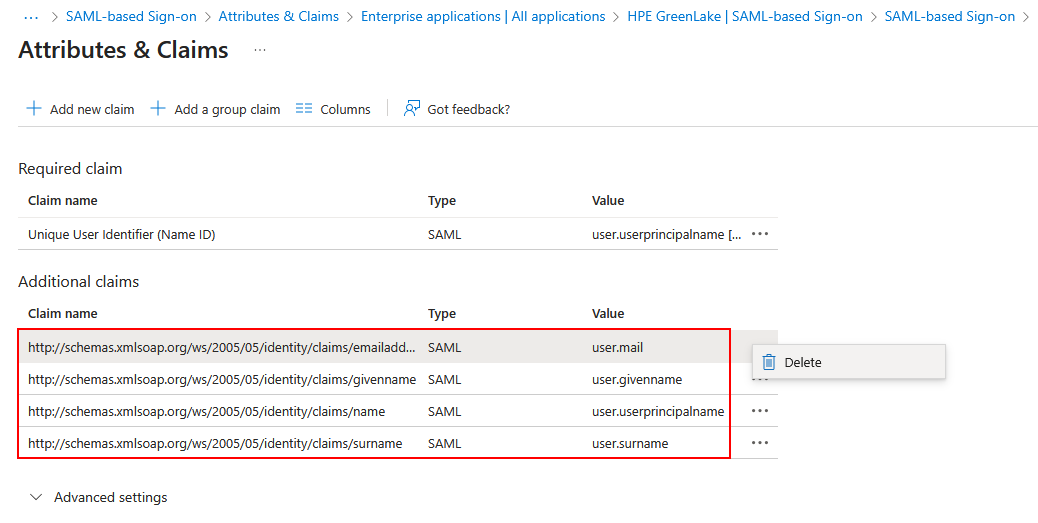
For the HPE GreenLake integration, the following SAML attributes must be defined:
Name Value Unique User Identifier (Name ID) user.emailFirstName user.firstNameLastName user.lastNamehpe_ccs_attribute See configuration below Important: Attribute names (FirstName, LastName, hpe_ccs_attribute) are case-sensitive and must match exactly as shown. The Unique User Identifier (Name ID) should already be configured with
user.emailby default - verify this setting but do not modify it.These SAML attributes define how user identity information is transmitted from Entra ID to HPE GreenLake during authentication:
- Unique User Identifier (Name ID): Maps the user’s email address to the SAML NameID, serving as the primary identifier for authentication
- FirstName: Provides the user’s given name for profile information
- LastName: Provides the user’s family name for profile information
- hpe_ccs_attribute: (Optional) Enables role-based access control when configured
-
Click on the Unique User Identifier (Name ID) claim. Verify that Source attribute is set to
user.mail. If it shows a different value, update it touser.mailand click Save.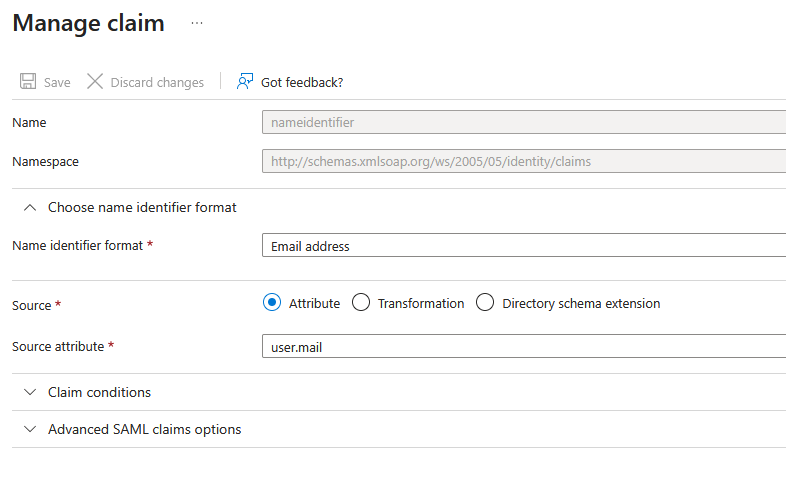
-
Add a claim named FirstName (case-sensitive) with Source attribute set to
user.givenname, then click Save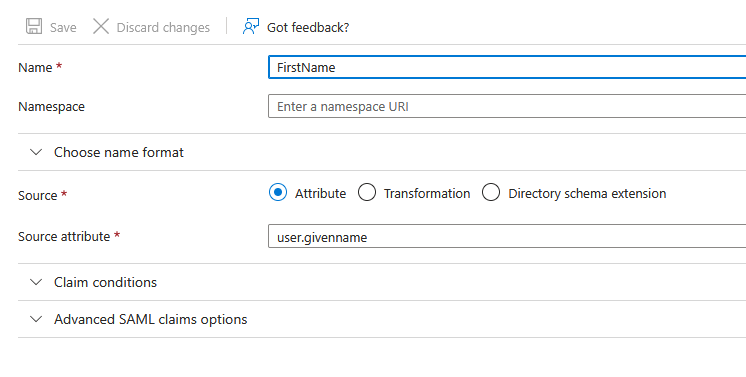
-
Add a claim named LastName (case-sensitive) with Source attribute set to
user.surname, then click Save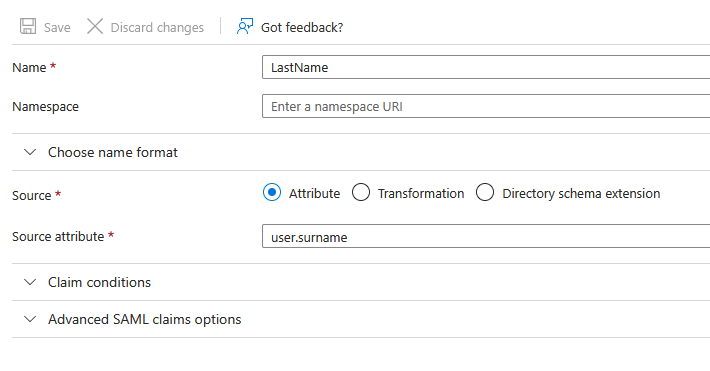
Verification: At this point, your Attributes & Claims section should contain only the Unique User Identifier (Name ID), FirstName, and LastName claims. If you see any other default claims (such as those with
http://schemas.xmlsoap.org/URIs), delete them now before proceeding. -
Add a claim named hpe_ccs_attribute (case-sensitive). This attribute enables role-based access control (RBAC) by mapping your Entra ID group to specific HPE GreenLake roles and permissions.
Note: This claim is optional. If you prefer to manage user authorization directly within the HPE GreenLake platform instead of through SAML attributes, you can skip this step.
Configure the claim with the following settings:
- Name:
hpe_ccs_attribute - In the Claim conditions section, enter:
- User type:
Any - Scoped Groups: Select the security group created earlier (i.e. HPE GreenLake)
- Source:
Attribute - Value: Enter your constructed attribute value (see below)
- User type:
The
hpe_ccs_attributevalue follows a specific format that defines workspace access, application permissions, and user roles. For detailed instructions on constructing this attribute value, including the required syntax and examples, refer to HPE GreenLake cloud SAML attribute for session-based authentication.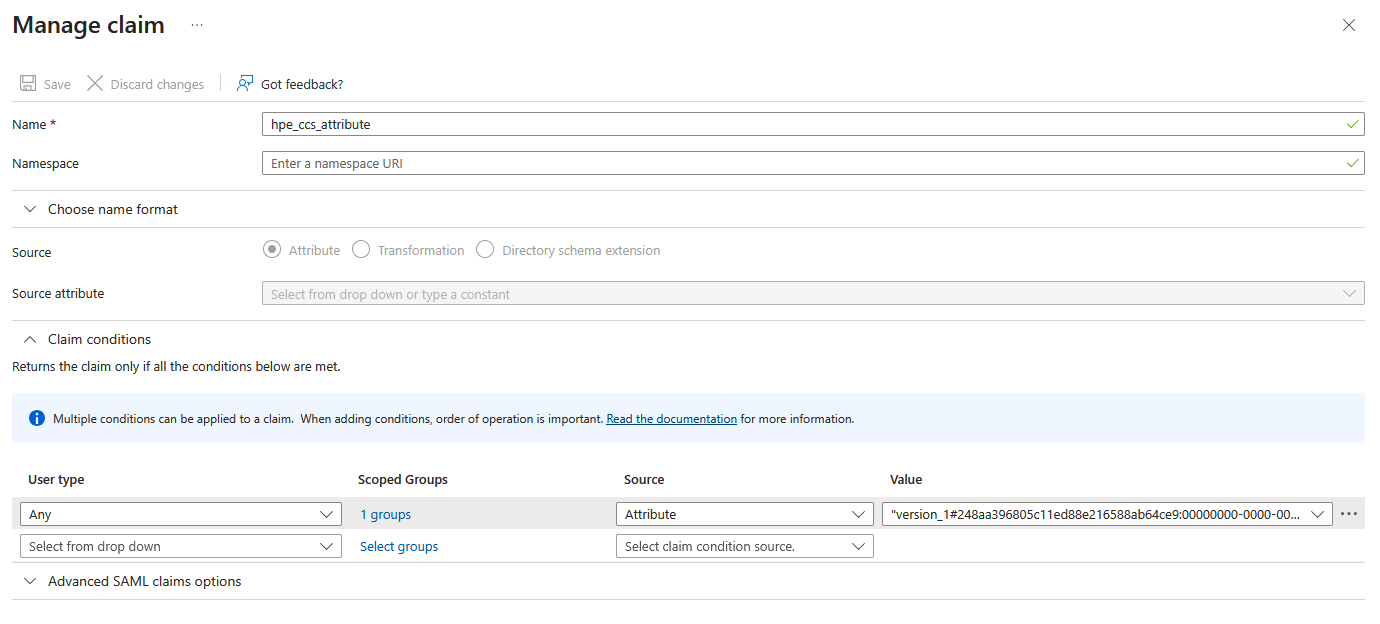
The
hpe_ccs_attributevalue follows this format:Single Workspace:
version_1#<workspace_id>:<app_id_1>:<role_1>:ALL_SCOPES:<app_id_2>:<role_2>:ALL_SCOPESMultiple Workspaces:
version_1#<workspace_id_1>:<app_id_1>:<role_1>:ALL_SCOPES:<app_id_2>:<role_2>:ALL_SCOPES#<workspace_id_2>:<app_id_1>:<role_1>:ALL_SCOPES:<app_id_2>:<role_2>:ALL_SCOPES-
Example 1 (single workspace, single service):
version_1#40aab0a48e5811f0bc31ca04dee87a18:00000000-0000-0000-0000-000000000000:Workspace Observer:ALL_SCOPESThis example grants:
- Observer access to the HPE GreenLake workspace
-
Example2 (single workspace, two services: HPE GreenLake and COM):
version_1#40aab0a48e5811f0bc31ca04dee87a18:00000000-0000-0000-0000-000000000000:Workspace Administrator:ALL_SCOPES:b394fa01-8858-4d73-8818-eadaf12eaf37:Compute Ops Management administrator:ALL_SCOPESThis example grants:
- Administrator access to the HPE GreenLake workspace
- Administrator access to Compute Ops Management
-
Example3 (two workspaces, two services: HPE GreenLake and COM):
version_1#248aa396805c11ed88e216588ab64ce9:00000000-0000-0000-0000-000000000000:Workspace Observer:ALL_SCOPES:b394fa01-8858-4d73-8818-eadaf12eaf37:Compute Ops Management administrator:ALL_SCOPES#34652ff0317711ec9bc096872580fd6d:00000000-0000-0000-0000-000000000000:Workspace Observer:ALL_SCOPES:b394fa01-8858-4d73-8818-eadaf12eaf37:Compute Ops Management administrator:ALL_SCOPESThis example grants:
- Observer access to the HPE GreenLake workspaces
- Administrator access to Compute Ops Management
To construct the
hpe_ccs_attributevalue, you need to gather three key pieces of information from your HPE GreenLake workspace:- Workspace ID: The unique identifier for your HPE GreenLake workspace
- Service ID: The unique identifier for each service you want to grant access to
- Role: The permission level to assign for each service
How to Find These Values:
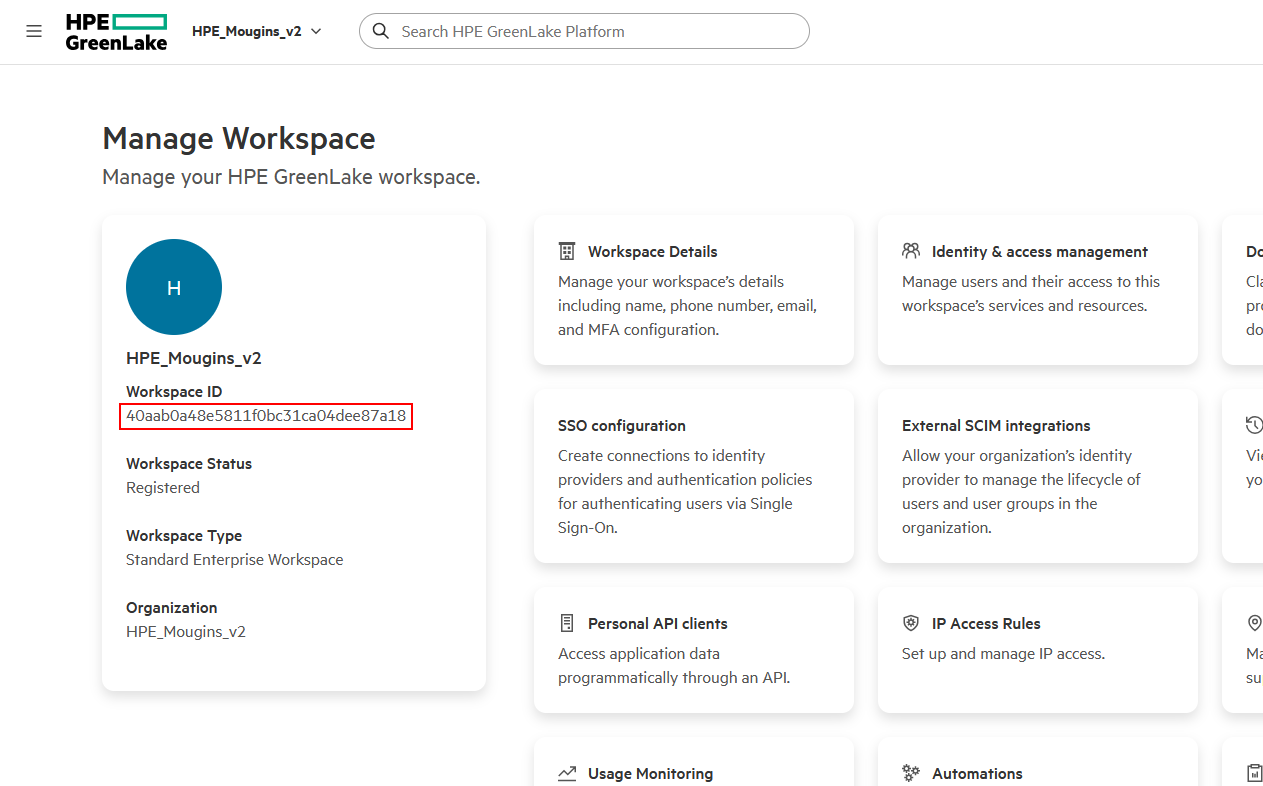
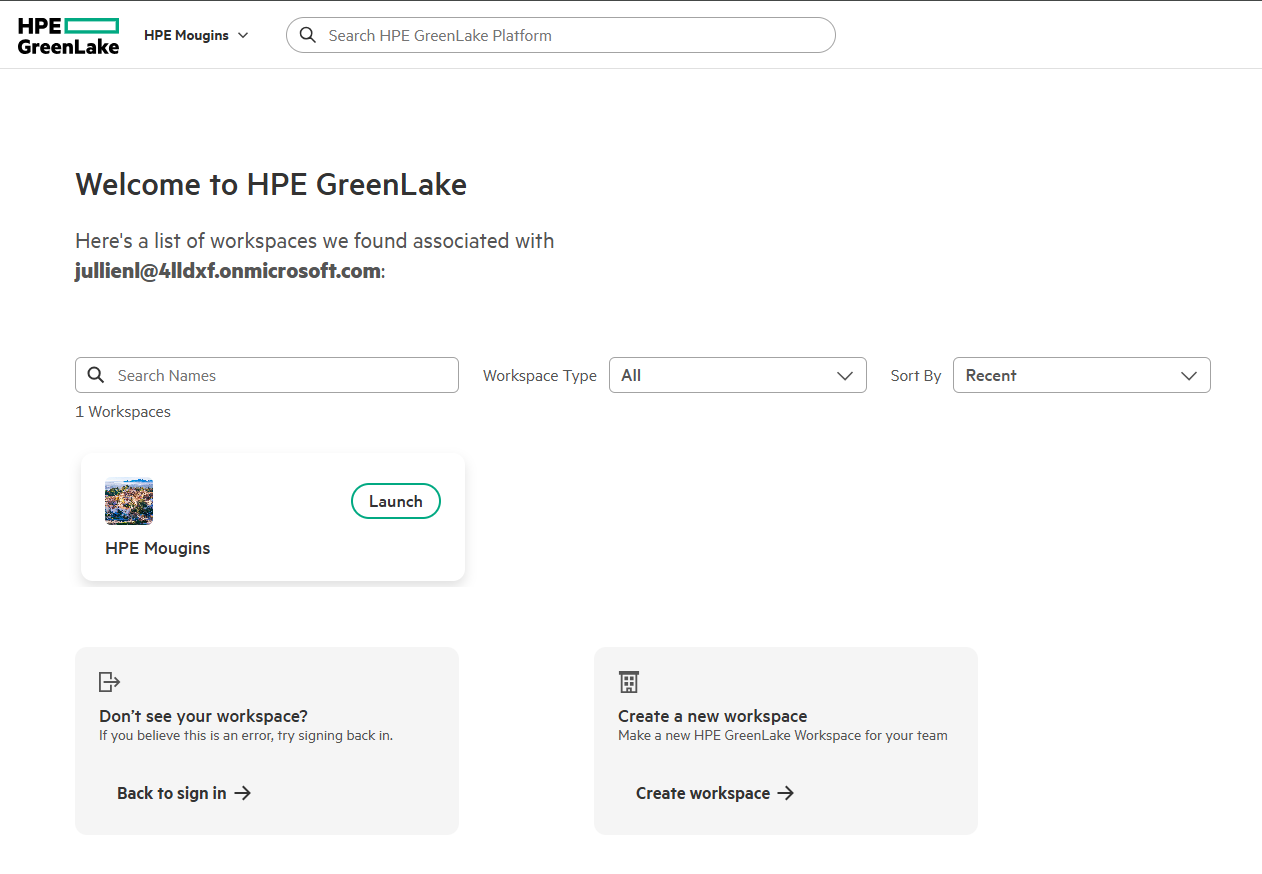
- Locate Your Workspace ID:
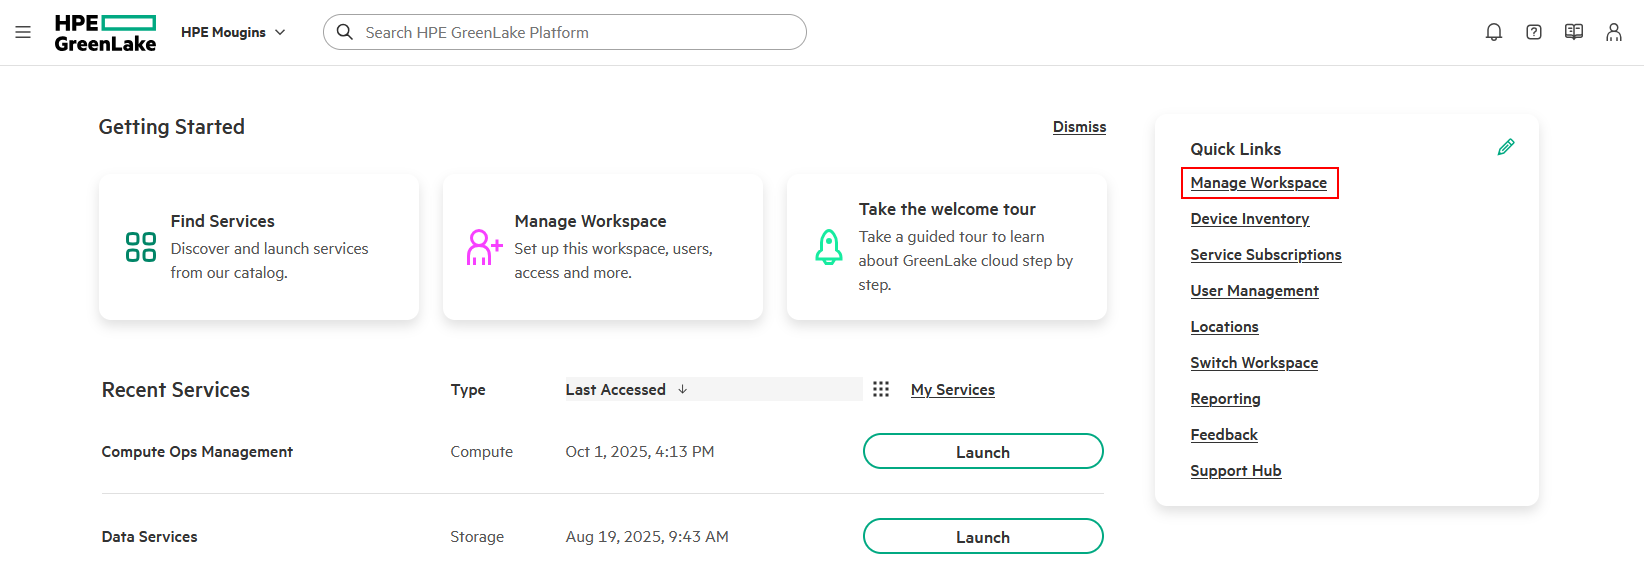
- Log in to HPE GreenLake at https://common.cloud.hpe.com/
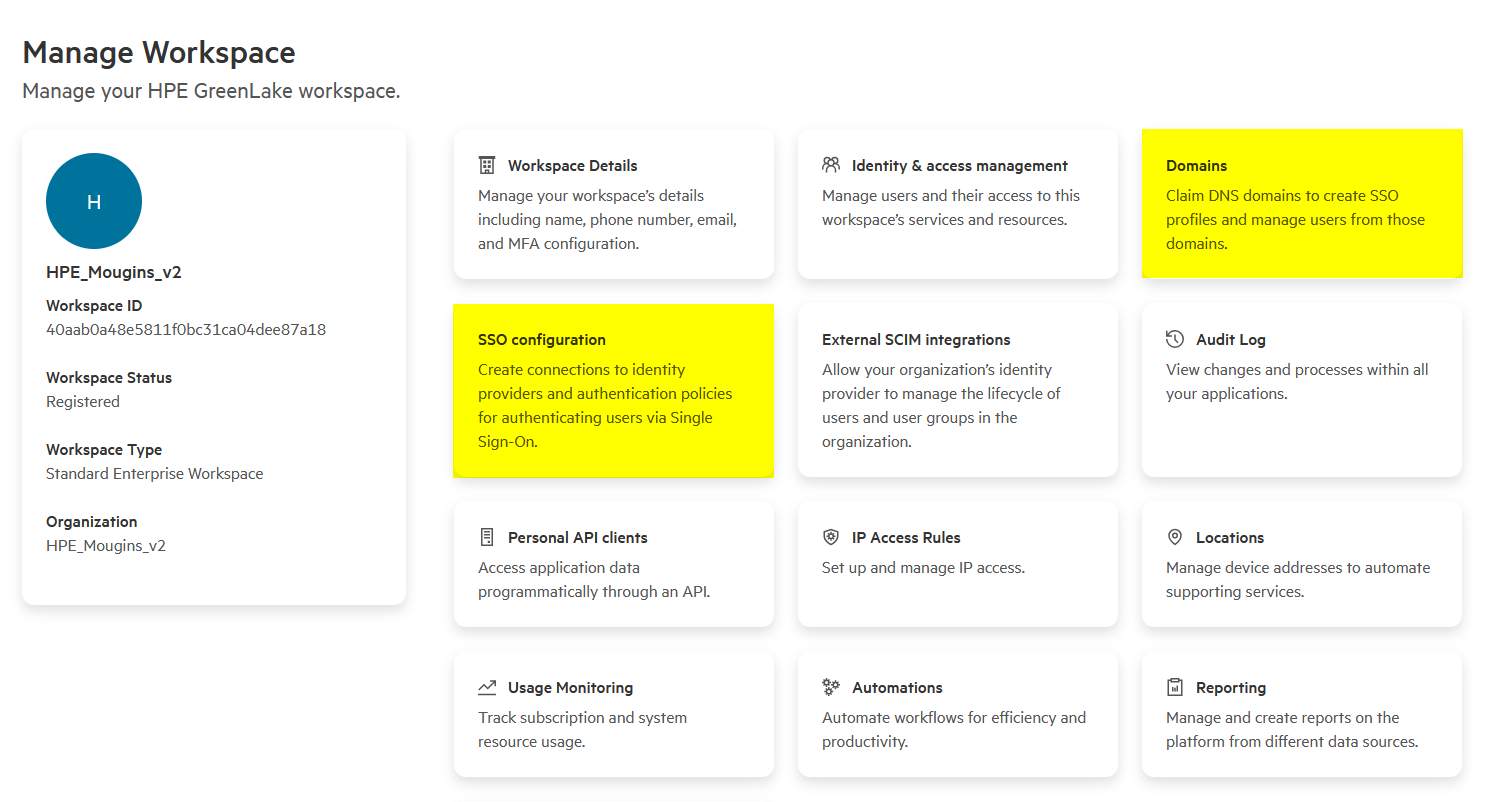
- Navigate to Manage Workspace
-
The Workspace ID is displayed on the workspace card.
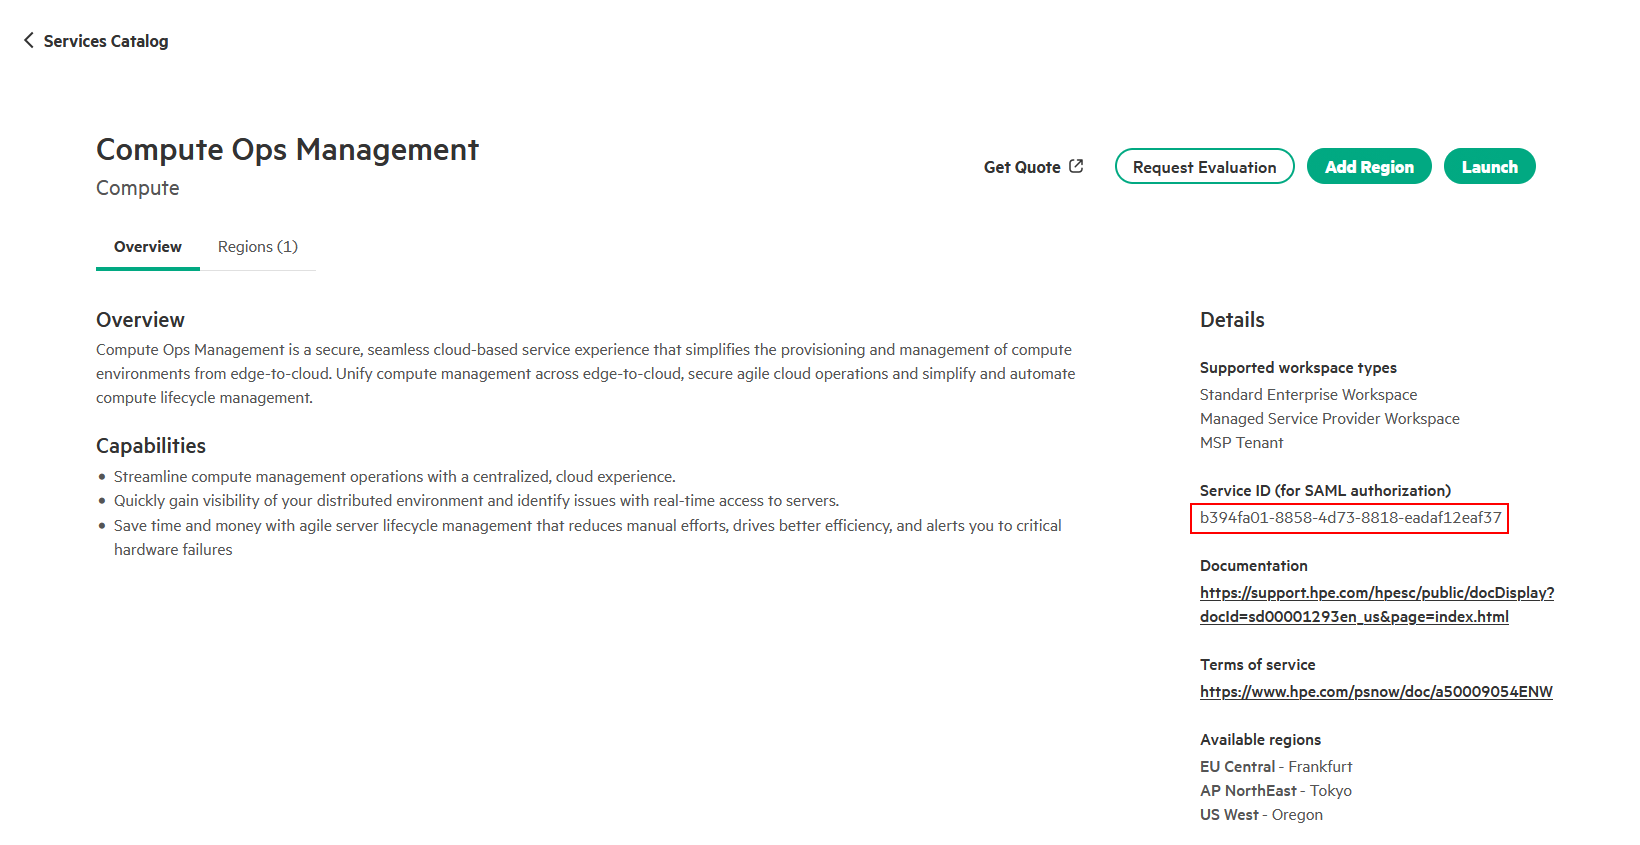
- Find Service IDs:
- Navigate to Services → Catalog in HPE GreenLake
- Select the service you want to grant access to
-
In the Details section, locate and copy the Service ID
Common Application IDs:
- HPE GreenLake Platform:
00000000-0000-0000-0000-000000000000 - Compute Ops Management:
b394fa01-8858-4d73-8818-eadaf12eaf37
- Identify Available Roles:
- Navigate to Manage Workspace → Identity & access management → Roles & permissions
-
Review the available roles for each application
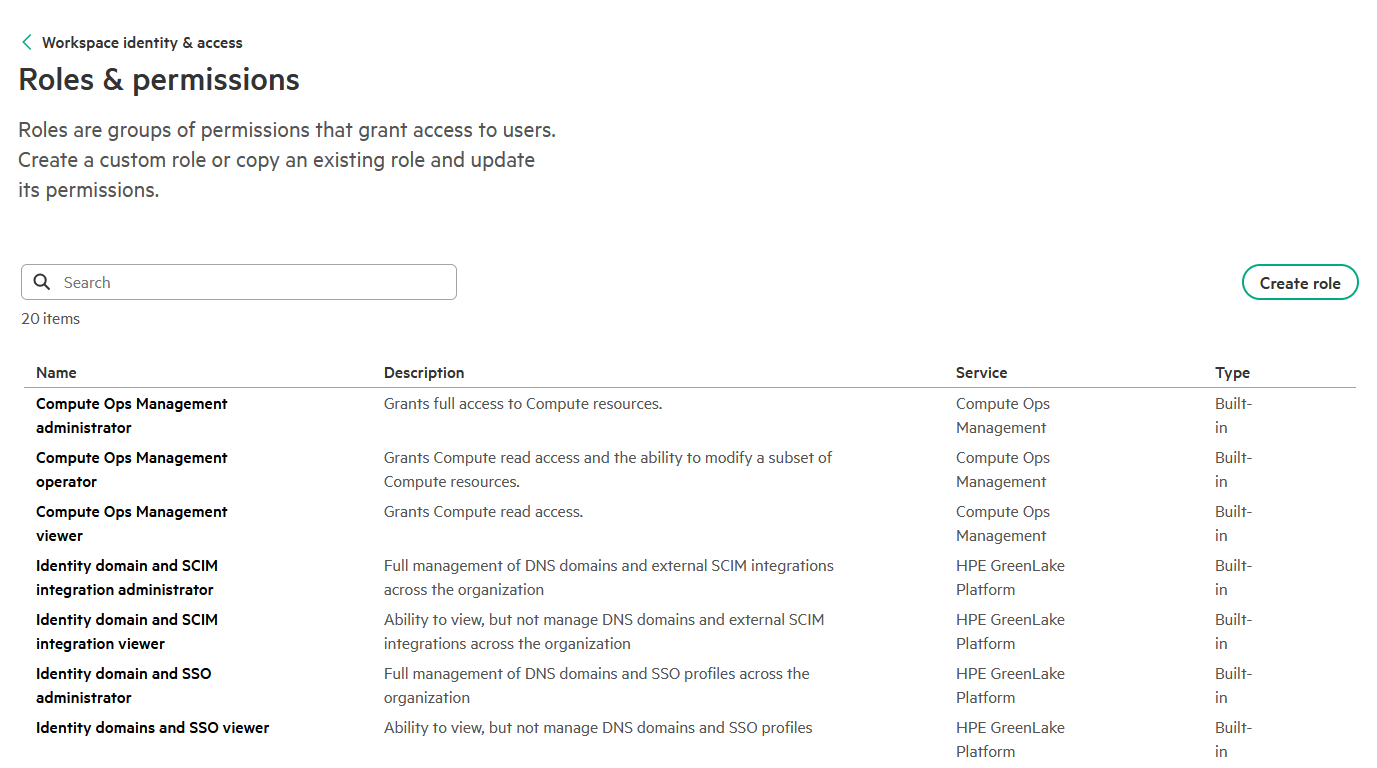
Note: Role names are case-sensitive and must match exactly as displayed in the HPE GreenLake console. Always verify role names before adding them to your SAML attribute configuration.
Common Roles:
Workspace Administrator: Full administrative access to the workspaceWorkspace Observer: Read-only access to workspace resourcesCompute Ops Management administrator: Full access to COM featuresCompute Ops Management viewer: Read-only access to COM features
- Name:
-
Once completed, your final claims configuration should include only:
-
The SAML SSO configuration is now complete, you can close the Attributes & Claims page. To proceed with the HPE GreenLake integration, you need to obtain the Federation Metadata. Navigate to the SAML Certificates tile and locate the App Federation Metadata Url. Click Copy to copy the metadata URL to your clipboard.
RECOMMENDATION: Use Metadata URL (Not Manual XML Upload)
Why? Identity providers rotate SAML certificates every 2-3 years. When certificates expire:
- ❌ Manual XML: Users cannot authenticate until you manually upload new certificate
- ✅ Metadata URL: Positions you for potential future automatic updates (feature under consideration)
Current State (Nov 2025): HPE GreenLake retrieves metadata at configuration time but doesn’t auto-refresh. However, configuring the URL today positions you for seamless updates when this feature launches.
What to do: Always configure the metadata URL in HPE GreenLake, even though manual updates are still required today.
This completes the Entra ID application configuration for HPE GreenLake. You can now proceed to Step 2 to register Entra ID as your identity provider in the HPE GreenLake platform.
Step 2: Register Entra ID in HPE GreenLake
With your Entra ID application now configured, the next step is to register Entra ID as a trusted identity provider within the HPE GreenLake platform. This process establishes the trust relationship that enables single sign-on and involves three key activities: claiming and verifying your organization’s domain, creating an SSO connection using the metadata from Entra ID, and defining an authentication policy to link the domain to the SSO connection.
Official Documentation: For detailed instructions on configuring SSO in HPE GreenLake, refer to the HPE GreenLake User Guide - Configuring SSO for organization users.
To complete the registration in HPE GreenLake, your account must be assigned one of the following roles:
- Workspace Administrator: A comprehensive role with full administrative access.
- Identity domain and SSO administrator: A specific role designed for managing SSO and domain configurations.
Note: While a Workspace Administrator can perform these actions, the Identity domain and SSO administrator role is purpose-built for this task and follows the principle of least privilege.
IMPORTANT: Enhanced IAM Workspaces Only
The SSO configuration steps in this guide apply exclusively to HPE GreenLake workspaces with enhanced Identity and Access Management (IAM). This guide is not compatible with legacy IAM workspaces.
-
For legacy IAM workspaces, do not use this guide. Instead, refer to the legacy SAML SSO configuration guide.
⚠️ Warning: If your workspace uses legacy IAM, the HPE GreenLake interface will show different menus and navigation paths. The configuration steps in this guide will not match your interface. Always verify your workspace type first to ensure you follow the correct procedure for your environment.
How to Verify Your Workspace Type:
Navigate to Manage Workspace and look for one of these indicators:
-
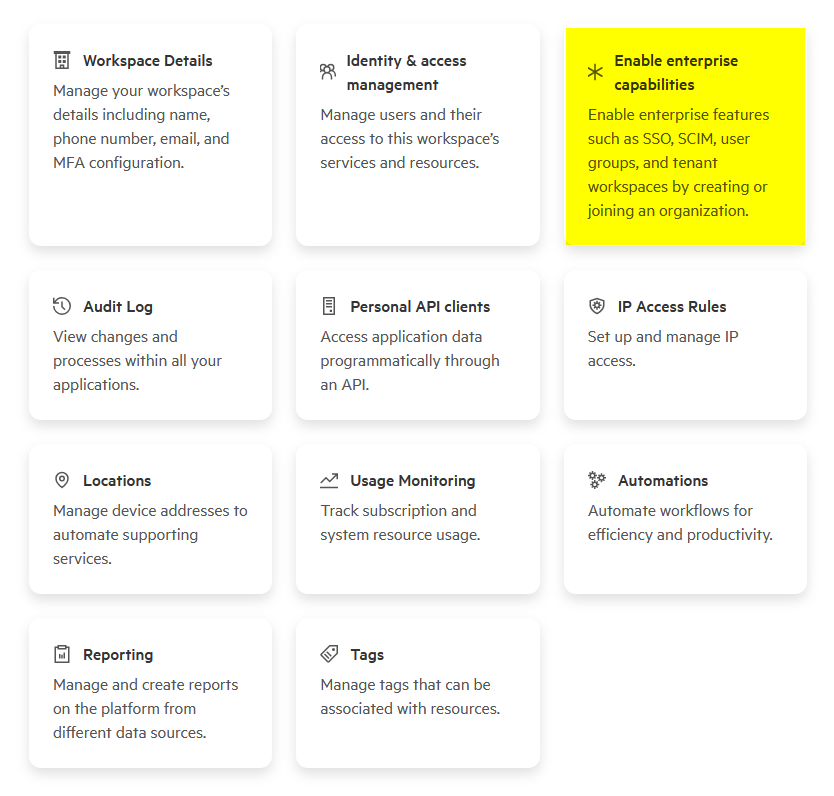
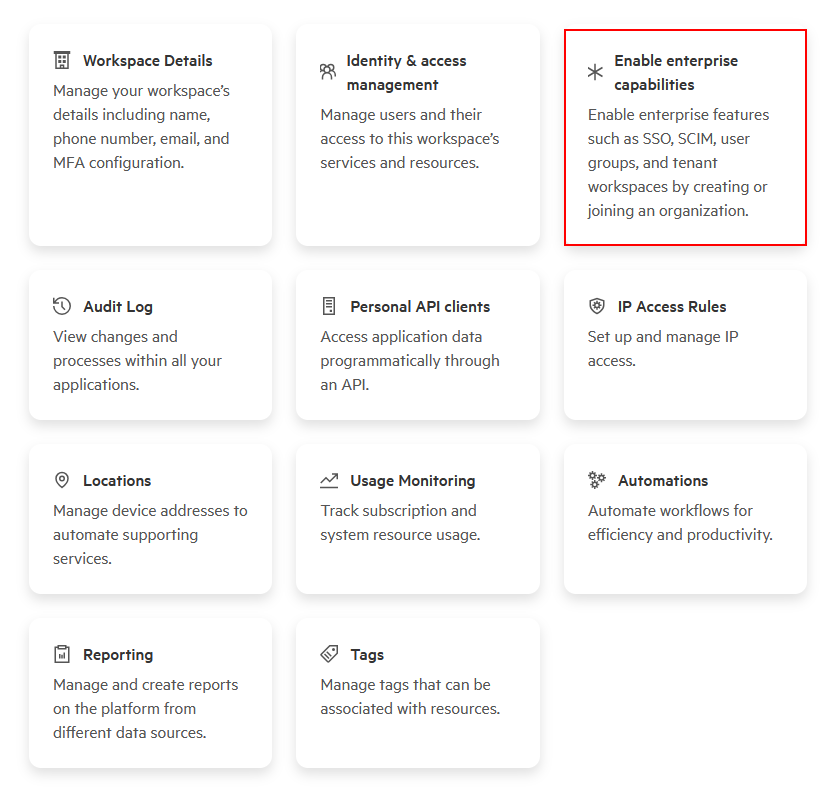
New workspace (not yet activated): If you see Enable enterprise capabilities, your workspace uses enhanced IAM but hasn’t been activated yet:
-
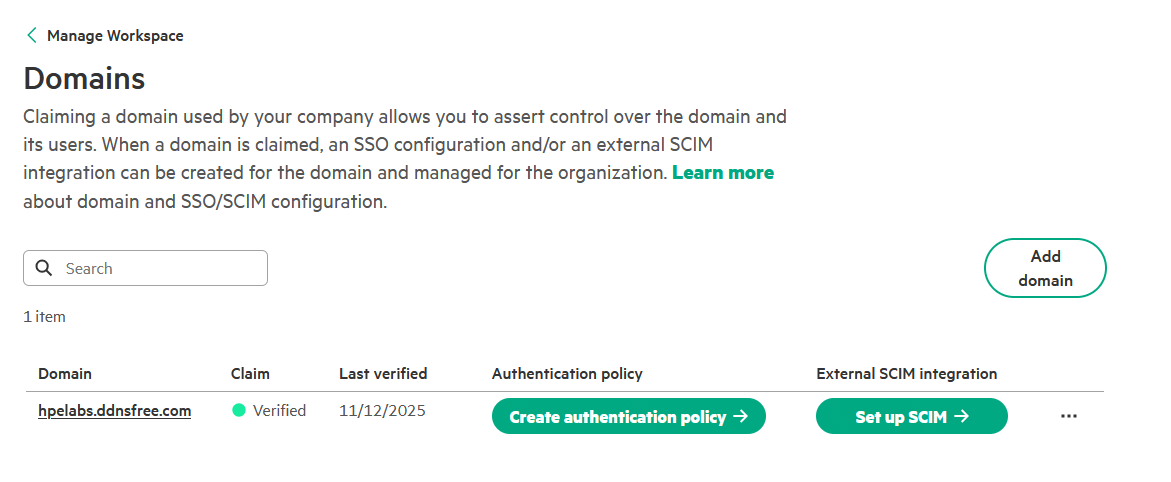
Activated workspace: If you see SSO configuration and Domains tiles, your workspace uses enhanced IAM and is ready for SSO configuration:
If you don’t see any of these elements, your workspace uses legacy IAM and requires a different configuration procedure.
-
1. Claim and verify a domain
The first step is to claim and verify the domain you will use for single sign-on. To prove ownership, you must add a unique TXT record, provided by HPE GreenLake, to your domain’s DNS settings. Once the record is published, HPE GreenLake verifies it, enabling the domain for SSO configuration.
-
Log in to HPE GreenLake at https://common.cloud.hpe.com/
-
Navigate to Manage Workspace
-
Navigate to Manage Workspace → SSO configuration.
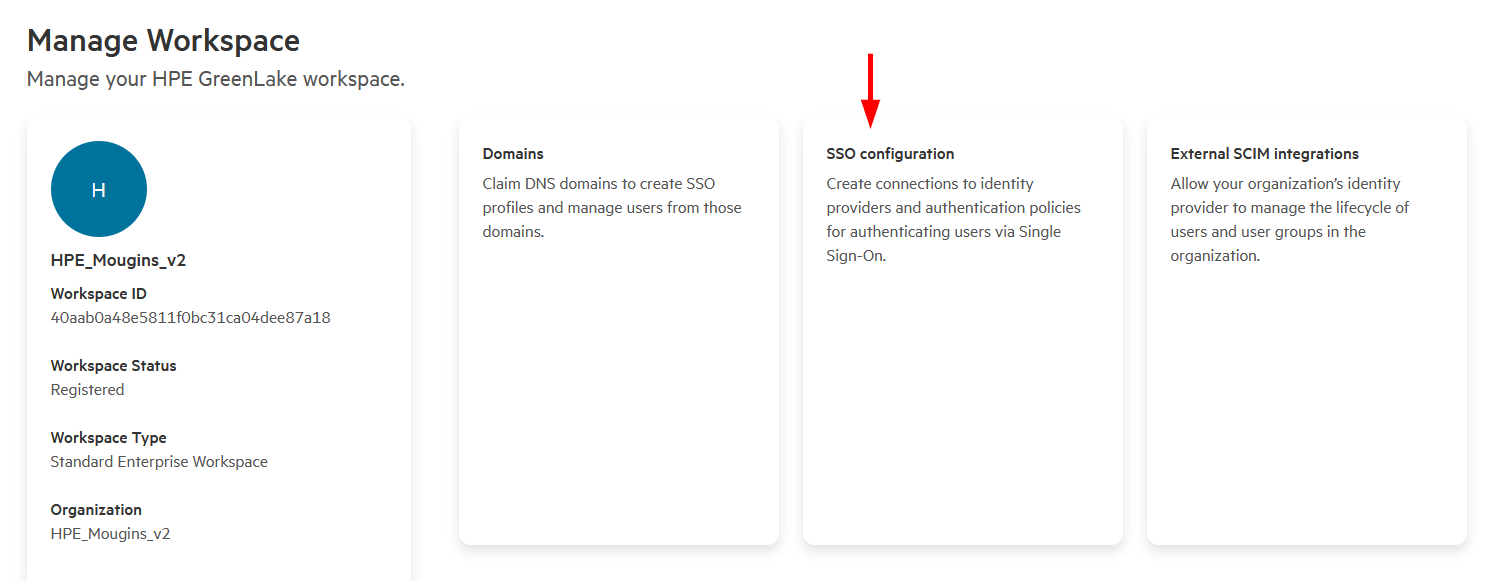
Important note: If you don’t see the SSO configuration tile, you must first enable enterprise capabilities for your workspace:
-
Click Enable enterprise capabilities to unlock single sign-on functionality
-
Organization setup (recommended for multiple workspaces): If you manage multiple standalone workspaces, follow these best practices:
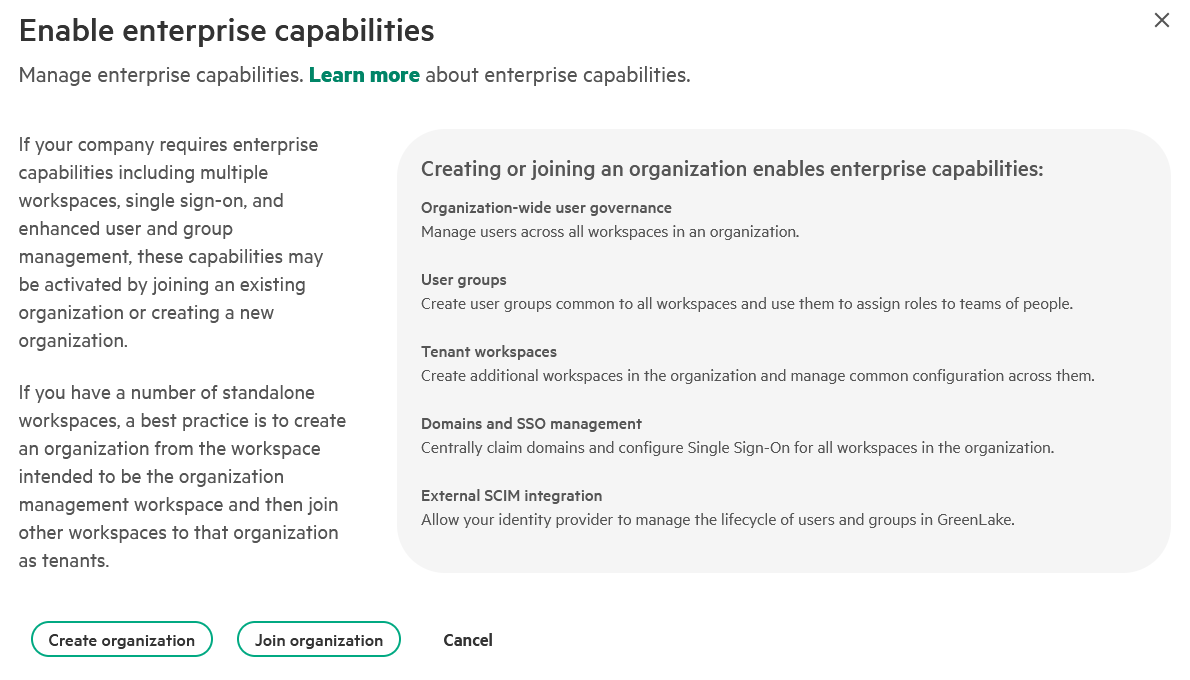
- Create an organization from your primary workspace (this becomes the organization management workspace)
- Join other workspaces to this organization as member tenants
- Benefits:
- Centralized SSO management across all workspaces
- Organization-wide user governance
- Simplified administration and consistent security policies
- Shared domain claiming: A domain can only be claimed once globally. By creating an organization, you claim the domain in the organization management workspace and automatically enable SSO for all member workspaces—eliminating the need to claim the domain separately for each workspace.
Note for MSP Workspaces: If you’re managing an MSP (Managed Service Provider) workspace, enterprise capabilities are automatically enabled, and you won’t see the “Enable enterprise capabilities” card. Each MSP tenant workspace is created as a separate organization with its own directory. SSO configuration works the same way—simply proceed to the domain claiming step below.
To learn more, see Enterprise capabilities in workspaces with enhanced IAM
-
-
Click Add Domain to begin the SAML domain setup.

-
Enter your domain name (e.g.,
your-company.com) and click Claim domain.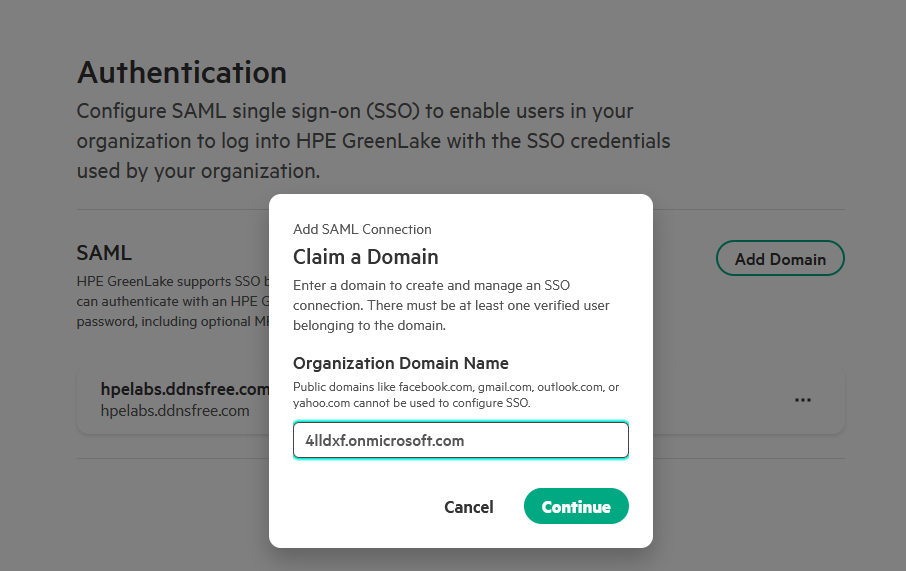
Important: A domain can only be claimed by one HPE GreenLake workspace globally. This one-to-one mapping prevents configuration conflicts and ensures your domain is uniquely associated with a single workspace.
-
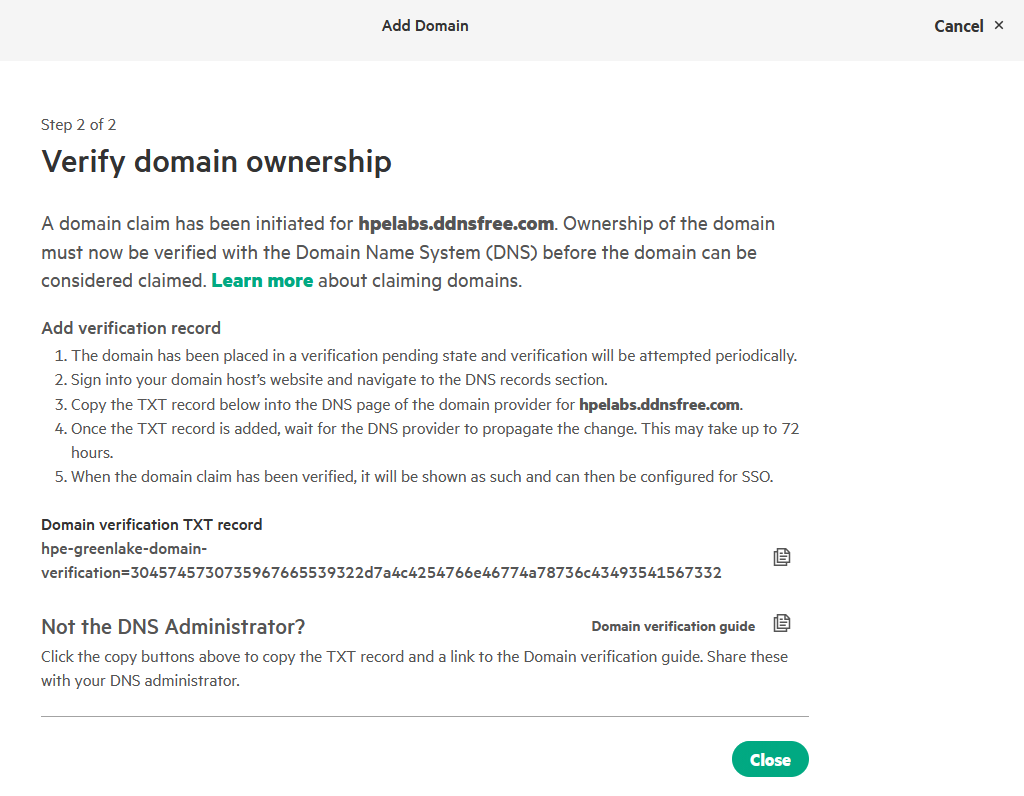
Follow the on-screen instructions to verify domain ownership by adding the provided TXT record to your domain’s DNS settings.
-
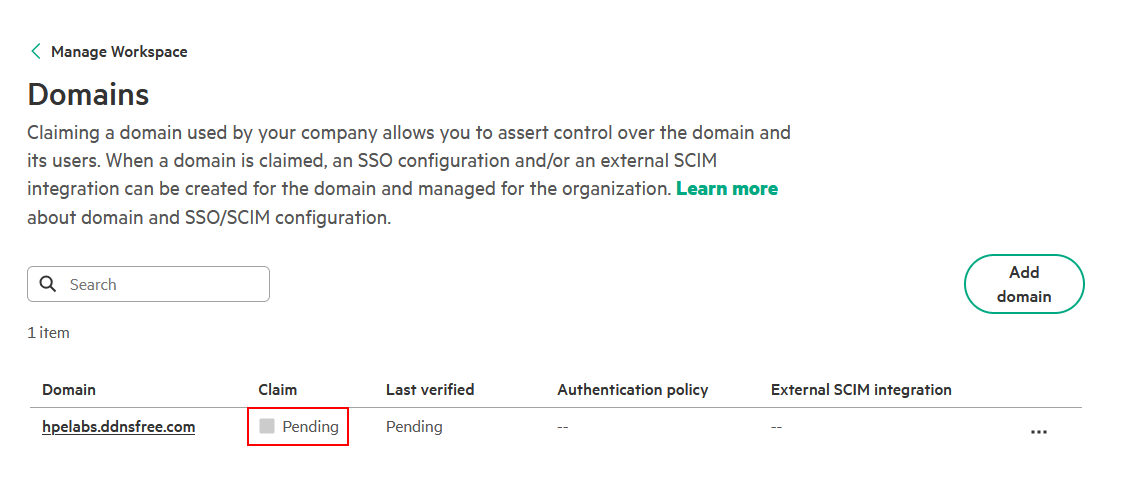
Click Close. On the Domains page, the domain is listed with a claim status of Pending.
-
Click on … and select the Verify domain now option.
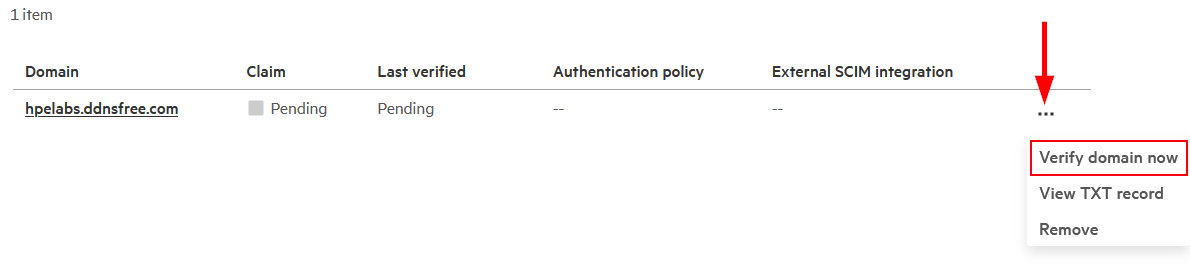
-
The claim status will update to Verified. If it remains Pending, this is typically due to DNS propagation delays. Wait a few minutes before trying to verify again.
2. Create a SSO connection between the platform and the IdP
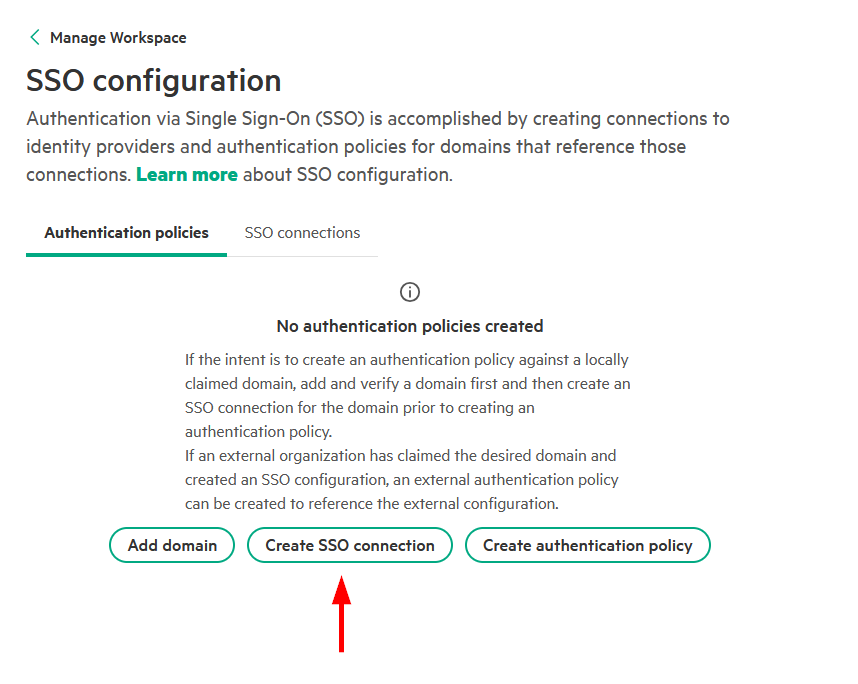
-
Once the domain claim is complete, navigate back to Manage Workspace → SSO configuration and click Create SSO connection.
-
On the Create SSO connection page, enter a descriptive SSO connection name (e.g.,
Entra ID SSO). Ensure SAML 2.0 is selected as the authentication protocol, then click Next.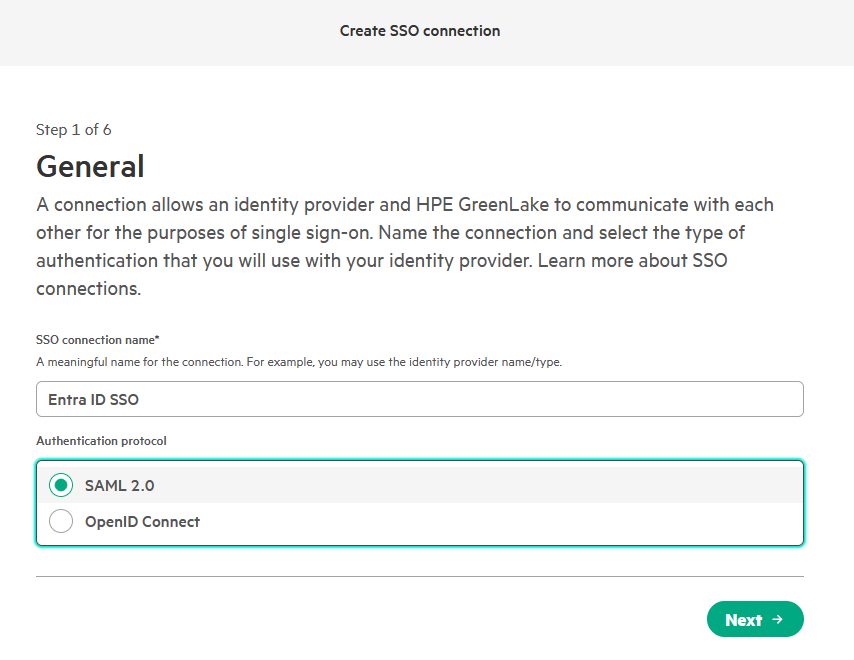
-
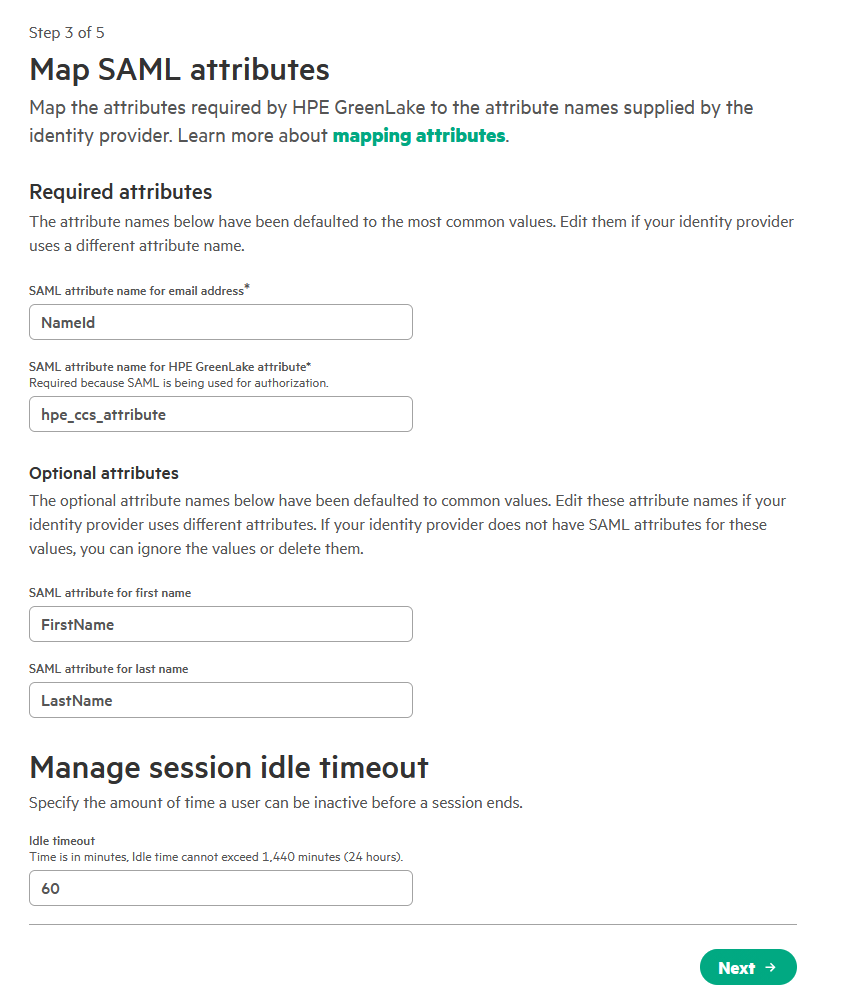
On the Map SAML attributes page, review the default configuration. These mappings must correspond to the claims configured in Entra ID during Step 1.
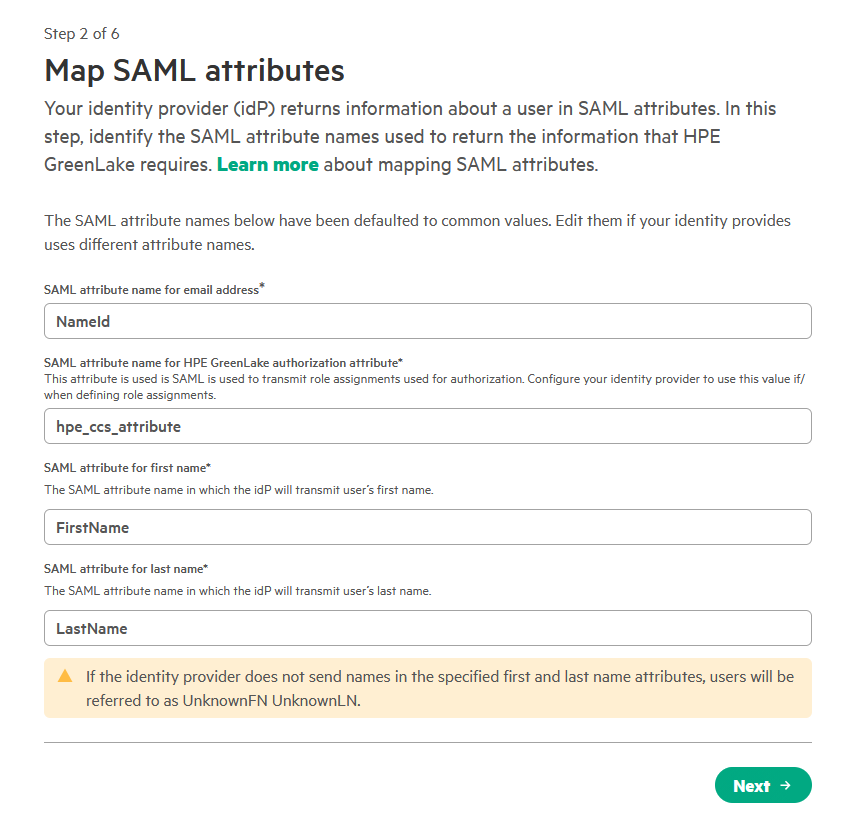
The default mappings should align with the claims configured in Entra ID. Verify that the following attributes are correctly mapped, then click Next:
- NameId: The unique user identifier.
- FirstName: The user’s first name.
- LastName: The user’s last name.
- hpe_ccs_attribute: (Optional) For role-based access control.
Note: These mappings are critical for user identification and authorization. Incorrect values will cause authentication failures or permission errors.
-
On the Configure your identity provider for HPE GreenLake page, review the HPE GreenLake
Entity ID,ACS URLandDefault relay state. These are the same values you used to configure the SAML application in your identity provider. Click Next.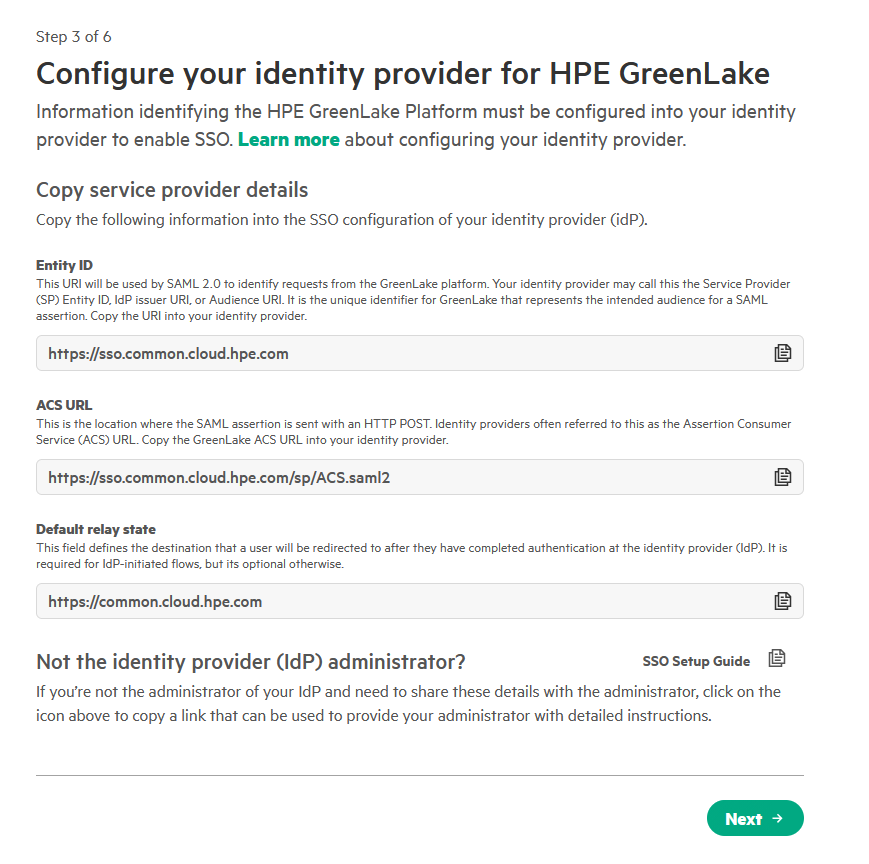
-
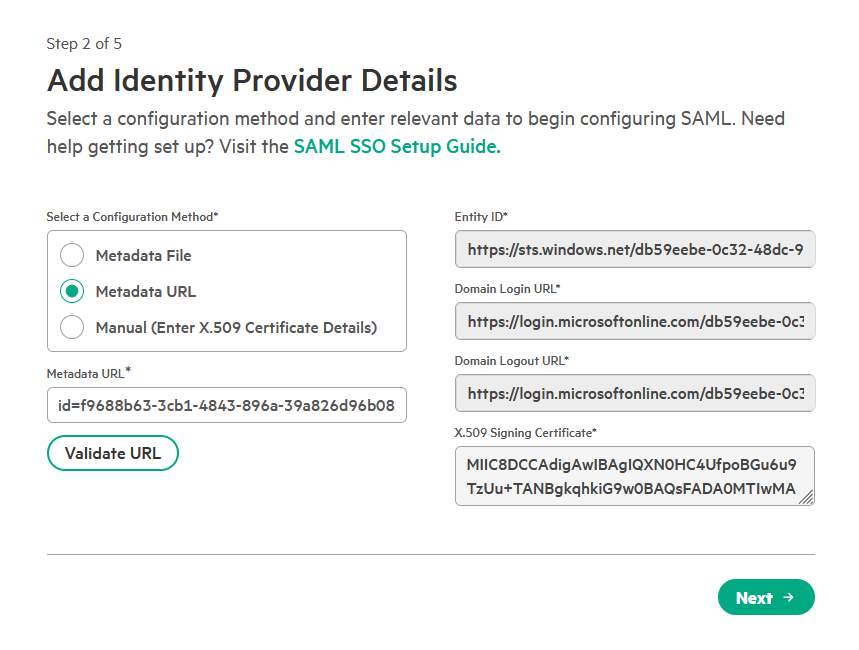
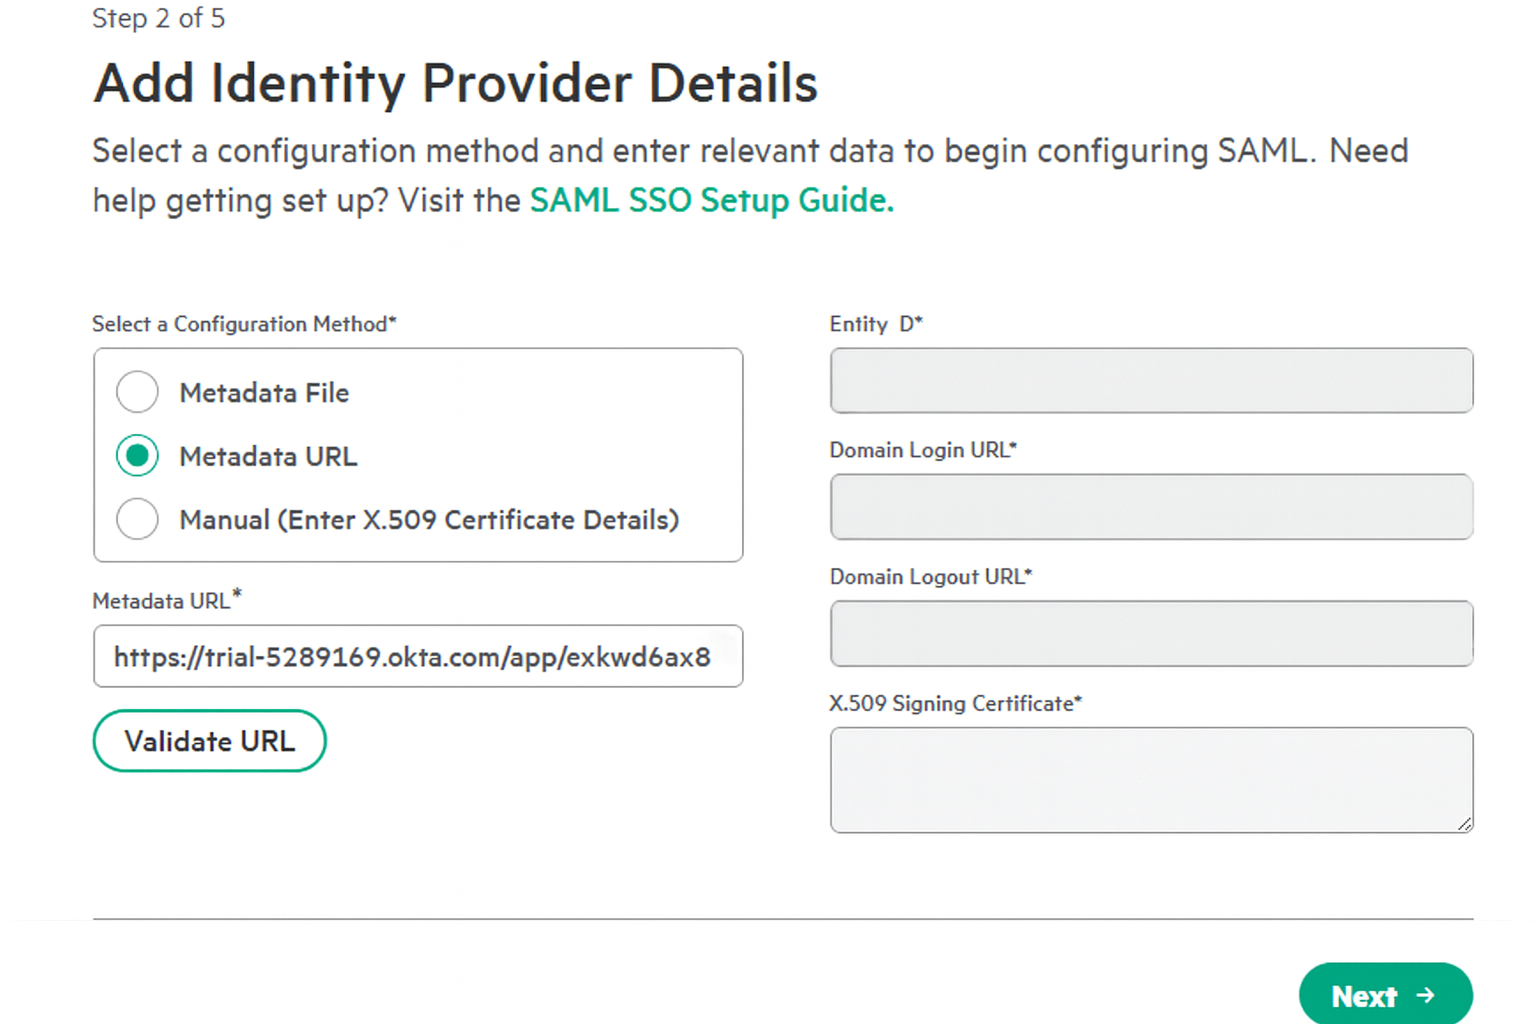
On the next page, you will configure the connection to your identity provider. Select Specify a metadata URL.
-
Paste the App Federation Metadata Url copied from your identity provider in Step 1. Click Validate URL to automatically populate the configuration details.
Note: Using the metadata URL future-proofs your configuration. Although HPE GreenLake does not yet auto-refresh certificates (as of Nov 2025), this method positions you for seamless updates when the feature becomes available, preventing future authentication outages caused by certificate rotation. The Upload a metadata XML file method requires you to manually re-upload the file every time your identity provider’s signing certificate rotates, risking authentication downtime. The Manual entry of configuration details method is error-prone and carries the same risk of authentication failure during certificate rotation as the XML upload method.
-
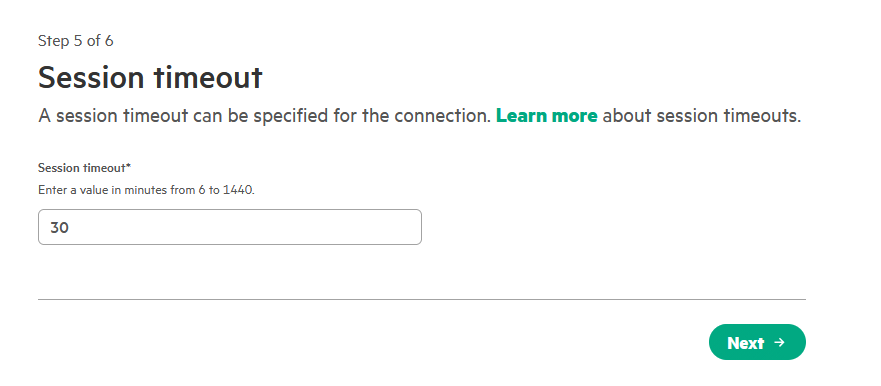
On the Session timeout page, enter the desired session duration (e.g., 30 minutes) and click Next.
-
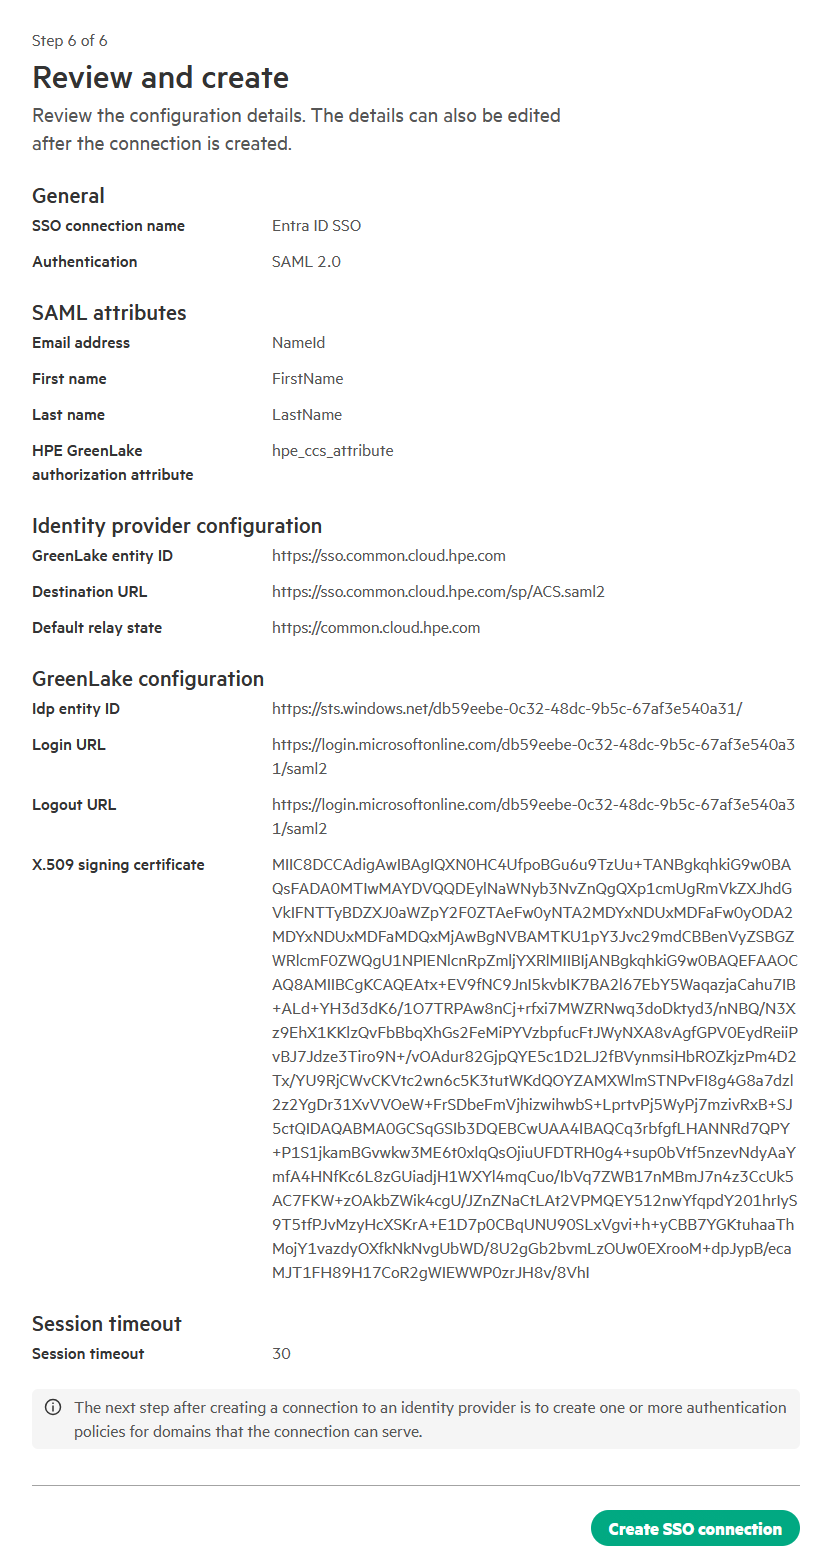
On the Review and create page, verify your settings and click Create SSO connection.
-
The SSO connection is now created and listed on the SSO configuration page.

3. Configure an authentication policy
With the SSO connection established, the final step is to create an authentication policy. This policy links your verified domain to the SSO connection, activating single sign-on for your users.
-
Return to the SSO configuration page and click Create authentication policy.
- On the General step 1 page, configure the following settings:
- Domain type: Select Verified domain. This option is for internal organization users whose email addresses belong to a domain you own and have verified.
- Domain: Choose your claimed domain from the dropdown menu.
-
SSO connection: Select the SSO connection you created in the previous step.
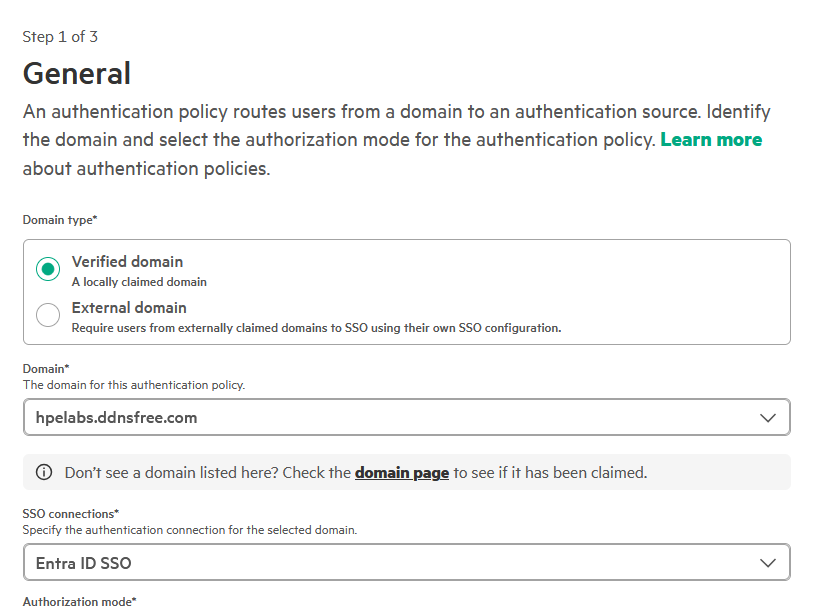
Note: Do not select External domain. That option is used to grant access to external partners or contractors and is outside the scope of this guide.
-
In the Authorization mode section, select how user permissions are managed. Your choice depends on whether you configured the
hpe_ccs_attributein your identity provider (Step 1):-
If you configured
hpe_ccs_attributein Step 1:-
Select SSO role assignments.
This option enables dynamic role-based access control (RBAC) by leveraging the
hpe_ccs_attributefrom your SAML response. User permissions are assigned in real-time during each SSO session, ensuring that access to workspaces and roles is always up-to-date based on your identity provider’s configuration.
-
-
If you did not configure
hpe_ccs_attributein Step 1:-
Select Local role assignments.
This option decouples authentication from authorization. Users authenticate via your identity provider, but their roles and permissions are managed directly within the HPE GreenLake platform. With this approach, you must manually invite users and assign roles within HPE GreenLake after the SSO configuration is complete.
How It Works:
-
Navigate to Manage Workspace → Identity & access management.
-
Click Add Users, select New user, and enter the user’s email address.
Important: The user’s email address must belong to the SSO-claimed domain (e.g.,
user@your-sso-domain.com). -
Use the Assign role button to grant the necessary permissions.
-
The user will receive an invitation and can then log in via SSO. Their access will be determined by the roles assigned in HPE GreenLake.
-
-
-
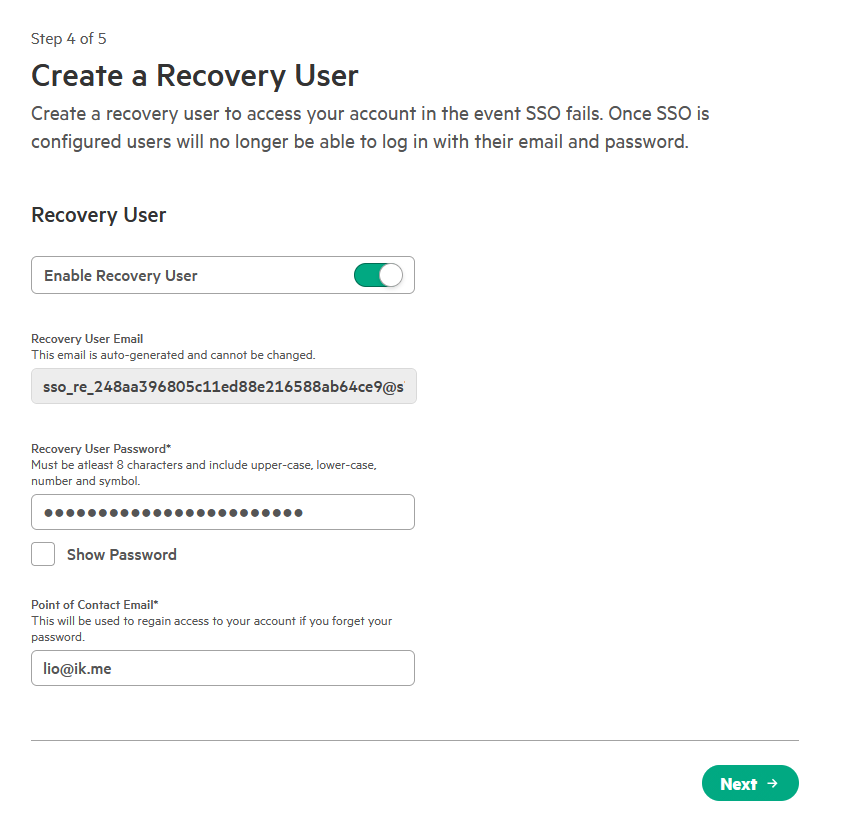
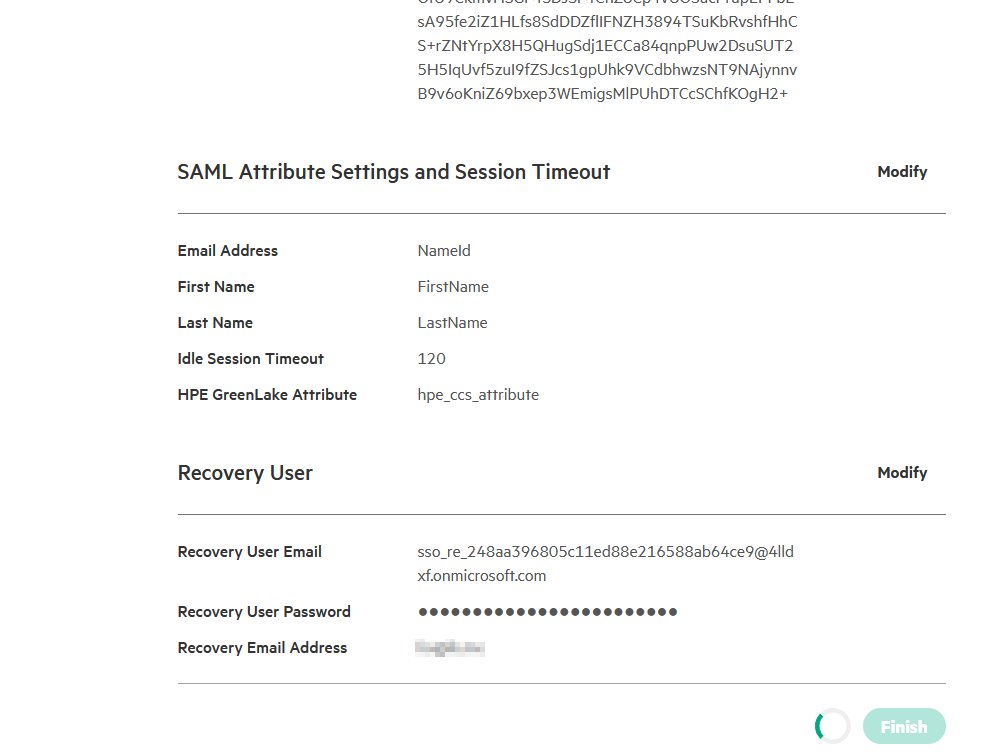
On the Recovery account page, enable Create a recovery account to prevent lockout if SSO authentication fails.
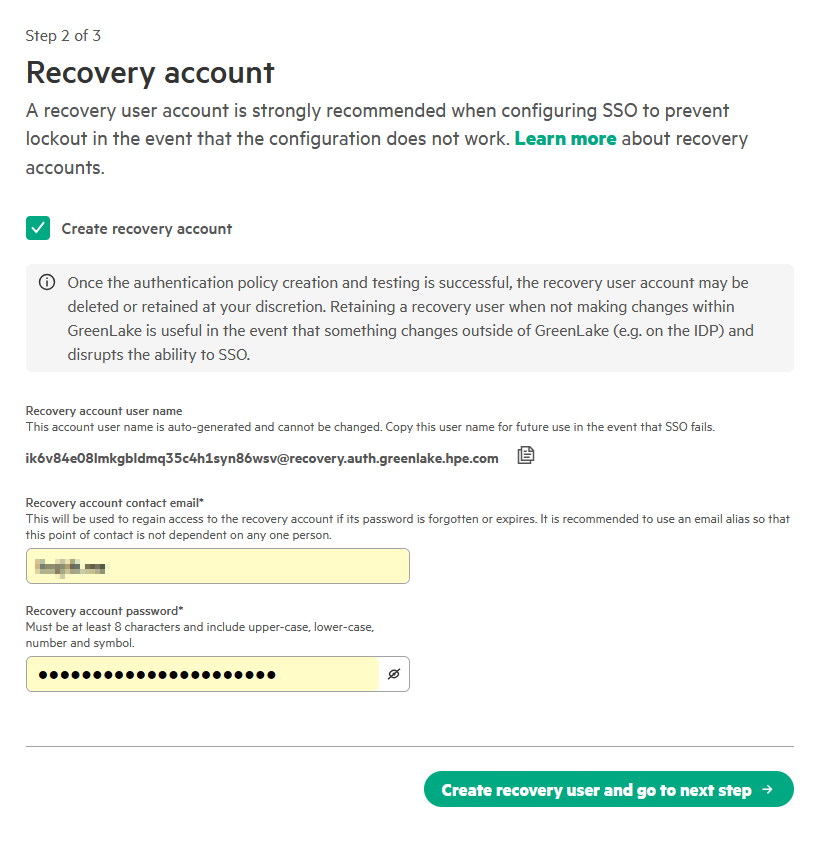
A recovery user account is strongly recommended when configuring SSO to prevent lockout in the event that the configuration does not work. This account provides emergency “break-glass” access when normal SSO authentication is unavailable.
Configuration Details:
- Recovery account user name: This username is auto-generated and cannot be changed. Copy this value (e.g.,
ik6v84e081mkgbldmq35c4h1syn86wsv@recovery.auth.greenlake.hpe.com) immediately and store it securely. - Recovery account contact email: Enter a shared team email alias (e.g.,
admin-team@company.com) rather than a personal address. This email will be used to regain access to the recovery account if its password is forgotten or expires. It is recommended to use an email alias that is not dependent on any one person so that this point of contact is not dependent on any one person. - Recovery account password: Must be at least 8 characters and include upper-case, lower-case, number, and symbol.
When to Use: Access this recovery account if SSO fails due to identity provider misconfiguration, certificate expiration, network issues, or policy errors.
Post-Deployment: Once the authentication policy creation and testing is successful, the recovery user account may be deleted or retained at your discretion. Retaining a recovery user account even when not making further changes within GreenLake is useful in the event that something changes outside of GreenLake (e.g. on the IDP) and disrupts the ability to SSO.
Security Best Practice: Store the recovery account credentials in your organization’s password vault or break-glass procedure documentation with appropriate access controls.
- Recovery account user name: This username is auto-generated and cannot be changed. Copy this value (e.g.,
-
On the Review and create page, carefully verify all your settings then click Create authentication policy to finalize the setup.

-
The authentication policy is now created and listed on the SSO configuration page. Initially, it will show a Configuring status.
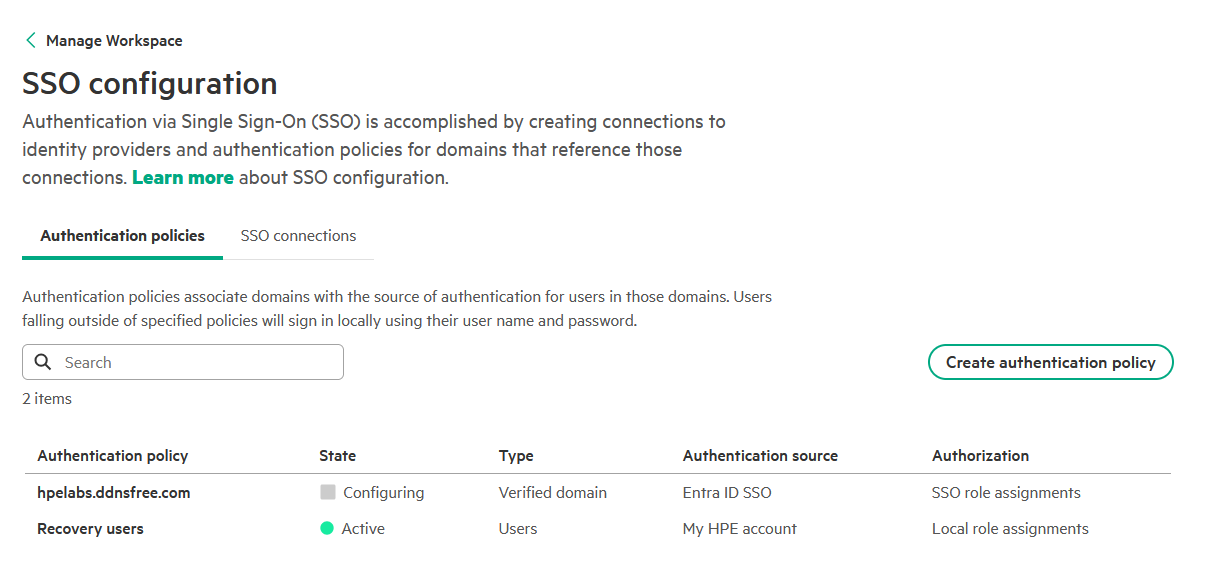
-
After a few moments, the status updates to Active, confirming that SSO is now enabled for your domain.
Step 3: Testing SAML SSO Authentication
Once the SAML SSO configuration is complete, it’s important to verify that authentication is working correctly before rolling it out to all users.
Test the SSO SP-Initiated login flow (User starts at HPE GreenLake)
Service Provider (SP) initiated SSO is the authentication flow that begins when users access HPE GreenLake directly by navigating to the login page. This is the most common authentication method where users enter their email address on the HPE GreenLake login page, and the system redirects them to your configured identity provider for authentication.
Authentication Flow: User → HPE GreenLake → Entra ID → Back to HPE GreenLake
-
To ensure a clean test without cached credentials, open a new private browser window (e.g., Incognito, InPrivate) and navigate to the HPE GreenLake login page: https://common.cloud.hpe.com/
-
Click on the Sign in with SSO button
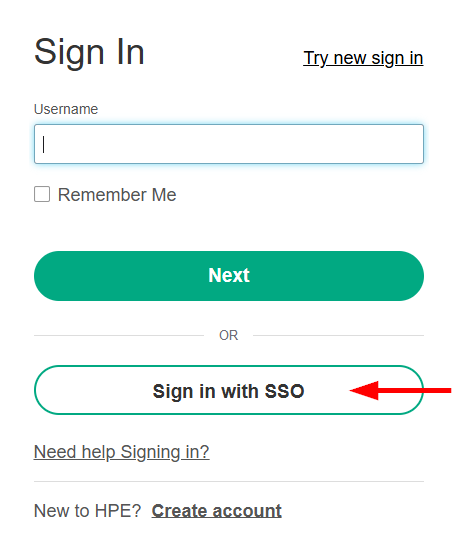
-
Enter your verified email address from the SSO-claimed domain (e.g.,
lionel@hpelabs.ddnsfree.com) and click Continue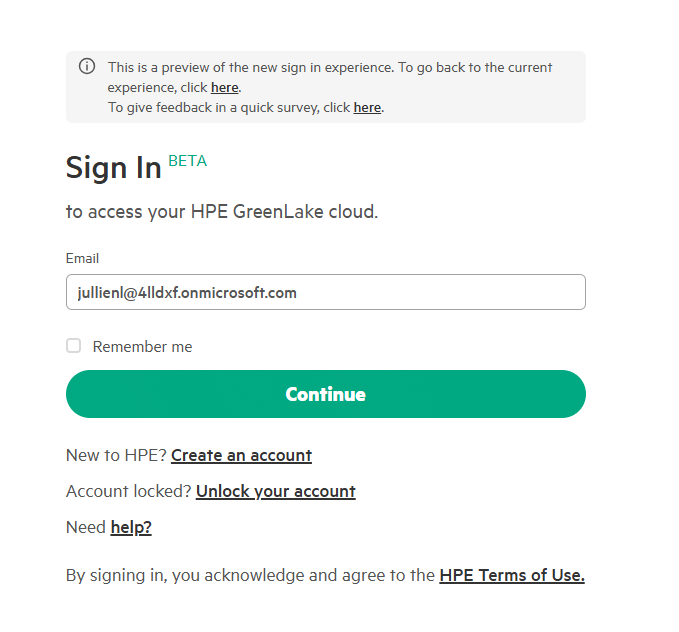
-
You will be redirected to your Entra ID login page. Authenticate using your organizational credentials

Note: If prompted for authentication, complete the required authentication method (such as push notification approval) configured in your Conditional Access policy.
-
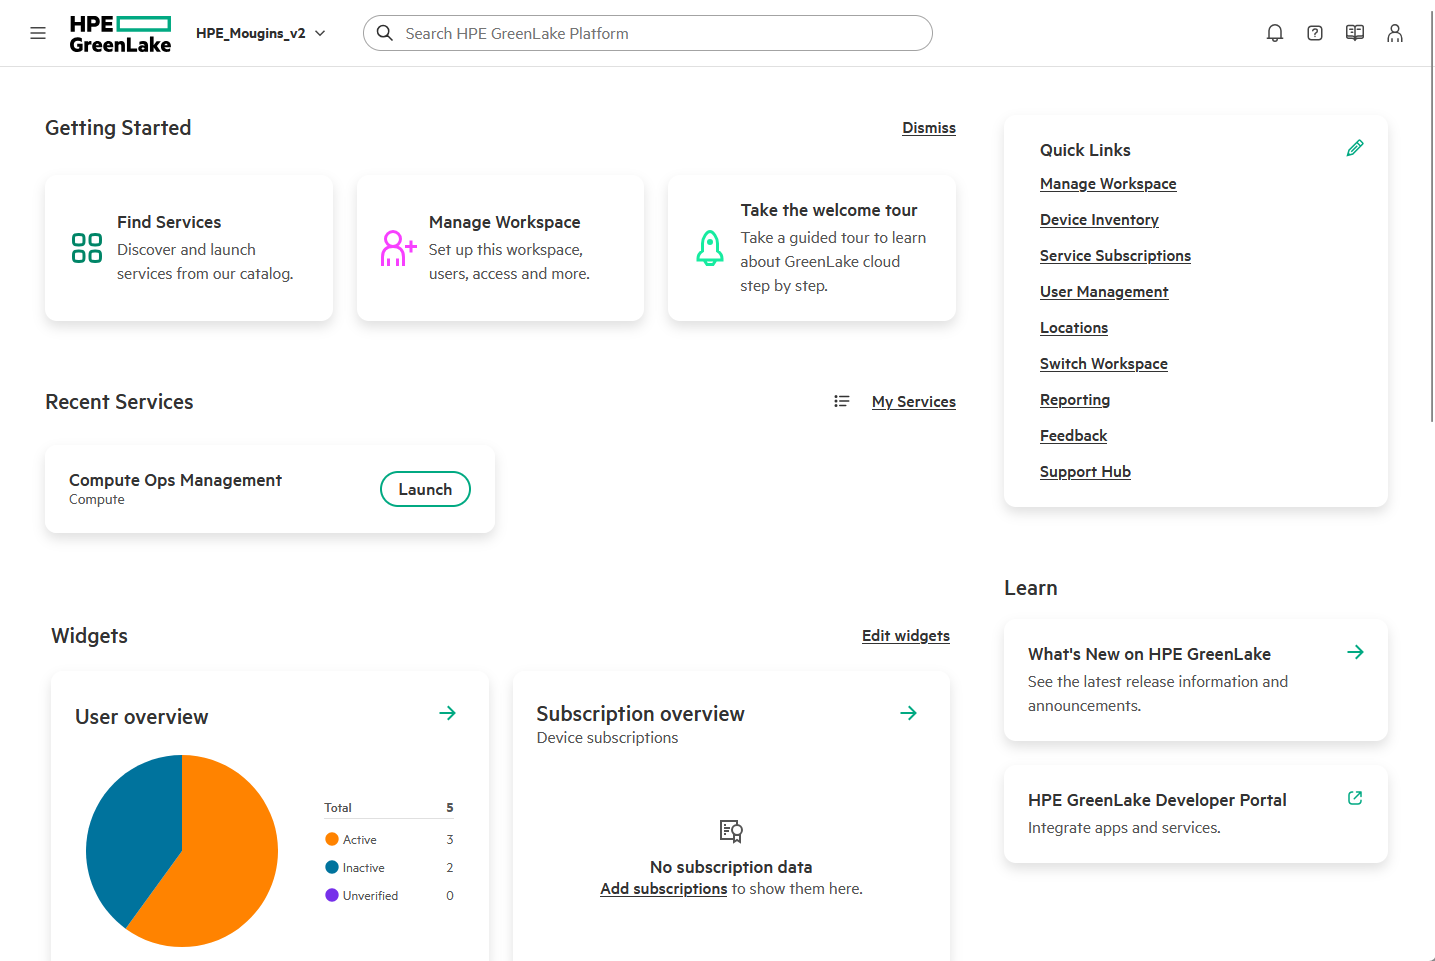
After successful authentication, you should be redirected back to HPE GreenLake and automatically logged in
Verify the authentication
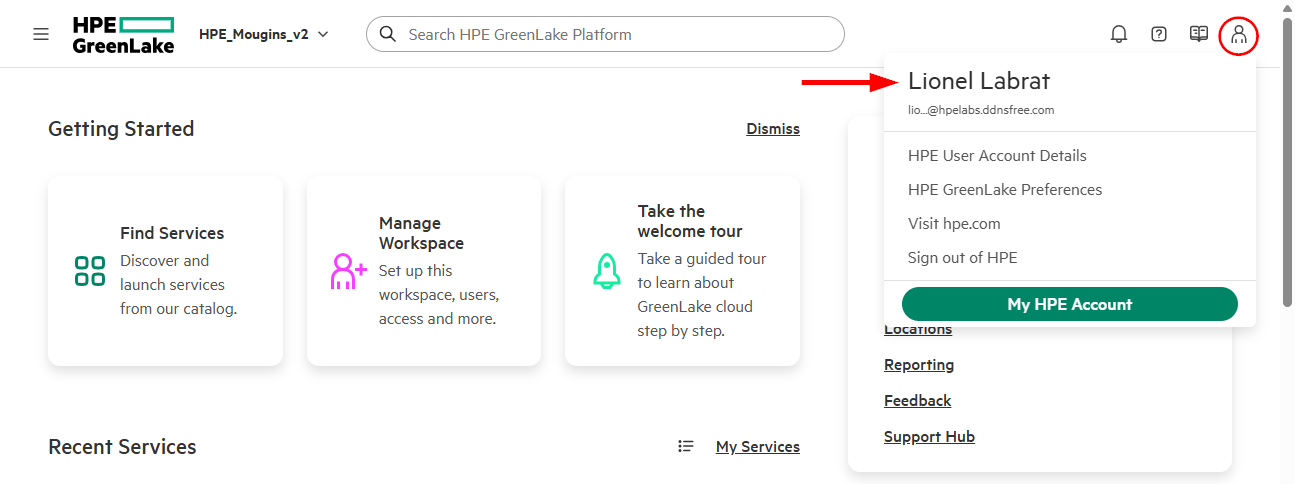
- Confirm User Profile and Access:
-
Verify that your user profile information (name, email) is displayed correctly in the HPE GreenLake console.
-
Ensure you have access to the expected workspaces and resources.
-
-
Verify Role-Based Permissions (if applicable):
-
If you configured the
hpe_ccs_attributefor SAML-based role assignments, confirm that the correct roles have been applied:-
Navigate to Manage workspace → Identity & access management → Users.
-
Locate your user account, which should be identified with an SSO authorization source.

-
Select your user and verify that the assigned roles match the permissions defined in your
hpe_ccs_attribute.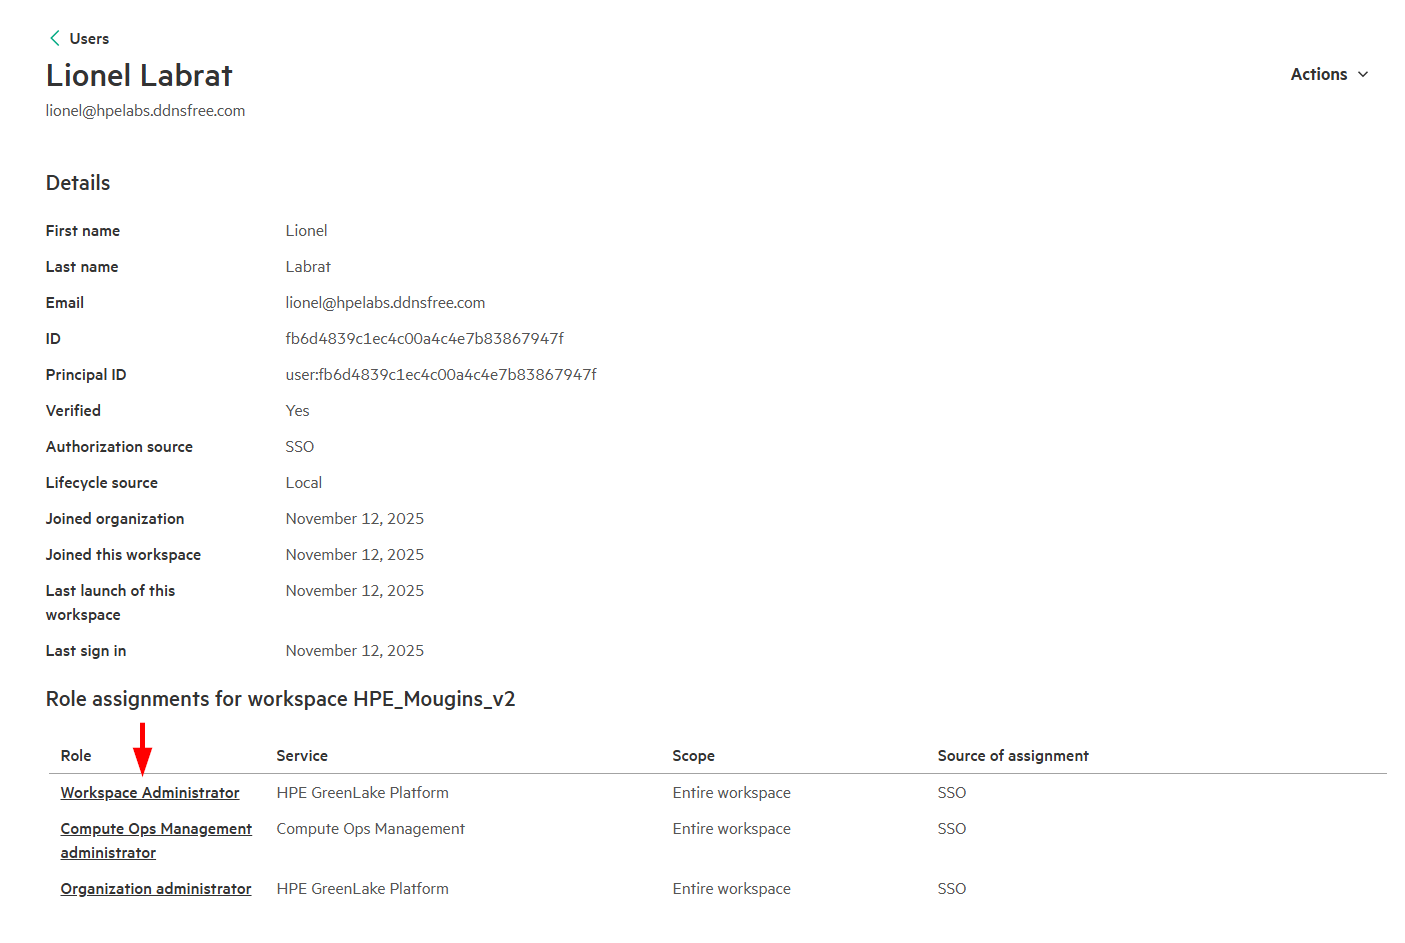
-
-
Test the SSO IdP-Initiated login flow (User starts at Entra ID portal)
Identity Provider initiated SSO (IdP-Initiated) provides users with direct access to HPE GreenLake from their identity provider’s application portal, eliminating the need to first navigate to the HPE GreenLake login page. This streamlined approach offers a single-click authentication experience.
Authentication Flow: User → Entra ID Portal → HPE GreenLake Application → HPE GreenLake Console
-
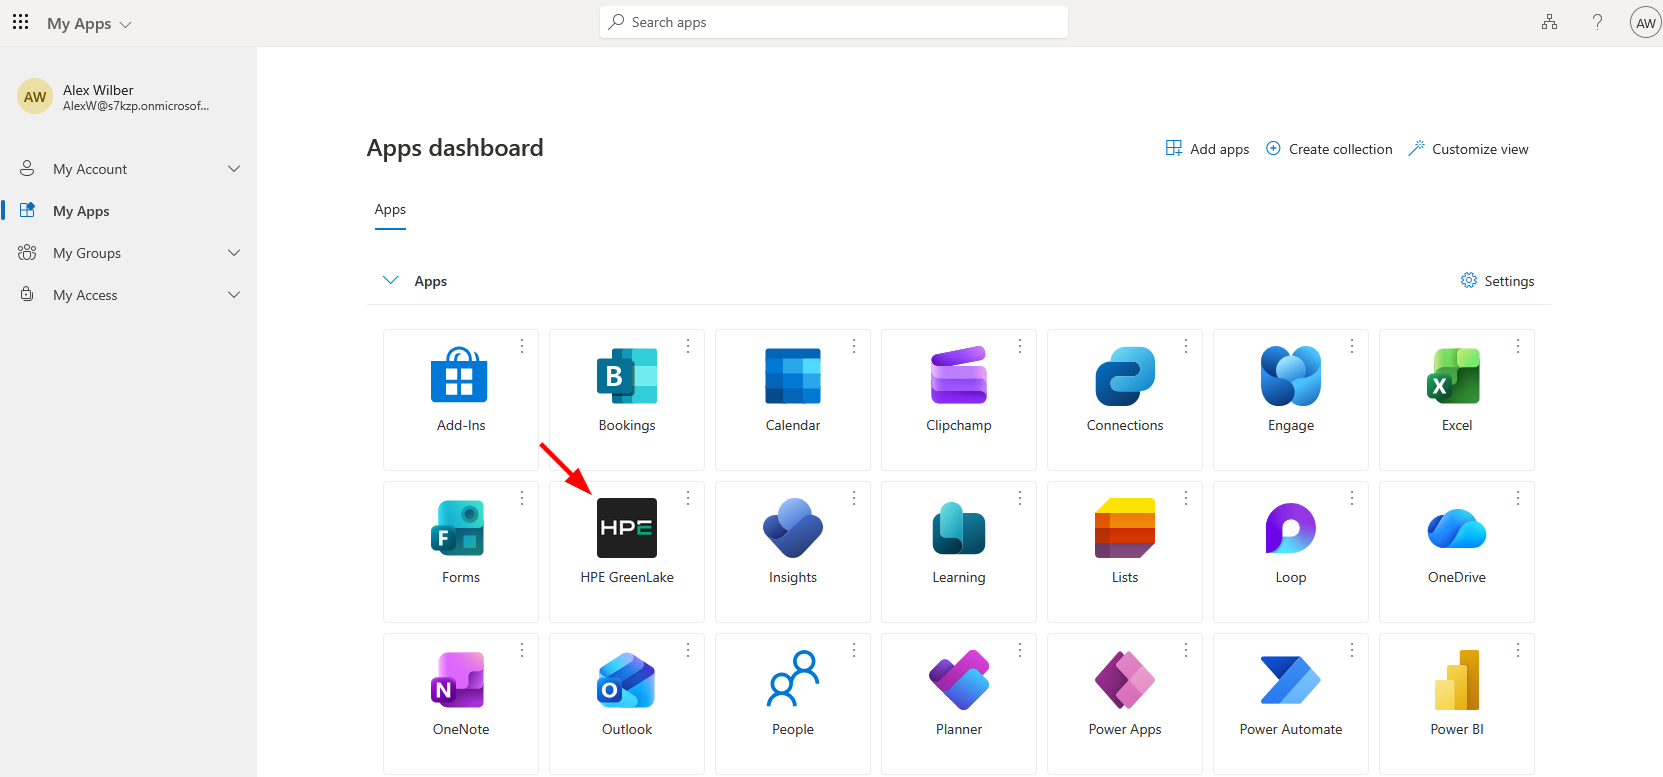
Navigate to your Entra ID MyApps portal at https://myapps.microsoft.com
-
Locate and click the HPE GreenLake application tile in your application dashboard
-
You should be automatically redirected to HPE GreenLake and logged in without additional authentication prompts
-
Verify successful authentication by confirming your user profile and workspace access are displayed correctly in the HPE GreenLake console
Troubleshooting
If authentication fails, use the following diagnostic approaches:
- Identity provider logs: Check the authentication logs in Entra ID Portal → Monitoring & health → Sign-in logs for detailed error messages and failure reasons
- HPE GreenLake audit logs: While HPE GreenLake’s audit logs currently provide limited troubleshooting information for authentication failures, they can help confirm whether authentication requests are reaching the platform. Go to Manage Workspace → Audit Log.
- Browser developer tools: Review the SAML response in your browser’s developer tools (Network tab) to identify assertion errors or attribute mismatches
Common authentication failures include misconfigured SAML attributes, certificate mismatches, or incorrect RelayState values.
Step 4: Entra ID Configuration Guide for HPECOMCmdlets SSO Integration
Purpose: Configure Entra ID to support passwordless SSO authentication for the HPECOMCmdlets PowerShell module when connecting to HPE GreenLake.
Use Case: Enable Connect-HPEGL -SSOEmail user@company.com to authenticate via Microsoft Authenticator push notification without requiring password entry.
To support HPECOMCmdlets SSO functionality, Entra ID must be configured to enable MFA (Multi-Factor Authentication) with passwordless methods:
- ✅ Allow user enrollment during first authentication
- ✅ Support push notifications to mobile devices
- ✅ Enable passwordless authentication flow (no password prompt)
- ✅ Provide SMS/Email fallback for device issues (optional but recommended)
Configuration Overview:
The following sections guide you through verifying and configuring each requirement:
- Authentication Method Policies (Section 1): Enables Microsoft Authenticator with push notifications and configures optional SMS/Email fallback methods
- Conditional Access Policies (Section 2): Enforces passwordless authentication for the HPE GreenLake application
Note: User enrollment occurs automatically during the first authentication attempt when users are prompted to set up Microsoft Authenticator. No additional configuration is required to enable first-time enrollment. OTP (One-Time Password/Passcode) methods like TOTP are also supported as fallback options.
Learn more: For detailed guidance on passwordless authentication methods and best practices, see Microsoft’s passwordless authentication recommendations.
Note: As of November 2025, number matching cannot be disabled for Microsoft Authenticator push notifications in Microsoft Entra ID. Microsoft enforced it globally starting May 8, 2023, to combat MFA fatigue and phishing attacks.
1. Verify authentication method prerequisites
Before implementing the two-phase enrollment strategy, verify that your Entra ID tenant has the required authentication methods enabled:
Quick Prerequisites Check:
-
Navigate to Authentication methods → Policies
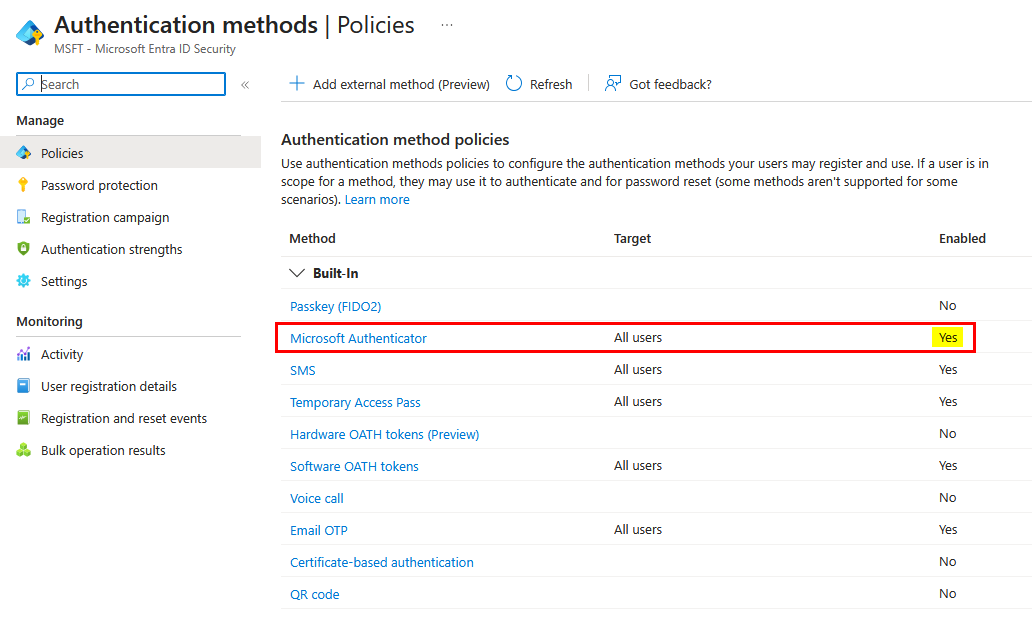
- Verify Microsoft Authenticator is enabled:
- Status should show Enabled
- Target should include your HPE GreenLake users (either All users or the HPE GreenLake group)
- Authentication mode should be set to Any or Push
If Microsoft Authenticator is not enabled:
- Click Microsoft Authenticator → Set Enable to Yes
- Configure target users and authentication mode as described above
- Click Save
-
Navigate to Authentication methods → Authentication strengths
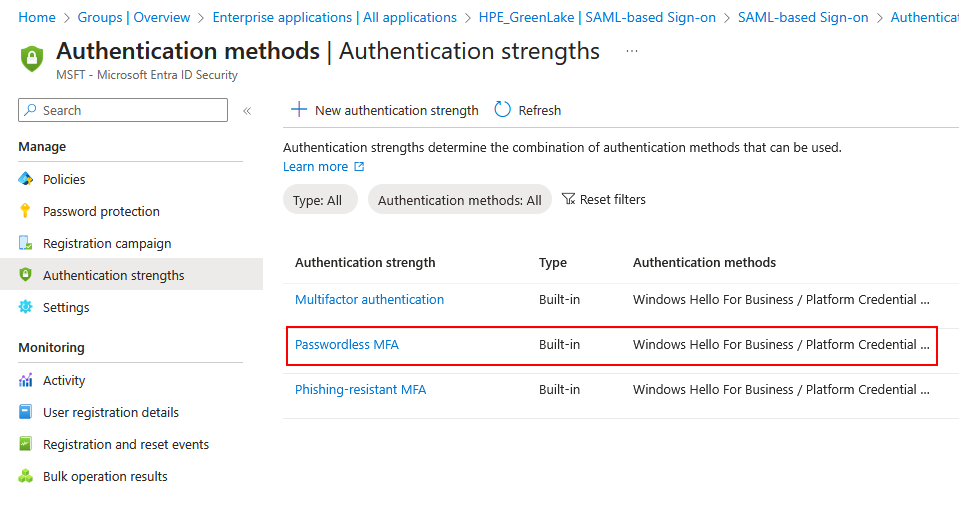
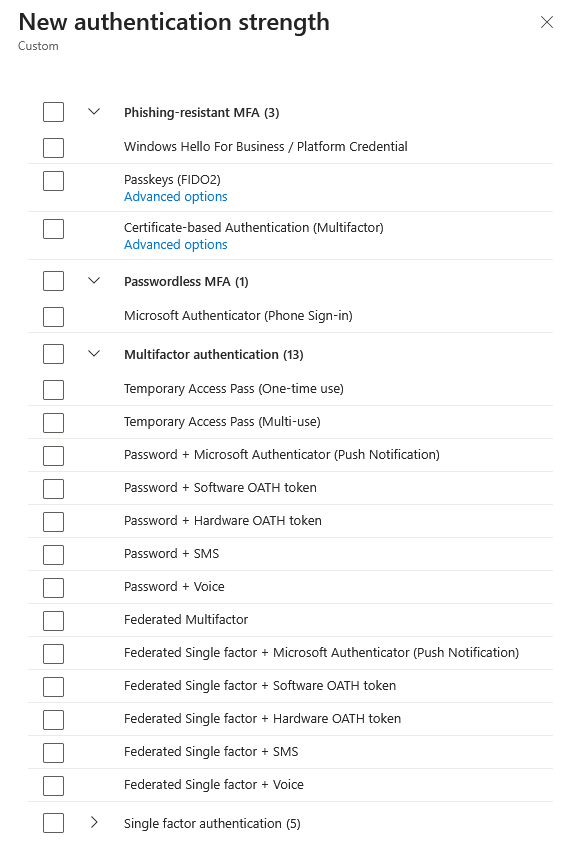
- Verify the built-in Passwordless MFA authentication strength exists:
- This is a built-in strength that includes Microsoft Authenticator push notifications and TOTP
-
You’ll reference this strength when creating Conditional Access policies in the next section
Optional - SMS/Email Fallback Methods: If you want to provide recovery options when users can’t access their mobile device, you can enable SMS and Email OTP authentication methods. These are useful for browser-based recovery but are NOT compatible with the HPECOMCmdlets PowerShell module. Enable them at Authentication methods → Policies → SMS or Email OTP.
2. Conditional access policies and passwordless enrollment strategy
Conditional Access policies determine when and how multi-factor authentication (MFA) or passwordless authentication is required for your organization. To support the HPECOMCmdlets module while maintaining security best practices, you need to implement a two-phase enrollment strategy that allows users to set up passwordless authentication before enforcing it.
Understanding the Two-Phase Enrollment Strategy
Why Two Phases Are Necessary:
If you immediately enforce passwordless-only authentication for all users, those who haven’t yet enrolled in passwordless methods will encounter an authentication loop: they’ll be required to use a passwordless method they don’t have configured, preventing them from accessing the system to complete enrollment.
The Solution: Hybrid Enrollment with Grace Period
This strategy uses two Conditional Access policies and an enrollment tracking group to enable a smooth transition:
- Phase 1 - Enrollment Grace Period: New users authenticate with password + MFA while setting up passwordless methods
- Phase 2 - Passwordless Enforcement: After enrollment verification, users must use passwordless authentication only
How It Works:
- Admin adds user to both HPE GreenLake (access) and HPE-GreenLake-Enrollment (grace period) groups
- User signs in with password + push notification, receives automated prompt to set up passwordless
- User completes passwordless enrollment in Microsoft Authenticator app
- Admin verifies enrollment and removes user from enrollment group
- User now authenticates passwordless-only on future sign-ins
Key Advantage: Each user gets their own individual enrollment window. Whether you’re onboarding your first user or adding someone 6 months later, the process is identical. This solves the “new user problem” where time-based approaches lock out users added after the initial rollout.
Benefits:
- ✅ Works for initial rollout AND ongoing user additions
- ✅ Individual grace periods (not time-based)
- ✅ Manual enrollment via secure Microsoft portal
- ✅ ~2 minutes of admin effort per user
Implementation Steps
How Policies Work Together: Entra ID evaluates Conditional Access policies independently. Users in the enrollment group will match Policy 1 (grace period) because they’re excluded from Policy 2, even though they’re members of the HPE GreenLake group. Exclusions always take precedence.
Step 1: Create the Enrollment Tracking Group
First, create a security group to track users who are in the enrollment phase:
- Navigate to Groups → Overview → New group
- Create a Security group named
HPE-GreenLake-Enrollment - Do not add any members yet - this group will be populated as new users need enrollment
-
Click Create
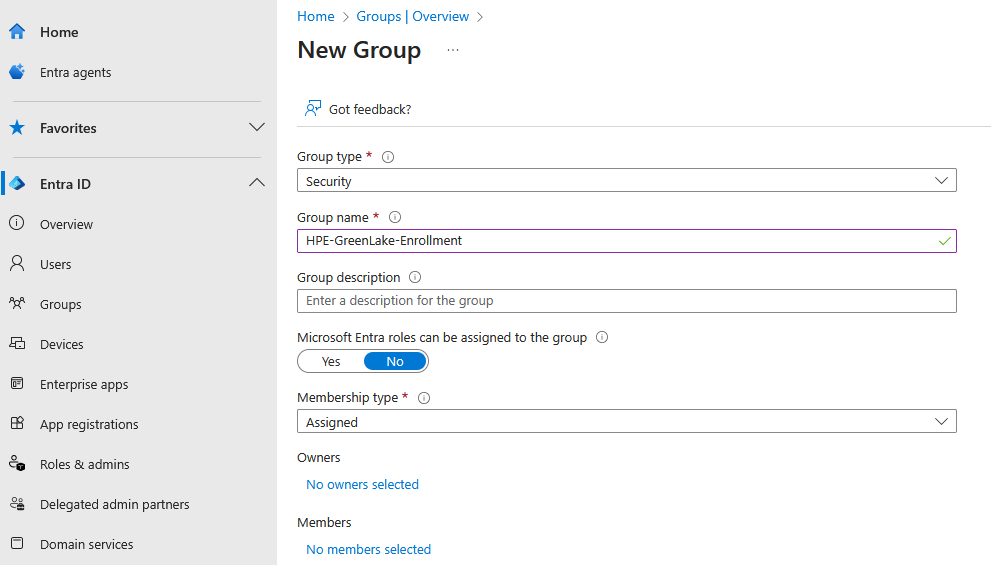
Purpose: This group identifies users who are still setting up passwordless authentication and need the grace period policy.
Step 2: Create Policy 1 - Enrollment Grace Period
This policy applies to users in the enrollment group, allowing them to authenticate with password + push while setting up passwordless:
-
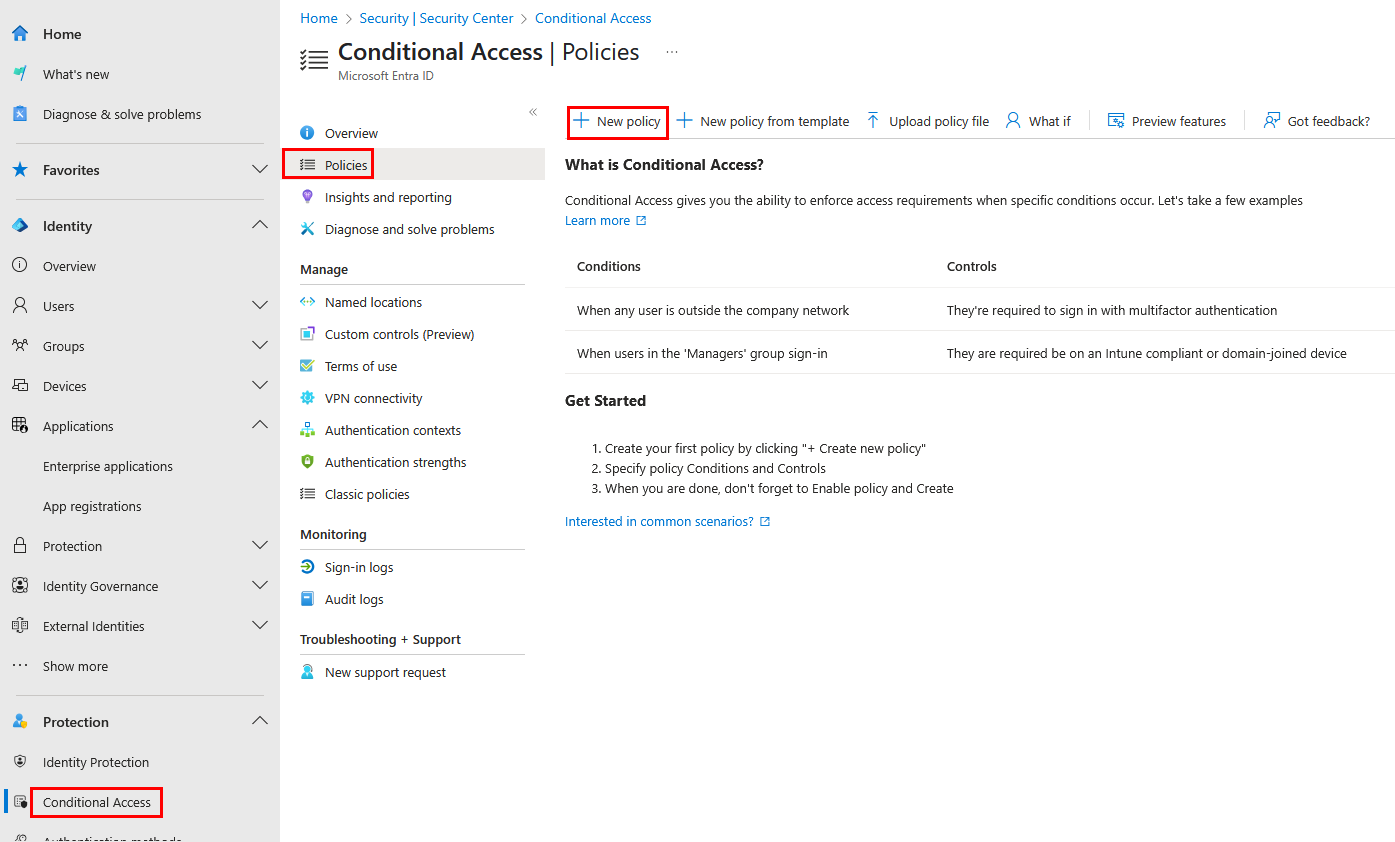
Navigate to Conditional Access → Policies → New policy
-
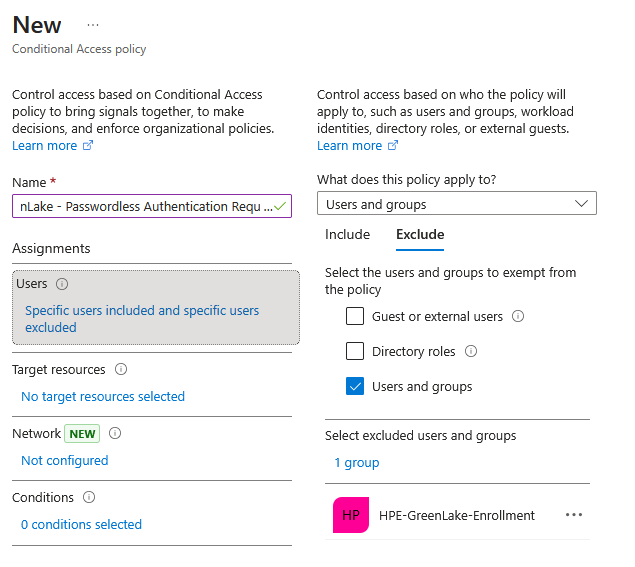
Configure the policy with the following settings:
Policy name:
HPE GreenLake - Enrollment Grace PeriodAssignments:
- Users:
-
Include: Select the HPE-GreenLake-Enrollment group
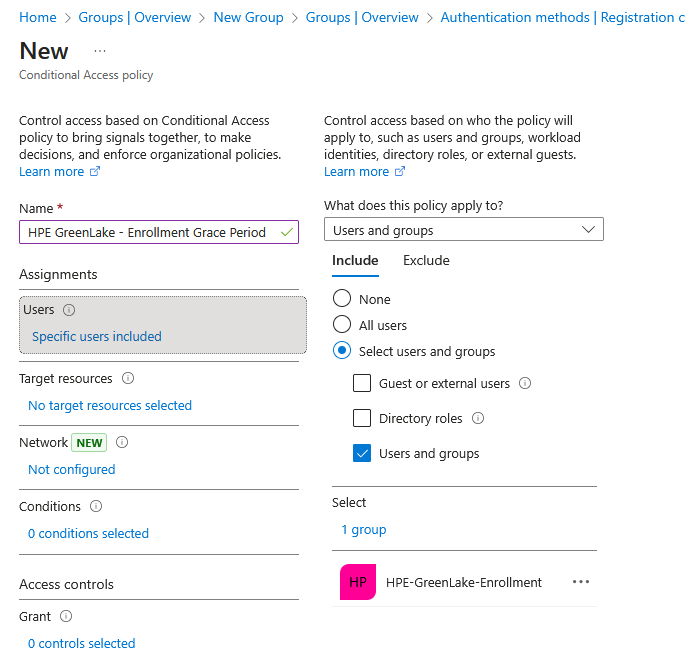
- Exclude: At least one administrator account (not in HPE GreenLake group) to prevent accidental lockout
- Exclude: Emergency access (break-glass) accounts
-
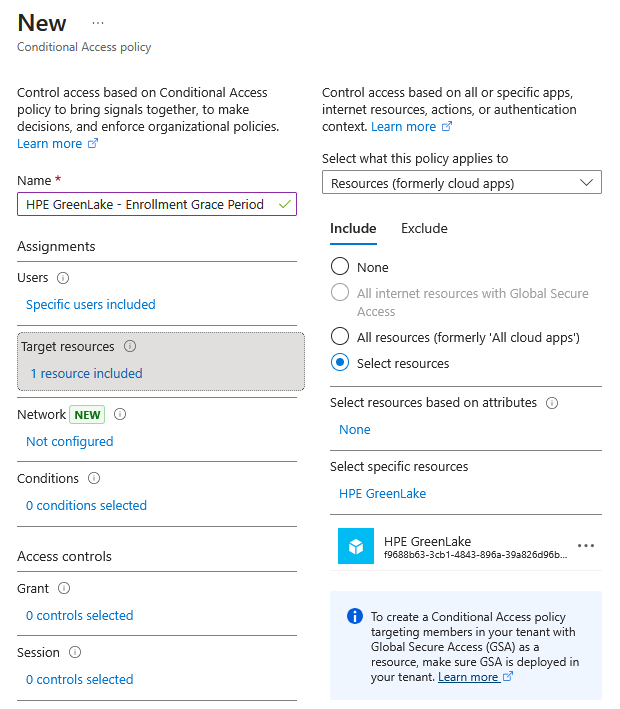
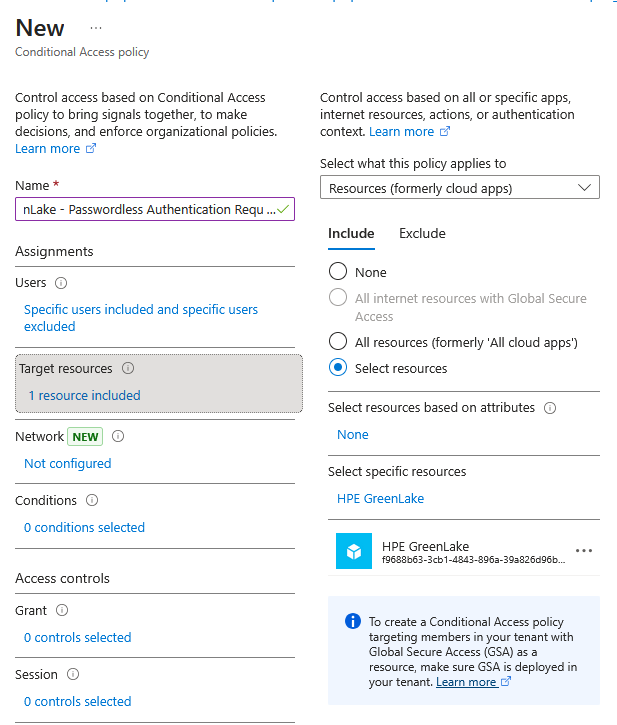
- Target resources:
- Select Resources (formerly cloud apps) → Select resources
-
Choose the HPE GreenLake application created in Step 1
Access controls:
- Grant:
- Select Grant access
- Check Require authentication strength
-
From the dropdown, select Multifactor authentication
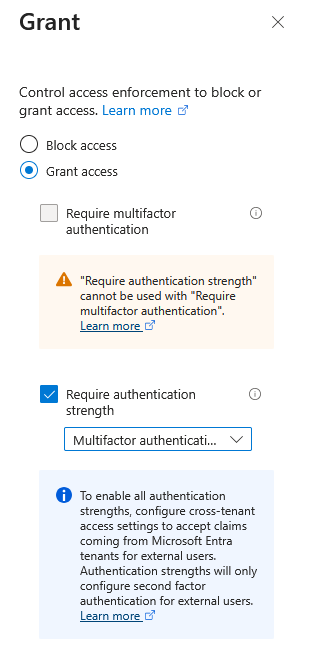
Important: Use “Multifactor authentication” (NOT “Passwordless MFA”) for the enrollment policy. This allows password + push notifications during the enrollment phase.
- Session: (Optional) Configure Sign-in frequency to control how often users must re-authenticate
- Users:
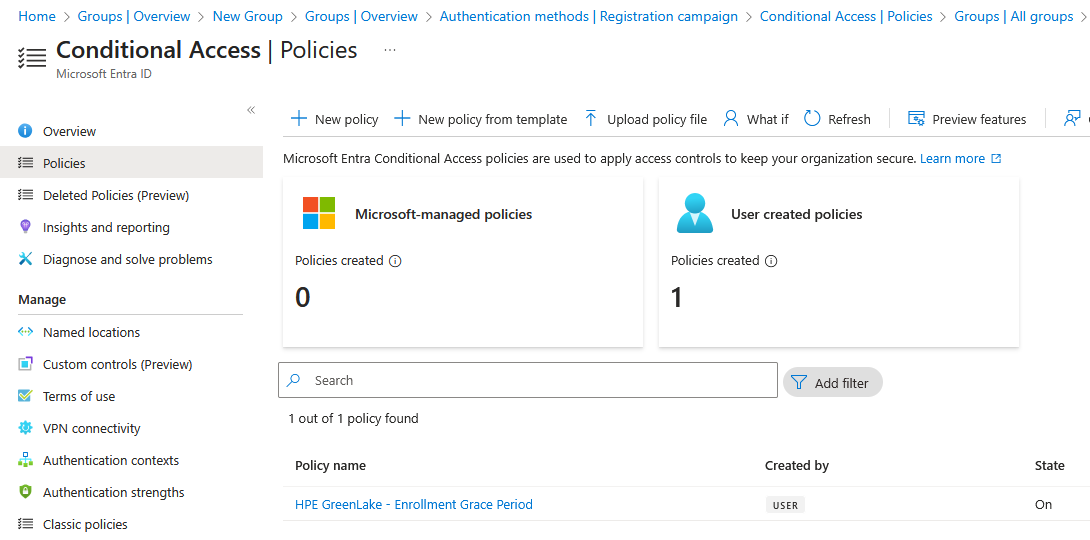
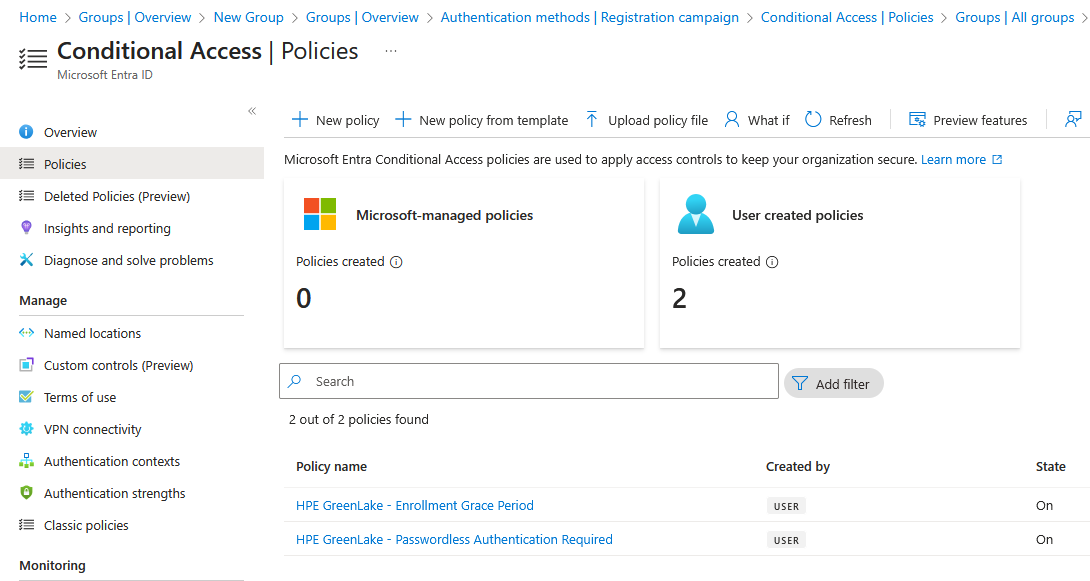
- Set Enable policy to On
-
Click Create to activate the policy
Step 3: Create Policy 2 - Passwordless Enforcement
This policy applies to users who have completed passwordless enrollment, enforcing passwordless-only authentication:
-
Navigate to Conditional Access → Policies → New policy
-
Configure the policy with the following settings:
Policy name:
HPE GreenLake - Passwordless Authentication RequiredAssignments:
- Users:
- Include: Select the HPE GreenLake group
- Exclude: Select the HPE-GreenLake-Enrollment group
- Exclude: At least one administrator account (not in HPE GreenLake group) to prevent accidental lockout
-
Exclude: Emergency access (break-glass) accounts
Key Configuration: By including the main group but excluding the enrollment group, this policy only applies to users who have completed passwordless setup.
- Target resources:
- Select Resources (formerly cloud apps) → Select resources
-
Choose the HPE GreenLake application created in Step 1
Access controls:
- Grant:
- Select Grant access
- Check Require authentication strength
-
From the dropdown, select Passwordless MFA
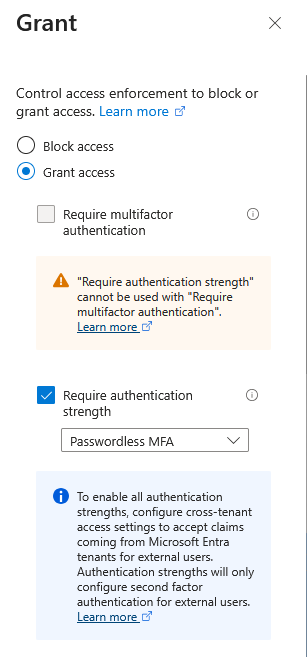
Note: The “Passwordless MFA” authentication strength ensures only compatible passwordless methods (Microsoft Authenticator push notifications and TOTP) are accepted, while excluding FIDO2 and platform authenticators that are incompatible with PowerShell automation.
- Session: (Optional) Configure Sign-in frequency to control how often users must re-authenticate
- Users:
-
Set Enable policy to On
-
Click Create to activate the policy
Operational Procedures
Adding a New User to HPE GreenLake:
When you need to grant HPE GreenLake access to a new user, follow this process:
- Grant Access and Enrollment Period:
- Navigate to Groups → All groups
- Open the HPE GreenLake group → Click Members → Add members
- Select the new user → Click Select
- Open the HPE-GreenLake-Enrollment group → Click Members → Add members
-
Select the same user → Click Select
Result: The user now has HPE GreenLake access AND can authenticate with password + push during enrollment.
- User Completes Passwordless Setup:
- Direct the user to visit https://aka.ms/mysecurityinfo to set up passwordless authentication
- User follows the enrollment wizard (detailed steps in next section)
- User notifies you when setup is complete
Note: Detailed step-by-step instructions are provided in the User Enrollment Experience section below.
- Verify Passwordless Enrollment:
- Navigate to Users → All users → Select the user
- Click Authentication methods
-
Verify Microsoft Authenticator is listed under Usable authentication methods
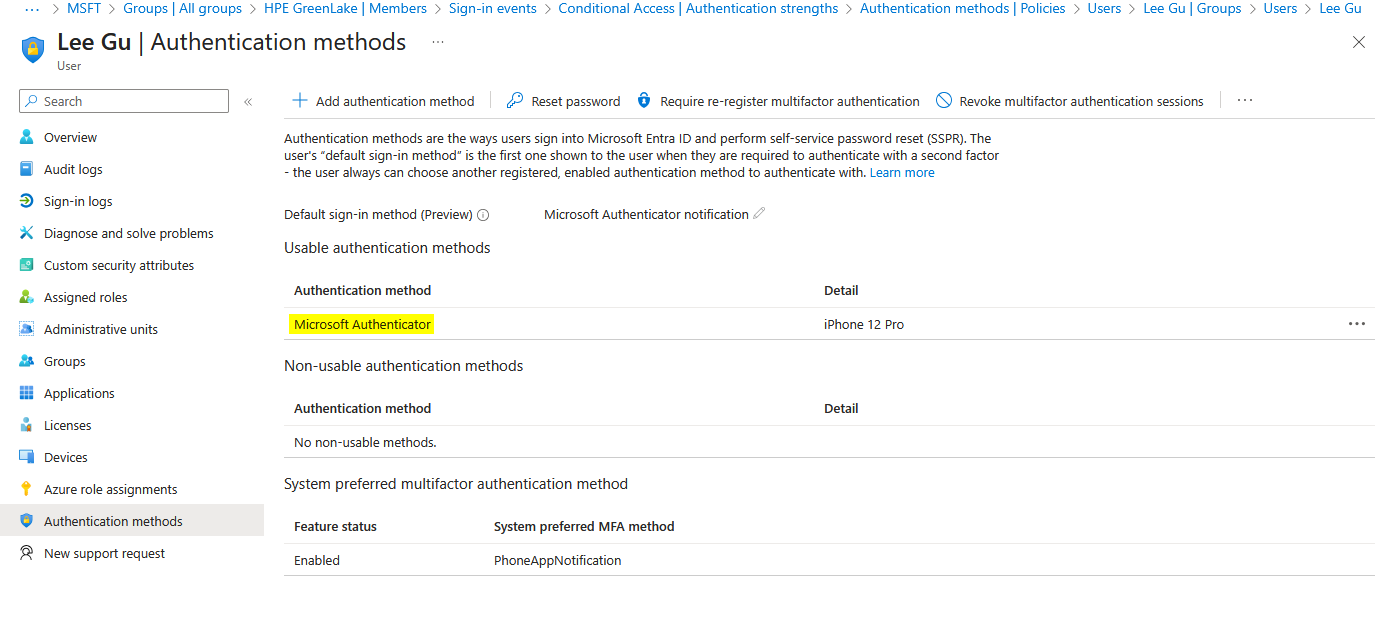
IMPORTANT: How to Verify Passwordless is Actually Enabled
The Entra ID admin portal does NOT clearly distinguish between password+push MFA and true passwordless in the authentication methods view. Both show as “Microsoft Authenticator” with device details.
To confirm passwordless is truly enabled, ask the user to:
- Visit https://aka.ms/mysecurityinfo
- Verify they see “Passwordless sign-in” listed as a method (with a key icon 🔑)
OR verify directly in the Microsoft Authenticator app:
- Open the app → Tap the account → Verify “Passwordless sign-in requests” is shown as an available option
✅ ACCEPTABLE: User portal shows “Passwordless sign-in” (confirms correct setup)
❌ NOT ACCEPTABLE: User only sees “Phone” or “Push notification” methods (passwordless not enabled)More instructions are provided in the User Enrollment Experience section below.
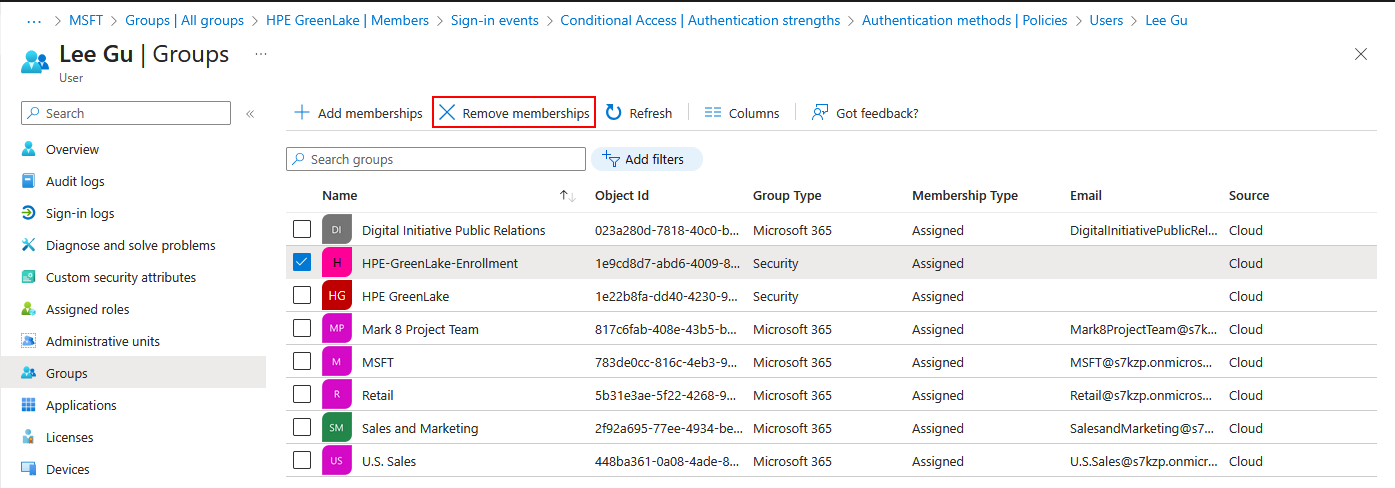
- Graduate to Passwordless Enforcement:
- Navigate to Groups → All groups
- Open the HPE-GreenLake-Enrollment group → Click Members
-
Select the user → Click Remove members
Result: Policy 2 now applies to this user, enforcing passwordless-only authentication.
Time Estimate: 2 minutes per user
User Enrollment Experience
- Initial Sign-In:
-
Navigate to https://common.cloud.hpe.com/newlogin and enter your email address
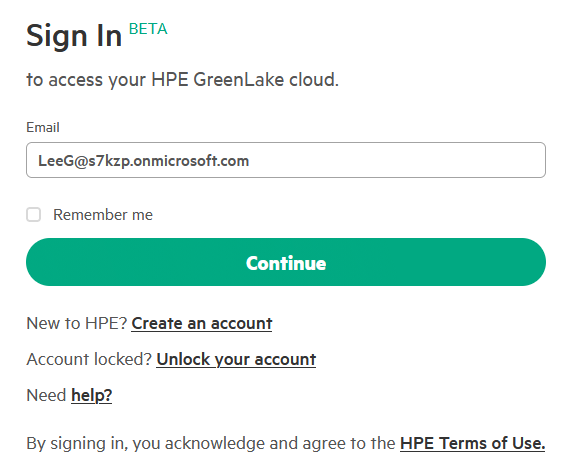
-
Select Sign in with SSO

-
The Microsoft sign-in page appears. Enter your username

-
Enter your password
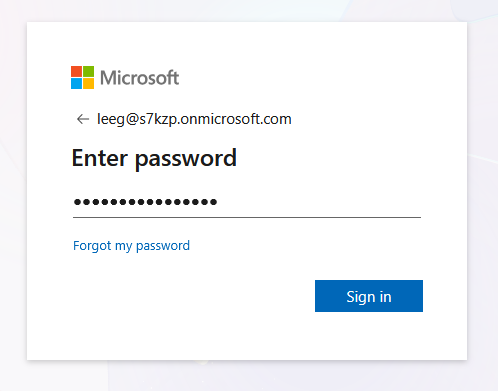
-
After successful authentication, a prompt appears: “Let’s keep your account secure”
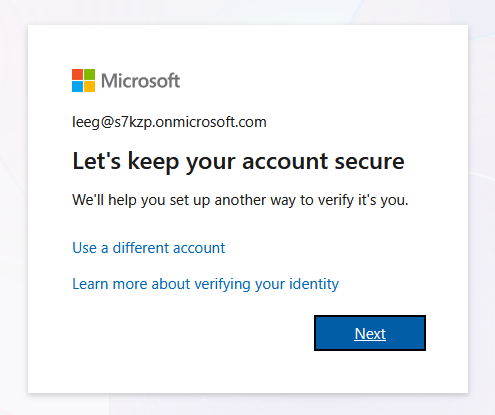
-
-
Passwordless Setup Wizard (click Next to begin):
-
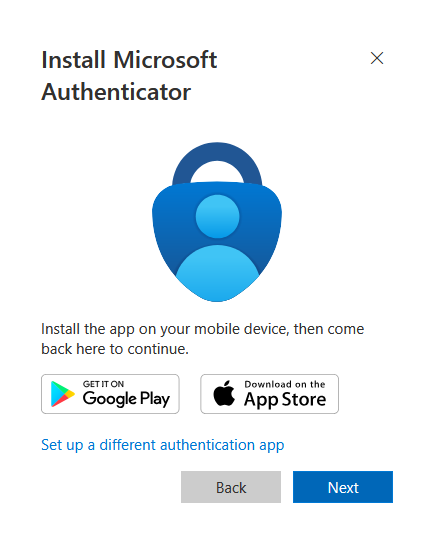
Step 1 - Install Authenticator: “Install Microsoft Authenticator on your mobile device” → Click Next
-
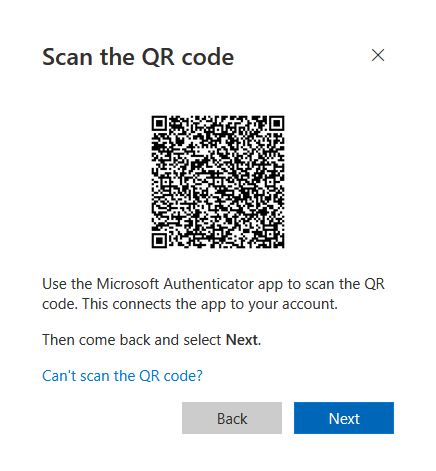
Step 2 - Scan QR Code: A QR code appears. Open Microsoft Authenticator on your mobile device and scan the code to pair your device
-
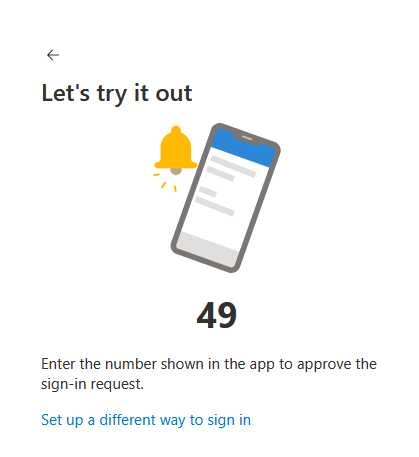
Step 3 - Test Notification: A test notification is sent to your device. Approve the notification, then tap Yes
-
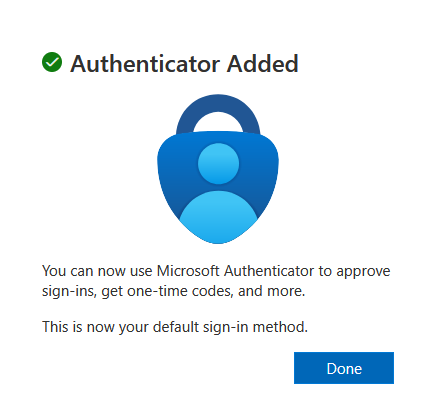
Step 4 - Completion: “Microsoft Authenticator is now ready to approve sign-ins” → Click Done
-
-
Enable Passwordless Sign-In (CRITICAL STEP):
🔴 CRITICAL: THIS IS THE MOST COMMONLY MISSED STEP
Completing the enrollment wizard only sets up traditional MFA (password + push). You MUST manually enable “Passwordless sign-in requests” in the Authenticator app. Without this step, the HPECOMCmdlets module will NOT work.
- Open Microsoft Authenticator on your mobile device
- Tap the newly added account for your organization
-
Tap Set up passwordless sign-in requests
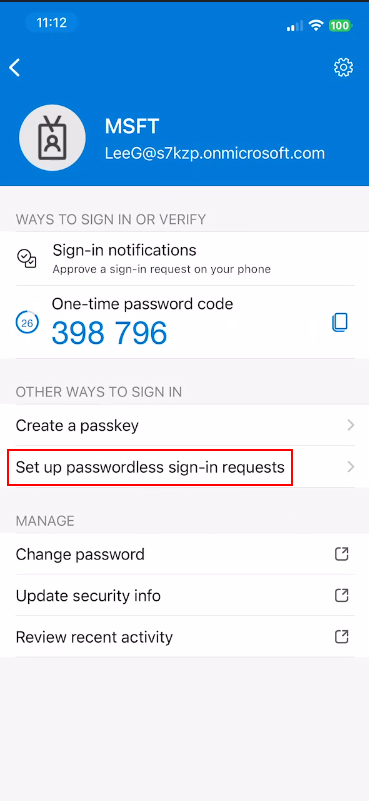
- Complete the authentication request when prompted
- Set up device biometrics (fingerprint, face recognition, or PIN) if requested
-
Verify that Passwordless sign-in requests now appears as an available method in your account settings
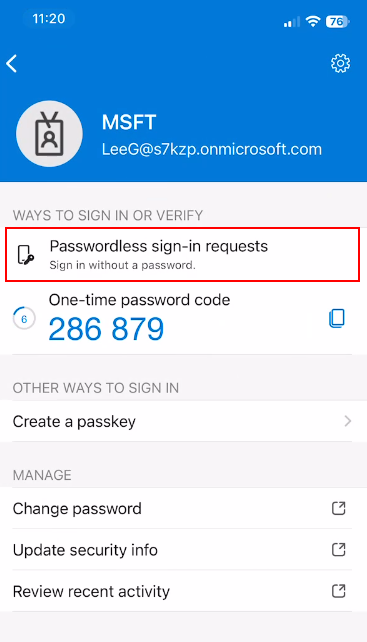
-
To confirm successful enrollment, visit https://aka.ms/mysecurityinfo
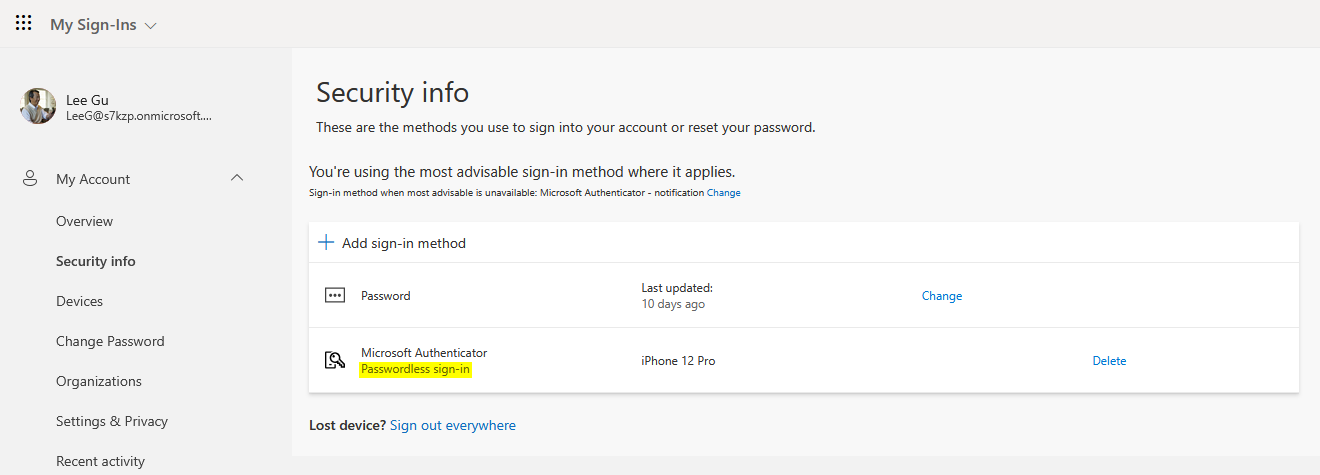
The page should display: Microsoft Authenticator - Passwordless sign-in (with a key icon 🔑)
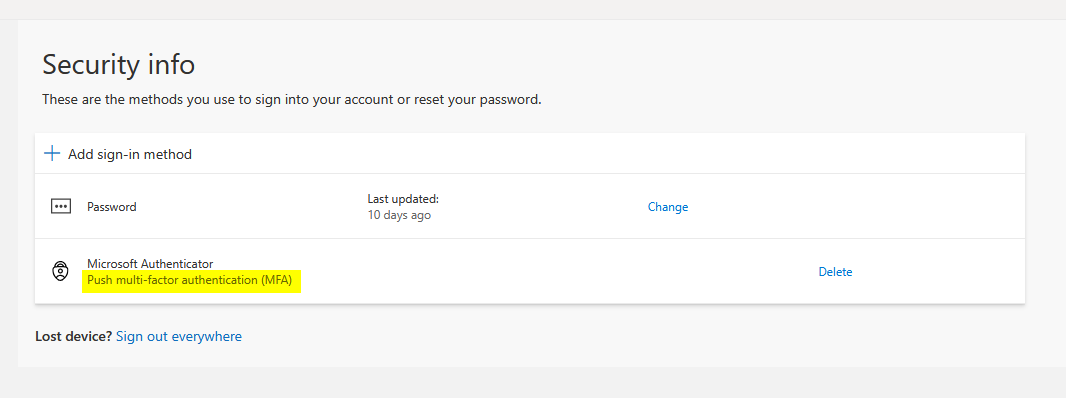
Verification Checkpoint: You must see the “Passwordless sign-in” method listed. If you see “Push multi-factor authentication (MFA)” (with a lock icon 🔒), passwordless authentication is not enabled and the HPECOMCmdlets module will NOT work.
- Notify Administrator:
- User sends email/message to administrator: “Passwordless setup complete for HPE GreenLake”
-
Administrator removes user from enrollment group
3. Test SSO Authentication with Browser
To verify that your passwordless authentication configuration is working correctly, test the complete authentication flow using a web browser:
-
Open a web browser and navigate to https://common.cloud.hpe.com/newlogin
- Initial Sign-In:
-
Enter your email address on the HPE GreenLake login page
-
Click Sign in with SSO
-
The Microsoft sign-in page appears. Enter your username
-
- Passwordless Authentication Prompt:
-
If prompted for a password, click Use an app instead to proceed with passwordless authentication
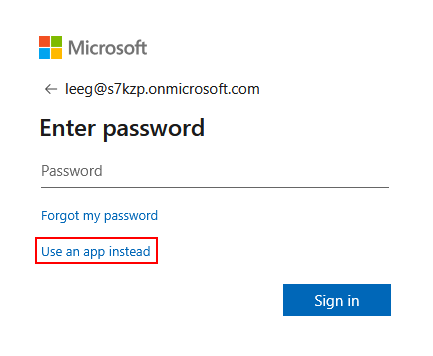
Note: If Microsoft Authenticator is already configured as your default sign-in method, you will bypass the password prompt and proceed directly to the push notification authentication step.
-
The browser displays an Approve sign-in request page, confirming that a push notification has been sent to your registered mobile device. A challenge number appears on the screen (e.g., “80”)
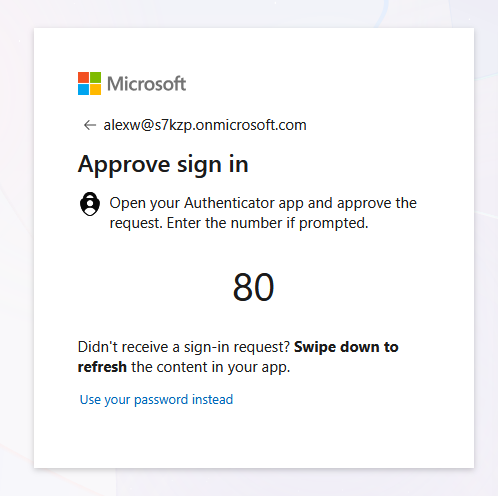
- Open Microsoft Authenticator on your mobile device
- A push notification appears requesting authentication approval
-
Enter the matching number: Type the challenge number displayed in your browser (e.g., “80”) into the authenticator app to approve the request
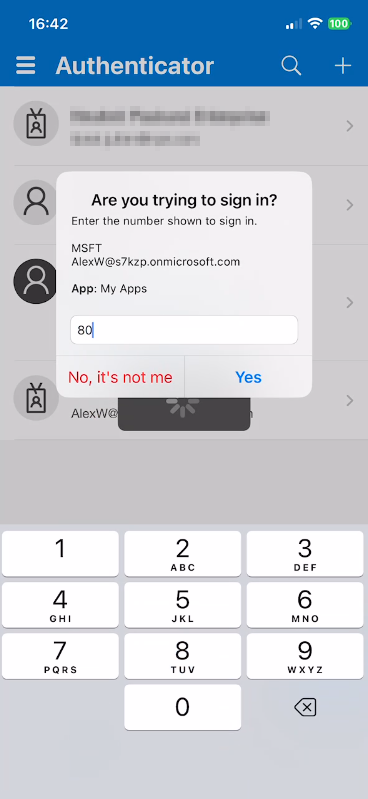
-
Complete biometric authentication (fingerprint, face recognition, or PIN) if configured on your device
- Authentication Completion:
- After successful approval, the browser automatically completes the authentication flow
- You are redirected to the HPE GreenLake console with your assigned permissions and workspace access
-
Troubleshooting: If you don’t receive a push notification, verify that:
- The Microsoft Authenticator app is installed and properly configured
- Push notifications are enabled in your device settings
- Your device has an active internet connection
4. Test SSO Authentication with HPECOMCmdlets
After confirming browser-based authentication works correctly, verify that the HPECOMCmdlets PowerShell module can successfully authenticate using the passwordless flow:
PowerShell Test Script:
# Import the HPECOMCmdlets module
Import-Module HPECOMCmdlets

# Attempt SSO login with your verified email address
Connect-HPEGL -SSOEmail "test.user@company.com"
Expected Authentication Flow:
- Command Execution:
- The
Connect-HPEGLcmdlet initiates the SAML SSO authentication flow
- The
- Push Notification Delivery:
-
A push notification is immediately sent to your registered mobile device
-
The PowerShell console displays a progress indicator
-
- Authentication Approval (behavior depends on your Conditional Access policy configuration):
- With Number Matching (enhanced security):
-
The PowerShell progress bar displays a challenge number (e.g., “Respond ‘26’ to the Microsoft Authenticator notification”)

- Open Microsoft Authenticator on your mobile device
-
Enter the challenge number displayed in the PowerShell progress bar into the app to approve the authentication request, then press Yes
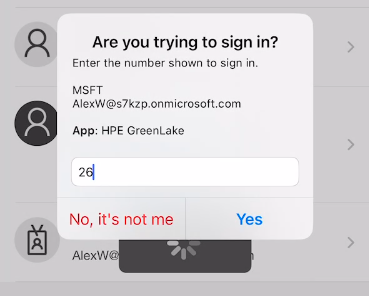
- Complete biometric authentication if enabled
-
- Without Number Matching (standard approval):
- The PowerShell progress bar displays: “Check your Microsoft Authenticator Push notification from HPE GreenLake…”
- Open Microsoft Authenticator on your mobile device
- Review the authentication request details
- Tap Approve to confirm the request
- Complete biometric authentication if enabled
- With Number Matching (enhanced security):
- Authentication Completion:
- After successful approval, the
Connect-HPEGLcmdlet completes authentication - Connection details containing your authentication context and connection details are displayed in the PowerShell console

- After successful approval, the
Important: The authentication flow must complete within the timeout period configured in your Conditional Access policy (typically 60-90 seconds). If the timeout expires before approval, the connection attempt will fail and you’ll need to retry the
Connect-HPEGLcommand.If authentication fails, consult the HPECOMCmdlets documentation or review the authentication logs in Entra ID Portal under Monitoring & health → Sign-in logs.
Part 2: Configuring SAML SSO with Okta
Okta is a leading cloud-based identity and access management (IAM) platform that provides comprehensive enterprise authentication and authorization services. As one of the most widely adopted identity-as-a-service (IDaaS) solutions, Okta delivers robust SAML 2.0 support for seamless single sign-on integration with thousands of cloud applications, including HPE GreenLake.
Important: Okta Identity Engine Required
This guide is written for Okta Identity Engine (OIE), which is the current standard for all Okta organizations created since 2021. Identity Engine provides enhanced authentication capabilities and improved passwordless authentication support.
How to verify your Okta version:
- Identity Engine: Navigate to Security → Authentications (note the ‘s’)
- Classic Engine (Legacy): Navigate to Security → Authenticators
If your organization is still using Classic Engine, Okta is actively migrating all customers to Identity Engine. Contact your Okta administrator or Okta support to upgrade your organization, as Classic Engine is being phased out.
Key capabilities relevant to HPE GreenLake integration include:
- Universal Directory: Centralized user management with support for custom attributes and group-based access control
- Adaptive authentication: Context-aware authentication policies based on user behavior, location, and device security posture
- Lifecycle Management: Automated user provisioning and deprovisioning workflows
- Multi-factor authentication: Extensive support for passwordless authentication methods including Okta Verify with push notifications
- API-first architecture: Comprehensive REST APIs for automation and custom integrations
- Application catalog: Pre-configured and custom SAML application templates for simplified integration
The following steps will guide you through creating a custom SAML 2.0 application integration in Okta, configuring the required SAML attributes for seamless integration with HPE GreenLake, and establishing passwordless authentication policies. While HPE GreenLake itself supports standard password-based SAML authentication, this guide will also demonstrate how to configure passwordless authentication methods that are essential for users who plan to leverage the HPECOMCmdlets PowerShell module for automation and management tasks.
Step 1: Register HPE GreenLake in Okta
Before configuring the HPE GreenLake enterprise application in Okta, it’s essential to create a group that will control which users can access the HPE GreenLake application. This group will be used for authentication purposes and can optionally be leveraged for role-based access control (RBAC) through SAML attributes, allowing you to map Okta groups to specific HPE GreenLake roles and permissions. Alternatively, if you prefer to manage user authorization directly within the HPE GreenLake platform, you can configure your SAML domain to use local authorization instead of SAML-based RBAC.
1. Create a group
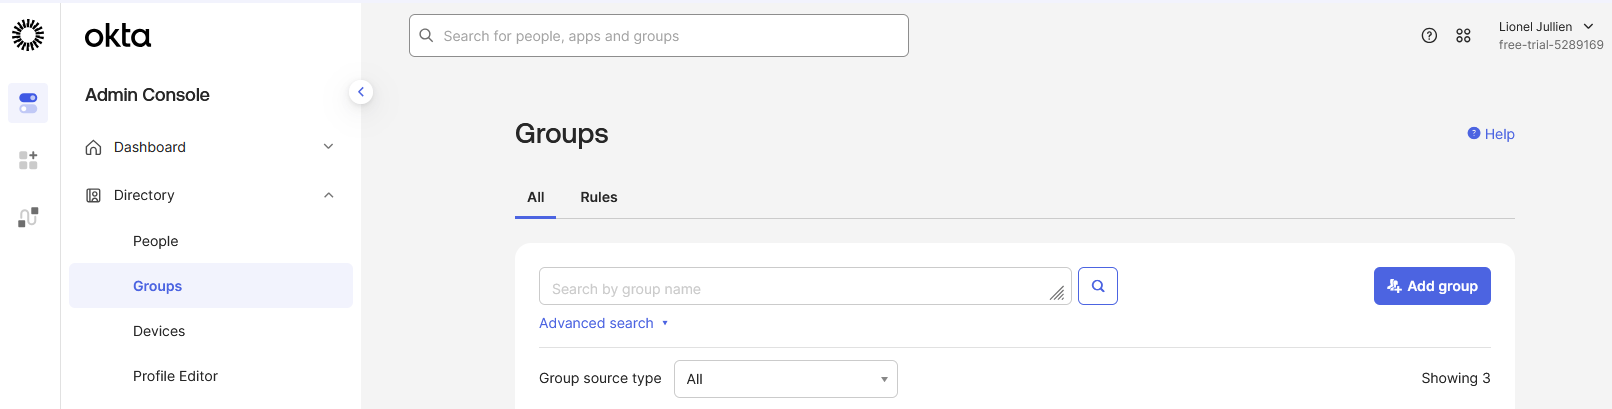
-
Go to Directory → Groups → Add group
-
Create a group for the HPE GreenLake application. Name it
HPE GreenLakeand add the members who will be granted access to the application.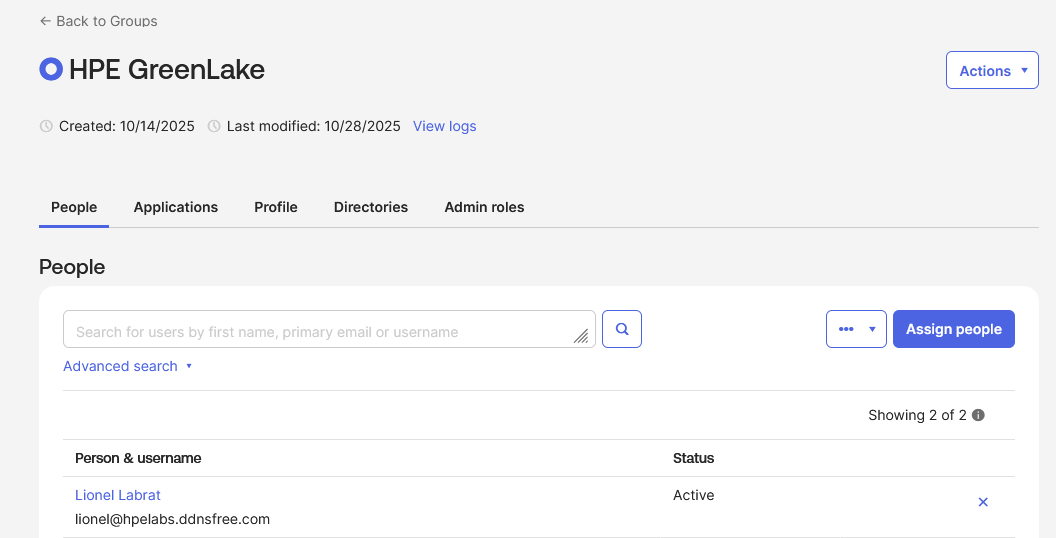
2. Create a new SAML 2.0 Application Integration
With the security group created, you can now proceed to register the HPE GreenLake application in Okta. This involves creating a custom SAML 2.0 application integration that will serve as the connection point between Okta and HPE GreenLake.
-
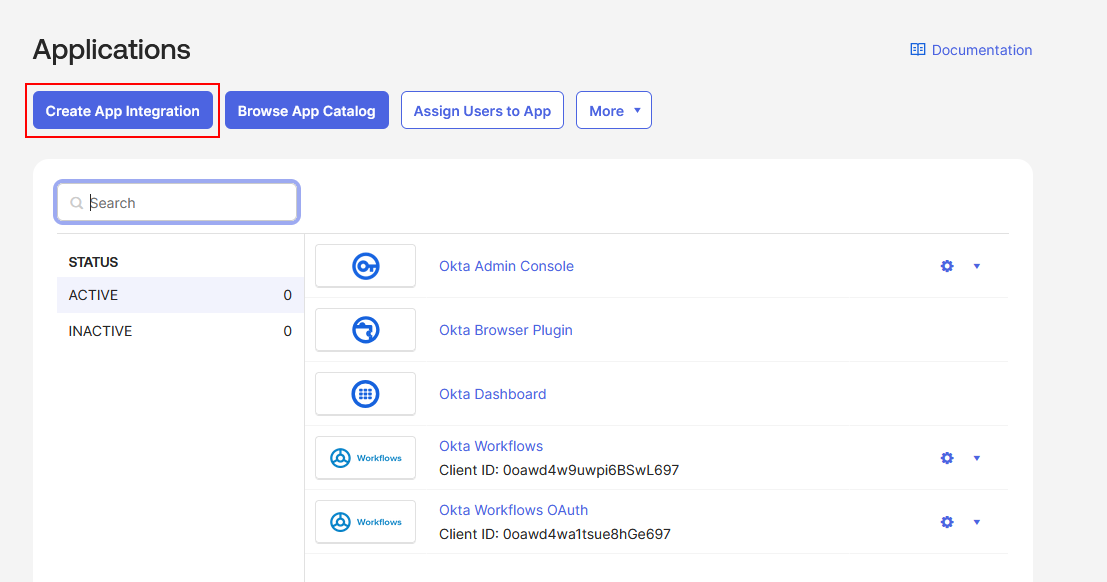
Go to Applications → Applications → Create App Integration
-
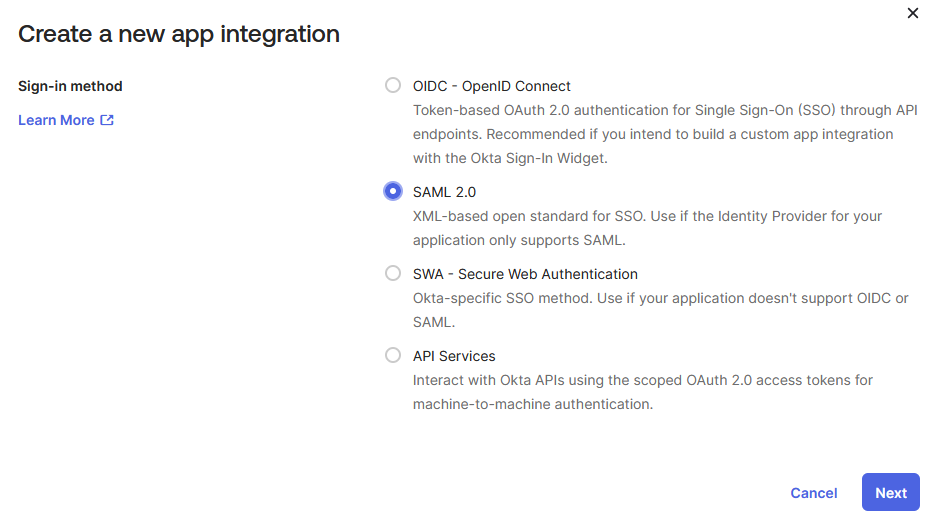
Select SAML 2.0 as the sign-in method
- On the General Settings page:
- Enter an App name, e.g.,
HPE GreenLake -
Optionally, upload an HPE logo for the app
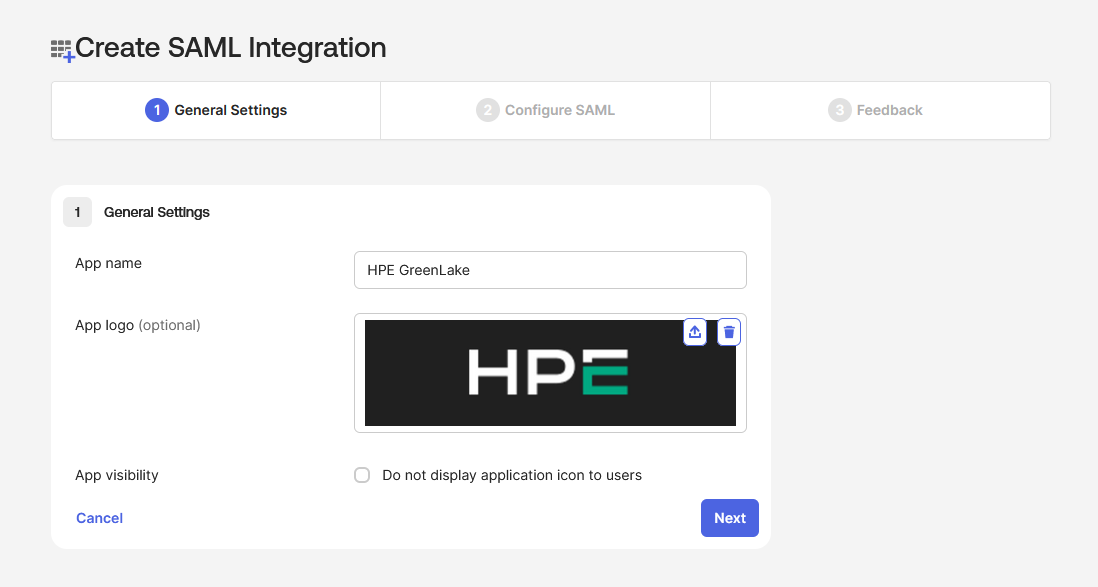
- Enter an App name, e.g.,
-
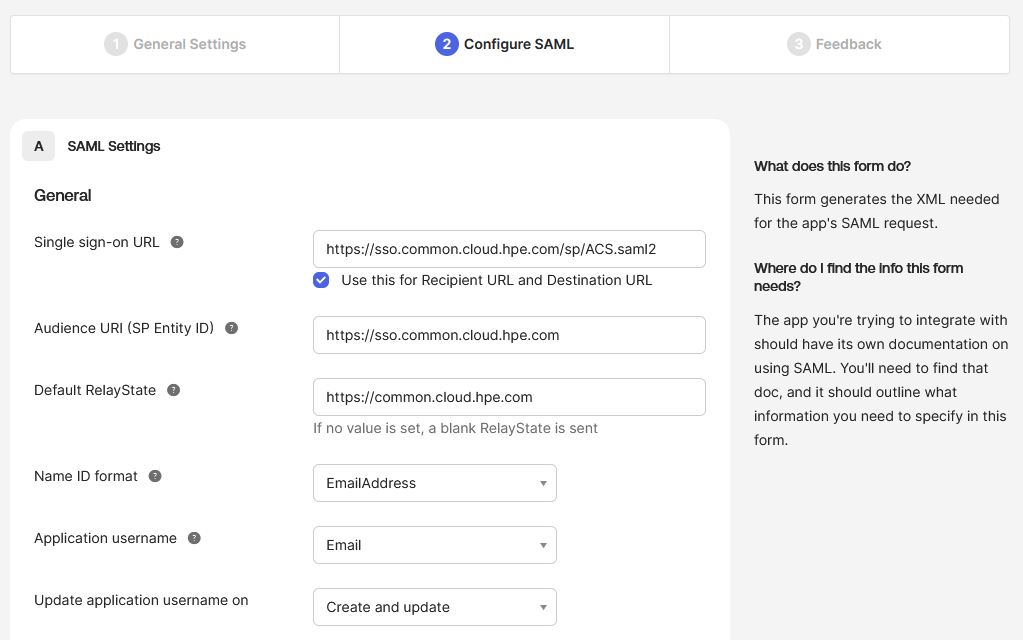
On the Configure SAML page, enter:
Field Value Single sign-on URL https://sso.common.cloud.hpe.com/sp/ACS.saml2Audience URI (SP Entity ID) https://sso.common.cloud.hpe.comDefault RelayState https://common.cloud.hpe.comName ID format EmailAddressApplication username EmailThese fields are critical for establishing the SAML connection between your identity provider and HPE GreenLake. Each serves a specific purpose in the authentication flow:
- Single sign-on URL: The endpoint where Okta sends SAML authentication responses after successful user authentication
- Audience URI (SP Entity ID): Uniquely identifies HPE GreenLake as the service provider in the SAML federation
- Default RelayState: Defines the destination URL where users land after successful authentication, enabling Identity Provider initiated SSO (IdP-Initiated) for direct access from the Okta dashboard
- Name ID format: Specifies that the user’s email address will be used as the unique identifier in SAML assertions
-
Application username: Maps the Okta user’s email address to the SAML NameID attribute sent to HPE GreenLake
Important: The Relay State parameter is required for IdP-Initiated SSO functionality. Without this value configured, users attempting to access HPE GreenLake from your identity provider will encounter the error: “Please Specify Target - No Single Sign-On Target Specified”
-
Scroll down to Attribute Statements and configure the following SAML attributes by clicking Add Another for each entry:
Name Name format Value NameId Unspecifieduser.emailFirstName Unspecifieduser.firstNameLastName Unspecifieduser.lastNamehpe_ccs_attribute UnspecifiedSee configuration below Note: These SAML attributes define how user identity information is transmitted from Okta to HPE GreenLake during authentication. Proper configuration ensures users are correctly identified and authorized when accessing the platform.
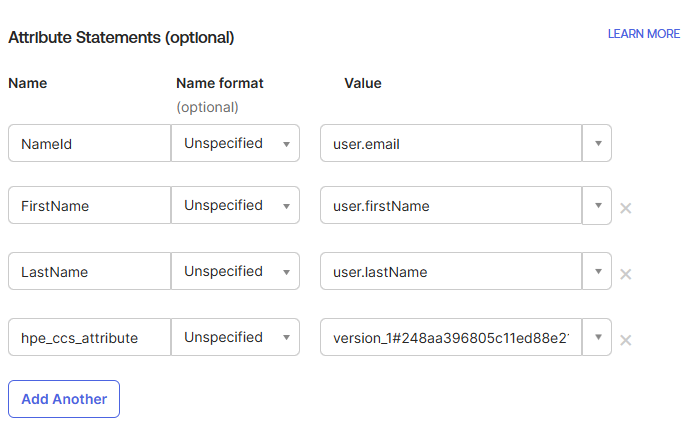
Note: The
hpe_ccs_attributename is case-sensitive and must match exactly as shown above. Other attribute names (FirstName, LastName, NameId) are also case-sensitive.-
Configure the hpe_ccs_attribute (Optional)
The
hpe_ccs_attributeenables role-based access control (RBAC) by mapping your Okta group memberships to specific HPE GreenLake workspace roles and application permissions.Note: This attribute is optional. If you prefer to manage user authorization directly within the HPE GreenLake platform instead of through SAML attributes, you can skip this configuration.
To configure this attribute:
The
hpe_ccs_attributevalue follows a specific format that defines workspace access, application permissions, and user roles. For detailed instructions on constructing this attribute value, including the required syntax and examples, refer to the HPE GreenLake cloud SAML attribute for session-based authentication documentation.For comprehensive guidance on building and formatting the
hpe_ccs_attributevalue, including workspace IDs, service IDs, and role assignments, see the detailed configuration instructions in the Entra ID hpe_ccs_attribute settings section.
-
-
Click Next to proceed to the feedback page
-
On the Feedback page, select the appropriate options for Okta’s integration survey, then click Finish to complete the application setup
-
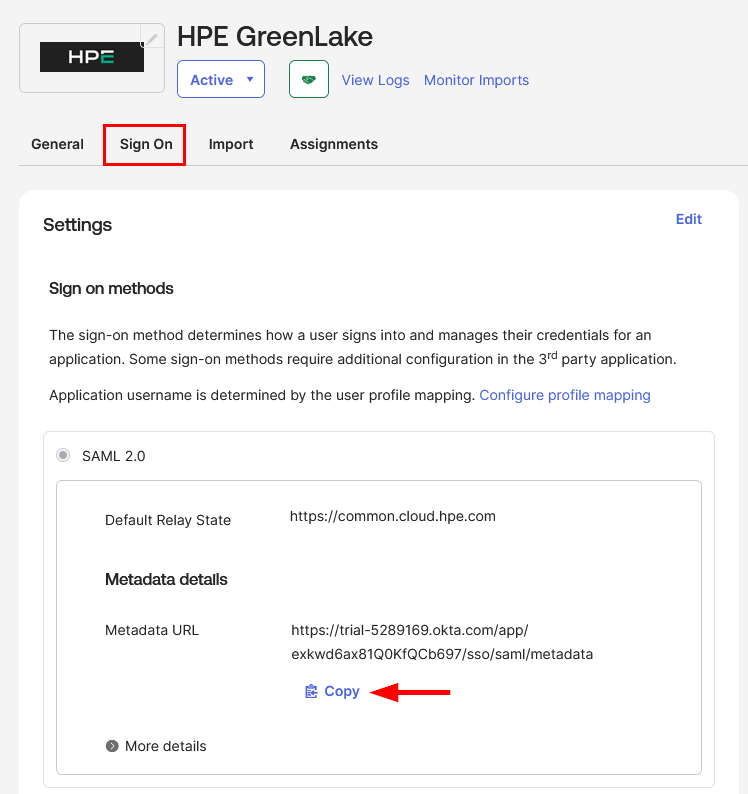
The SAML SSO configuration is now complete. To proceed with the HPE GreenLake integration, you need to obtain the Federation Metadata. Navigate to the Sign On tab and locate the Metadata URL in the SAML 2.0 section. Click Copy to copy the metadata URL to your clipboard.
RECOMMENDATION: Use Metadata URL (Not Manual XML Upload)
Why? Identity providers rotate SAML certificates every 2-3 years. When certificates expire:
- ❌ Manual XML: Users cannot authenticate until you manually upload new certificate
- ✅ Metadata URL: Positions you for potential future automatic updates (feature under consideration)
Current State (Nov 2025): HPE GreenLake retrieves metadata at configuration time but doesn’t auto-refresh. However, configuring the URL today positions you for seamless updates when this feature launches.
What to do: Always configure the metadata URL in HPE GreenLake, even though manual updates are still required today.
-
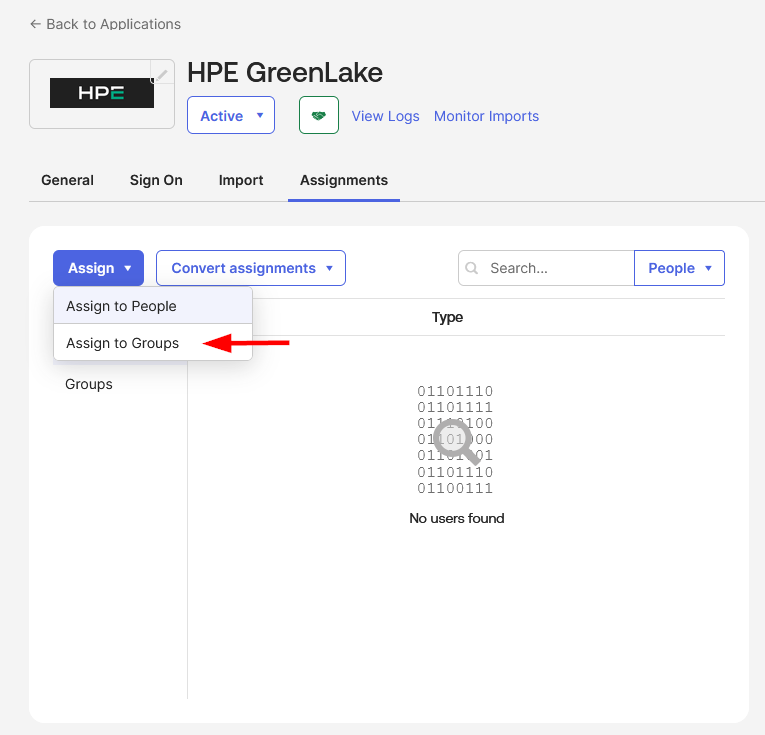
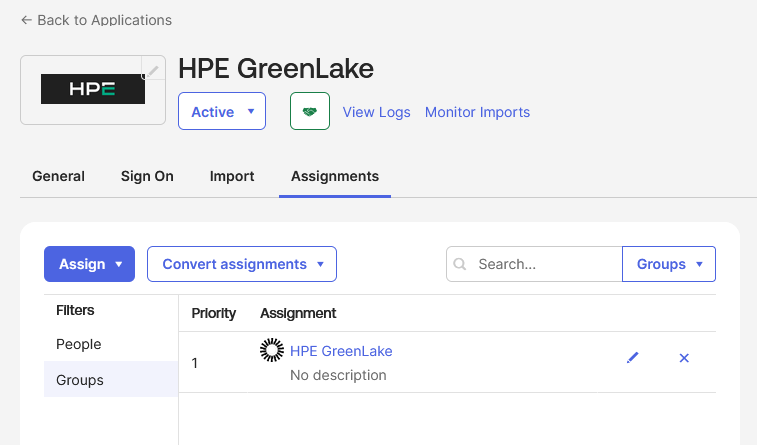
Before proceeding to Step 2, assign the HPE GreenLake application to the security group created earlier. Navigate to the Assignments tab and click Assign → Assign to Groups
-
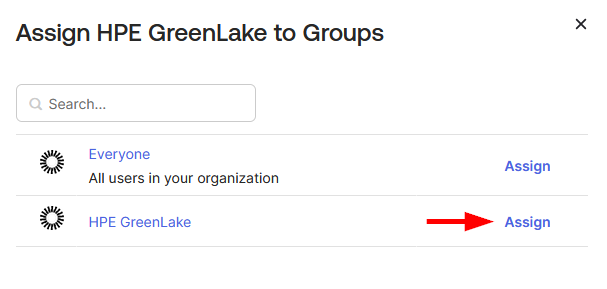
Select the HPE GreenLake group and click Assign
-
Click Done to complete the group assignment
This completes the Okta application configuration for HPE GreenLake. You can now proceed to Step 2 to register Okta as your identity provider in the HPE GreenLake platform.
Step 2: Register Okta in HPE GreenLake
To complete the SAML SSO configuration, you need to register your Okta identity provider in HPE GreenLake. The registration process is identical across all supported identity providers.
Follow the detailed instructions in Step 2: Register Entra ID in HPE GreenLake, using your Okta metadata URL in the same way as described for Entra ID.
Note: When configuring the metadata in HPE GreenLake, paste the Okta Metadata URL copied in Step 1, just as you would with the Entra ID App Federation Metadata URL.
Step 3: Testing SAML SSO Authentication
Once the SAML SSO configuration is complete, it’s important to verify that authentication is working correctly before rolling it out to all users.
Test the SSO SP-Initiated login flow (User starts at HPE GreenLake)
Service Provider (SP) initiated SSO is the authentication flow that begins when users access HPE GreenLake directly by navigating to the login page. This is the most common authentication method where users enter their email address on the HPE GreenLake login page, and the system redirects them to your configured identity provider for authentication.
Authentication Flow: User → HPE GreenLake → Okta → Back to HPE GreenLake
-
To ensure a clean test without cached credentials, open a new private browser window (e.g., Incognito, InPrivate) and navigate to the HPE GreenLake login page: https://common.cloud.hpe.com/
-
Click on the Sign in with SSO button
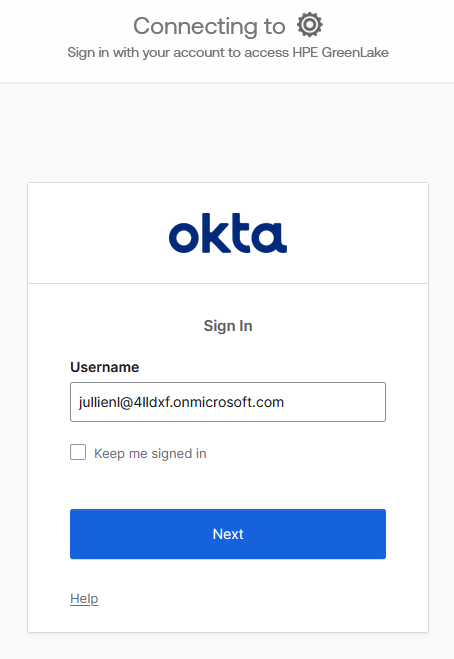
-
Enter your verified email address from the SSO-claimed domain (e.g.,
lionel@hpelabs.ddnsfree.com) and click Continue -
You will be redirected to your Okta login page. Authenticate using your organizational credentials
Note: If prompted for authentication, complete the required authentication method (such as push notification approval) configured in your Okta app sign-in policy.
-
After successful authentication, you should be redirected back to HPE GreenLake and automatically logged in
Verify the authentication
- Confirm User Profile and Access:
-
Verify that your user profile information (name, email) is displayed correctly in the HPE GreenLake console.
-
Ensure you have access to the expected workspaces and resources.
-
-
Verify Role-Based Permissions (if applicable):
-
If you configured the
hpe_ccs_attributefor SAML-based role assignments, confirm that the correct roles have been applied:-
Navigate to Manage workspace → Identity & access management → Users.
-
Locate your user account, which should be identified with an SSO authorization source.
-
Select your user and verify that the assigned roles match the permissions defined in your
hpe_ccs_attribute.
-
-
Test the SSO IdP-Initiated login flow (User starts at Okta portal)
Identity Provider initiated SSO (IdP-Initiated) enables users to access HPE GreenLake directly from their Okta dashboard with a single click, bypassing the HPE GreenLake login page entirely. This streamlined authentication flow provides the most efficient user experience for frequently accessed applications.
Authentication Flow: User → Okta Dashboard → HPE GreenLake Application → HPE GreenLake Console
-
Navigate to your Okta End-User Dashboard at your organization’s Okta URL (typically
https://<your-domain>.okta.com) -
Locate and click the HPE GreenLake application tile in your application dashboard
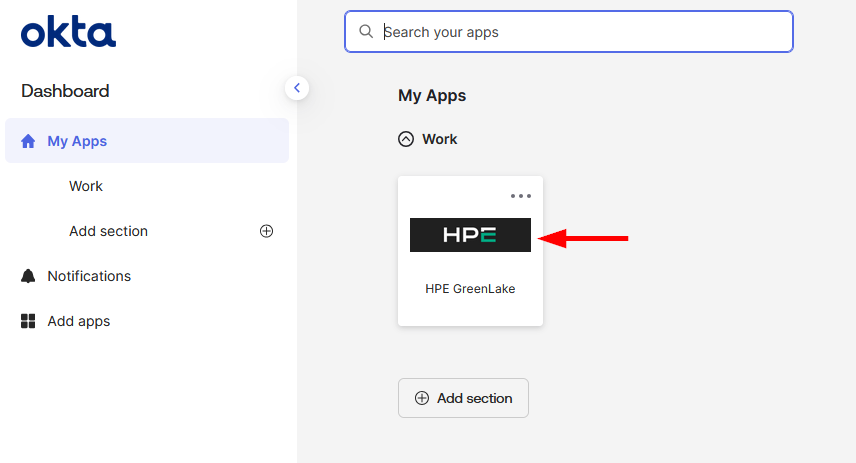
-
You should be automatically redirected to HPE GreenLake and logged in without additional authentication prompts (assuming you’ve already authenticated to Okta)
-
Verify successful authentication by confirming your user profile and workspace access are displayed correctly in the HPE GreenLake console
Troubleshooting
If authentication fails, use the following diagnostic approaches:
- Identity provider logs: Check the authentication logs in Okta Admin Console → Reports → System Log for detailed error messages and failure reasons
- HPE GreenLake audit logs: While HPE GreenLake’s audit logs currently provide limited troubleshooting information for authentication failures, they can help confirm whether authentication requests are reaching the platform. Go to Manage Workspace → Audit Log.
- Browser developer tools: Review the SAML response in your browser’s developer tools (Network tab) to identify assertion errors or attribute mismatches
Common authentication failures include misconfigured SAML attributes, certificate mismatches, or incorrect RelayState values.
Step 4: Okta Configuration Guide for HPECOMCmdlets SSO Integration
Purpose: Configure Okta to support passwordless SSO authentication for the HPECOMCmdlets PowerShell module when connecting to HPE GreenLake.
Use Case: Enable Connect-HPEGL -SSOEmail user@company.com to authenticate via Okta Verify push notification without requiring password entry.
To support HPECOMCmdlets SSO functionality, Okta must be configured to:
- ✅ Allow user enrollment during first authentication
- ✅ Support push notifications to mobile devices
- ✅ Enable passwordless authentication flow (no password prompt)
- ✅ Provide SMS/Email fallback for device issues (optional but recommended)
Configuration Overview:
The following sections guide you through verifying and configuring each requirement:
- Authenticator Configuration (Section 1): Verifies compatible authentication methods for PowerShell automation
- Okta Verify Setup (Section 2): Enables push notifications and configures enrollment policies
- SMS/Email Fallback (Section 2): Configures optional backup authentication methods for device recovery scenarios
- Authentication Policy (Section 2): Creates and applies passwordless authentication policy to HPE GreenLake application
Note: User enrollment occurs automatically during the first authentication attempt when users are prompted to set up Okta Verify. No additional configuration is required to enable first-time enrollment.
Learn more: For comprehensive guidance on passwordless authentication in Okta, refer to the official documentation: Set up a passwordless sign-in experience.
1. Verify authentication method compatibility
Before implementing passwordless authentication for the HPECOMCmdlets module, ensure your Okta tenant supports the required authentication methods. As outlined earlier in this guide, only push notifications and TOTP-based authenticators are compatible with PowerShell automation scenarios. FIDO2 security keys and biometric platform authenticators (Touch ID, Face ID, Windows Hello) cannot be used due to WebAuthn API limitations in PowerShell.
Compatible passwordless methods for HPECOMCmdlets:
- Okta Verify with push notifications: Standard push approval or number matching challenge
- Okta Verify with TOTP: Time-based one-time password verification
The following sections demonstrate how to configure Okta Verify with push notifications, which provides the most streamlined authentication experience while maintaining robust security standards compatible with the HPECOMCmdlets module.
2. Configure Okta Verify for push notification
-
Enable push notification
Before creating the authentication policy, ensure that Okta Verify is properly configured to support push notifications. This authenticator will serve as the primary passwordless authentication method for HPE GreenLake access.
To configure Okta Verify for push notifications:
-
In the Admin Console, go to Security → Authenticators.
-
On the Setup tab, click Add Authenticator.
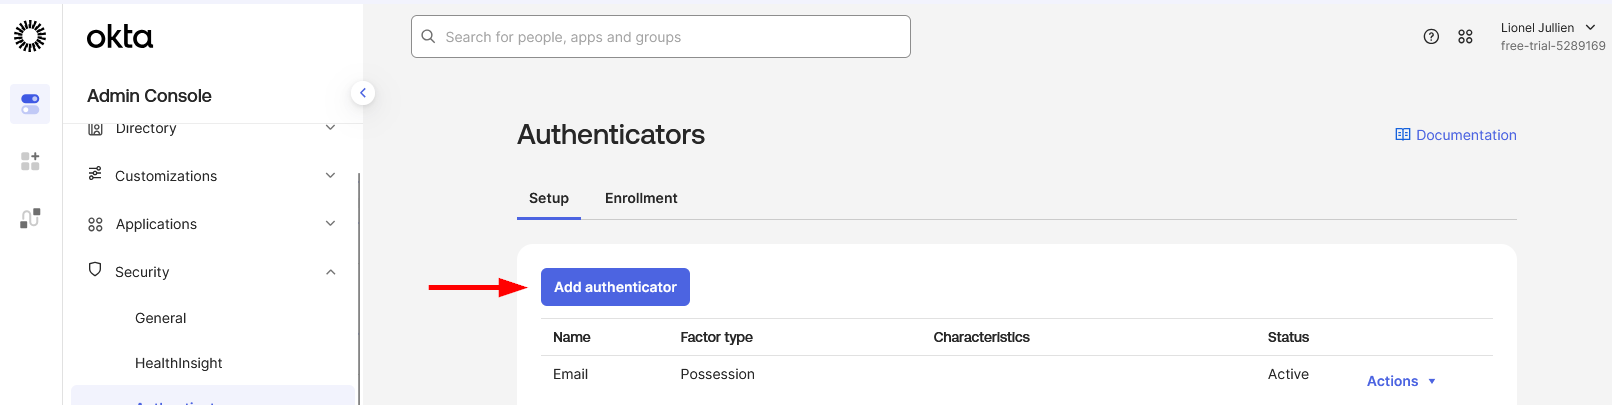
If Okta Verify is already added to your tenant, you cannot create a duplicate instance with application-specific settings. Instead, you’ll need to modify the existing Okta Verify authenticator to ensure it supports push notifications. Locate Okta Verify in the list of configured authenticators and click Edit to verify or enable the push notification settings.
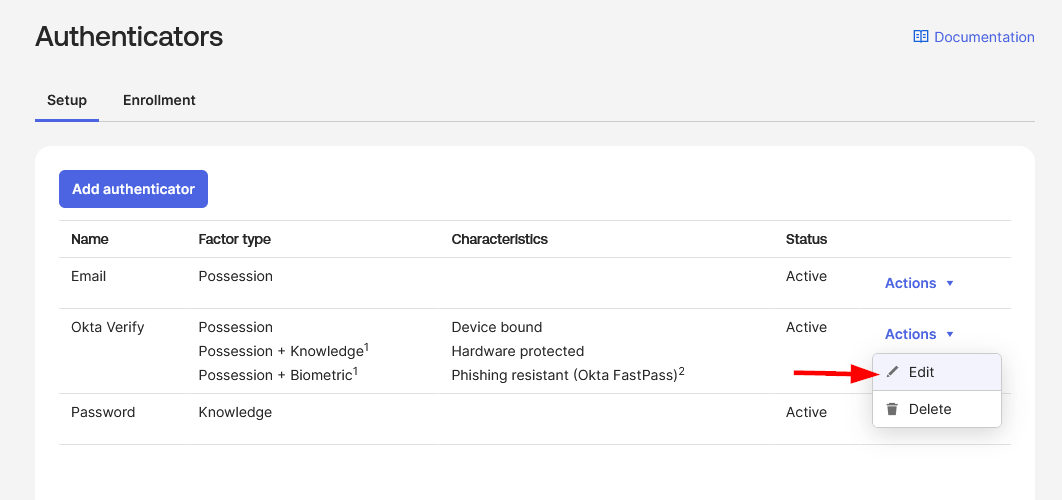
Note: Changes to the existing Okta Verify authenticator will apply globally to all applications using it in your tenant. If this is a concern, coordinate with your Okta administrators to ensure the configuration meets all organizational requirements.
If Okta Verify is not yet added to your tenant, select Okta Verify from the list of available authenticators and click Add.
-
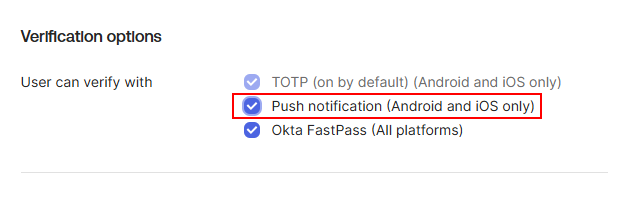
In the Verification options section, enable the Push notification (Android and iOS only) option.
-
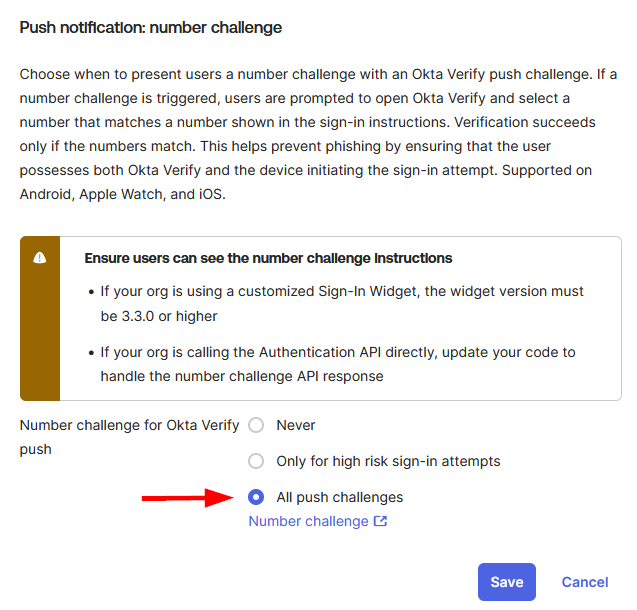
To enhance security, navigate to the Push notification: number challenge section and configure your preferred option. The number challenge provides an additional layer of verification by requiring users to enter a displayed number when approving push notifications. While enabling this feature is strongly recommended for enhanced security, both push notification methods (with and without number challenge) are fully supported by the HPECOMCmdlets module.
-
Save your configuration.
-
-
Create an authenticator enrollment policy for Okta Verify
After configuring Okta Verify for push notifications, you need to create an authenticator enrollment policy that requires users in the HPE GreenLake group to enroll with Okta Verify. This policy ensures that all HPE GreenLake users have the necessary passwordless authentication method configured before they can access the application.
-
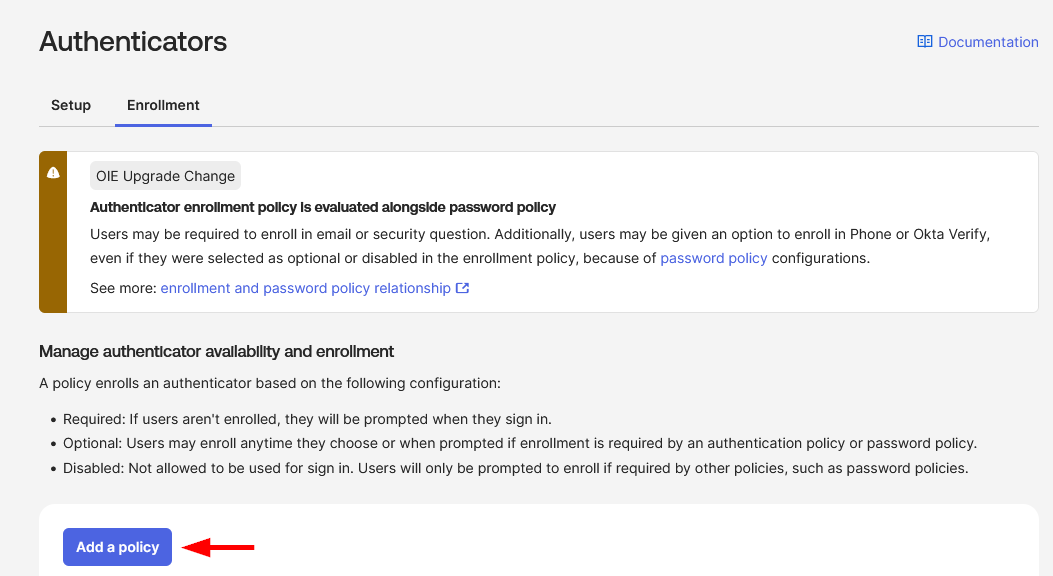
Navigate to the Enrollment tab and click Add a Policy to create a new authenticator enrollment policy.
-
Provide a descriptive policy name (e.g.,
HPE GreenLake - Passwordless Enrollment) and assign it to the HPE GreenLake group. In the Authenticators section, configure Okta Verify as either Optional or Required based on your organization’s security requirements. Click Create rule to save your configuration.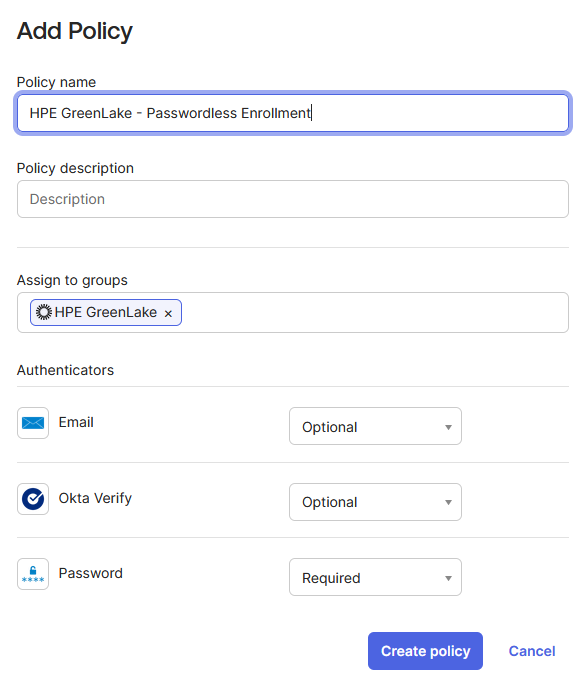
-
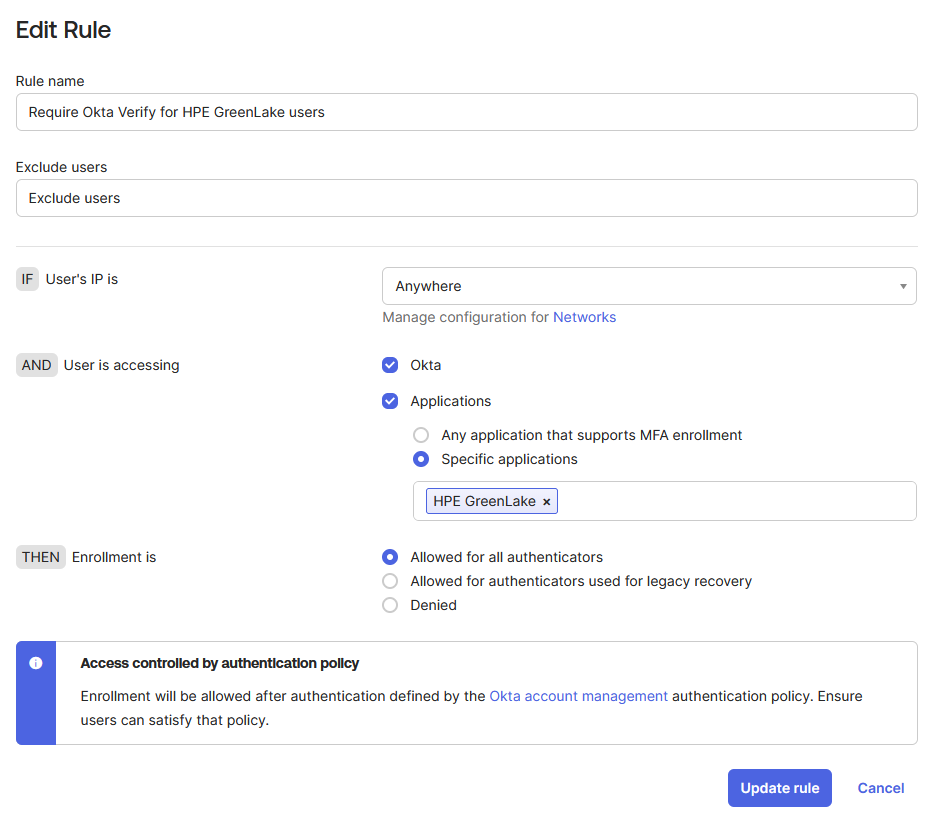
In the Add rule page, configure the enrollment rule to ensure users accessing HPE GreenLake are required to enroll with Okta Verify:
- Provide a descriptive rule name (e.g.,
Require Okta Verify for HPE GreenLake users) - Under User is accessing, enable the Applications option and select your HPE GreenLake application from the list. This ensures the enrollment requirement applies specifically to HPE GreenLake users.
- Keep all other default parameters unchanged unless your organization has specific security requirements.
-
Review your configuration to ensure accuracy, then click Create rule to save your enrollment policy.
Note: This enrollment rule ensures that when users first access the HPE GreenLake application, they will be prompted to enroll in Okta Verify if they haven’t already done so. This is a critical step for enabling passwordless authentication with the HPECOMCmdlets module.
- Provide a descriptive rule name (e.g.,
-
-
Configure SMS and Email fallback methods (Optional)
While Okta Verify provides the primary passwordless authentication experience, enabling SMS and Email authentication methods offers users alternative verification options when they cannot access their mobile device (e.g., device lost, out of battery, or temporarily unavailable).
Important Limitation: While SMS and Email fallback methods provide recovery options for browser-based authentication, they are not compatible with the HPECOMCmdlets PowerShell module due to manual code entry requirements. Users leveraging HPECOMCmdlets for automation should ensure they maintain access to their primary authenticator (Okta Verify) for push notification approval. If a user loses access to their primary authenticator device, they will need to re-enroll before using the module for PowerShell automation.
Security Note: Phone and Email are less secure than push notifications and should only be used as fallback methods for browser-based access. Okta recommends limiting their use to recovery scenarios rather than primary authentication.
To enable Phone authentication:
-
In the Admin Console, go to Security → Authenticators
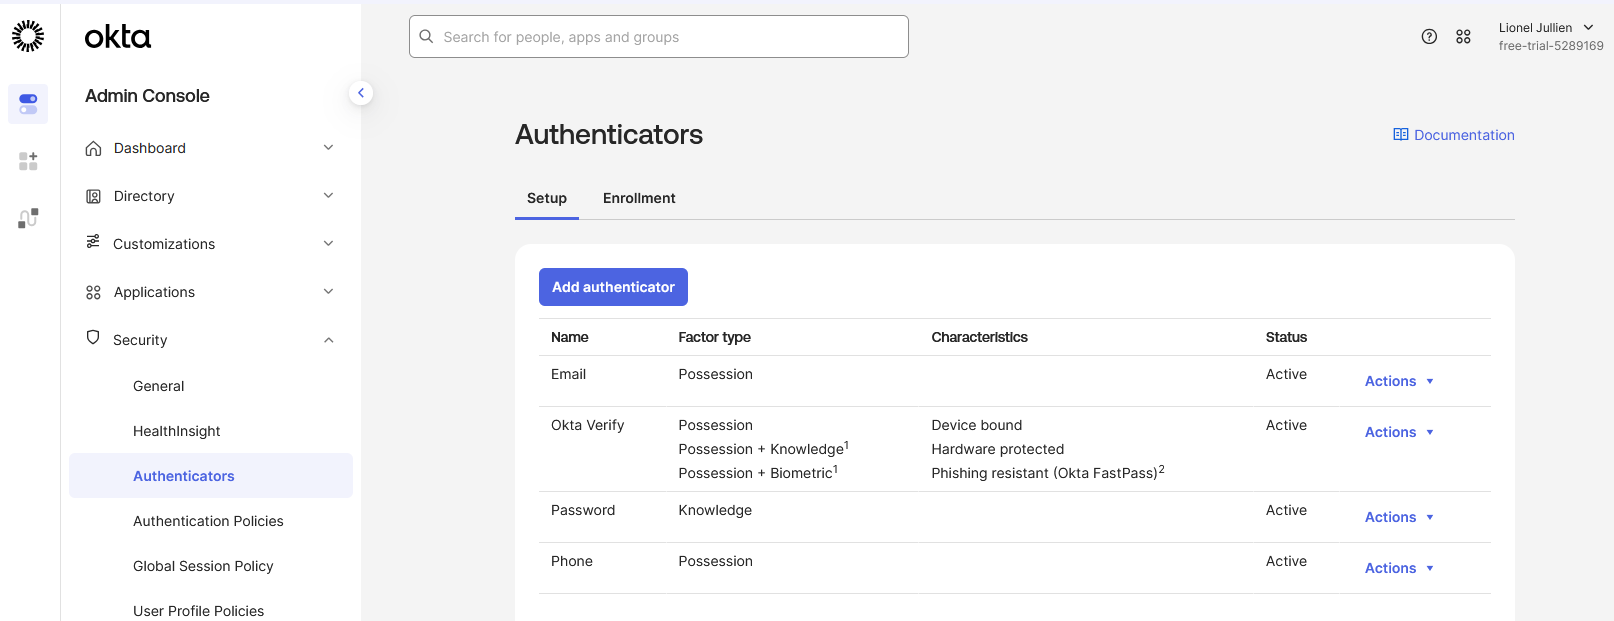
- On the Setup tab, locate Phone in the authenticator list
- If Phone is not listed in your authenticators, you’ll need to add it:
- Click Add authenticator
- Select Phone from the available authenticators
- Click Add
Note: For detailed configuration instructions, refer to Okta’s official documentation: Configure the phone authenticator
- If Phone is not listed in your authenticators, you’ll need to add it:
-
Click Actions → Edit
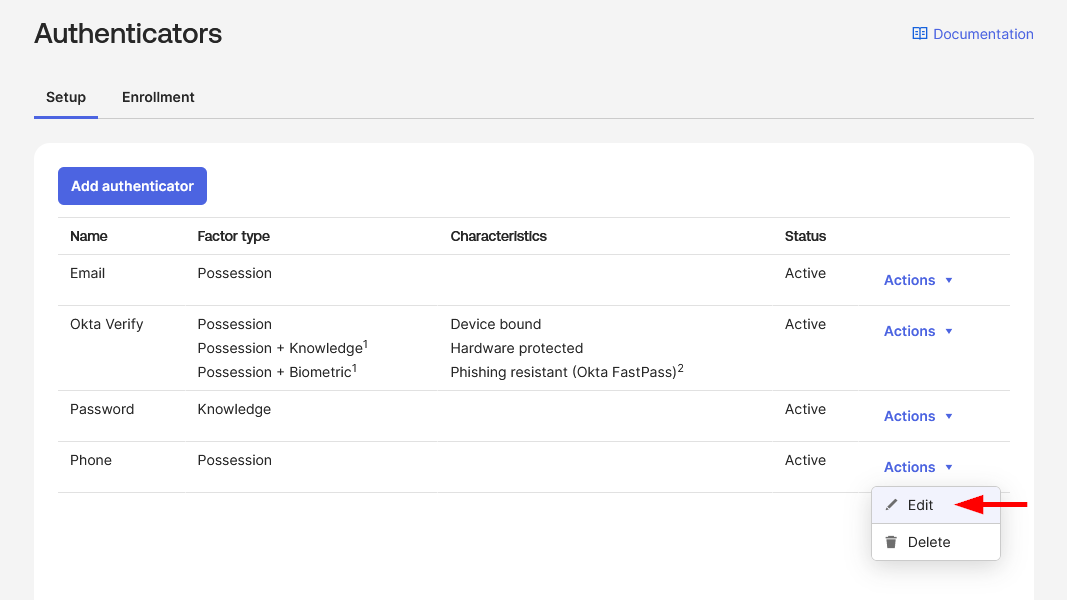
-
In the User can verify with field, select Voice call, SMS, or both depending on your organization’s security requirements and user preferences
-
Set This authenticator can be used for to Authentication and recovery
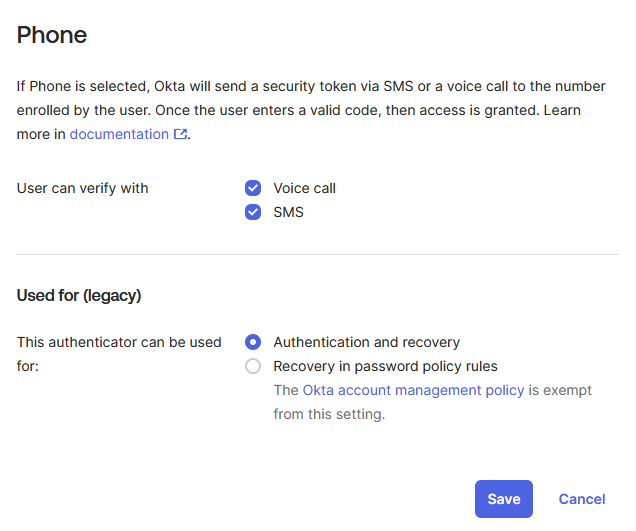
Note: This setting enables Phone as both a primary authentication method and a recovery option for browser-based authentication scenarios. However, SMS/Voice call verification is not supported by the HPECOMCmdlets PowerShell module and will only provide fallback capability for manual web browser access.
- Click Save to save your configuration
To enable Email authentication:
- In the Admin Console, go to Security → Authenticators
- On the Setup tab, locate Email in the authenticator list
-
If not already enabled, click Actions → Edit

-
Set This authenticator can be used for to Recovery in password policy rules
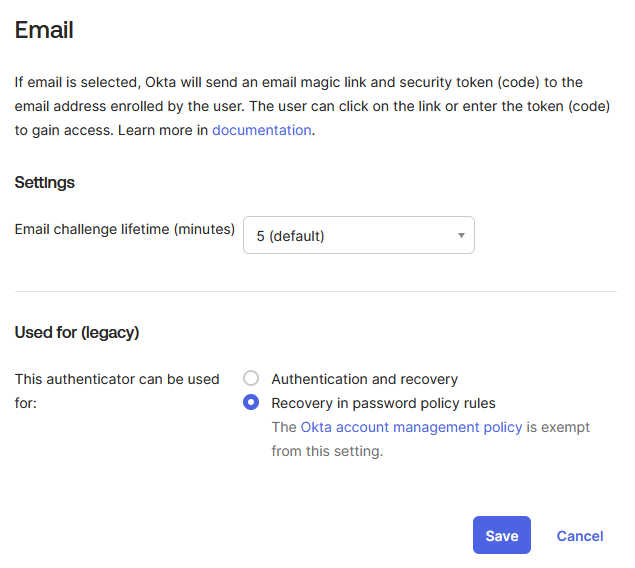
Note: Unlike Phone authentication which is set to “Authentication and recovery”, Email is configured for “Recovery in password policy rules” only. This more restrictive setting is recommended because email-based verification codes are more vulnerable to interception and phishing attacks. Limiting email to password recovery scenarios (rather than allowing it as a primary MFA method) maintains stronger security posture while still providing users with account recovery options when needed.
- Click Save to save your configuration
Summary: These SMS and Email fallback methods provide recovery options for browser-based authentication only. They will be available to users when enrolling in MFA or when they cannot access their primary authentication method for web access, but they cannot be used with the HPECOMCmdlets PowerShell module automation. The authentication policy you’ll configure next will still enforce multi-factor authentication requirements.
-
-
Configure an authentication policy
Now that Okta Verify is configured for push notifications and users are enrolled, you need to create a dedicated authentication policy for the HPE GreenLake application. This policy will enforce passwordless authentication by requiring users to authenticate with Okta Verify push notifications instead of passwords.
-
In the Admin Console, go to Security → Authentication Policies → App sign-in.
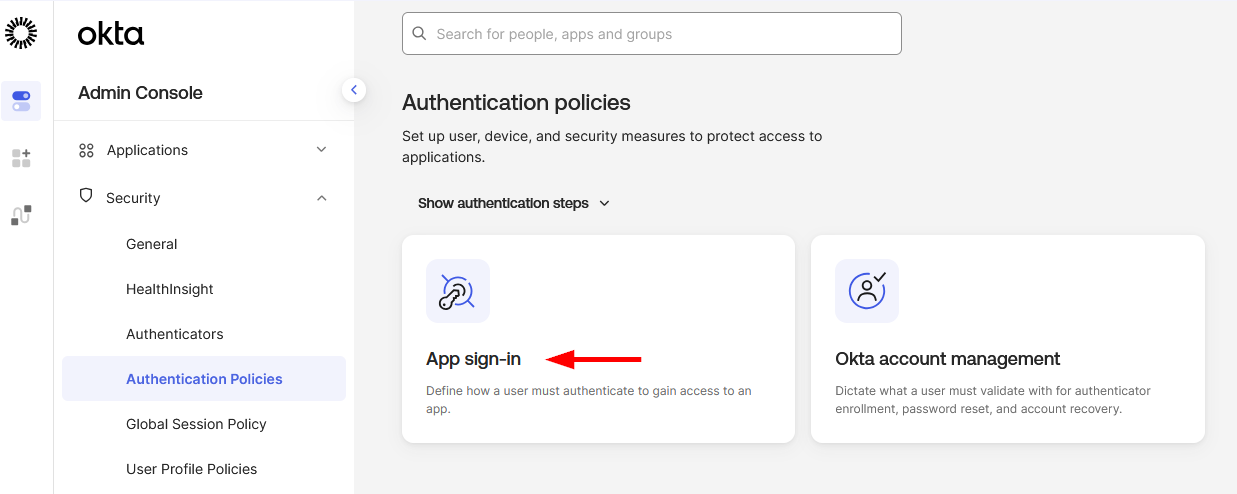
-
Click Create policy.
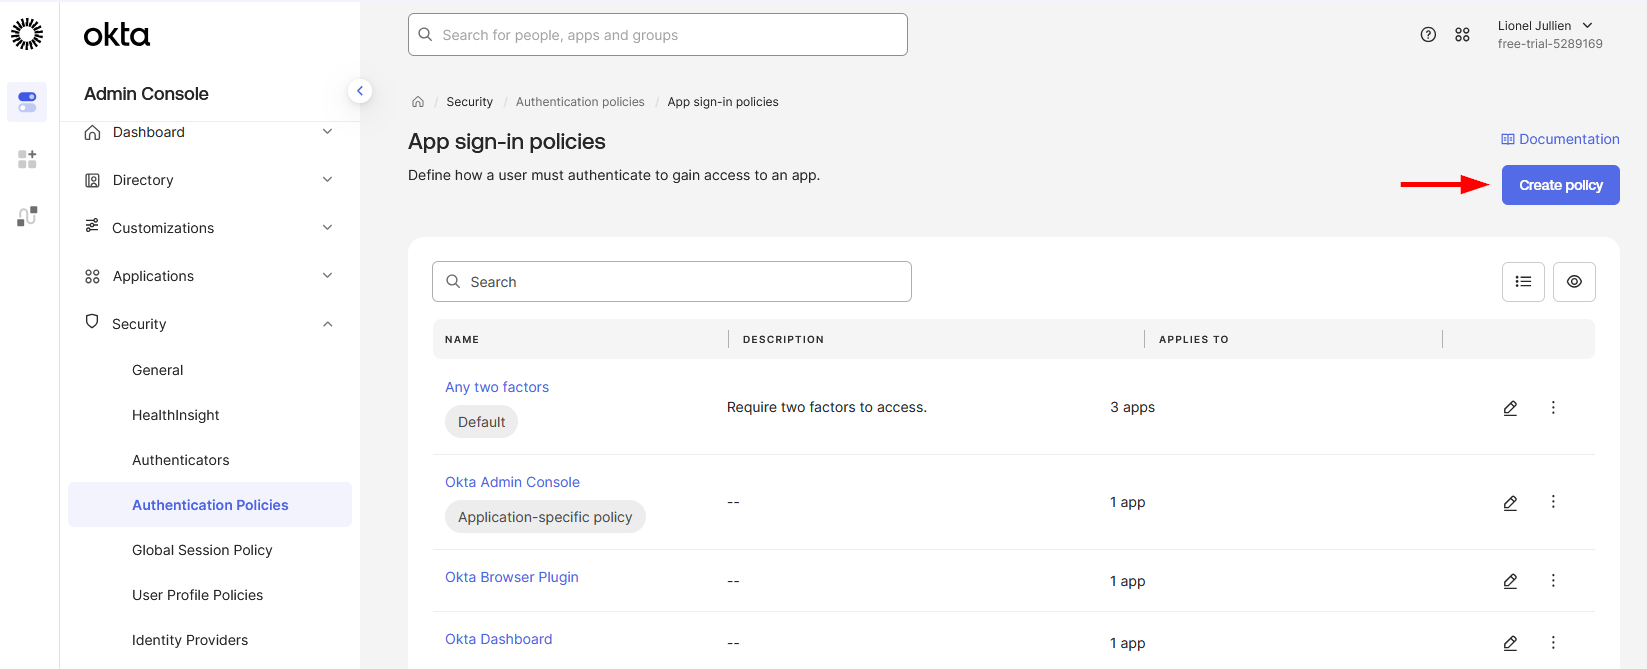
-
Enter a policy name (e.g.,
HPE GreenLake - Passwordless MFA) and description, then click Create policy.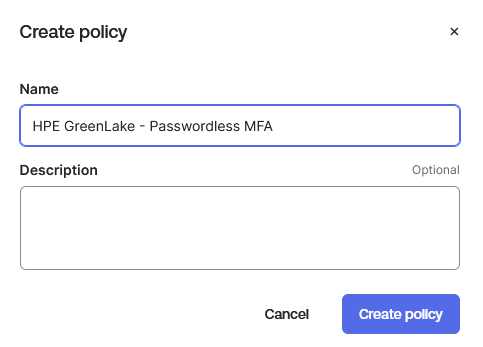
-
Using the Actions menu on the Catch-all Rule, select Edit
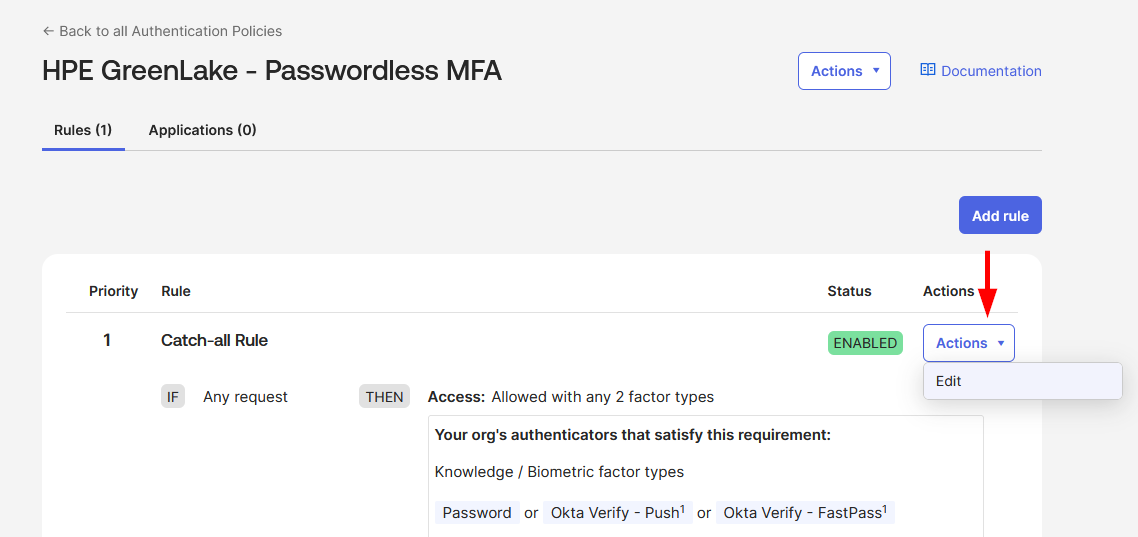
-
Under User must authenticate with, select Any 2 factor types
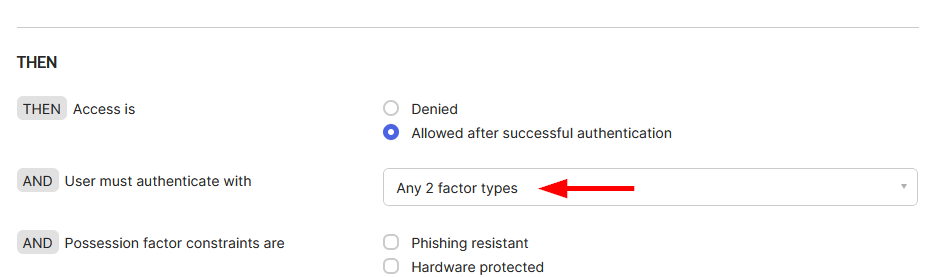
- In the Possession factor constraints section:
- Check Require user interaction
-
Select Any interaction (this includes responding to an approval prompt in Okta Verify or touching a Yubikey to activate)
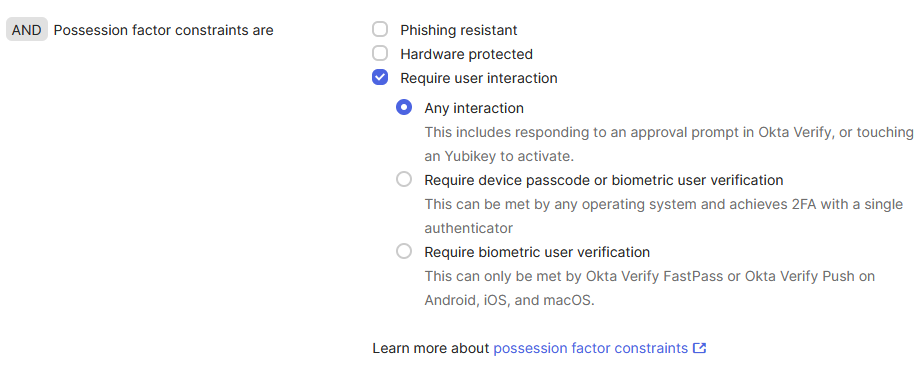
This configuration ensures users authenticate using interactive methods like Okta Verify push notifications, enforcing passwordless authentication.
Note: The “Any interaction” option supports Okta Verify push notifications (with or without number challenge) and hardware tokens like FIDO2 keys, all of which are passwordless methods compatible with the HPECOMCmdlets module.
- In the Authentication methods section, select Disallow specific authentication methods to prevent password-based authentication:
- In the dropdown list, type Password to exclude it from allowed authentication methods
- Verify that other password-based methods are also excluded if they appear in your configuration
-
Only passwordless methods should remain available (e.g., Okta Verify push notification, Okta Verify - TOTP, Okta Verify - FastPass)
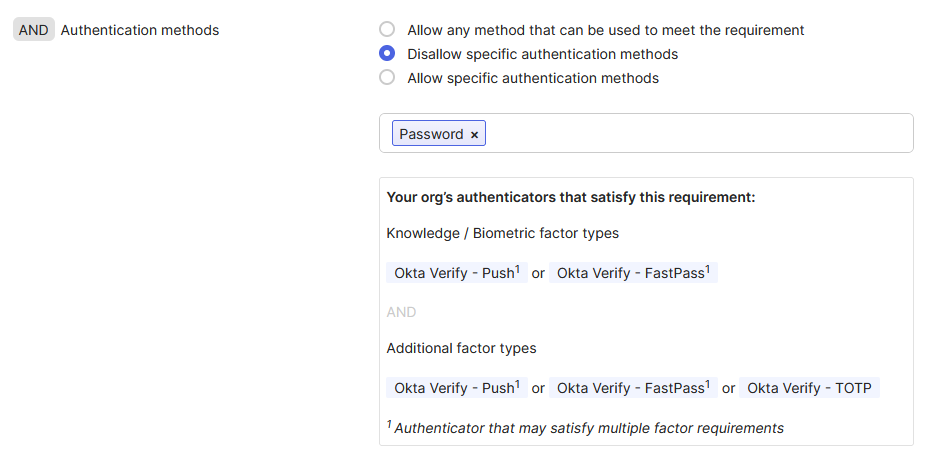
Note: This configuration prevents users from authenticating with passwords and ensures compliance with passwordless requirements for the HPECOMCmdlets module.
-
Review all settings carefully to ensure accuracy, then click Save to apply the authentication policy.
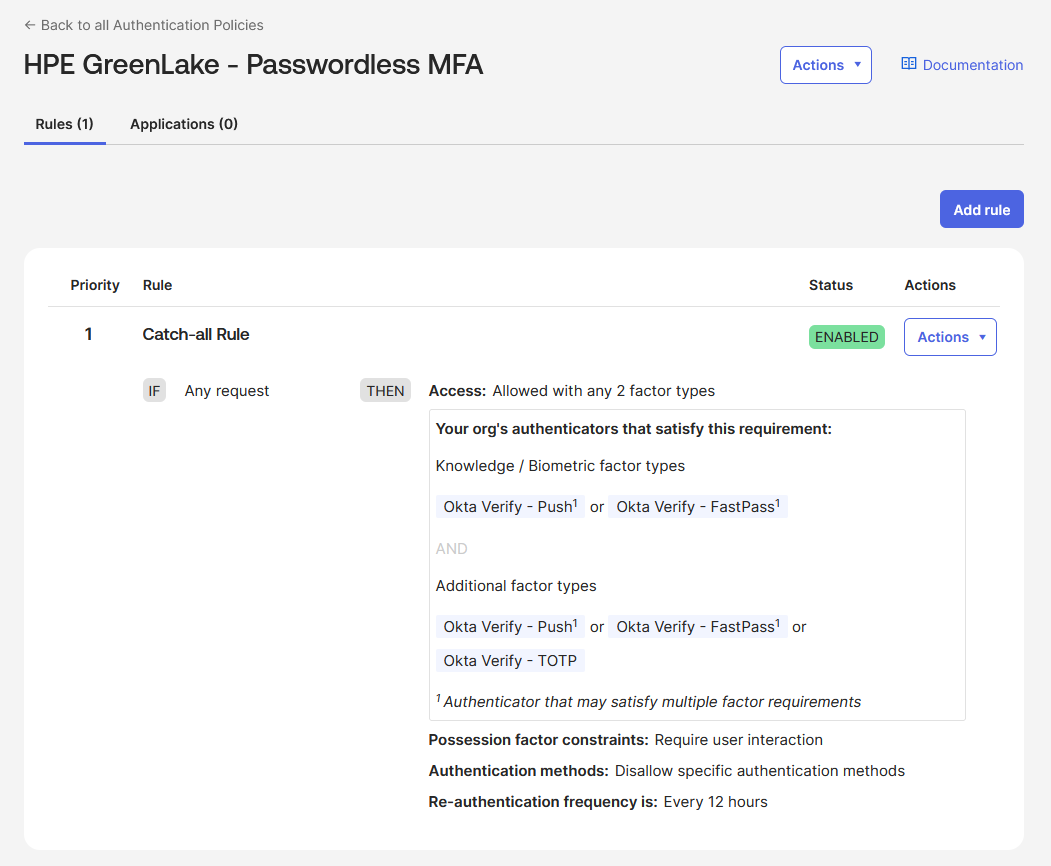
-
-
Assign the authentication policy to the HPE GreenLake application
With the authentication policy created and configured for passwordless authentication, the final step is to apply this policy to the HPE GreenLake application. This ensures that all authentication attempts to HPE GreenLake will be governed by the passwordless MFA requirements you’ve defined.
-
Navigate to Applications → Applications and select your HPE GreenLake application.
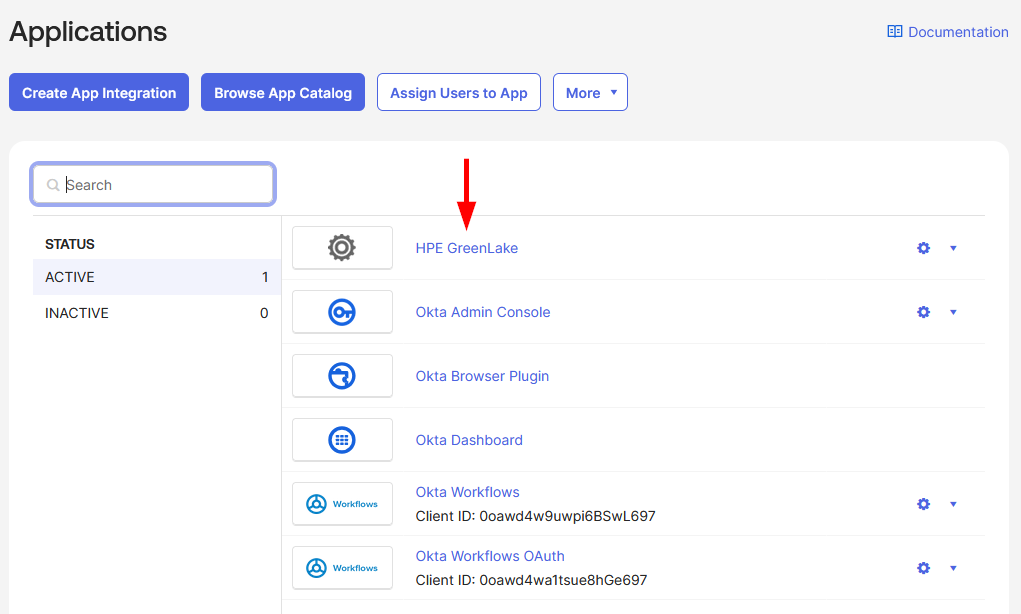
-
Go to the Sign On tab and scroll down to the User authentication section.
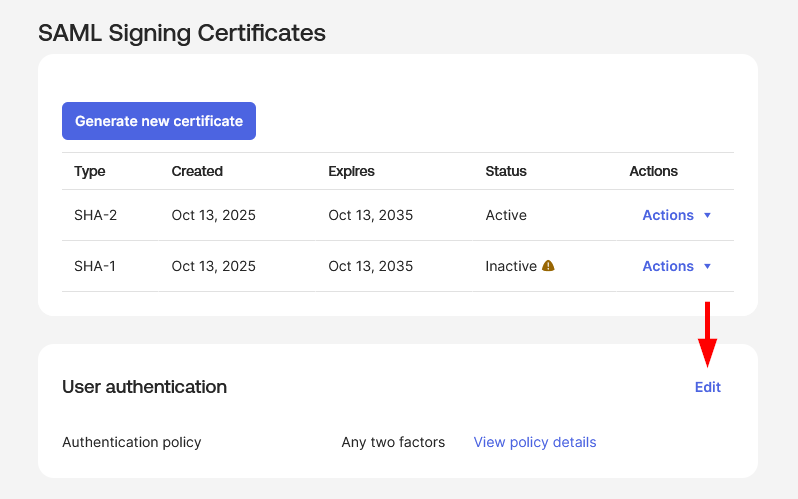
-
Click Edit.
-
Select the authentication policy you created earlier (e.g.,
HPE GreenLake - Passwordless MFA).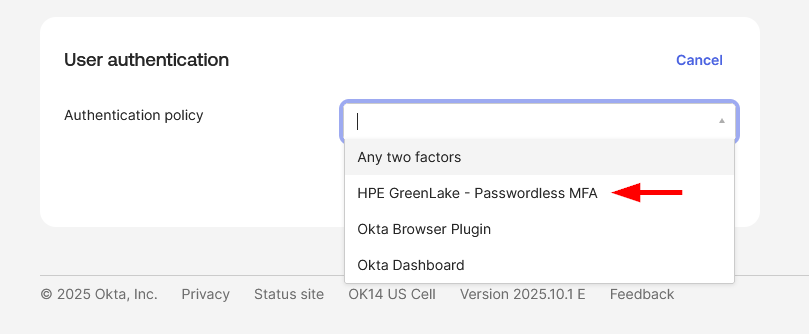
-
Click Save to apply the policy to your HPE GreenLake application.
-
This completes the passwordless authentication configuration for Okta. Users in the HPE GreenLake group will now be required to authenticate using Okta Verify with push notification when accessing the HPE GreenLake application.
3. Test SSO Authentication with Browser
⚠️ CRITICAL: First-Time User Enrollment Requirement
Because the HPE GreenLake application uses a passwordless authentication policy (disallowing password authentication method), users MUST complete their initial Okta Verify device enrollment through the Okta End-User Dashboard - NOT by attempting to log in directly to HPE GreenLake.
Why this matters:
- The passwordless policy (
HPE GreenLake - Passwordless MFA) never prompts for a password during authentication- Without a password authentication step, Okta cannot trigger the self-enrollment flow
- If a user without a registered device tries to access HPE GreenLake directly, they will encounter authentication errors or be unable to complete enrollment
- This creates a chicken-and-egg problem: the user needs a device to authenticate, but cannot enroll a device without authenticating
Correct enrollment workflow:
- First-time users: Log in to Okta Dashboard (using standard Okta authentication) → Click HPE GreenLake app tile → Complete device enrollment with QR code
- Subsequent logins: Users can access HPE GreenLake directly via SP-Initiated SSO using passwordless authentication
Important: If you need users to enroll when accessing HPE GreenLake directly (SP-Initiated), you must modify the authentication policy to allow password authentication as a fallback method, which contradicts the pure passwordless design. For pure passwordless deployments, initial enrollment via the Okta Dashboard is required.
To verify that your passwordless authentication configuration is working correctly, test the complete authentication flow using a web browser:
-
Open a web browser and navigate to your Okta End-User Dashboard at your organization’s Okta URL (typically
https://<your-domain>.okta.com/app/UserHome) -
Expected Authentication Flow:
-
Initial Login Screen: The Okta sign-in screen appears. Enter your email address and note that no password field is displayed, confirming that the passwordless policy is active.
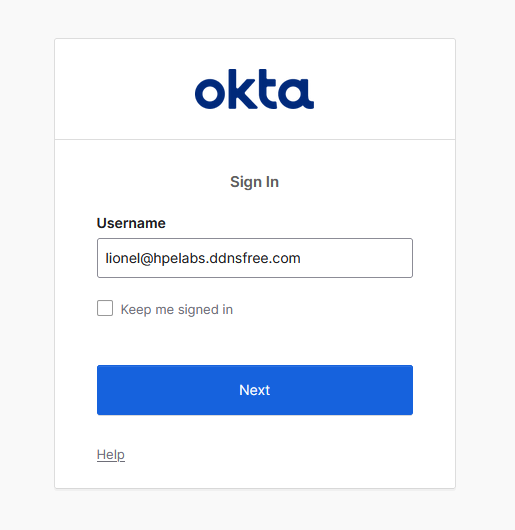
- First-Time Okta Verify Setup (if applicable):
-
A “Set up security methods” screen appears displaying a Set up button
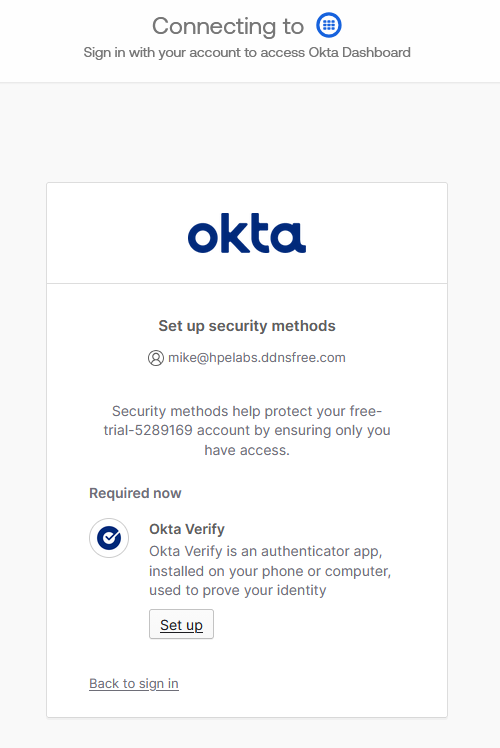
-
Click Set up to display a QR code for device pairing
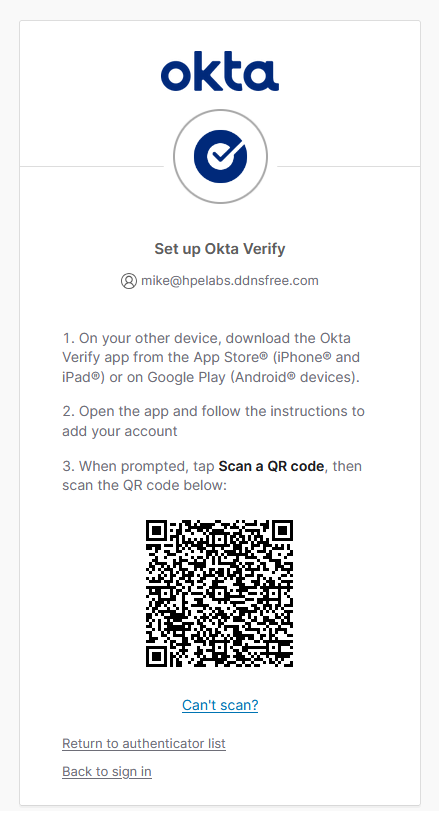
- Open the Okta Verify app on your mobile device
- Tap the + icon to add an account
-
Select Other for the account type
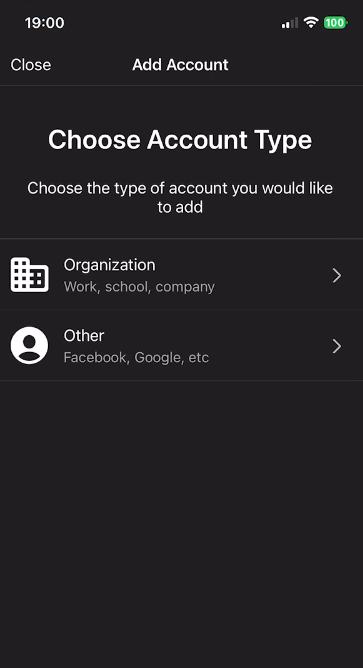
- Scan the QR code displayed on the screen to complete device pairing
- Once paired, the system automatically proceeds to push notification authentication
-
-
Push Notification Authentication:
Note: If Okta Verify is already configured on your device, you will skip the first-time device pairing process above and proceed directly to the push notification authentication step below.
- The Okta authentication page displays in your browser, showing multiple authentication options
-
Select Get a push notification
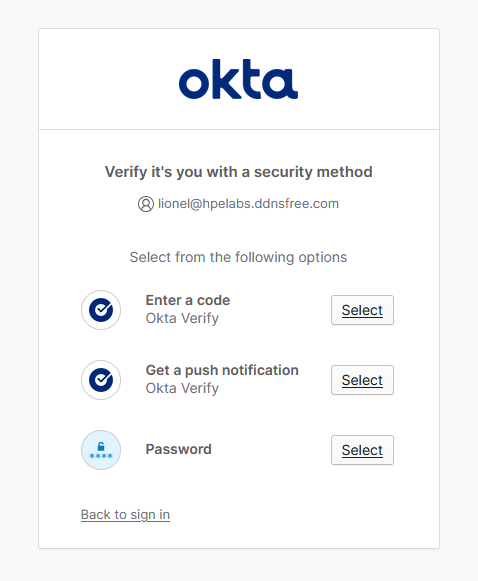
Note: Multiple authentication options may appear including Enter a code (Okta Verify TOTP), Get a push notification (Okta Verify), and Password. For passwordless authentication compatible with HPECOMCmdlets automation, always select Get a push notification. While Password is shown as an option, using it will require password entry and does not provide the streamlined passwordless experience. If you configured optional fallback methods (Phone/Email) earlier in this guide, those may also appear as additional options for browser-based recovery scenarios.
-
Push Notification Approval (behavior depends on your Okta authentication policy configuration):
- With Number Matching (enhanced security):
-
A challenge number appears on the browser screen (e.g., “74”)
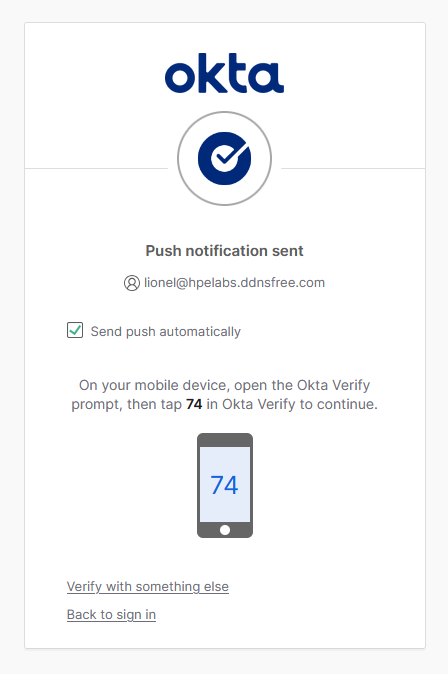
- Open Okta Verify on your mobile device
-
Locate and tap the matching challenge number displayed in your browser
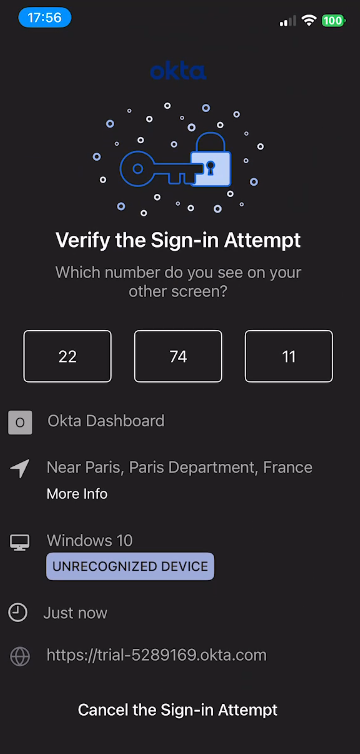
- Complete biometric authentication if enabled
-
- Without Number Matching (standard approval):
- Open Okta Verify on your mobile device
- Review the authentication request details
- Tap Approve to confirm the request
- Complete biometric authentication if enabled
- With Number Matching (enhanced security):
- Authentication Completion:
- The browser automatically completes the authentication process
- You are redirected to the Okta End-User Dashboard with full access
-
Troubleshooting: If you don’t receive a push notification, verify that:
- The Okta Verify app is installed and properly configured
- Push notifications are enabled in your device settings
- Your device has an active internet connection
4. Test SSO Authentication with HPECOMCmdlets
After confirming browser-based authentication works correctly, verify that the HPECOMCmdlets PowerShell module can successfully authenticate using the passwordless flow:
PowerShell Test Script:
# Import the HPECOMCmdlets module
Import-Module HPECOMCmdlets

# Attempt SSO login with your verified email address
Connect-HPEGL -SSOEmail "test.user@company.com"
Expected Authentication Flow:
- Command Execution:
- The
Connect-HPEGLcmdlet initiates the SAML SSO authentication flow
- The
- Push Notification Delivery:
-
A push notification is immediately sent to your registered mobile device
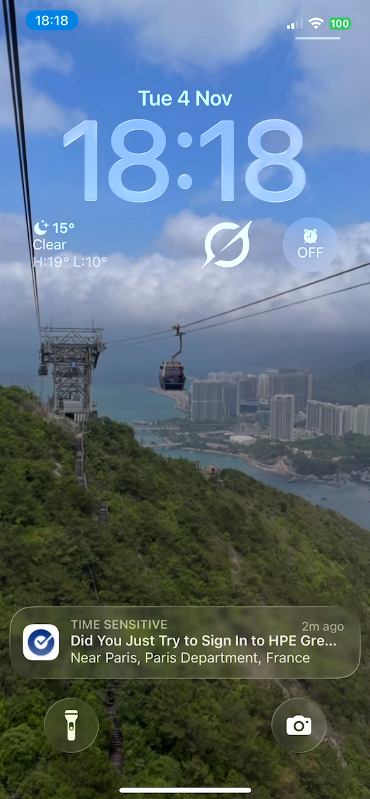
-
The PowerShell console displays a progress indicator
-
- Authentication Approval (behavior depends on your Okta authentication policy configuration):
- With Number Matching (enhanced security):
-
The PowerShell progress bar displays a challenge number (e.g., “Respond ‘53’ to the Okta Verify notification”)

- Open Okta Verify on your mobile device
-
Locate and tap the matching number displayed in the PowerShell console
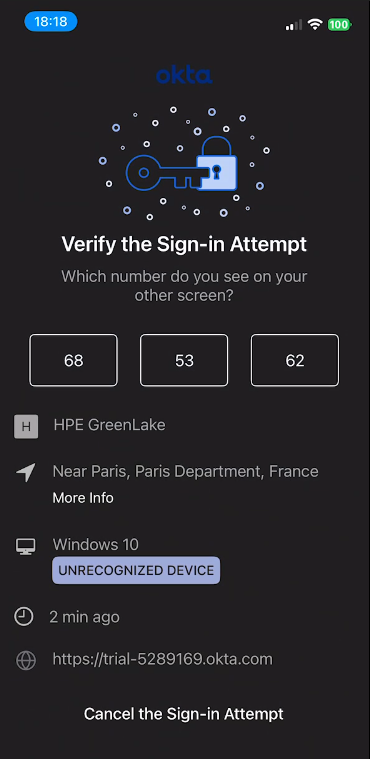
- Complete biometric authentication if enabled
-
- Without Number Matching (standard approval):
-
The PowerShell progress bar displays: “Approve the Okta Verify Push notification”

- Open Okta Verify on your mobile device
- Review the authentication request details
-
Tap Yes, it’s Me to confirm the request from HPE GreenLake
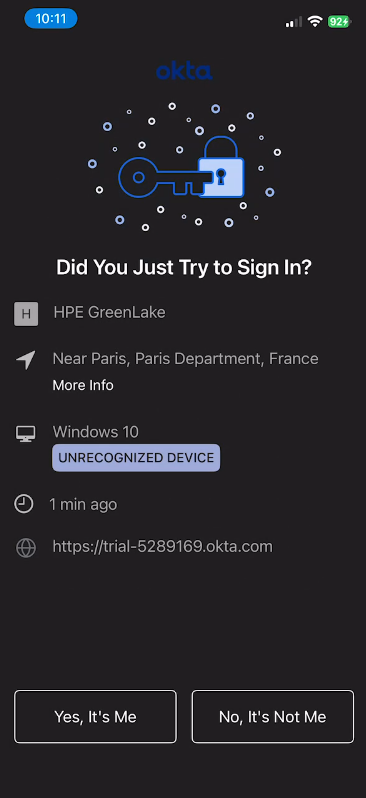
- Complete biometric authentication if enabled
-
- With Number Matching (enhanced security):
- Authentication Completion:
- After successful approval, the
Connect-HPEGLcmdlet completes authentication -
Connection details containing your authentication context and connection details are displayed in the PowerShell console

- After successful approval, the
Important: The authentication flow must complete within the timeout period configured in your Okta authentication policy (typically 60-90 seconds). If the timeout expires before approval, the connection attempt will fail and you’ll need to retry the
Connect-HPEGLcommand.If authentication fails, consult the HPECOMCmdlets documentation or review the authentication logs in Okta Admin Console under Reports → System Log.
Part 3: Configuring SAML SSO with Ping Identity
Ping Identity is a comprehensive enterprise identity security platform that delivers robust authentication, authorization, and identity management capabilities. As a leader in the identity and access management space, Ping Identity provides extensive SAML 2.0 support for seamless single sign-on integration with cloud and on-premises applications, including HPE GreenLake.
Key capabilities relevant to HPE GreenLake integration include:
- PingOne for Enterprise: Cloud-native identity-as-a-service platform with pre-built application integrations
- Adaptive authentication: Risk-based authentication policies leveraging AI and machine learning
- PingID multi-factor authentication: Comprehensive passwordless authentication support including mobile push notifications
- Directory services: Flexible user management with support for hierarchical organizations and custom attributes
- API-driven architecture: Extensive REST APIs enabling automation and custom integrations
- Zero Trust security model: Continuous authentication and authorization based on user context and behavior
The following steps will guide you through creating a custom SAML 2.0 application integration in Ping Identity, configuring the required SAML attributes for seamless integration with HPE GreenLake, and establishing passwordless authentication policies. While HPE GreenLake itself supports standard password-based SAML authentication, this guide will also demonstrate how to configure passwordless authentication methods that are essential for users who plan to leverage the HPECOMCmdlets PowerShell module for automation and management tasks.
Step 1: Register HPE GreenLake in Ping Identity
Before configuring the HPE GreenLake application in Ping Identity, it’s essential to create a group that will control which users can access the HPE GreenLake application. This group will be used for authentication purposes and can optionally be leveraged for role-based access control (RBAC) through SAML attributes, allowing you to map Ping Identity groups to specific HPE GreenLake roles and permissions. Alternatively, if you prefer to manage user authorization directly within the HPE GreenLake platform, you can configure your SAML domain to use local authorization instead of SAML-based RBAC.
1. Create a group
-
Navigate to Directory → Groups → Add Group
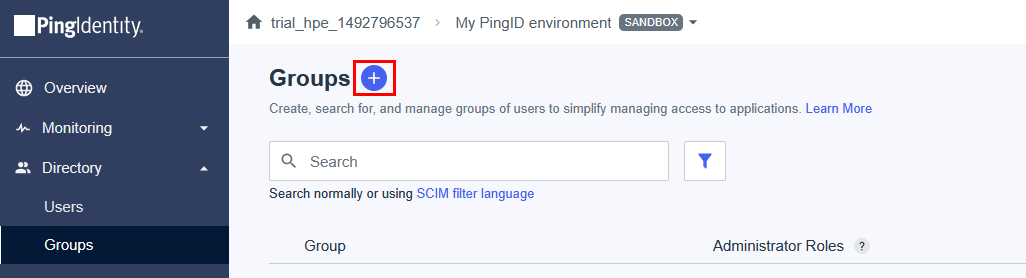
-
Create a group for the HPE GreenLake application. Name it
HPE GreenLake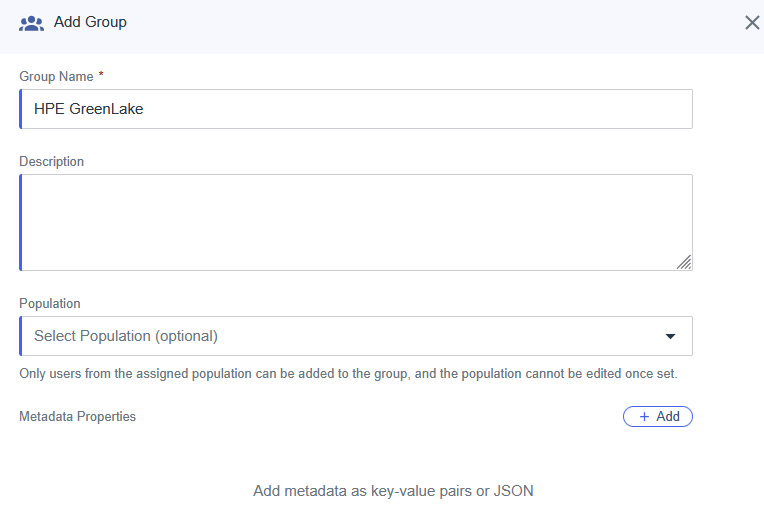
-
Click Save to create the group
-
From the Users tab, add the members who will be granted access to the application
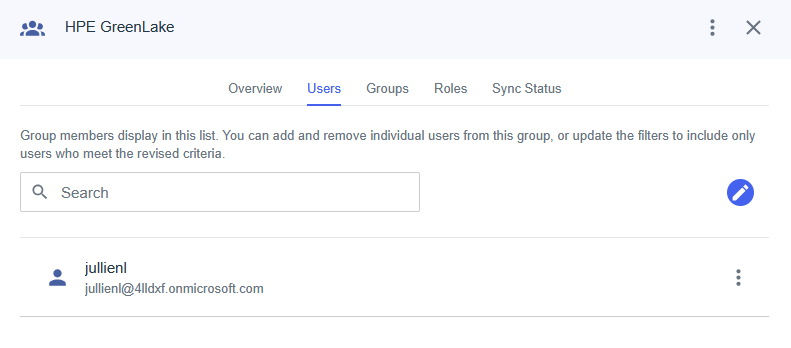
2. Create a new SAML Application Connection
With the security group created, you can now proceed to register the HPE GreenLake application in Ping Identity. This involves creating a custom SAML 2.0 application connection that will serve as the integration point between Ping Identity and HPE GreenLake.
-
Go to Applications → Applications → Click on the plus icon
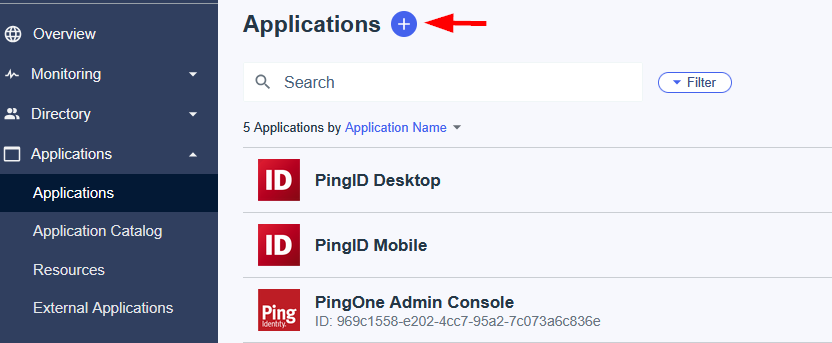
-
Enter an Application Name, e.g.,
HPE GreenLakeand select SAML Application as the application type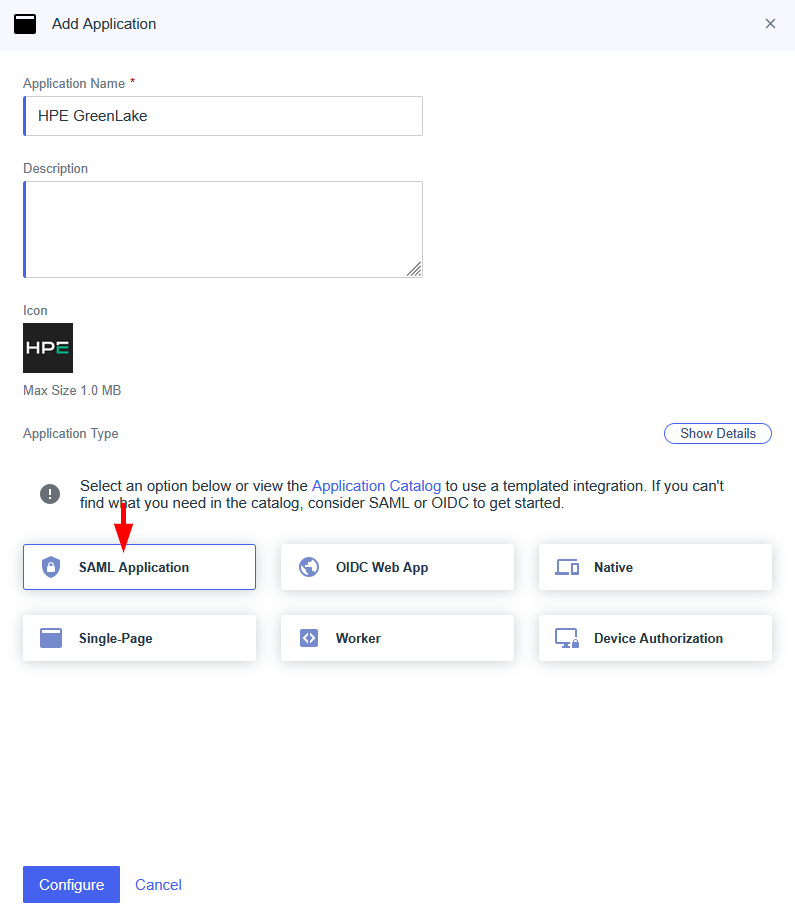
-
Optionally, upload an HPE logo for visual identification and click Configure
-
On the SAML Configuration page, select the Manually Enter option and configure the following settings:
Field Value ACS URLs https://sso.common.cloud.hpe.com/sp/ACS.saml2Entity ID https://sso.common.cloud.hpe.com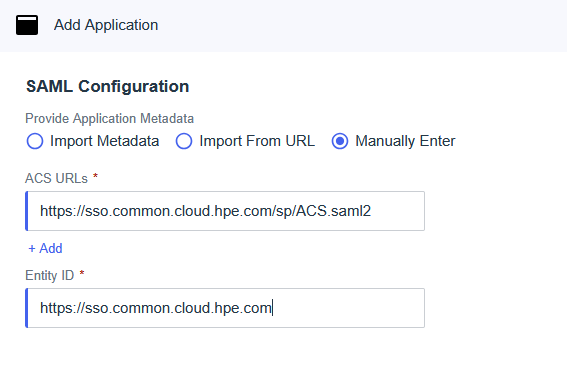
These fields establish the SAML connection between Ping Identity and HPE GreenLake:
- ACS URLs (Assertion Consumer Service): The endpoint where Ping Identity sends SAML authentication responses after successful authentication
- Entity ID: Uniquely identifies HPE GreenLake as the service provider in the SAML federation
-
Click Save to proceed
-
On the Attribute Mapping tab, click the Edit button (pencil icon) at the top of the page
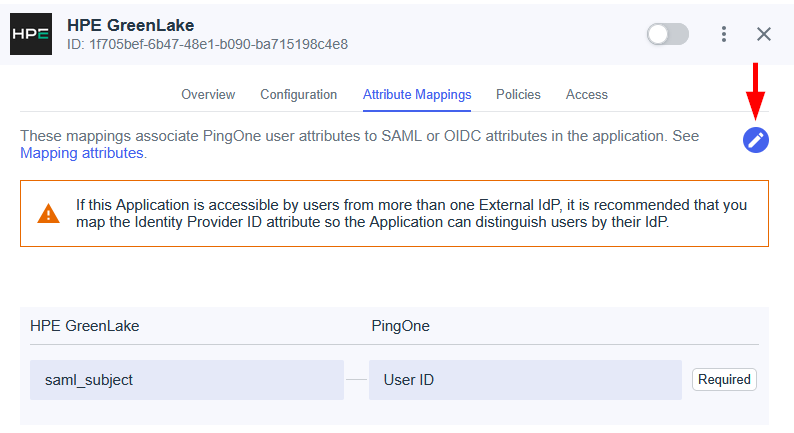
-
Configure the required SAML attributes by clicking + Add for each entry. Mark all attributes as Required:
HPE GreenLake Attribute Outgoing Value (Ping Attribute) saml_subject Email Address FirstName Given Name LastName Family Name hpe_ccs_attribute (Optional - see configuration below) 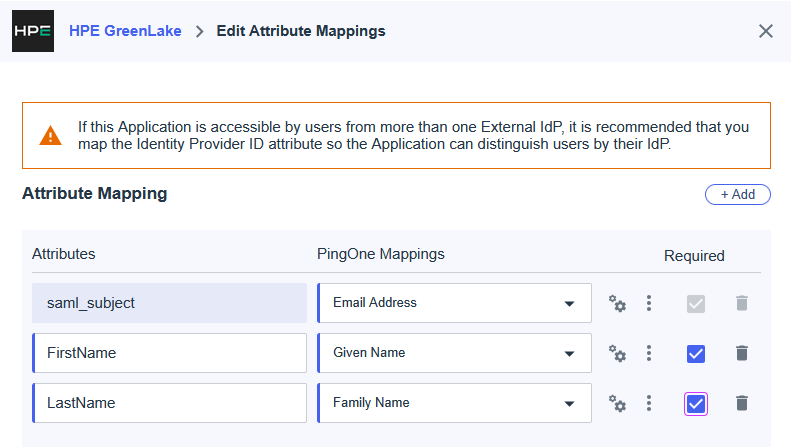
Note: These SAML attributes define how user identity information is transmitted from Ping Identity to HPE GreenLake during authentication. The attribute names are case-sensitive and must match exactly as shown. All attributes should be marked as Required to ensure proper user identification.
-
Configure the hpe_ccs_attribute (Optional)
The
hpe_ccs_attributeenables role-based access control (RBAC) by mapping your Ping Identity group memberships to specific HPE GreenLake workspace roles and application permissions.Note: This attribute is optional. If you prefer to manage user authorization directly within the HPE GreenLake platform instead of through SAML attributes, you can skip this configuration.
To configure this attribute:
The
hpe_ccs_attributevalue follows a specific format that defines workspace access, application permissions, and user roles. For detailed instructions on constructing this attribute value, including the required syntax and examples, refer to HPE GreenLake cloud SAML attribute for session-based authentication.For comprehensive guidance on building and formatting the
hpe_ccs_attributevalue, including workspace IDs, service IDs, and role assignments, see the detailed configuration instructions in the Entra ID hpe_ccs_attribute settings section.Steps to add this attribute in Ping Identity:
-
Click + Add to create a new attribute mapping
-
Enter the attribute name:
hpe_ccs_attribute(case-sensitive) -
Click the Advanced Expression editor icon (gear icon) next to the mapping value field
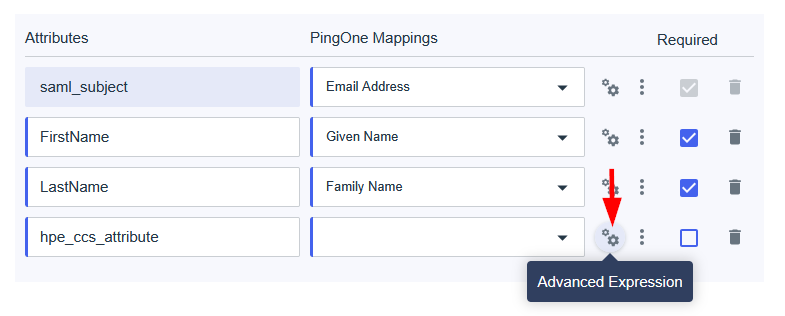
-
In the expression editor, enter your constructed attribute value enclosed in double quotes, then click Save

-
Ensure the attribute is marked as Required
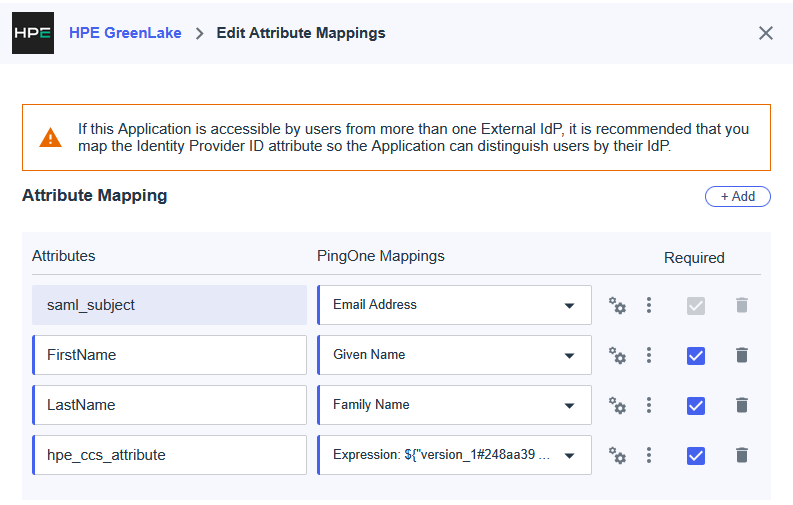
-
-
-
Review all SAML attribute mappings for accuracy, ensuring that each attribute is properly configured and marked as Required, then click Save
-
On the Access tab, configure user access by clicking the Edit button (pencil icon)
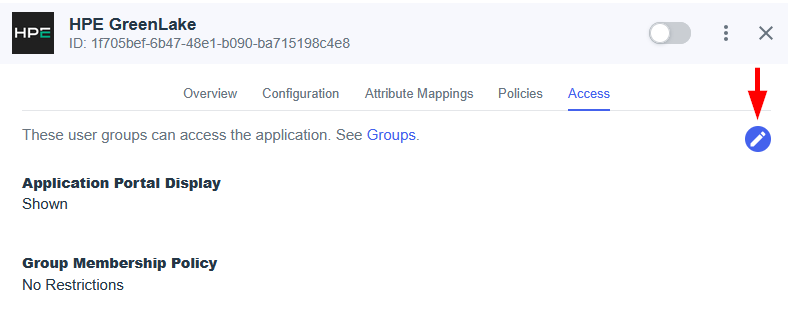
-
Select the HPE GreenLake group created earlier to grant application access to the appropriate users and ensure the Display this application in the Application Portal option is enabled to allow Identity Provider initiated SSO (IdP-Initiated). When enabled, users can launch HPE GreenLake directly from their Ping Identity application portal with a single click
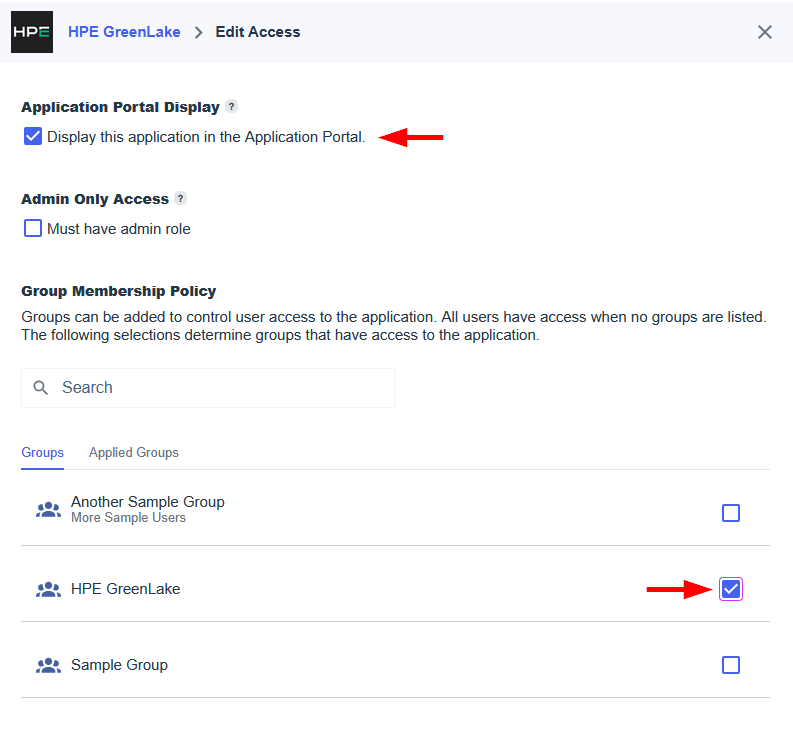
Note: This group assignment determines which users can authenticate to HPE GreenLake through Ping Identity. Only members of the selected group will have access to the application.
-
Click Save to apply the access configuration
-
To enable IdP-Initiated, configure the Target Application URL:
-
In the application Configuration tab, click the Edit button
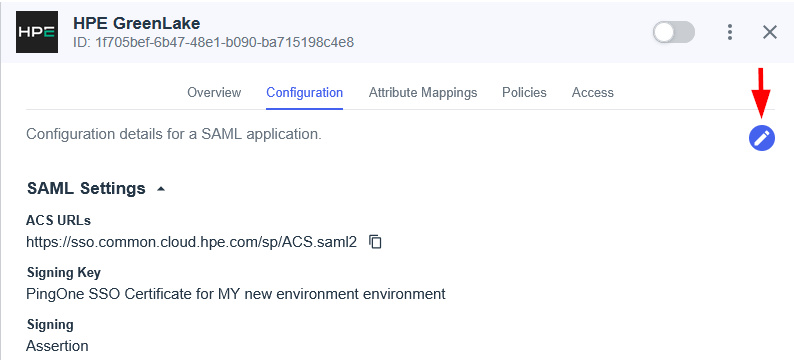
-
Locate the Target Application URL field and enter:
https://common.cloud.hpe.comThis URL defines the destination where users will be redirected after successful authentication when launching HPE GreenLake from the Ping Identity application portal. Without this configuration, IdP-Initiated SSO will not function properly.
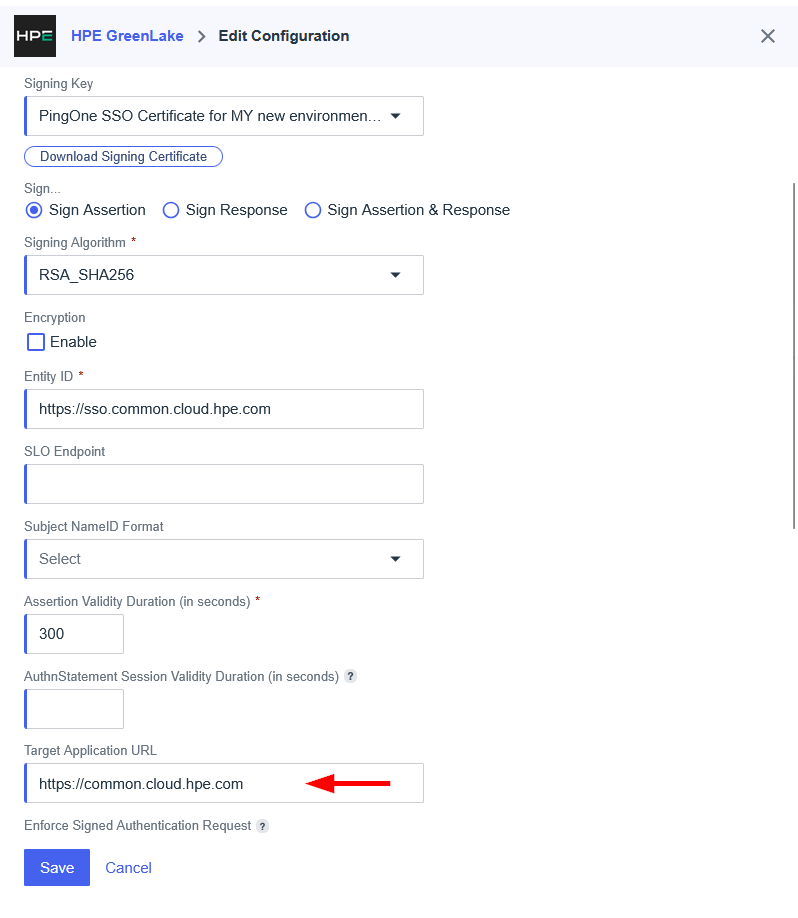
Important: The Target Application URL is required for IdP-Initiated SSO functionality. Without this value configured, users attempting to access HPE GreenLake from Ping Identity will encounter authentication errors.
-
-
Review all configuration settings carefully to ensure accuracy, then click Save to apply your changes
-
Enable the application by clicking the toggle button at the top of the page to make it active and accessible to users

Important: The application must be enabled for users to authenticate. A disabled application will prevent all authentication attempts, even if all other configuration settings are correct.
-
After creating the application, you need to obtain the Federation Metadata for HPE GreenLake integration:
- Navigate to the Overview tab of your HPE GreenLake application
-
Locate the IDP Metadata URL. Click Copy to copy the metadata URL to your clipboard.
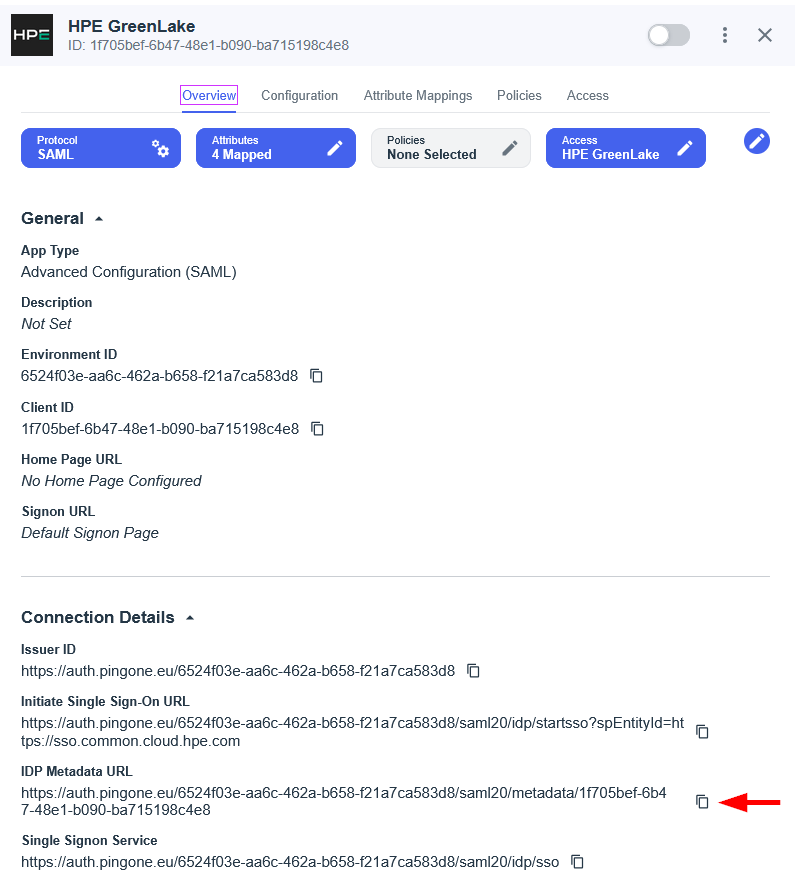
RECOMMENDATION: Use Metadata URL (Not Manual XML Upload)
Why? Identity providers rotate SAML certificates every 2-3 years. When certificates expire:
- ❌ Manual XML: Users cannot authenticate until you manually upload new certificate
- ✅ Metadata URL: Positions you for potential future automatic updates (feature under consideration)
Current State (Nov 2025): HPE GreenLake retrieves metadata at configuration time but doesn’t auto-refresh. However, configuring the URL today positions you for seamless updates when this feature launches.
What to do: Always configure the metadata URL in HPE GreenLake, even though manual updates are still required today.
This completes the Ping Identity application configuration for HPE GreenLake. You can now proceed to Step 2 to register Ping Identity as your identity provider in the HPE GreenLake platform.
Step 2: Register Ping Identity in HPE GreenLake
To complete the SAML SSO configuration, you need to register your Ping Identity identity provider in HPE GreenLake. The registration process is identical across all supported identity providers.
Follow the detailed instructions in Step 2: Register Entra ID in HPE GreenLake, using your Ping Identity metadata URL in the same way as described for Entra ID.
Note: When configuring the metadata in HPE GreenLake, paste the IDP Metadata URL copied in Step 1, just as you would with the Entra ID App Federation Metadata URL.
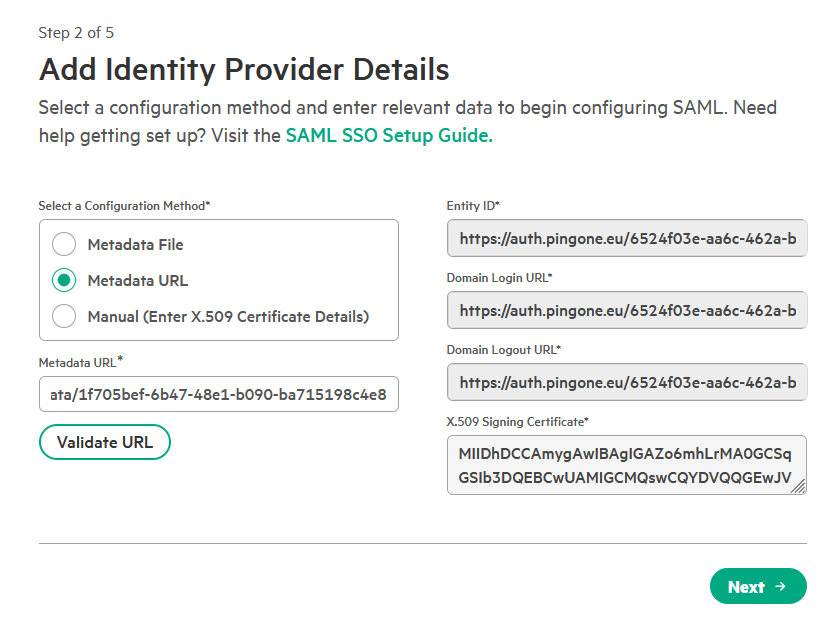
Step 3: Testing SAML SSO Authentication
Once the SAML SSO configuration is complete, it’s important to verify that authentication is working correctly before rolling it out to all users.
Test the SSO SP-Initiated login flow (User starts at HPE GreenLake)
Service Provider (SP) initiated SSO is the authentication flow that begins when users access HPE GreenLake directly by navigating to the login page. This is the most common authentication method where users enter their email address on the HPE GreenLake login page, and the system redirects them to your configured identity provider for authentication.
Authentication Flow: User → HPE GreenLake → Ping Identity → Back to HPE GreenLake
-
To ensure a clean test without cached credentials, open a new private browser window (e.g., Incognito, InPrivate) and navigate to the HPE GreenLake login page: https://common.cloud.hpe.com/
-
Click on the Sign in with SSO button
-
Enter your verified email address from the SSO-claimed domain (e.g.,
lionel@hpelabs.ddnsfree.com) and click Continue -
You will be redirected to your Ping Identity login page. Authenticate using your organizational credentials
Note: If prompted for multi-factor authentication, complete the required authentication method (such as push notification approval or TOTP code) configured in your Ping Identity policy.
-
After successful authentication, you should be redirected back to HPE GreenLake and automatically logged in
Verify the authentication
- Confirm User Profile and Access:
-
Verify that your user profile information (name, email) is displayed correctly in the HPE GreenLake console.
-
Ensure you have access to the expected workspaces and resources.
-
-
Verify Role-Based Permissions (if applicable):
-
If you configured the
hpe_ccs_attributefor SAML-based role assignments, confirm that the correct roles have been applied:-
Navigate to Manage workspace → Identity & access management → Users.
-
Locate your user account, which should be identified with an SSO authorization source.
-
Select your user and verify that the assigned roles match the permissions defined in your
hpe_ccs_attribute.
-
-
Test the SSO IdP-Initiated login flow (User starts at PingOne Apps portal)
Identity Provider initiated SSO (IdP-Initiated) provides users with direct access to HPE GreenLake from their Ping Identity application portal, eliminating the need to first navigate to the HPE GreenLake login page. This streamlined approach offers a single-click authentication experience.
Authentication Flow: User → PingOne Portal → HPE GreenLake Application → HPE GreenLake Console
-
Navigate to your PingOne application portal at your organization’s URL (typically provided by your administrator)
-
Locate and click the HPE GreenLake application tile in your application dashboard
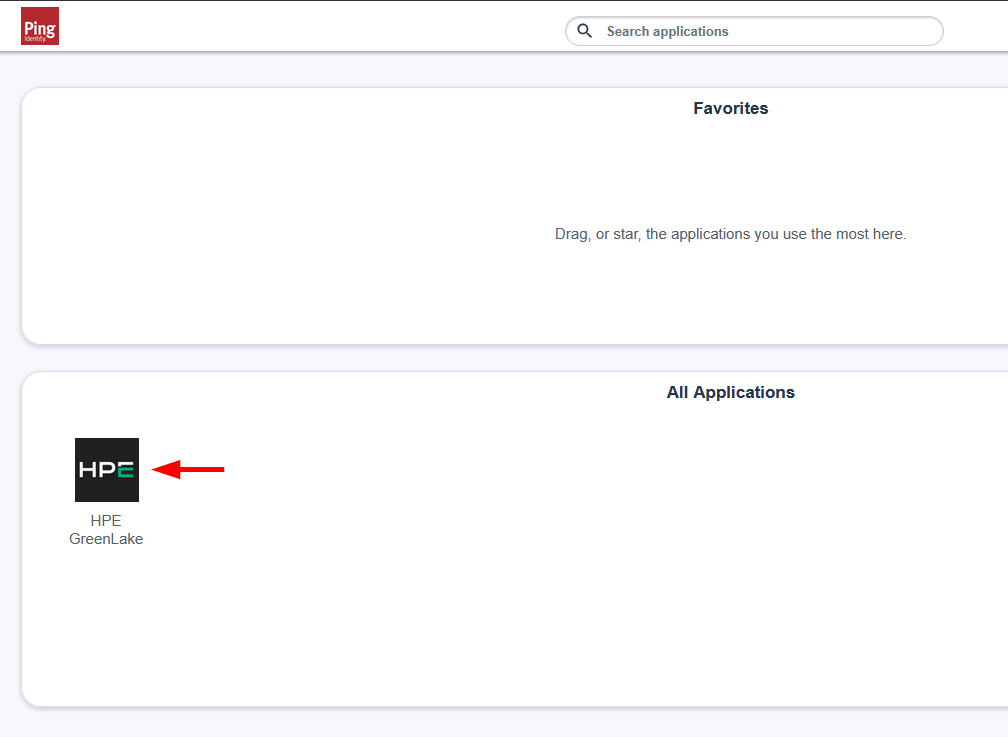
-
You should be automatically redirected to HPE GreenLake and logged in without additional authentication prompts (assuming you’ve already authenticated to Ping Identity)
-
Verify successful authentication by confirming your user profile and workspace access are displayed correctly in the HPE GreenLake console
Troubleshooting
If authentication fails, use the following diagnostic approaches:
- Identity provider logs: Check the authentication logs in Ping Identity Admin Console → Monitoring → Audit for detailed error messages and failure reasons
- HPE GreenLake audit logs: While HPE GreenLake’s audit logs currently provide limited troubleshooting information for authentication failures, they can help confirm whether authentication requests are reaching the platform. Go to Manage Workspace → Audit Log.
- Browser developer tools: Review the SAML response in your browser’s developer tools (Network tab) to identify assertion errors or attribute mismatches
Common authentication failures include misconfigured SAML attributes, certificate mismatches, or incorrect Target Application URL values.
Step 4: PingID Configuration Guide for HPECOMCmdlets SSO Integration
Purpose: Configure PingID to support passwordless SSO authentication for the HPECOMCmdlets PowerShell module when connecting to HPE GreenLake.
Use Case: Enable Connect-HPEGL -SSOEmail user@company.com to authenticate via PingID push notification without requiring password entry.
To support HPECOMCmdlets SSO functionality, PingID must be configured to:
- ✅ Allow user enrollment during first authentication
- ✅ Support push notifications to mobile devices
- ✅ Enable passwordless authentication flow (no password prompt)
- ✅ Provide SMS/Email fallback for device issues (optional but recommended)
Configuration Overview:
The following sections guide you through verifying and configuring each requirement:
- Authenticator Configuration (Section 1): Verifies compatible authentication methods for PowerShell automation
- PingID Setup (Section 2): Enables push notifications and configures enrollment policies
- SMS/Email Fallback (Section 2): Configures optional backup authentication methods for device recovery scenarios
- Authentication Policy (Section 2): Creates and applies passwordless authentication policy to HPE GreenLake application
Note: User enrollment occurs automatically during the first authentication attempt when users are prompted to set up PingID. No additional configuration is required to enable first-time enrollment.
Learn more: For comprehensive guidance on passwordless authentication in Ping Identity, refer to the official documentation: Configure a basic passwordless login experience using PingOne and PingOne MFA.
1. Verify authentication method compatibility
Before implementing passwordless authentication for the HPECOMCmdlets module, ensure your Ping Identity tenant supports the required authentication methods. As outlined earlier in this guide, only push notifications and TOTP-based authenticators are compatible with PowerShell automation scenarios. FIDO2 security keys and biometric platform authenticators (Touch ID, Face ID, Windows Hello) cannot be used due to WebAuthn API limitations in PowerShell.
Compatible passwordless methods for HPECOMCmdlets:
- PingID mobile app with push notifications: Standard push approval or swipe-to-approve authentication
- PingID mobile app with TOTP: Time-based one-time password verification
The following sections demonstrate how to configure PingID with push notifications, which provides the most streamlined authentication experience while maintaining robust security standards compatible with the HPECOMCmdlets module.
2. Configure PingID for push notification
-
Enable push notification
Before creating the authentication policy, ensure that PingID is properly configured to support push notifications. This authenticator will serve as the primary passwordless authentication method for HPE GreenLake access.
To configure PingID for push notifications:
-
Navigate to Authentication → MFA
-
On the MFA Policies page, click on the default MFA Policy and click the Edit button (pencil icon) at the top of the page
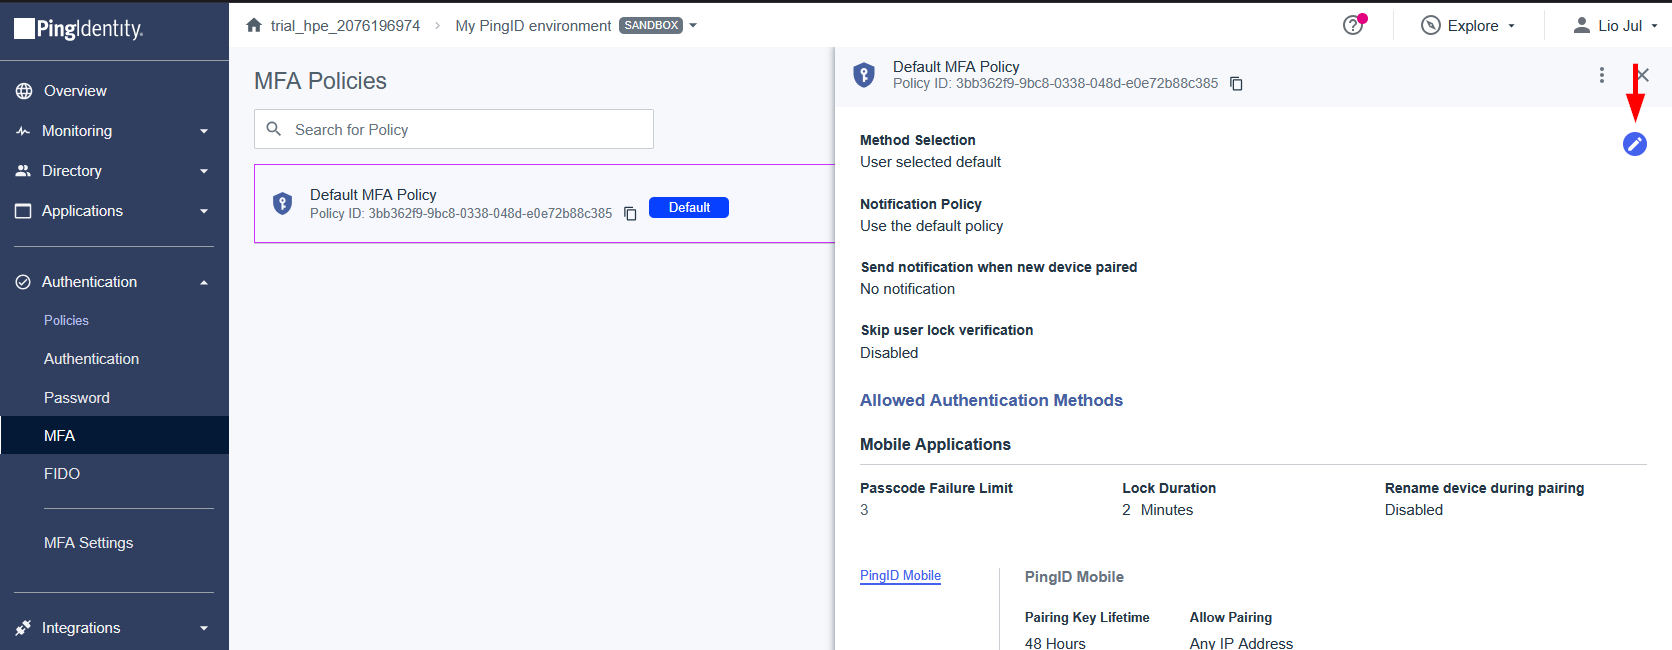
Note: Alternatively, you can create a dedicated policy for HPE GreenLake by clicking the + icon to add a new MFA policy. A dedicated policy allows for more granular control over authentication requirements specific to your HPE GreenLake application.
-
In the Add Applications section, verify that PingID Mobile is available and enabled
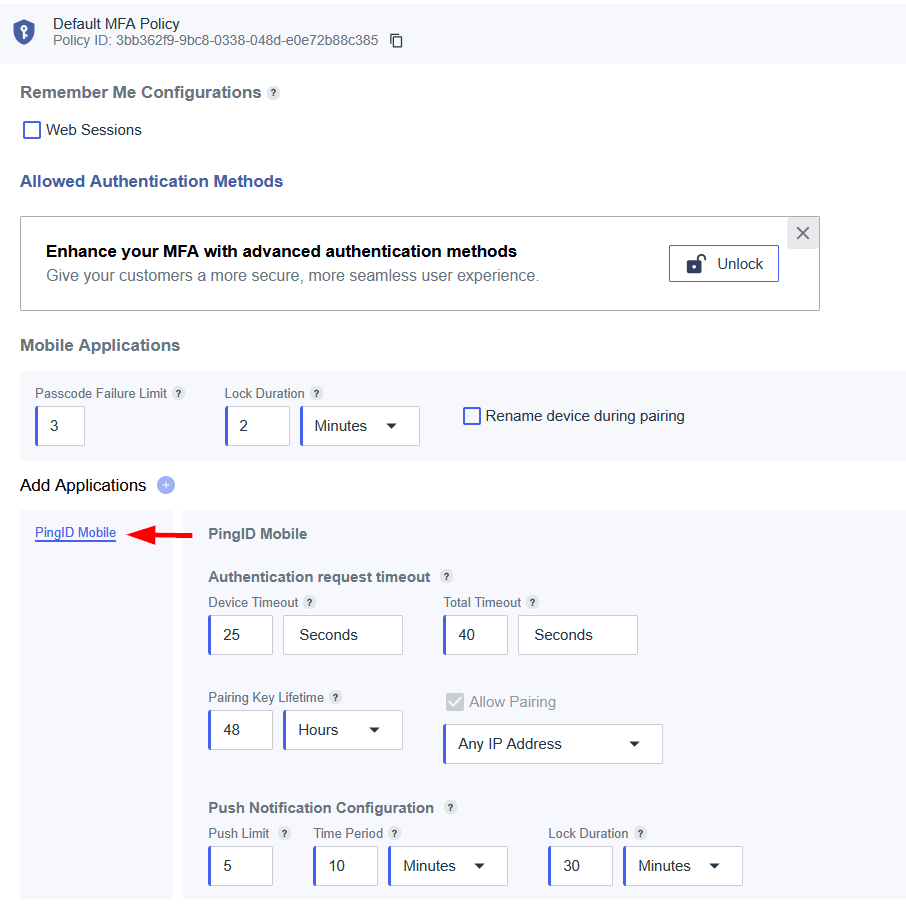
-
In the Allow Authentication By section, enable the Push Notification and Number Matching
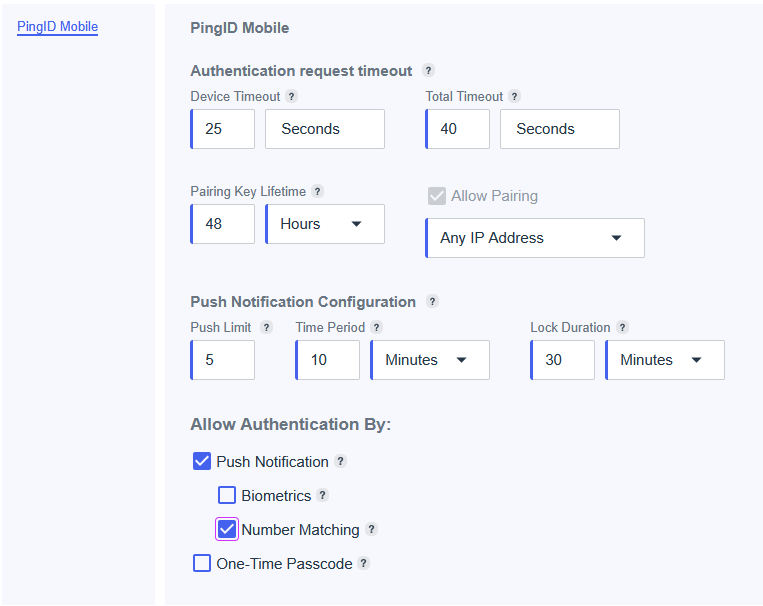
Note: The number challenge provides an additional layer of verification by requiring users to enter a displayed number when approving push notifications. While enabling this feature is strongly recommended for enhanced security, both push notification methods (with and without number challenge) are fully supported by the HPECOMCmdlets module.
Additional Verification Methods: PingID also supports Biometrics (fingerprint or face recognition) and One-Time Passcode (TOTP) as verification methods. Both are compatible with the HPECOMCmdlets module and can be configured based on your organization’s security requirements.
-
Save your configuration.
-
-
Create an authentication policy for passwordless login
The next step is to create an authentication policy that enforces passwordless authentication for HPE GreenLake users. This policy will require users to authenticate using PingID push notifications or TOTP codes instead of passwords.
-
Navigate to Authentication → Authentication → Policies and click Add Policy
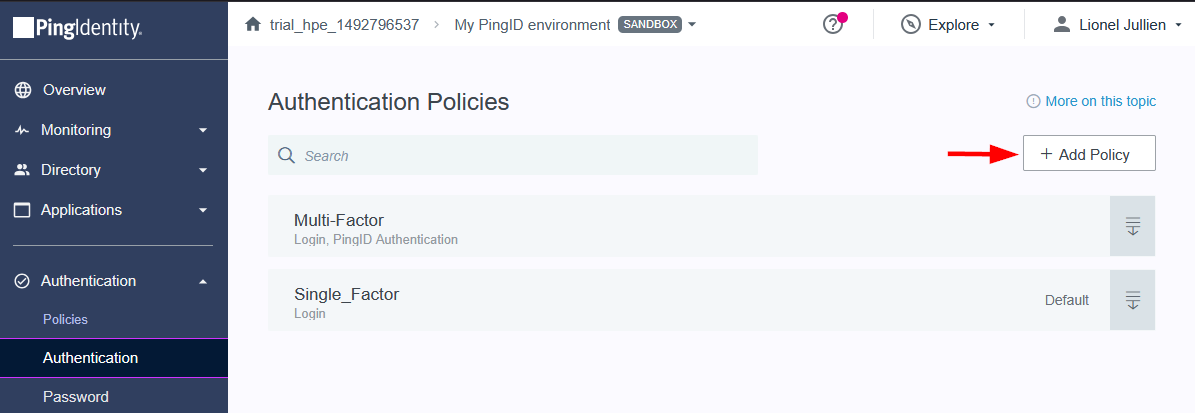
-
Provide a descriptive policy name (e.g.,
HPEGreenLake_PingID_Passwordless) and select PingID Authentication from the Step Type dropdown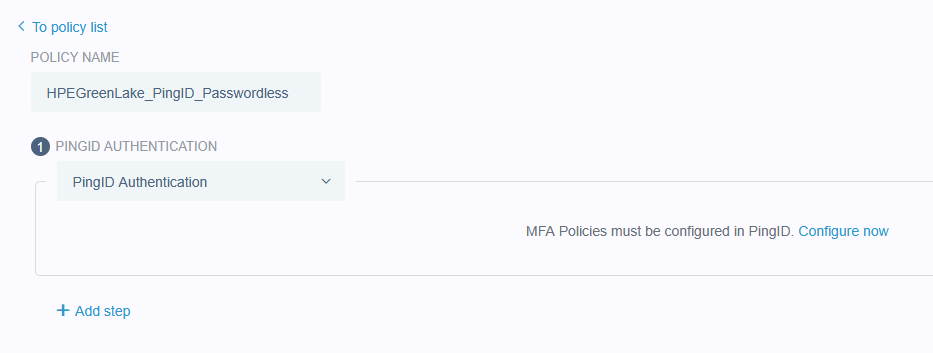
-
Click Save to create the authentication policy then click on the Edit icon
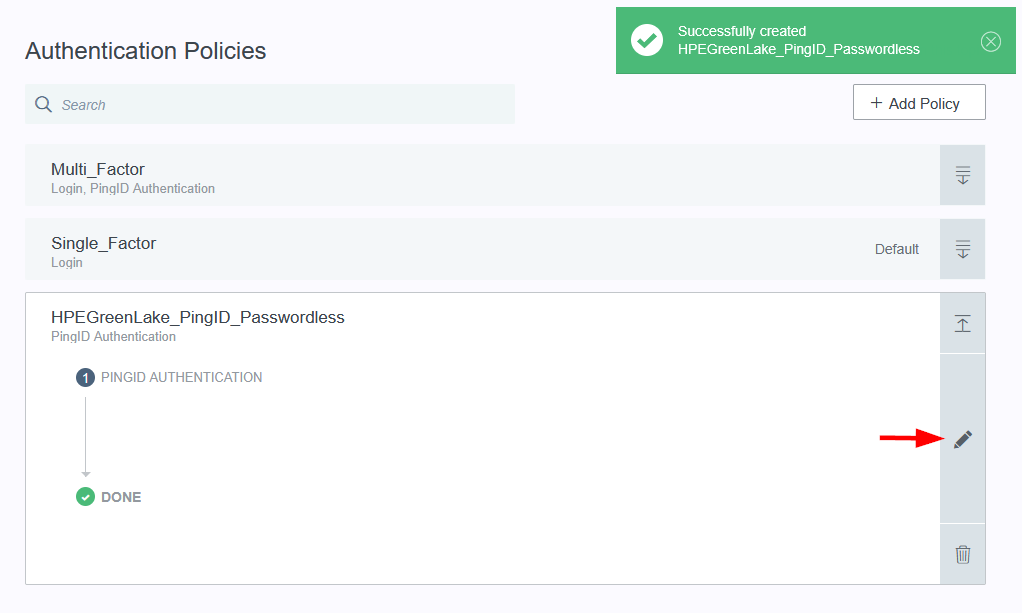
This configuration establishes a streamlined one-step authentication flow where users authenticate exclusively through PingID using either push notifications (or TOTP codes if enabled) — no password required.
-
A warning message will appear indicating additional configuration is needed. Click Configure now to access the PingID authentication settings
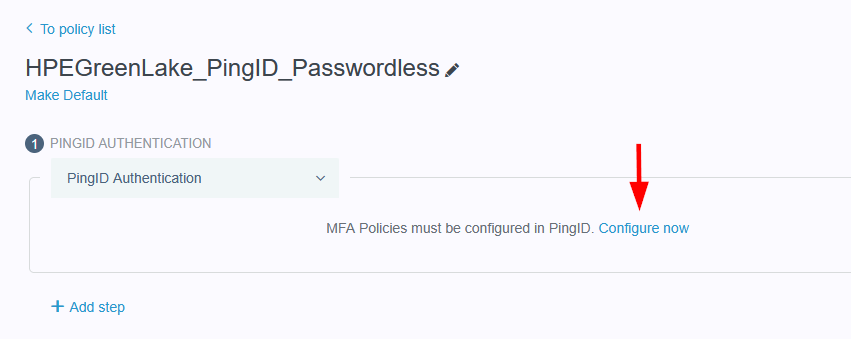
-
In the PingID configuration screen, locate the ENROLLMENT section and verify the following settings:
-
Ensure SELF-ENROLLMENT DURING AUTHENTICATION is Enabled
Note: This setting allows users to pair their mobile device with PingID during their first login attempt, eliminating the need for a separate enrollment process. This streamlines the initial setup experience while maintaining security.
-
Verify the Enforce Policy evaluation after new device registration checkbox is UNCHECKED
Important: This option must be disabled to allow new users to complete device enrollment successfully. When enabled, PingID immediately re-evaluates all authentication policy requirements after a device is registered. This can cause enrollment failures because:
- The newly registered device may not yet be fully activated in the system
- Additional policy requirements (like device trust level) might not be immediately satisfied
- This creates a timing issue where the device exists but isn’t yet “usable” according to policy evaluation
By leaving this option unchecked, the enrollment process completes fully before policy enforcement occurs, ensuring a smooth first-time user experience. After initial deployment and all users have enrolled their devices, you may optionally enable this setting if you require immediate policy validation after device registration.
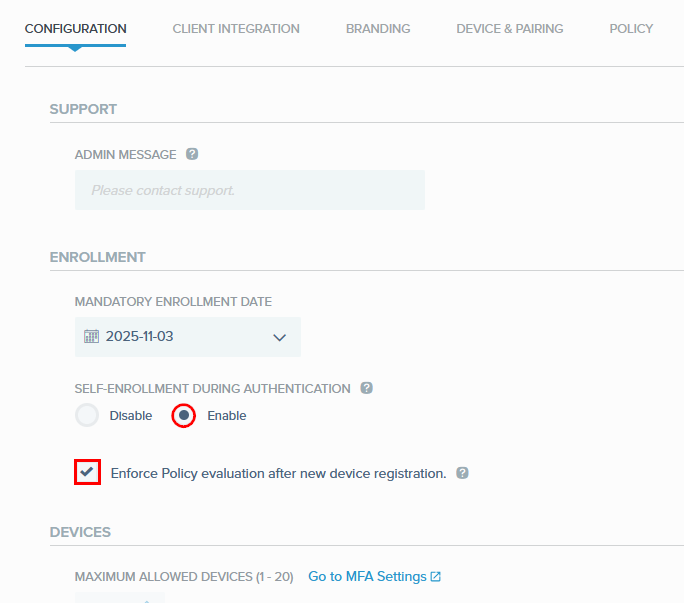
-
-
Locate the MOBILE APP AUTHENTICATION section:
-
Scroll to the ONE-TIME PASSCODE FALLBACK sub-section, select Enable to allow users to enter TOTP codes as a backup method if push notification delivery fails
Note: This fallback option provides continuity when push notifications are unavailable due to network issues or device connectivity problems, while maintaining passwordless authentication compatibility with the HPECOMCmdlets module.
-
Scroll to the DIRECT PASSCODE USAGE sub-section, select Disable to enforce push notification as the primary authentication method (prevents users from bypassing push notifications by entering OTP codes directly)
-
Select Enable to allow users to enter OTP codes without attempting push notification first
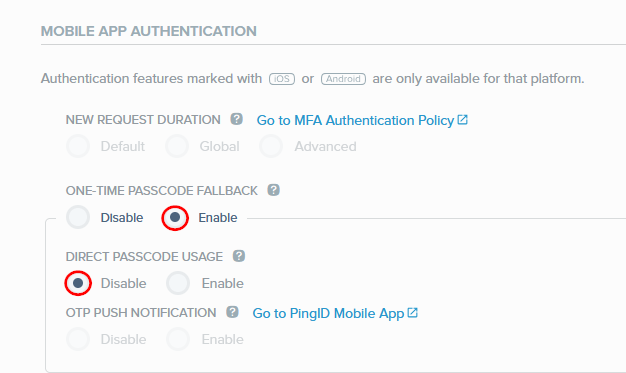
Recommendation: Disable this option to prioritize push notifications while maintaining TOTP as a fallback method. This configuration ensures a consistent passwordless experience while preserving backup authentication capability.
-
Scroll to the bottom of the page and click Save to save the configuration
-
Scroll back to the OTP PUSH NOTIFICATION section and click Go to PingID Mobile App link
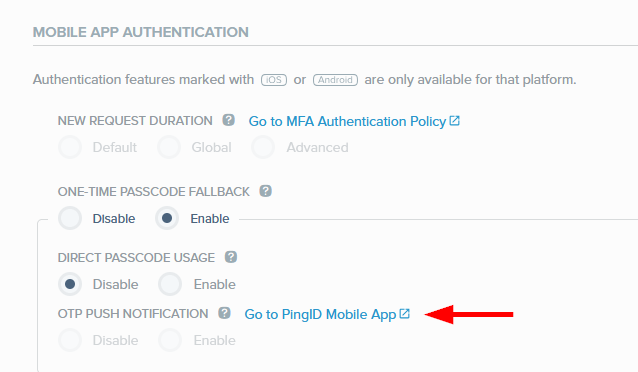
-
-
In the PingID Mobile App, select the Configuration tab and click the Edit button

-
Navigate to the Mobile App authentication section and verify the following settings:
- Mobile Biometrics: Set to Preferred (allows but doesn’t require biometric authentication) or Required (enforces biometric authentication for enhanced security)
- Enable Face ID Consent on iOS: Check this option to enable Face ID biometric authentication on iOS devices
- Number Matching Options: Set to Select Number to enable number challenge during push notification approval (enhanced security)
- Enable OTP Push Notification: Leave this option UNCHECKED to prevent OTP codes from being displayed in push notifications (maintains stronger security posture)
- Display Authentication Information map: Check this option to show authentication context information to users during approval
These settings control the mobile app authentication behavior and should align with your organization’s security requirements.
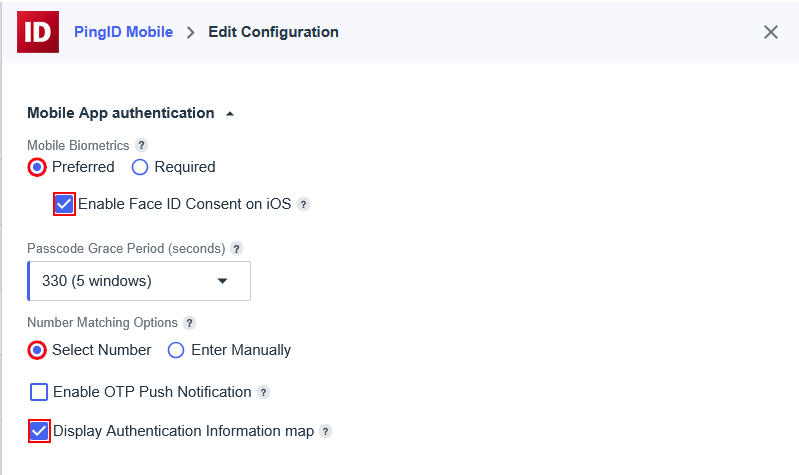
Note: The Number Matching Options setting here should match the number matching configuration you enabled in your MFA policy earlier. Setting it to “Select Number” provides enhanced security by requiring users to select the displayed challenge number from their mobile device.
-
Scroll down to the Mobile Management section and verify:
- Allow users to unpair or change device from the PingID mobile app: Checked (allows users to manage their own device pairing)
-
Allow authentication from lock screen for legacy Android devices: Checked (provides better user experience on older Android devices)
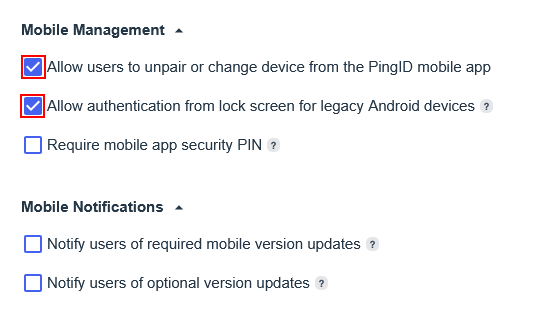
These settings provide users with flexibility to manage their authentication devices while maintaining security.
-
Click Save at the bottom of the page to preserve your PingID Mobile app configuration
-
Return to your authentication policy page. This completes the configuration of your passwordless authentication policy, which is now ready to be assigned to the HPE GreenLake application.
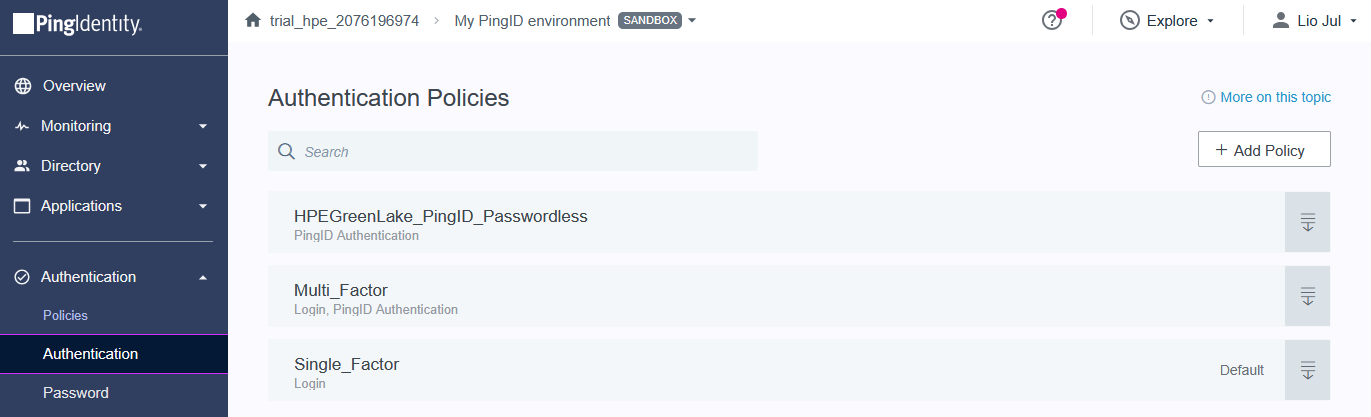
-
-
Assign the authentication policy to the HPE GreenLake application
With the passwordless authentication policy created, the final step is to apply this policy to your HPE GreenLake application. This ensures that all authentication attempts to HPE GreenLake will be governed by the passwordless MFA requirements you’ve defined.
-
Navigate to Applications → Applications and select your HPE GreenLake application
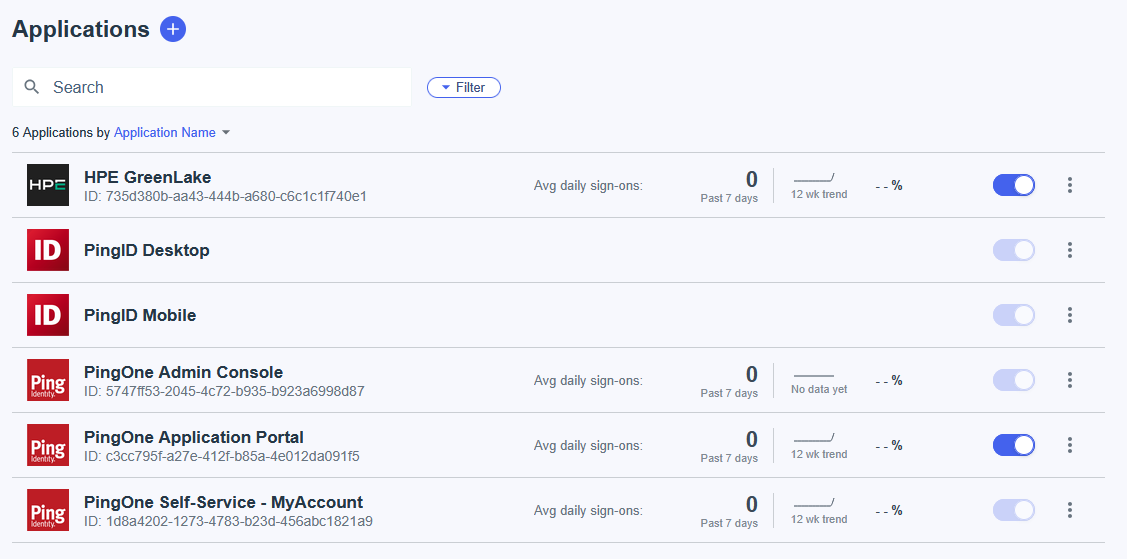
-
Go to the Policies tab
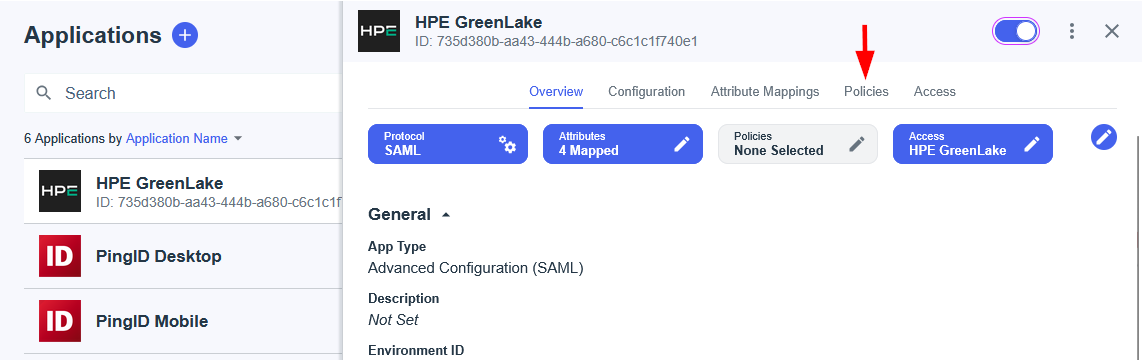
-
Click Edit to modify the policy assignment
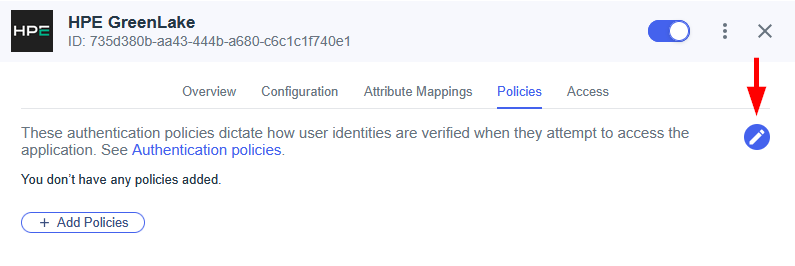
-
Select the passwordless policy you created earlier (e.g.,
HPEGreenLake_PingID_Passwordless)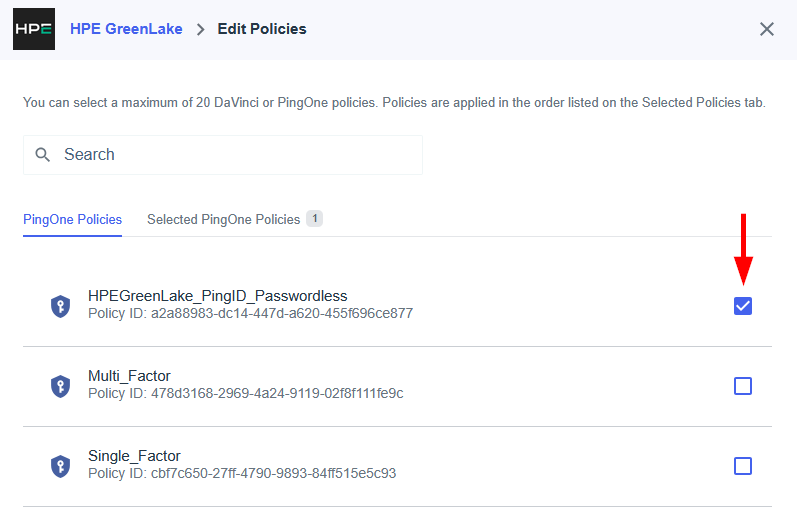
-
Click Save to apply the authentication policy to your HPE GreenLake application
-
This completes the passwordless authentication configuration for Ping Identity. Users accessing the HPE GreenLake application will now be required to authenticate using PingID with push notifications or TOTP codes, eliminating password-based authentication while maintaining compatibility with the HPECOMCmdlets PowerShell module.
3. Test SSO Authentication with Browser
⚠️ CRITICAL: First-Time User Enrollment Requirement
Because the HPE GreenLake application uses a passwordless authentication policy (PingID Authentication only, no password step), users MUST complete their initial PingID device enrollment through the PingOne application portal - NOT by attempting to log in directly to HPE GreenLake.
Why this matters:
- The passwordless policy (
HPEGreenLake_PingID_Passwordless) never prompts for a password during authentication- Without a password authentication step, PingID cannot trigger the self-enrollment flow
- If a user without a registered device tries to access HPE GreenLake directly, they will encounter the error: “Blocked - User has no usable devices”
- This creates a chicken-and-egg problem: the user needs a device to authenticate, but cannot enroll a device without authenticating
Correct enrollment workflow:
- First-time users: Log in to PingOne portal → Click HPE GreenLake app tile → Complete device enrollment with QR code
- Subsequent logins: Users can access HPE GreenLake directly via SP-Initiated SSO using passwordless authentication
Important: If you need users to enroll when accessing HPE GreenLake directly (SP-Initiated), you must modify the authentication policy to include a password authentication step BEFORE the PingID step, which contradicts the passwordless design. For pure passwordless deployments, initial enrollment via the PingOne portal is required.
To verify that your passwordless authentication configuration is working correctly, test the complete authentication flow using a web browser:
Authentication Flow: User → PingOne Portal (standard login) → HPE GreenLake Application → PingID Passwordless Authentication → HPE GreenLake Console
-
Open a web browser and navigate to your PingOne application portal at your organization’s URL (typically provided by your administrator)
-
Log in to the PingOne portal using your standard credentials (username and password, as the portal uses its own authentication policy)

-
Once logged in, locate and click the HPE GreenLake application tile in your application dashboard
-
Expected Authentication Flow:
-
First-Time Device Pairing (if applicable):
If this is your first time using PingID for MFA, you’ll be prompted to configure it:
-
A “Welcome to PingID” screen appears displaying a START button

-
Click START to display a QR code for device pairing
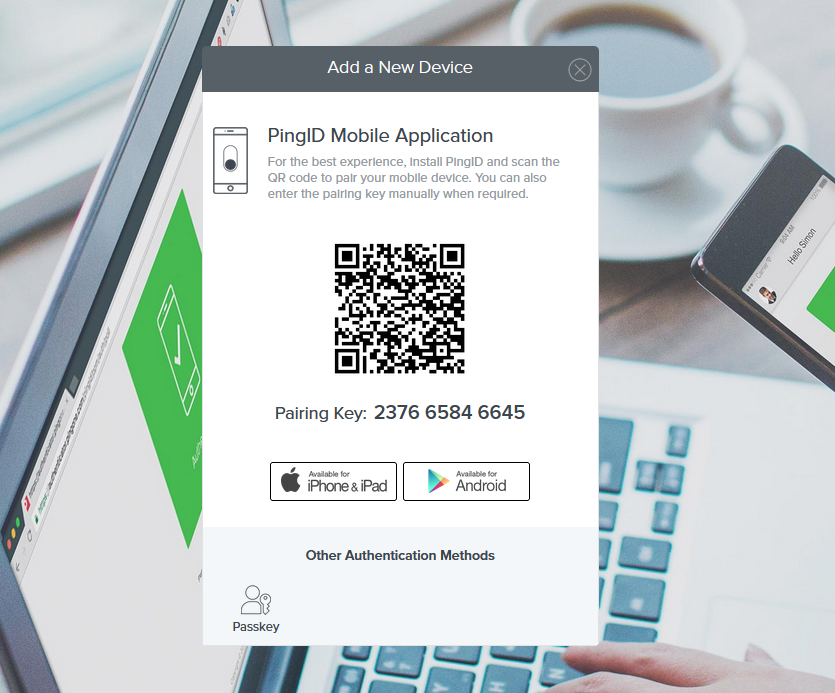
- Open the PingID mobile app on your device
- Tap the + icon or Scan option
- Scan the QR code displayed on the screen to complete device pairing
- Once paired, the system automatically proceeds to push notification authentication
-
-
Push Notification Authentication:
Note: If PingID is already configured on your device, you will skip the first-time device pairing process above and proceed directly to the push notification authentication step below.
-
The PingOne notification displays in your mobile device, confirming a push notification has been sent to your registered mobile device
- Open the PingID mobile app on your device
- A push notification appears requesting authentication approval
-
-
Push Notification Approval:
-
A challenge number appears on the browser screen (e.g., “28”)
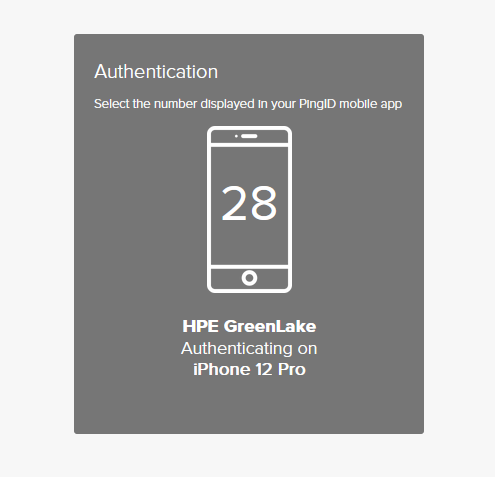
-
In the PingID app, tap the matching number displayed in your browser to approve the authentication request
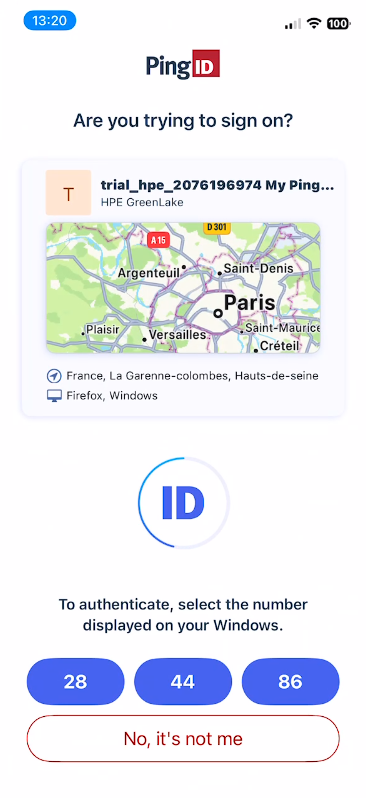
-
Complete biometric authentication if enabled on your device
-
-
Authentication Completion:
- After successful push notification approval, the browser automatically completes the authentication process
- You are redirected to HPE GreenLake and logged in with passwordless authentication
-
-
Verify successful authentication by confirming your user profile and workspace access are displayed correctly in the HPE GreenLake console
Note: This test confirms that the passwordless authentication policy is correctly applied to the HPE GreenLake application. The initial portal login using username/password is expected and does not affect the passwordless experience when accessing HPE GreenLake.
Troubleshooting: If you don’t receive a push notification when accessing HPE GreenLake, verify that:
- The PingID mobile app is installed and properly configured
- Push notifications are enabled in your device settings
- Your device has an active internet connection
- The passwordless authentication policy is correctly assigned to the HPE GreenLake application
4. Test SSO Authentication with HPECOMCmdlets
After confirming browser-based authentication works correctly, verify that the HPECOMCmdlets PowerShell module can successfully authenticate using the passwordless flow:
PowerShell Test Script:
# Import the HPECOMCmdlets module
Import-Module HPECOMCmdlets

# Attempt SSO login with your verified email address
Connect-HPEGL -SSOEmail "test.user@company.com"
Expected Authentication Flow:
- Command Execution:
- The
Connect-HPEGLcmdlet initiates the SAML SSO authentication flow
- The
- Push Notification Delivery:
-
A push notification is immediately sent to your registered mobile device
-
The PowerShell console displays a progress indicator
-
- Authentication Approval (behavior depends on your PingID policy configuration):
- With Number Challenge (enhanced security):
-
The PowerShell progress bar displays a challenge number (e.g., “Respond ‘59’ to the PingID notification”)

- Open the PingID app on your mobile device
-
Locate and tap the correct challenge number matching the displayed value

- Complete biometric authentication if enabled
-
- Without Number Challenge (standard approval):
-
The PowerShell progress bar displays: “Check your PingID enabled device Push notification from HPE GreenLake…”

- Open the PingID app on your mobile device
- Review the authentication request details
-
Tap Yes to approve the authentication request
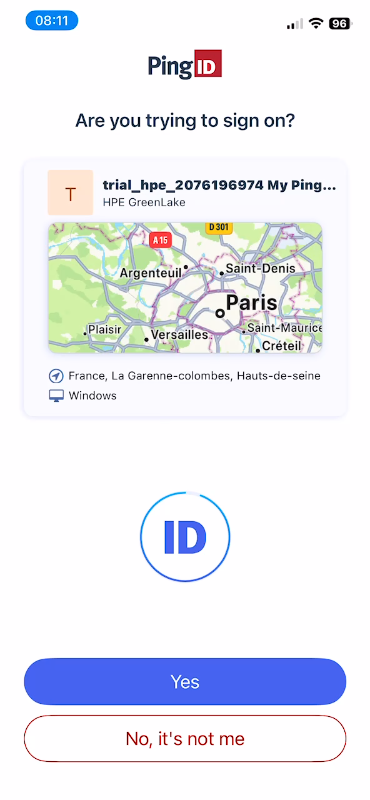
- Complete biometric authentication if enabled
-
- With Number Challenge (enhanced security):
- Authentication Completion:
- After successful approval, the
Connect-HPEGLcmdlet completes authentication -
Connection details containing your authentication context and connection details are displayed in the PowerShell console
- After successful approval, the
Important: The authentication flow must complete within the timeout period configured in your PingID policy (typically 60-90 seconds). If the timeout expires before approval, the connection attempt will fail and you’ll need to retry the
Connect-HPEGLcommand.If authentication fails, consult the HPECOMCmdlets documentation or review the authentication logs in your PingOne Admin Console under Monitoring → Audit.
Troubleshooting Common Issues
SAML Attribute Errors
If users cannot authenticate or are missing permissions, verify the following:
- SAML attribute mapping: Confirm that all required SAML attributes (NameID, FirstName, LastName, and optionally hpe_ccs_attribute) are correctly configured in your identity provider and match the expected format
- hpe_ccs_attribute format: If using role-based access control through SAML, validate that the
hpe_ccs_attributevalue follows the correct syntax as described in the Building hpe_ccs_attribute value documentation - Group membership: Verify that users are assigned to the correct security group in your identity provider that grants access to the HPE GreenLake application
For additional troubleshooting guidance, refer to the Troubleshooting SAML connectivity errors section.
Certificate Issues
Certificate mismatches are a common cause of SAML authentication failures. To resolve certificate-related issues:
- Validate certificate expiration: Verify that the SAML signing certificate configured in your HPE GreenLake workspace has not expired. Expired certificates will cause all authentication attempts to fail
- Verify certificate matching: Confirm that the certificate thumbprint in HPE GreenLake matches exactly with the certificate published by your identity provider. Even minor discrepancies will prevent successful SAML authentication
- Check certificate renewal: If your identity provider automatically rotates SAML signing certificates, ensure you update the certificate in HPE GreenLake before the old certificate expires to prevent service interruption
- Review metadata updates: To future-proof your HPE GreenLake SAML setup against certificate rotations, configure the federation metadata URL upfront. Although automatic retrieval isn’t supported yet (as of November 2025—feature under consideration), this enables seamless updates once available, avoiding manual uploads and downtime. HPE GreenLake fetches metadata statically at config time without auto-refreshing certificates currently. If authentication fails post-rotation, verify the URL is reachable and includes the latest
<X509Certificate>in<KeyDescriptor use="signing">(check via browser or curl), then temporarily upload the updated XML file to test SSO.
Best Practice: Proactive Certificate Management
Prevent outages with these habits:
- Enable expiration alerts: Configure notifications in your identity provider to receive advance warning (typically 30-60 days) before certificate expiration
- Build a renewal workflow: Document the process for updating certificates in HPE GreenLake before they expire to ensure seamless authentication continuity
-
Automate certificate updates: Leverage the HPECOMCmdlets PowerShell module for scripted renewals:
This automation allows you to programmatically renew and update SAML certificates before they expire to ensure continuous SSO availability without manual intervention.
 # Extract the new certificate from your identity provider's metadata
 $certificate = "MIIE5DCC....xkUqNXSHY=" # Base64-encoded X.509 cert

 # Update the certificate in HPE GreenLake
 Set-HPEGLWorkspaceSAMLSSODomain -DomainName "example.com" -X509Certificate $certificate
PowerShell Module Authentication
If you encounter authentication issues when using the HPECOMCmdlets PowerShell module with SAML SSO:
- Review the Common Issues and Solutions section: Consult the README.md file of the HPECOMCmdlets module for detailed troubleshooting guidance
- Verify passwordless authentication configuration: Ensure your identity provider is properly configured to support passwordless authentication methods as outlined in Step 4 of the relevant IdP section
- Validate SAML attributes: Confirm that the required SAML attributes (NameID, FirstName, LastName) are being passed correctly in the authentication response
- Review authentication logs: Check the authentication logs in both your identity provider and HPE GreenLake for specific error messages or failed authentication attempts
Conclusion
Implementing SAML SSO authentication with HPE GreenLake enhances security, simplifies user management, and provides a seamless authentication experience for your organization. Combined with passwordless authentication for the HPECOMCmdlets PowerShell module, you can build secure, automated workflows that integrate seamlessly with your existing identity infrastructure.
Whether you choose Entra ID, Okta, or Ping Identity as your identity provider, the configuration steps are straightforward, and the benefits are immediate. By following the guidelines in this post, you’ll be well on your way to a more secure and efficient HPE GreenLake environment.
I hope you find this guide useful.
Drop a comment below or ping me at lio@hpe.com with your setup wins!
Additional Resources
your hub for all HPE software-related content!