HPE Compute Ops Management Zero-Touch Automation
Jump to:
- Introduction
- HPE Compute Ops Management PowerShell Library
- Connecting to the lab environment
- Task 1 - How to Install HPECOMCmdlets
- Task 2 - Get the exported commands
- Task 3 - Connection to HPE GreenLake
- Task 4 - Configuration of your workspace
- Task 5 - Onboarding devices
- Task 6 - Configuration of Compute Ops Management
- Task 7 - Gathering Comprehensive Server Inventory Information
- Task 8 - Monitoring Server Health, Support, and Warranty Status
- Task 9 - Updating and Ensuring Server Firmware Compliance
- Task 10 - Essential Next Steps for Server Management and Sustainability
- Task 11 - Clean the lab for the next participant
- Task 12 - Explore Zero Touch Automation with the Sample Script (Optional)
- Summary
- Want more?
Hands on Lab Guide
Introduction
Welcome to this Hands-On Lab (HOL). For the next two hours you will complete a self-paced lab using the HPECOMCmdlets PowerShell library, HPE ProLiant DL-series servers and HPE GreenLake Compute Ops Management.
Lab Objectives
In this hands-on lab, you will discover how the HPE Compute Ops Management PowerShell library can transform the way you manage data center infrastructure. By working through real-world scenarios, you will learn how to replace time-consuming manual operations with automated, repeatable workflows—covering the full server lifecycle from initial provisioning and device onboarding to policy enforcement, compliance monitoring, and decommissioning. You will gain practical experience automating critical IT tasks such as workspace configuration, firmware management, and iLO settings enforcement, while also learning how to leverage sustainability and utilization insights to make smarter infrastructure decisions. By the end of this lab, you will have the skills and confidence to design and implement automation workflows that reduce human error, enforce consistent configurations at scale, and accelerate server deployments across your HPE GreenLake environment.
Team Assignments
This lab has 25 stations. Each station will have its own HPE DL-series server to be onboarded into COM. You will be working in a Virtual Machine using Visual Studio Code with the PowerShell extension.
Your team assignments will be on a separate sheet of paper issued to you by your lab proctor. Please return the team assignment sheet to your proctor when finished with this lab.
Virtual Lab Environment
Upon access to the lab, you will be presented with a Windows desktop.
Each team will have the following physical and virtual infrastructure:
-
Windows virtual machine with Visual Studio Code
-
One ProLiant DL-series server
HPE Compute Ops Management PowerShell Library
This lab introduces the HPE Compute Ops Management PowerShell module, a set of cmdlets for managing and automating your HPE GreenLake environment. The module enables direct interaction with HPE GreenLake and Compute Ops Management services from the PowerShell command line, fitting easily into existing automation workflows.
Development is ongoing. SaaS cloud applications evolve over time. Therefore, this library will be continuously updated to incorporate new features as they are released by HPE.
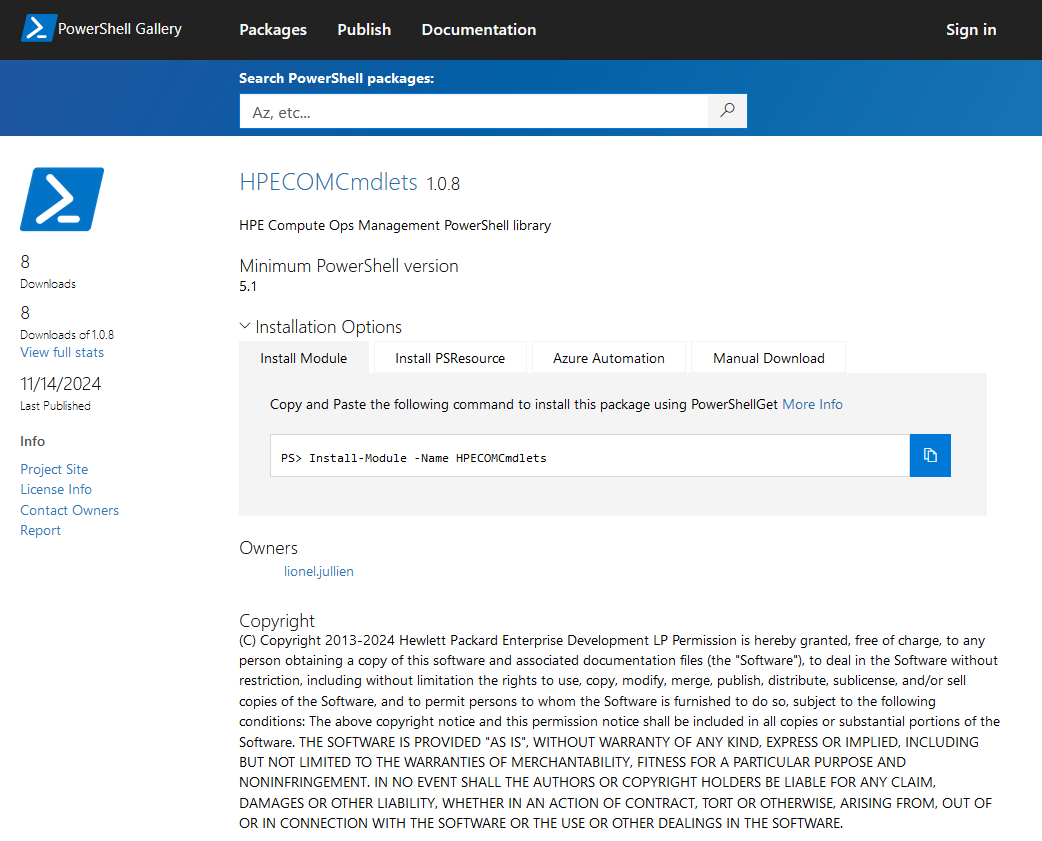
This module is available in the PowerShell Gallery under the name HPECOMCmdlets, following the naming convention used by most HPE modules.
The PowerShell Gallery is a repository for sharing and distributing
PowerShell modules and scripts. It’s a community-driven platform that
provides access to various PowerShell resources, enabling you to easily
discover, install, and publish your own PowerShell content. The
PowerShell Gallery can be accessed through the PowerShellGet module
(includes Install-Module, Find-Module, etc.), which comes
pre-installed with Windows PowerShell 5.0 and above.
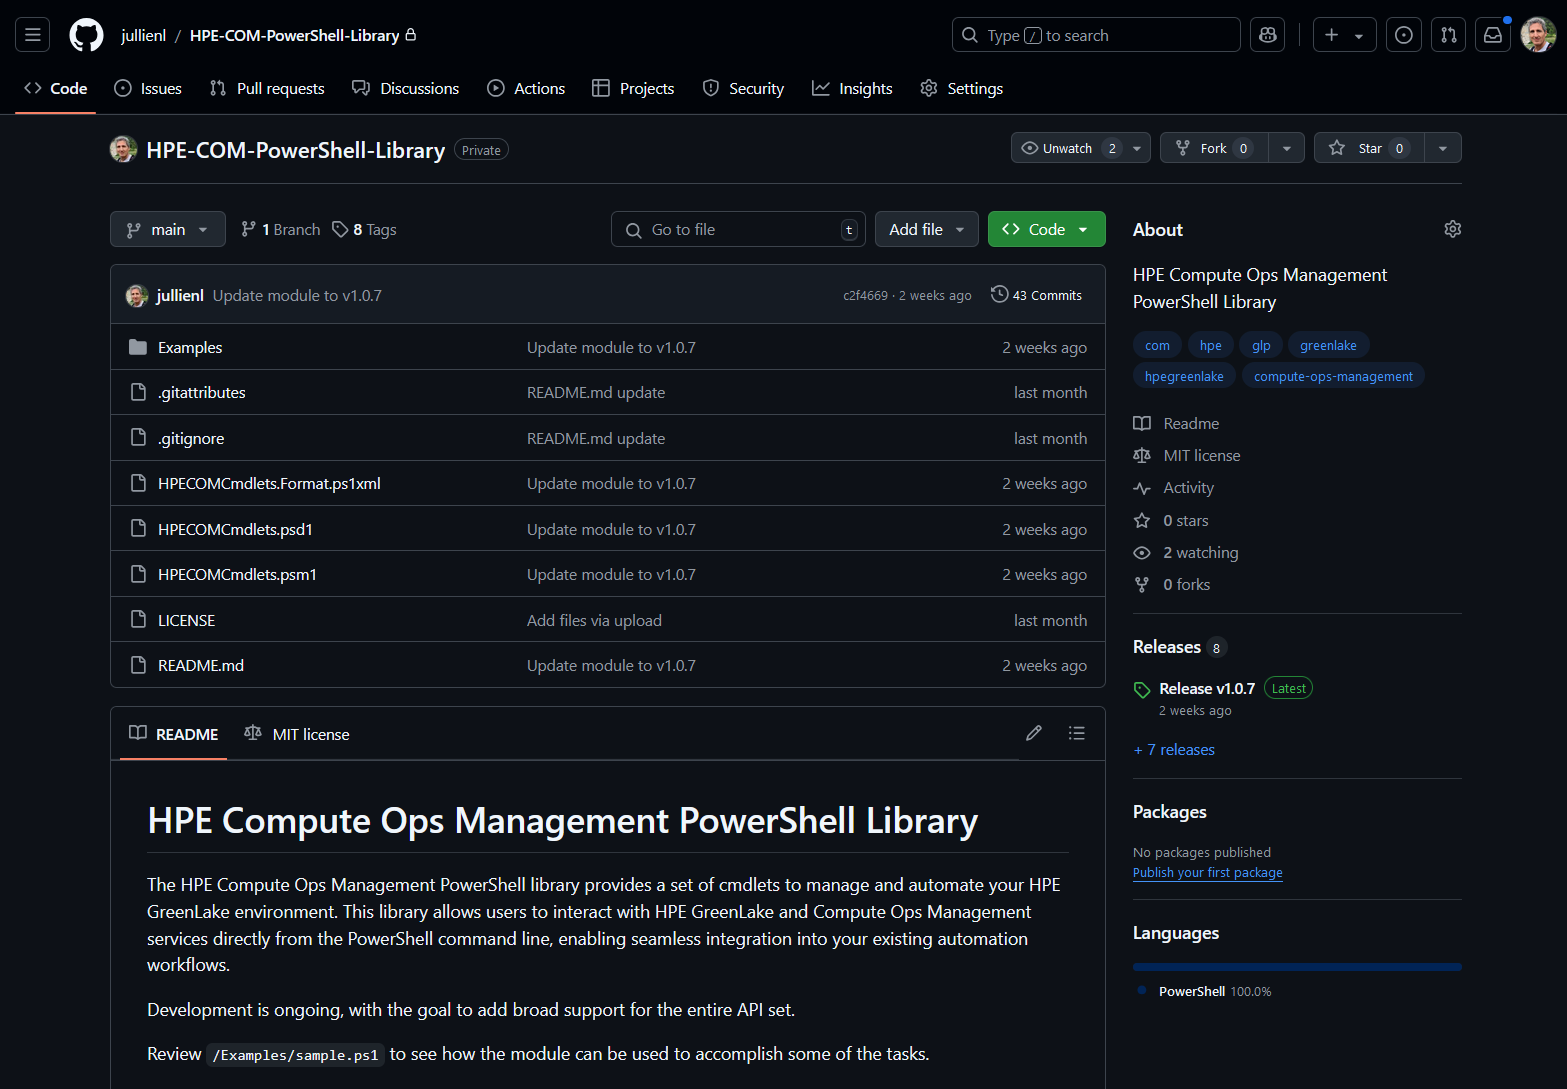
This project is also associated with a new public GitHub repository from our community contributor, Lionel Jullien from HPE. This repository is where the source code is developed. You can also track releases, report and view issues, and participate in discussions.
This library provides a variety of key features for managing HPE GreenLake and Compute Ops Management. Here are the main features:
-
Authentication: Establish secure connections to HPE GreenLake using Single Sign-On (SSO) or single/multi-factor authentication. Whether you have an existing workspace or not, the library supports flexible authentication methods to suit your needs.
-
Workspace Management: Create and manage HPE GreenLake workspaces.
-
Session Tracking: Automatically track sessions with the global session tracker $HPEGreenLakeSession.
-
User Management: Invite and manage users within your HPE GreenLake environment, assign roles.
-
Resource Management: Manage resources such as servers, storage, and networking within your HPE GreenLake environment.
-
Service Provisioning: Provision services like Compute Ops Management, manage service roles and subscriptions.
-
Device Management: Add devices individually or in bulk using CSV files, manage device subscriptions and auto-subscriptions, set device locations and connect devices to services.
-
Server Configuration Management: Create and apply BIOS, storage, OS, and firmware settings. Manage group and apply configurations to groups of servers.
-
Security and Compliance: Manage iLO security settings and run inventory and compliance checks.
-
Job Scheduling and Execution: Schedule and execute various tasks like firmware updates, OS installations, and sustainability reports.
-
Notification and Integration: Enable email notifications for service events and summaries, integrate with external services like ServiceNow.
-
Appliance Management: Add HPE OneView and Secure Gateway appliances, upgrade HPE OneView appliances.
-
Monitoring and Alerts: Monitor alerts for your resources to ensure optimal performance and uptime.
-
Reporting: Generate detailed reports on resource usage, performance, and other metrics.
-
Automation: Automate repetitive tasks and workflows using PowerShell scripts and cmdlets.
-
Integration: Seamlessly integrate with other tools and platforms using REST APIs and webhooks.
-
Security: Implement security best practices and manage access control for your HPE GreenLake environment.
These features collectively provide a comprehensive set of cmdlets to manage various aspects of your HPE GreenLake environment and any existing Compute Ops Management service instances.
Connecting to the lab environment
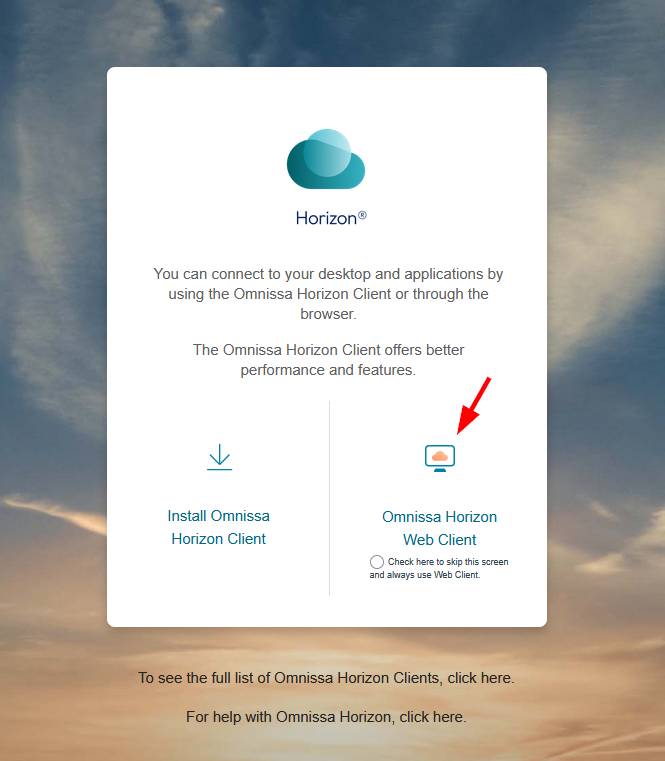
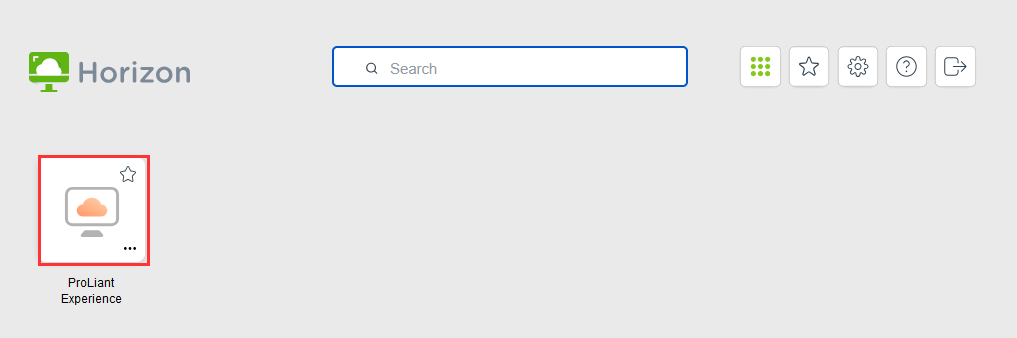
Access the lab environment via VMware Omnissa Horizon by completing these steps:
-
Navigate to the appropriate URL based on your network location to open the Omnissa Horizon Web Client:
-
External to HPE (not connected to HPE VPN): https://labs.compute.cloud.hpe.com
-
Internal to HPE (or connected to HPE VPN): https://techenablement.hpecorp.net
-
-
On the Horizon login screen, click the Omnissa Horizon Web Client button.
-
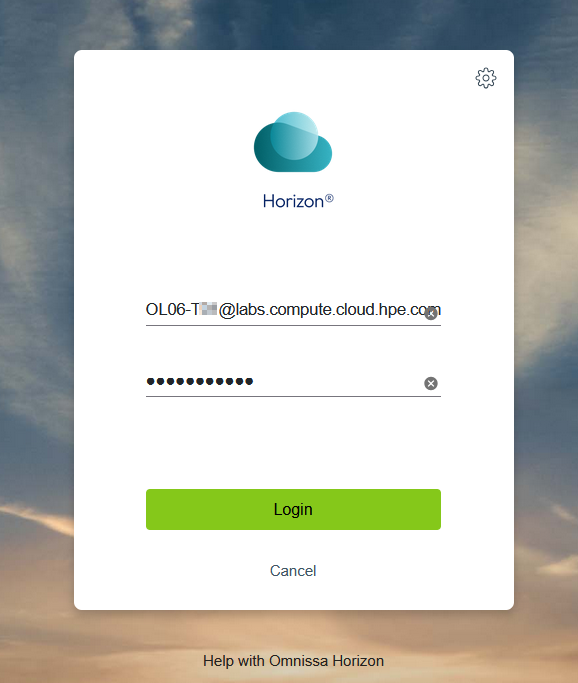
Login with the credentials provided in your login sheet.
-
Click on the graphic that represents your Lab environment.
Since Horizon is presenting a remote desktop session inside of your desktop’s browser, it may be helpful to hit F11 at this time to put the browser in full screen mode.
Preparation of your environment
-
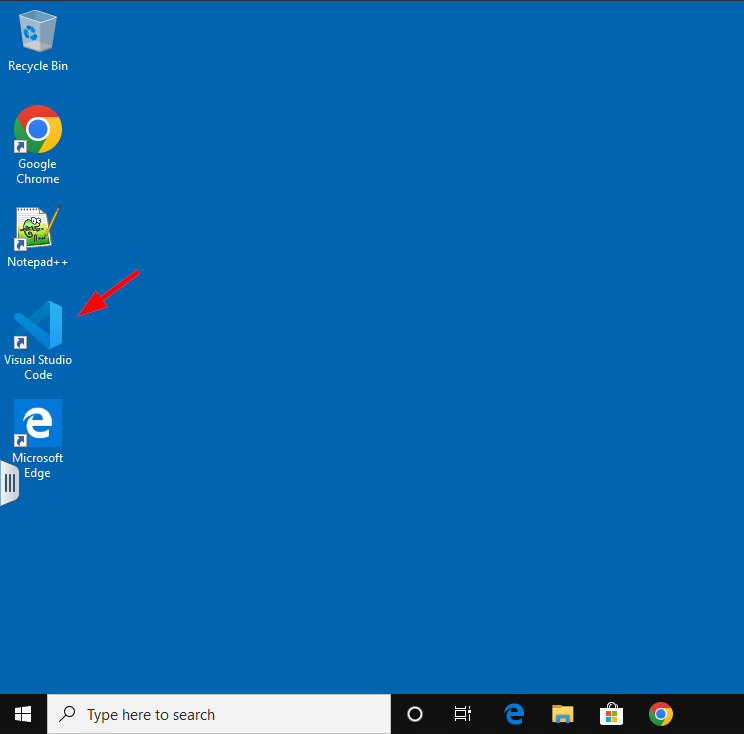
You’ll start by opening Visual Studio Code using the shortcut in the VM’s desktop:
-
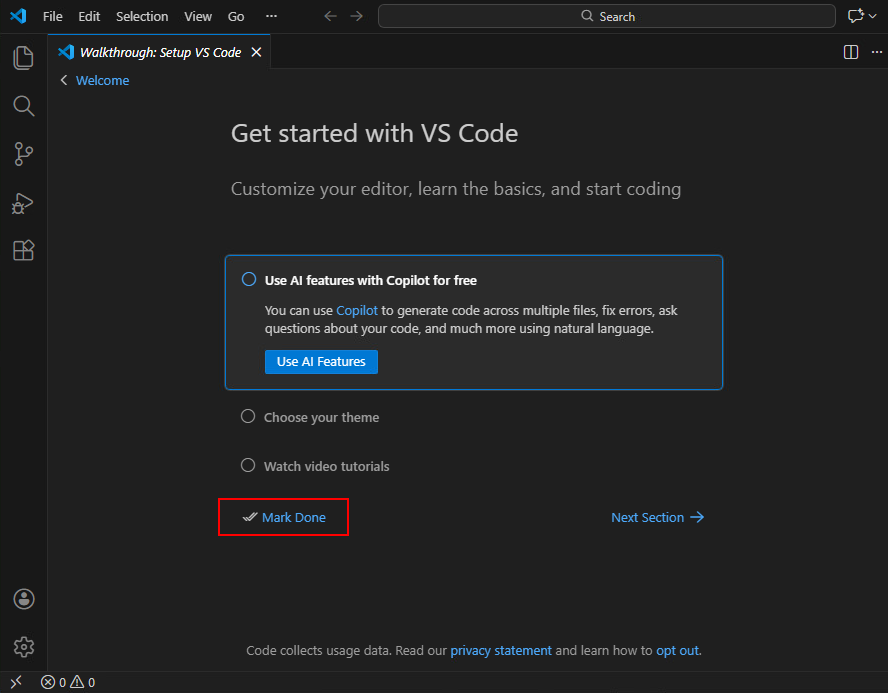
Once opened, click on Mark Done:
-
Start by opening a new file:
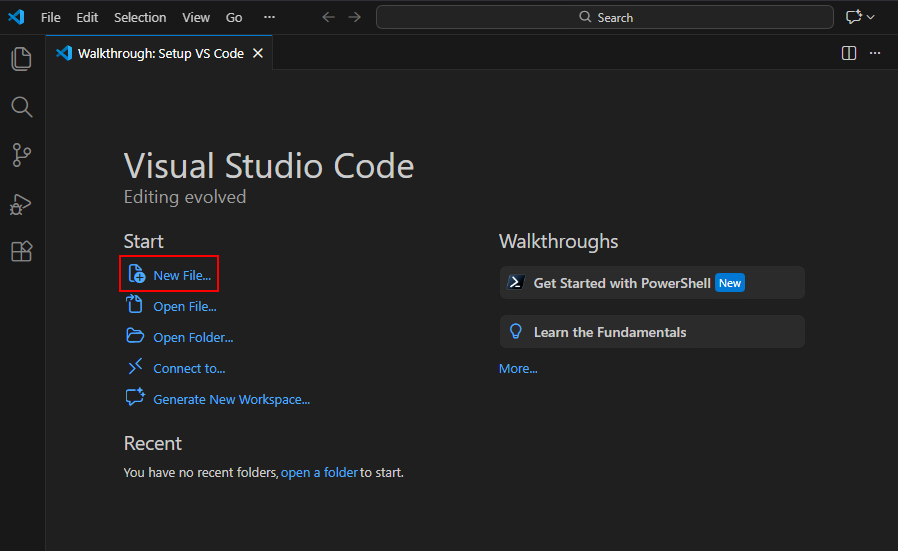
This new file will be useful to copy/paste all important information you find useful to keep an eye on.
-
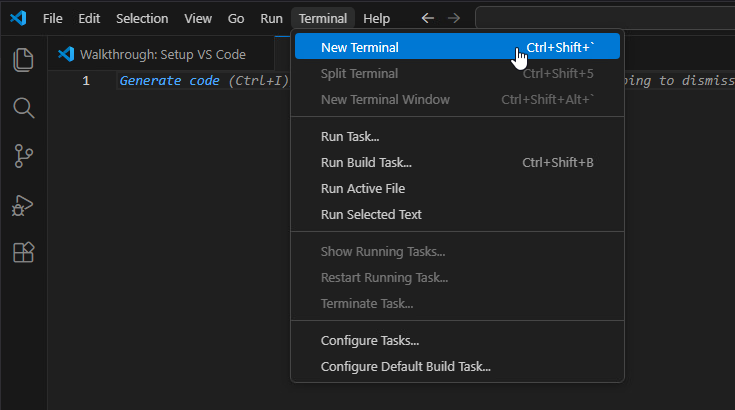
Then open a PowerShell terminal using the Terminal menu / New Terminal:
All the commands outlined in this lab guide should be executed in this window.
-
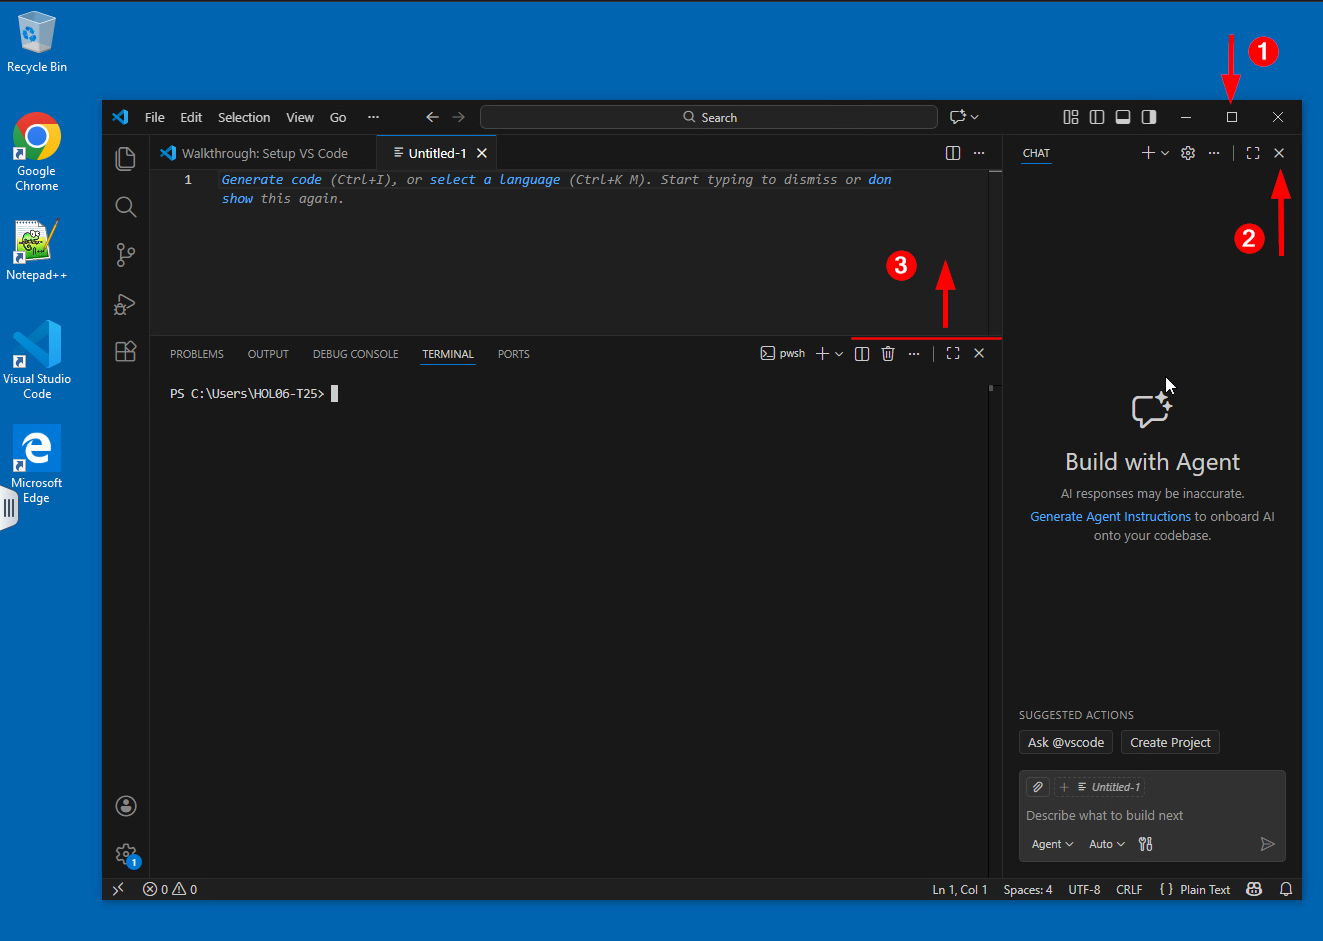
I recommend you: 1️⃣ expand the window, 2️⃣ close the Copilot agent, and 3️⃣ increase the terminal size to improve your experience:
💡 Tip: Using the Copy Button
Throughout this lab, each code block displays a Copy button in the middle-right corner. Click it to copy the commands to your clipboard, then press Ctrl+V to paste them into the PowerShell terminal. This eliminates typing errors and speeds up your workflow.

Task 1 - How to Install HPECOMCmdlets
-
The first step is to install the library on your Windows virtual machine. Return to the PowerShell console and enter the following command:
Install-Module HPECOMCmdlets
This command will download and install the module from the official PowerShell Gallery repository. If this is your first time installing a module from the PowerShell Gallery, it will ask you to confirm whether you trust the repository or not.
-
Type
Ywhen prompted and press Enter to continue with the installation.This library has no dependencies, so it does not require the installation of any other software or modules to function properly.
Task 2 - Get the exported commands
-
Now that the module is installed, you can get the list of commands exported by the module using:
Get-Command -Module HPECOMCmdlets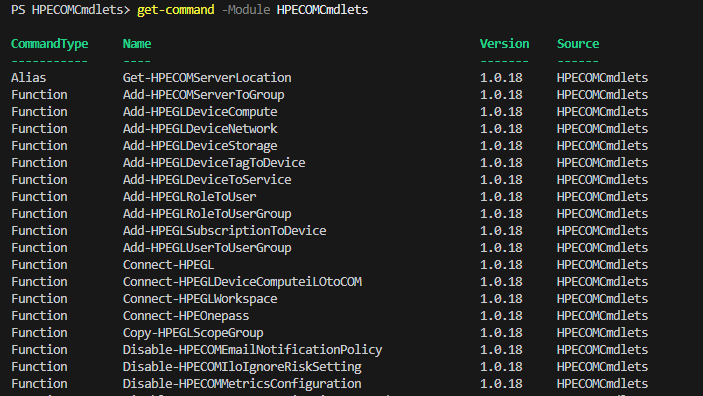
Version v1.0.23 of the module includes over 240 cmdlets.
-
In PowerShell, cmdlets follow a verb-noun naming convention. In this library, cmdlet names begin with HPECOM for Compute Ops Management (e.g.,
Get-HPECOMServer) or HPEGL for HPE GreenLake (e.g.,New-HPEGLUser), reflecting the close integration between both platforms. -
To list all cmdlets in the module related to server resources, use the following command:
Get-Command -Module HPECOMCmdlets | ? name -match server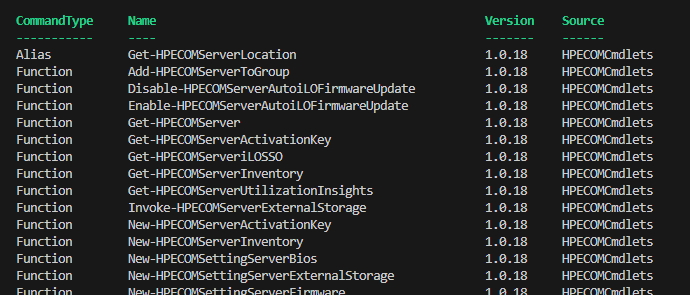
This command is especially helpful when you’re dealing with many cmdlets and need to pinpoint the one that fits your needs best.
💡Note
?is an alias forWhere-Objectin PowerShell, and-matchis the operator used to determine if a string matches a regular expression, such asserverin this example. -
Get-Helpcmdlet is another essential PowerShell command for locating information about new modules. To utilize this command, enter:Get-Help Get-HPECOMserver -Full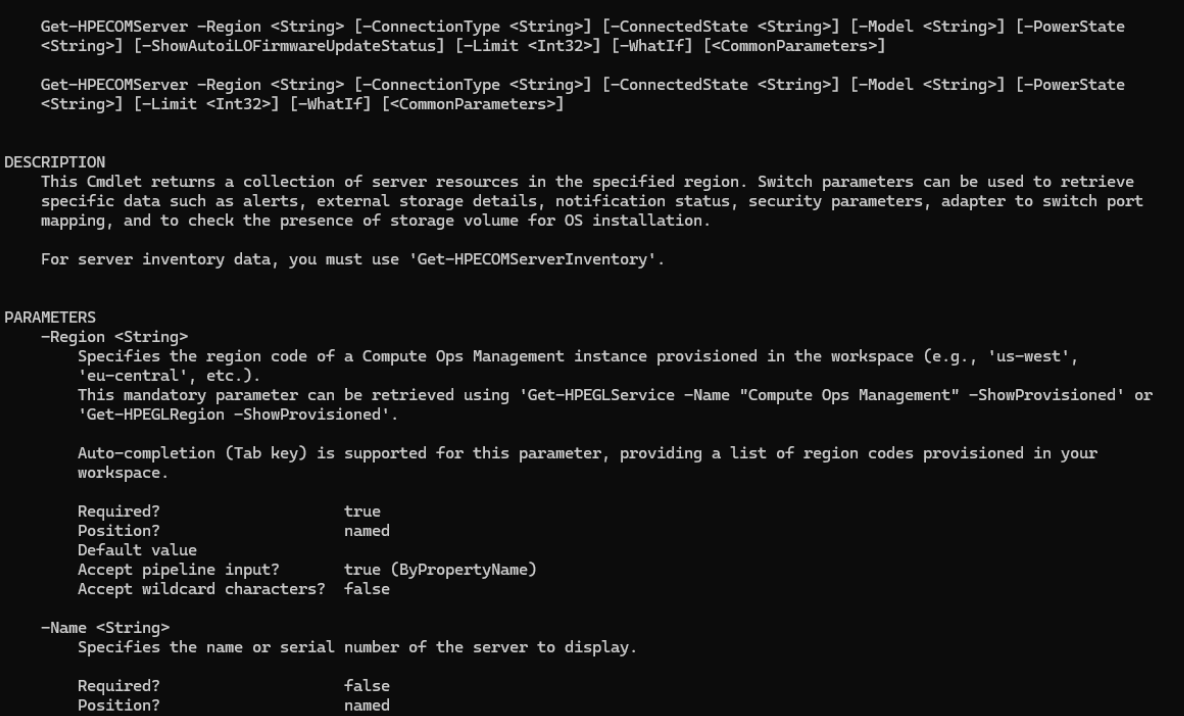
Get-Help(or the aliasHelp) is a PowerShell cmdlet that allows you to retrieve information on other PowerShell cmdlets and functions.By running
Get-Helpin the PowerShell console, you can view detailed information about the specified cmdlet, including its syntax, parameters, examples, and related links. Additionally, you can use specific switches such as-Detailed,-Examples, or-Fullto customize the output. -
Each cmdlet exported from this module provides detailed examples of how to use the command. To view the examples for the
Get-HPECOMServercmdlet, enter:Help Get-HPECOMServer -ExamplesThis will display a list of examples demonstrating how to use
Get-HPECOMServeralong with detailed explanations of what each example does.
Task 3 - Connection to HPE GreenLake
After the module is installed, the next step is to connect to HPE GreenLake using the Connect-HPEGL command.
The library supports two authentication methods:
1. HPE Account Credentials (Single or Multi-Factor Authentication)
- Authenticate using your HPE Account email and password
- Optional multi-factor authentication (MFA) for enhanced security (requires v1.0.12+ )
- Supports standard password-based authentication flows
2. SAML Single Sign-On (SSO) with Passwordless Authentication
-
Integrate with Your Organization’s Identity Provider: Seamlessly connect with Okta, PingIdentity, or Microsoft Entra ID (exclusively!) for enterprise-wide authentication alignment.
-
Passwordless Authentication Methods: Leverage push notifications or Time-based One-Time Password (TOTP) for secure, user-friendly access without traditional passwords.
-
Streamlined SSO Configuration: Align authentication with your organization’s existing SSO setup for consistent, centralized identity management.
-
Prerequisites (requires v1.0.18+):
-
Passwordless authentication must be enabled on your identity provider (Okta, Microsoft Entra ID, or PingIdentity)—such as push notifications or TOTP. Without these,
Connect-HPEGLwith SSO will fail. For detailed guidance on configuring SSO and enabling passwordless authentication, refer to Configuring-SAML-SSO-with-HPE-GreenLake-and-Passwordless-Authentication-for-HPECOMCmdlets -
Unsupported identity providers require standard HPE account credentials instead of SSO.
-
Step 1 - Create Your HPE Account
If you already have an HPE account or workspace with SSO properly configured for passwordless access, proceed directly to Step 2 - Authenticate to HPE GreenLake.
-
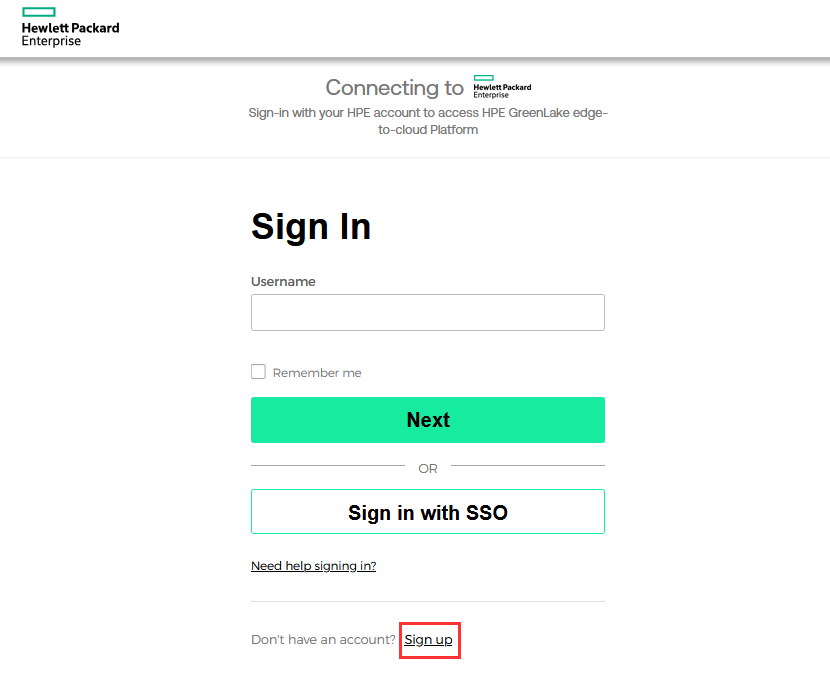
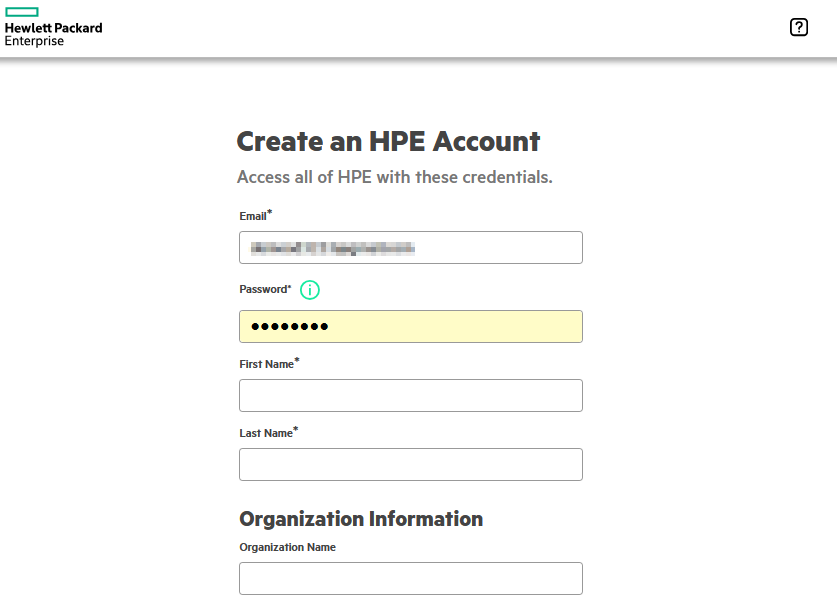
To create your HPE account for this library, go to the HPE GreenLake interface at https://common.cloud.hpe.com and click on Sign up:
-
Provide all the required information, accept the terms and conditions, and click on Create Account:
-
Once completed, you are ready to access the lab, then to install and use the library.
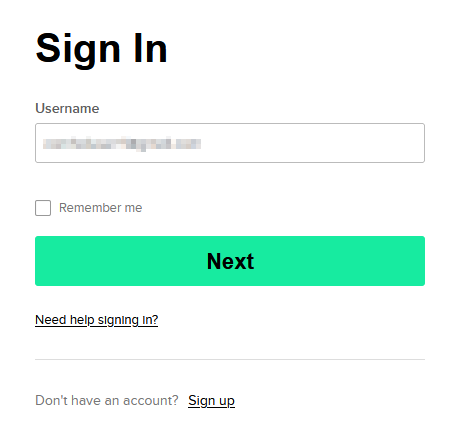
Step 2 - Authenticate to HPE GreenLake
Select the authentication method that applies to you: follow the steps below for HPE account credentials (single or multi-factor), or skip to Using SAML Single Sign-On (SSO) with Okta, PingID, or Entra ID if your organization uses an identity provider:
- Using Single or Multi-Factor Authentication with HPE account
-
Begin by creating a credential object to securely store your HPE account credentials (email and password):
$MyEmail = "your_email@your_domain.com" $credentials = Get-Credential -UserName $MyEmail -
Once executed, the command prompts you for the password.
-
Then use the credential object with the
Connect-HPEGLcommand:Connect-HPEGL -Credential $credentials
-
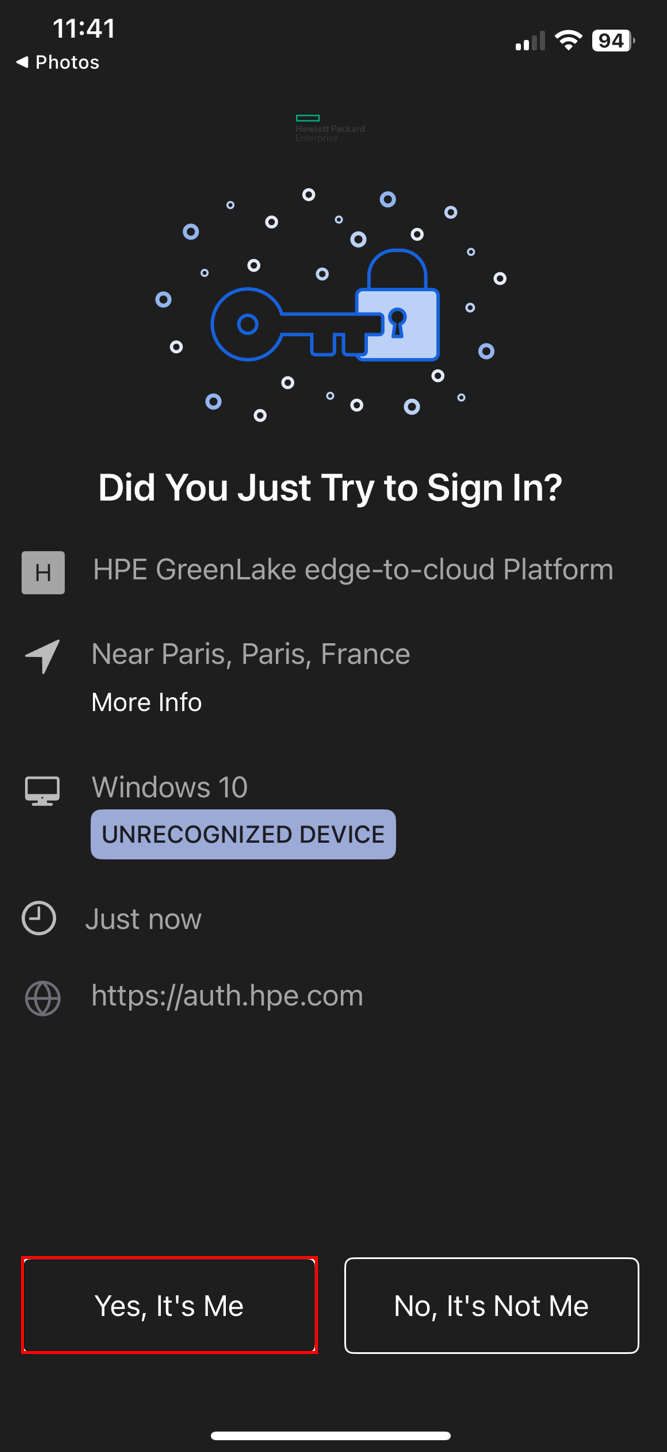
When MFA is enabled with Okta:
The cmdlet will prompt you to validate the push notification from Okta.

On your Okta-enabled device, press Yes, it’s me to approve the authentication request.
-
When MFA is enabled with Google Authenticator:
The cmdlet will pause and prompt you to enter the MFA token.

Open the Google Authenticator app on your device to retrieve the token and enter it when prompted.
-
-
You can skip the next section and proceed directly to Step 3 - Verify your connection
- Using SAML Single Sign-On (SSO) with Okta, PingID or Entra ID
-
Start by creating an email variable:
$MyEmail = "your_email@your_domain.com" -
To connect with SAML SSO through your organization’s identity provider (IdP), enter the following command in your terminal:
Connect-HPEGL -SSOEmail $MyEmail -
Once initiated, the cmdlet will prompt you to approve a push notification sent by your IdP. Follow the on-screen authentication steps displayed in your terminal. Typically, you’ll need to:
-
Check your IdP-enabled device for a push notification or authentication request.

-
Approve the request (for example, tap the number or “Yes, it’s me” in Okta or confirm in PingID/Entra ID).
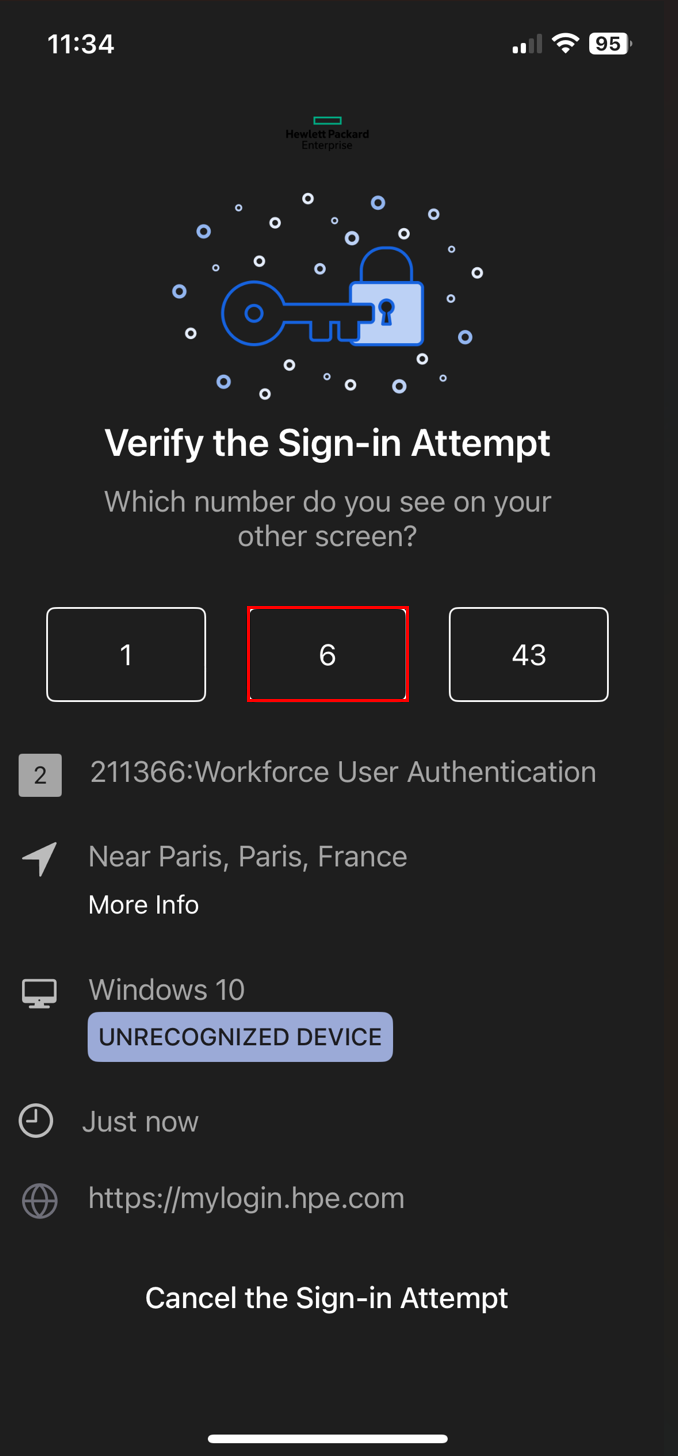
-
Complete any additional steps required by your organization’s security policies.
-
Step 3 - Verify your connection
Once authentication is successful, a secure connection to HPE GreenLake will be established, allowing you to proceed with subsequent operations.
-
If you have no workspace tied to your HPE account, the
Connect-HPEGLcommand will return a warning message indicating that you need to create your first workspace:
-
If you already have one or more workspaces available, the command will return a warning message indicating that you need to use a second command to connect to one of the workspaces:

The Connect-HPEGL cmdlet is responsible for initiating and managing this connection. Upon establishment, it maintains a persistent session using the $HPEGreenLakeSession connection tracker variable, which supports all further module cmdlet activities. Furthermore, the cmdlet issues a temporary API client credential for both HPE GreenLake and any Compute Ops Management service instances provisioned within your workspace.
💡 Note
You can use
Get-Help Connect-HPEGL -Fullto access the complete help documentation, technical details, and in-depth explanations forConnect-HPEGL.
💡 Note
The command to directly connect to an existing and known workspace is:
Connect-HPEGL -Credential $credentials -Workspace "workspace_name"
Now that you are connected to HPE GreenLake with the PowerShell module, you can optionally open a browser to access the HPE GreenLake portal and view the results of the commands you will run in the following sections. If your browser is not already open and connected to HPE GreenLake, navigate to https://common.cloud.hpe.com and sign in with your HPE account credentials:
💡 Note
If this is your first time using HPE GreenLake, it is normal for no workspace to appear in your environment. If one or more workspaces are already available, you can still continue with this lab without issue.
You may now leave this page open and begin your zero-touch automation experience.
Task 4 - Configuration of your workspace
Step 1 - Create your first workspace
-
To create your initial workspace (or an extra one just for this lab — don’t worry, it will be deleted once the lab ends), you need to provide a unique name. Since the name must be unique across all workspaces on the HPE GreenLake platform, we will use a random number to generate the name. Enter:
$WorkspaceName = "HPEWorkspaceTxx_$(Get-Random)"⚠️ Replace
xxwith your team number (e.g.,01for team 1,05for team 5,12for team 12).For example, team 5 should use:
$WorkspaceName = "HPEWorkspaceT05_$(Get-Random)"⚠️ CRITICAL REQUIREMENT ⚠️
You MUST follow the naming convention HPEWorkspaceTxx_ (with xx your team number) exactly. This is essential for the lab reset scripts to identify and clean up your workspace automatically.
⚠️ Failure to use this naming format will prevent automatic cleanup and may require manual intervention. -
This command generates a name such as HPEWorkspaceT01_12345678 for team 1. You can verify your workspace name by executing:
$WorkspaceName -
Now build the full command using PowerShell’s tab completion feature. Tab completion is a built-in PowerShell mechanism that, after typing a parameter name followed by a space, lets you press the Tab key to cycle through all valid values for that parameter — no need to memorize them.
-
Start by typing the command with the
-Typeparameter followed by a space, then press Tab repeatedly to cycle through the available workspace types and select ‘Standard enterprise workspace’:New-HPEGLWorkspace -Name $WorkspaceName -Type -
Add the
-Countryparameter followed by a space, then press Tab to browse the list of supported countries and select yours. You can also type the first letter(s) of your country before pressing Tab to jump directly to matching entries — for example, typeIto jump to countries starting with “I” such as Iceland, India, Ireland, etc.:-Country -
Complete the command with the
-Streetparameter. You can enter any address — real or fictional — since the workspace will be automatically deleted when the lab is reset:-Street "Your street address" -
Your complete command should look like this:
New-HPEGLWorkspace -Name $WorkspaceName -Type 'Standard enterprise workspace' -Country Canada -Street "123 Main Street"📌 Note
In the example above, only the
name,type,country, andstreetparameters are included because they are required. However, you can also specify optional parameters likecity,state,email, and others.
-
-
After executing this command, the workspace is created, and the command automatically disconnects the session. To connect to your new workspace, enter:
Connect-HPEGL -Credential $credentials -Workspace $WorkspaceName
-
To check the content of your workspace, enter:
Get-HPEGLWorkspace
Step 2 - Add a user to your workspace
There are several commands that are available to configure a workspace and the different resources available in a workspace, such as adding users, setting roles, location, etc. In this task, you will simply add a new user with a specific role.
-
Invite admin@hpelabs.us as an administrator to your newly created workspace:
 $NewUserEmail = "admin@hpelabs.us"
 New-HPEGLUser -Email $NewUserEmail -RoleName 'Workspace Administrator'
⚠️ CRITICAL REQUIREMENT ⚠️
You MUST add this admin user (admin@hpelabs.us) to your workspace. This is essential for the lab reset scripts to function properly at the end of your session.
⚠️ Failure to add this user will prevent cleanup and break the lab for the next participant. -
To verify the new user, execute the following command:
Get-HPEGLUser
Step 3 - Provision Compute Ops Management
The following step involves setting up services. There are several kinds of services you can provision across different regions.
-
To see all available services, use:
Get-HPEGLService -ShowUnprovisionedThis command lists all unprovisioned services, including those for networking devices (HPE Aruba Networking Central), compute devices (Compute Ops Management), storage devices (Data Services), OpsRamp, etc.
The ProvisionStatus column will indicate UNPROVISIONED for each listed service. You can choose to provision any of these, as long as you have the needed permissions.
-
In this lab exercise, you’ll set up the Compute Ops Management (COM) service in the European central region. Enter:
 $Region = "eu-central"
 New-HPEGLService -Name "Compute Ops Management" -Region $Region
💡 Note
Additional regions are available; to view different supported regions, use:
Get-HPEGLService -Name "Compute Ops Management" -
To confirm that the COM instance is provisioned, run:
Get-HPEGLService -ShowProvisioned -
Next, assign the ‘Administrator’ role for Compute Ops Management to both you and the invited user:
$MyEmail, $NewUserEmail | Add-HPEGLRoleToUser -RoleName 'Compute Ops Management administrator'💡 Note
The Tab key can be used to display the available list of role names.
-
Finally, verify the role assignments with:
 Get-HPEGLUserRole -Email $MyEmail
 Get-HPEGLUserRole -Email $NewUserEmail
Step 4 - Set a location
Locations in Service Delivery Information (SDI) store addresses, contacts, and support details for automation. Assigning a device to a location links it physically for automated support, including ticket creation with HPE.
This step is essential for automatically creating a ticket with HPE support.
-
To create a location, enter:
 $LocationName = "Your_customized_location_name"
 New-HPEGLLocation -Name $LocationName -Description "Your customized description" -Country "Your country" -Street "Your customized street address" -City $LocationName -State "NA" -PostalCode "123456789" -PrimaryContactEmail $MyEmail
💡 Note
You can press the Tab key after typing
-Countryto view all supported countries. -
Check the location with:
Get-HPEGLLocation
Step 5 - Add a subscription to your workspace
-
To activate compute devices that will be added later to your workspace, you need to add a COM subscription key. Enter:
New-HPEGLSubscription -SubscriptionKey "<key found in the login sheet>" -
To check the subscription, enter:
Get-HPEGLSubscription -
Workspaces have two subscription management options:
-
Assignment: Controls automatic subscription assignment when devices are added.
-
Re-assignment: Controls if subscriptions are reassigned when one expires or is canceled. Note that auto-reassignment is enabled by default for all device types.
To retrieve these options, enter:
Get-HPEGLDeviceAutoSubscription Get-HPEGLDeviceAutoReassignSubscription -
-
Set the automatic subscription assignment for Compute:
Set-HPEGLDeviceAutoSubscription -ComputeSubscriptionTier ENHANCED💡 Note
Auto-reassignment is enabled by default for all device types; therefore, manual configuration of automatic subscription re-assignment for Compute devices is generally unnecessary. For reference, you may enable it manually using
Set-HPEGLDeviceAutoReassignSubscription -Computesif it was previously disabled withRemove-HPEGLDeviceAutoReassignSubscription.
Task 5 - Onboarding devices
You can add devices to a workspace either one at a time or in bulk. Another option is to use a COM activation key, which lets you add single or multiple compute devices directly to a Compute Ops Management (COM) instance. In this lab, you’ll be using that specific method.
🎯 Note
For onboarding multiple servers, a better approach is to use the HPE Compute Ops Management Onboarding Script. This script automates the full onboarding workflow—from required pre-checks and preparation steps through final server onboarding to COM. It handles key prerequisites such as authentication, device registration, activation key application, and initial iLO configuration (DNS, NTP, tags, location, and policy settings), helping deliver a consistent zero-touch process at scale.
Step 1 - Onboard one server
For this lab, you will onboard a single server manually so you can understand each command and validation step.
In production or at scale, use the HPE Compute Ops Management Onboarding Script, which automates all prerequisite checks, preparation tasks, and the onboarding workflow end to end.
-
To generate an activation key for connecting your server to the Compute Ops Management instance in the region you provisioned earlier, use the following command:
$Activation_Key = New-HPECOMServerActivationKey -Region $RegionThis command should be used in conjunction with the
-Regionparameter, consistent with other HPECOM cmdlets, to specify the COM instance—that is, the region where the COM instance is provisioned and where the command will be executed. Please note that the auto-completion tab can be utilized to display the available region codes provisioned within your workspace.🔔 Note
This method is supported only for the following iLO versions:
- iLO 5: Version 3.09 or later
- iLO 6: Version 1.64 or later
- iLO 7: Version 1.12.00 or later
-
To see the activation key that has been generated, you can enter:
$Activation_key💡 Note
No subscription key is needed with this command because auto-subscription for Compute has been enabled earlier using
Set-HPEGLDeviceAutoSubscription. -
Next, assign the IP address of your iLO to a variable by entering the following command. Be sure to use the IP address listed in the login sheet provided by your instructor. Enter:
$iLO_IP = "xxx.xxx.xxx.xxx" -
And assign the password of your iLO, also found in the login sheet to another variable:
$iLO_Password = "xxxxxxxxxxxx" -
Then execute the following commands to connect the iLO to the COM instance using the activation key that was generated earlier:
 $iLO_SecurePassword = ConvertTo-SecureString $iLO_Password -AsPlainText -Force
 $iLO_credential = New-Object System.Management.Automation.PSCredential("Administrator", $iLO_SecurePassword)
 Connect-HPEGLDeviceComputeiLOtoCOM -iLOCredential $iLO_credential -IloIP $iLO_IP -ActivationKeyfromCOM $Activation_Key -SkipCertificateValidation
💡 Note
The
-SkipCertificateValidationparameter bypasses all certificate validation steps, including checks for expiration, revocation, and trusted root authority. This approach is insecure and generally discouraged. It should only be used with known hosts that are using self-signed certificates, which applies in our scenario.
💡 Note
The
Connect-HPEGLDeviceComputeiLOtoCOMcmdlet provides additional parameters to connect iLO through a COM Secure Gateway or through a web proxy.💡Note
In scenarios involving a Secure Gateway (not applicable to this lab), the commands would be as follows:
- Obtain a valid subscription key:
$SubscriptionKey = Get-HPEGLSubscription -ShowWithAvailableQuantity -ShowValid -FilterBySubscriptionType Server | Select-Object -First 1 -ExpandProperty key - Retrieve the Secure Gateway object:
$SG = Get-HPECOMAppliance -Region $Region -Name sg01.domain.com - Create a Secure Gateway activation key:
$Activation_Key = New-HPECOMServerActivationKey -Region $Region -SecureGateway $SG -SubscriptionKey $SubscriptionKey - Use the Secure Gateway activation key to connect the iLO to COM and set the Secure Gateway as the iLO’s proxy server:
Connect-HPEGLDeviceComputeiLOtoCOM -iLOCredential $iLO_credential -IloIP "xxx.xxx.xxx.xxx" -ActivationKeyfromCOM $Activation_Key -SkipCertificateValidation -IloProxyServer sg01.domain.com -IloProxyPort 8080
- Obtain a valid subscription key:
-
You can then verify the onboarded servers using the following cmdlet:
Get-HPEGLDevice
💡 Note
This method not only automatically assigns servers to the COM service instance but also automatically applies a subscription key to the devices.
-
As the device has been automatically assigned to your COM instance with a subscription key, you are now able to utilize COM cmdlets. For instance, you may use:
Get-HPECOMServer -Region $Region
Note that the output differs slightly from the output of the
Get-HPEGLDevicecommand. It adds additional information such as the power state, the connected state, the iLO IP address, and more.However, always remember that the output is a formatted view and does not show the entire content of the returned object. To get the full details, you need to pipe the command to
| Format-List(or| fl) at the end. -
To determine the number of remaining licenses, execute the following command:
Get-HPECOMServer -Region $Region -ShowSubscriptionDetails
-
Before proceeding with the next steps in the lab, ensure that your server is powered on by checking the PowerState column in the output above. If the server is not ON, run the following command:
Get-HPECOMServer -Region $Region | Start-HPECOMServer
This command powers on all servers managed by COM. Since you currently have only one server onboarded, it will start that specific device.
Step 2 - Set device location and tags
-
Next you need to set the device location. As indicated earlier, this step is important to ensure that support cases are automatically created in the event of device failures. To do so, enter:
Get-HPEGLdevice | Set-HPEGLDeviceLocation -LocationName $LocationName
-
To verify that the location has been correctly assigned to your device, use the following command:
Get-HPEGLdevice
📝 Note
Expand the PowerShell console to its maximum width to ensure that you can see the Location property in the output.
-
Next, you can assign tags to your device. A tag is a form of metadata that uses a key-value pair (e.g., App=AI) and can be applied to any resource. Tags are primarily used to categorize resources based on purpose, owner, environment, or other criteria.
ℹ️ Note
Tags are particularly important for extending filtering capabilities and enhancing the use of scope-based access control, which allows you to limit users’ abilities to perform actions on a selected list of resources. These resources can be categorized based on various criteria, such as generation, model, groups, and most importantly, tags.
-
Add two tags to your device: one for country location and one for AI application type. Use this command:
Get-HPEGLDevice | Add-HPEGLDeviceTagToDevice -Tags "Country=FR, App=AI"
-
To verify that the tags have been correctly assigned to your device, use the following command:
Get-HPEGLdevice -ShowTags
Task 6 - Configuration of Compute Ops Management
The following step involves setting up Compute Ops Management. This process includes various tasks like setting up server configurations, forming groups, assigning servers to these groups and much more. The steps to complete this setup are outlined below:
Step 1 - Create server settings
A setting in COM is a collection of parameters that you can apply to one or more servers through groups. These settings include parameters such as BIOS, internal storage, firmware, OS, etc.
Server Bios Settings
Server BIOS Settings allow you to create a new BIOS configuration for
servers using either a workload profile or custom parameters, ensuring
consistent settings across server groups. The
New-HPECOMSettingServerBios cmdlet provides many options; for
details on available parameters and how they behave with different iLO
versions and server generations, refer to the help section of the
cmdlet.
ℹ️ Note
Server BIOS settings can’t be managed from the UI—they can only be created today through the COM API using the
New-HPECOMSettingServerBioscmdlet.
-
To create a bios setting with a few customized options, enter:
 $BiosSettingName = "Custom-Bios-For-AI"
 New-HPECOMSettingServerBios -Region $Region -Name $BiosSettingName -WorkloadProfileName  "Virtualization - Max Performance" -AsrStatus:$True -AsrTimeoutMinutes Timeout10
This command creates a new BIOS setting configuration tailored for virtualization with maximum performance. It also enables the Automatic Server Recovery (ASR) feature and sets the timeout for the ASR feature to 10 minutes.

-
To verify the newly created BIOS setting, enter:
Get-HPECOMSetting -Region $Region -Name $BiosSettingName
Server Internal Storage Settings
These settings allow you to configure a new server storage setup with different volumes using selected RAID type and size, ensuring uniform storage across groups.
-
To configure for example a configuration with two volumes: OS on RAID1 with two SAS drives, and data on RAID5 with three SSDs plus two spares, enter:
 $InternalStorageSettingName = "RAID-Configuration-for-AI-Servers"
 $volume1 = New-HPECOMSettingServerInternalStorageVolume -RAID RAID5 -DriveTechnology  NVME_SSD -IOPerformanceMode ENABLED -ReadCachePolicy OFF -WriteCachePolicy  WRITE_THROUGH -SizeinGB 100 -DrivesNumber 3 -SpareDriveNumber 2
 $volume2 = New-HPECOMSettingServerInternalStorageVolume -RAID RAID1 -DriveTechnology  SAS_HDD
 New-HPECOMSettingServerInternalStorage -Region $Region -Name $InternalStorageSettingName -Volumes $volume1, $volume2 -Description "RAID1 and RAID5 server settings for AI systems"
-
To verify the newly created internal storage setting, enter:
Get-HPECOMSetting -Region $Region -Name $InternalStorageSettingName
-
To verify the two volumes that are defined:
Get-HPECOMSetting -Region $Region -Name $InternalStorageSettingName -ShowVolumes
Server Firmware Settings
These settings allow you to set baselines for updating server firmware, helping maintain consistent firmware versions across groups of servers.
-
To set up firmware, start by finding the latest baseline for the relevant generation using:
Get-HPECOMFirmwareBaseline -Region $Region -Generation 11 -LatestVersion
-
To create the firmware setting with the latest baselines for both Gen10 and Gen11, enter:
 $FirmwareSettingName = "Latest-Firmware-Baselines-for-AI"
 $Gen10_Firmware_Baseline = Get-HPECOMFirmwareBaseline -Region $Region -LatestVersion -Generation 10 | select -ExpandProperty releaseVersion
 $Gen11_Firmware_Baseline = Get-HPECOMFirmwareBaseline -Region $Region -LatestVersion -Generation 11 | select -ExpandProperty releaseVersion
 New-HPECOMSettingServerFirmware -Region $Region -Name $FirmwareSettingName -Description "FW baseline for AI servers" -Gen10FirmwareBaselineReleaseVersion $Gen10_Firmware_Baseline -Gen11FirmwareBaselineReleaseVersion $Gen11_Firmware_Baseline
-
To verify the newly created firmware setting, enter:
Get-HPECOMSetting -Region $Region -Name $FirmwareSettingName
iLO Settings
ILO settings enable the configuration of specific parameters to standardize iLO management across server groups. These settings support a range of options, including network protocols, SNMP, user accounts, security features, and update services. The New-HPECOMSettingiLOSettings cmdlet provides many options; for details on available parameters, refer to the help section of the cmdlet.
-
To configure iLO settings, enter:
 $iLOSettingName = "AI_iLO_Settings"
 New-HPECOMSettingiLOSettings -Region $Region -Name $iLOSettingName -Description "iLO Settings for AI Servers" -VirtualMedia Enabled -PasswordComplexity Enabled -WebServerSSL Enabled -AcceptThirdPartyFirmwareUpdates Disabled
This command activates iLO virtual media, enforces password complexity, enables HTTPS, and disables third-party firmware updates.

-
To verify the newly created iLO settings, enter:
Get-HPECOMSetting -Region $Region -Name $iLOSettingName
Step 2 - Create a group
In this task you will create a new group incorporating the different settings created earlier. Groups enable you to organize your servers into custom-defined sets for easier monitoring and manageability. The server-related settings and policies you created earlier can be applied to a single group, as you will do in this lab, or to multiple groups as needed.
-
To create a new group, enter:
 $GroupName = "AI_Group"
 New-HPECOMGroup -Region $Region -Name $GroupName -Description "My new group for AI servers"  -BiosSettingName $BiosSettingName -AutoBiosApplySettingsOnAdd:$false -iLOSettingName $iLOSettingName -AutoIloApplySettingsOnAdd:$true -FirmwareSettingName $FirmwareSettingName -AutoFirmwareUpdateOnAdd:$false -PowerOffServerAfterFirmwareUpdate:$false -FirmwareDowngrade:$false -StorageSettingName $InternalStorageSettingName -AutoStorageVolumeCreationOnAdd:$false -AutoStorageVolumeDeletionOnAdd:$false -TagUsedForAutoAddServer "App=AI"
This command creates the new group “AI_Group” with previously configured BIOS, firmware, storage, and iLO settings. Additionally, the command specifies whether certain actions, such as applying settings or creating storage volumes, should be automated when servers are added to the group. These are called group policies. The “App=AI” tag is defined so that any server with this tag during onboarding will automatically be added to this group.
💡 Note
The server operating system image setting is not used in this command but is another setting that can be utilized to install the operating system using an ISO image and optionally a kickstart file.
-
To verify the newly created group, enter:
Get-HPECOMGroup -Region $Region
Note that, as configured earlier, 4 settings are applied to that group.
-
To display the settings list, type:
Get-HPECOMGroup -Region $Region -Name $GroupName -ShowSettings
-
Additionally, you may review the policies currently assigned to the group by using the following:
Get-HPECOMGroup -Region $Region -Name $GroupName -ShowPolicies
Keep in mind that only the iLO settings take effect right away after you add servers to the group.
Step 3 - Add servers to the group
The next task is to add your server to the new group. According to the group policies, only the iLO settings will be applied immediately upon adding the servers to the group.
-
To assign all servers (in this instance, only one server) to the newly created group, proceed as follows:
Get-HPECOMServer -Region $Region | Add-HPECOMServerToGroup -GroupName $GroupName
-
To verify that the new server has been added to the group, enter the following command:
Get-HPECOMGroup -Region $Region -Name $GroupName -ShowMembers
-
To monitor the progress of active related group jobs, execute the following command at regular intervals:
Get-HPECOMJob -Region $Region -Category Group -ShowRunning
This command shows all the running jobs associated with the group category.
📝 Note
Each time a server is added to a group that includes firmware or iLO settings, an automatic process is initiated. This process triggers a group firmware compliance report job and a group iLO settings compliance job to ensure the servers meet the requirements of the associated firmware baselines and iLO settings.
-
To review the related server jobs that are presently active, execute the command multiple times:
Get-HPECOMJob -Region $Region -Category Server -ShowRunning
This command lists active jobs for the server category, focusing on the “add to group” action.
-
Once all jobs have finished running, execute the command below to check their status:
Get-HPECOMJob -Region $Region
📝 Note
Compute Ops Management tracks iLO settings and compares them to the desired configuration. Whenever iLO changes are detected, Compute Ops Management automatically verifies compliance.
-
You can check the compliance status of firmware and ILO settings in several ways, such as by using
Get-HPECOMGrouporGet-HPECOMServer. To verify the group compliance, use the following method:Get-HPECOMGroup -Region $Region -Name $GroupName -ShowCompliance
This command generates a comprehensive compliance status report for all types, including firmware, iLO settings, and external storage. Notably, the iLO settings status is ‘COMPLIANT,’ which confirms that the group-defined iLO settings have been properly implemented on the iLO.
📝 Note
The COM API does not track BIOS settings compliance. This is why you only see these three compliance types in the cmdlets
💡 Note
Get-HPECOMServerincludes several parameters-ShowGroupCompliance,-ShowGroupiLOSettingsCompliance, or-ShowGroupFirmwareCompliance—that allow you to directly check compliance on a specified server.
Task 7 - Gathering Comprehensive Server Inventory Information
Keeping accurate server inventory is crucial for effective IT management—it enables quick troubleshooting, ensures compliance, and helps identify issues before they escalate. Compute Ops Management streamlines this by automatically collecting and updating detailed server inventory, so administrators always have the latest information on hand.
To obtain detailed server inventory information, use the Get-HPECOMServerInventory cmdlet along with the -Name parameter. The -Name parameter accepts either the server’s name or its serial number, allowing you to specify the server from which you wish to retrieve inventory data.
-
But before that, capture the serial number of your server to facilitate all subsequent commands, enter:
$SN = Get-HPECOMServer -Region $Region | Select-Object -ExpandProperty SerialNumber -
Then to generate a detailed memory report of your server using the
$SNvariable, run:Get-HPECOMServerInventory -Region $Region -Name $SN -ShowMemory
-
Additional reporting options are available via the same command, like for a report on the CPU:
Get-HPECOMServerInventory -Region $Region -Name $SN -ShowProcessor
There are several Show commands for different server inventory data. For efficiency, type -Show and press CTRL+SPACE to view all property options or use Tab for auto-completion.
💡 Note
Running
-ShowSoftwaremay return no data if your server’s operating system or HPE Agentless Management Service (AMS) is not installed or running. Same with-ShowSmartUpdateToolif SUT is not installed and running.💡 Note
If it is necessary to initiate the collection of server inventory data (for example, if existing data may be outdated), the following command can be used to force a hardware inventory collection:
Get-HPECOMServer -Region $Region | New-HPECOMServerInventory -AsyncThe
-Asyncparameter allows the cmdlet to return the asynchronous job resource immediately. By default, the cmdlet will wait for the job to finish before returning.
Task 8 - Monitoring Server Health, Support, and Warranty Status
One of the key responsibilities in server management is troubleshooting
issues, managing open cases, monitoring server health, and ensuring that
servers remain under warranty coverage. In Task 8, effective server
management includes tasks such as confirming operational status,
reviewing health summaries, monitoring current activities and alerts,
retrieving support details and cases, and identifying servers with
recent support incidents for proactive maintenance. The
Get-HPECOMServer cmdlet, along with its related inventory and job
parameters, provides a comprehensive toolkit for these tasks.
Specifically, you can:
-
Check overall server health and component status (fans, memory, network, power supplies, processor, storage, temperature, BIOS, health LEDs) using
-ShowHealthStatus. -
Review current activities and alerts with
-ShowActivitiesand-ShowAlerts. -
Retrieve detailed support information and warranty details using
-ShowSupportDetails. -
Manage and track open support cases with
-ShowSupportCases, and identify servers with recent support cases via-ShowServersWithRecentSupportCases. -
Review recent jobs performed on the server using
-ShowJobs.
These features collectively enable robust monitoring, efficient troubleshooting, and proactive resolution of server issues, ensuring optimal server performance and support coverage.
Step 1 - Getting server health status, activities, jobs and alerts
The first step in server troubleshooting is to confirm that the server is operational and verify the absence of any active alerts.
-
To review your server’s health status, execute the following command:
Get-HPECOMServer -Region $Region -Name $SN -ShowHealthStatus
-
To retrieve the list of activities from the past month on your server, you can use:
Get-HPECOMServer -Region $Region -Name $SN -ShowActivities
You can use the dedicated cmdlet
Get-HPECOMActivity -Region $Region -SourceName $SNto retrieve COM activities, which offers enhanced options such as filtering by time, category, or source name. -
To retrieve all alerts associated with your server, use:
Get-HPECOMServer -Region $Region -Name $SN -ShowAlerts
Alerts provide security information and issues related to servers. By default, all alerts associated with your server are returned. You can use the dedicated cmdlet
Get-HPECOMAlertto get more options and filters. -
You may receive some returned alerts with a less-than-ideal output view. To view different properties, consider running:
Get-HPECOMServer -Region $Region -Name $SN -ShowAlerts | Format-List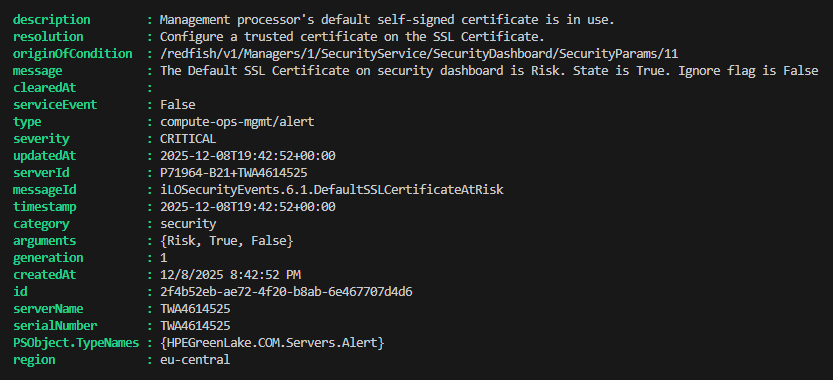
-
To obtain a comprehensive list of jobs associated with your server for the last month, including their current state “PENDING” (waiting to start), “RUNNING” (in progress), “STALLED” (stuck), “ERROR” (failed), or “COMPLETE” (finished successfully), you can run:
Get-HPECOMServer -Region $Region -Name $SN -ShowJobs
You can also utilize the specialized cmdlet
Get-HPECOMJob -Region $Region -SourceName $SNto retrieve a list of jobs associated with a specific source name. By default, this command returns jobs from the past seven days, but you can broaden your search using parameters like-ShowLastMonthto include the previous month or-ShowAllfor the complete job history. Additionally, you have the option to filter results to display only jobs that are currently running with-ShowRunning, or to show only jobs that are waiting in the queue by using-ShowPending. -
Please be advised that to obtain the list of jobs related to your group, you may use the following method:
Get-HPECOMJob -Region $Region -SourceName $GroupName
-
If you need to view detailed job information or troubleshoot specific tasks, you can refine your queries further by using additional parameters. For example, to quickly identify and analyze the most recent job that has failed, you can target your search accordingly:
Get-HPECOMJob -Region $Region | Where-Object resultCode -eq FAILURE | Select-Object -First 1 | Format-ListThis flexibility helps in managing and monitoring server operations more effectively, especially in large or complex environments.
Step 2 - Getting server support details
The subsequent phase in server troubleshooting involves verifying the support details. This information is crucial for determining warranty status and its duration.
-
To make sure the server is still supported, you can run.
Get-HPECOMServer -Region $Region -Name $SN -ShowSupportDetails
⚠️ Note
Your assigned lab server may not have a support contract warranty.
-
You can use the following command to verify whether COM has automatically created a support case:
Get-HPECOMServer -Region $Region -Name $SN -ShowSupportCases
Note that if no support cases are found for the specified server, the cmdlet returns no output.
💡 Note
Get-HPECOMServer -Region $Region -ShowServersWithRecentSupportCasescan be used to list servers with recent support cases.
Step 3 - Collecting and downloading server logs
When encountering a critical server issue, HPE support may request the collection and submission of your server’s Active Health System (AHS) logs for deeper analysis. Traditionally, gathering these logs can be a complex and time-consuming task. Fortunately, the provided module streamlines this process by offering a straightforward method to collect server logs for any specified server, making troubleshooting more efficient and accessible.
-
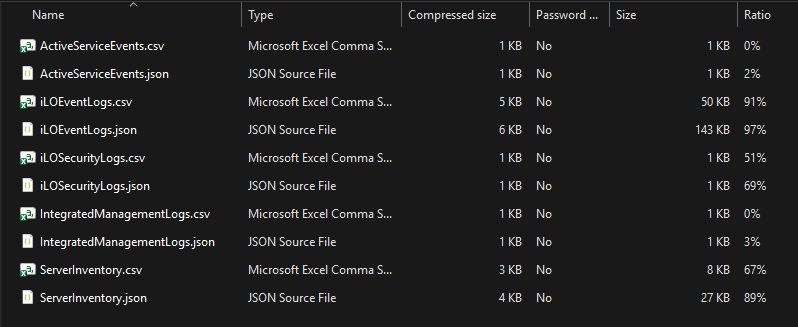
To initiate the collection and download of server logs, enter:
Get-HPECOMServerLogs -Region $Region -Name $SN -DownloadAHSLogs -Path .
💡 Note
The
-DownloadAHSLogsparameter enables you to include Active Health System (AHS) logs along with the regular server logs. AHS logs offer extensive diagnostic information that HPE support often asks for when investigating hardware problems or reviewing support cases. These logs give detailed insights into hardware health and performance. Normally, only standard server logs are gathered, so activate this option if HPE support requests AHS logs specifically for case analysis.The
-Pathparameter allows you to specify the destination folder for the downloaded server logs. In the example above, we used a single period “.” to indicate the current directory, so the logs will be saved locally. Since no custom filename was provided, the module automatically creates a file named in the format “server-logs-- .zip", making it easy to identify and organize logs for different servers and collection times. Please note that the log collection process may require 2 to 4 minutes to complete, as it compiles comprehensive diagnostic data from the server. -
Once the task completes, the zip file can be found using:
Get-ChildItem -Path . -Filter *.zip | Select-Object Name, Length, LastWriteTime
-
If you want to see what’s inside, you can use Windows Explorer to open the zip file:
-
Alternatively, you can use PowerShell’s built-in
Expand-Archivecmdlet to extract the contents of the zip file. Simply run the following by replacing the angle brackets with your server name, timestamp and destination folder:Expand-Archive -Path .server-logs-<servername>-<timestamp>.zip -DestinationPath .<foldername>This makes it easy to inspect individual log files and share relevant data with support teams for further troubleshooting.
Step 4 - Enabling email notification
An essential aspect of effective server management is receiving timely alerts when issues arise. To address this, COM provides configurable email notification policies for each service instance as well as for individual servers. In this step, you will establish an email notification policy at the COM instance level, ensuring that whenever a server is added to COM, the preferred email notification settings are automatically applied.
-
To subscribe your user account to receive email notifications, including service events, critical or warning severity events, and daily summary updates, execute the following command:
Enable-HPECOMEmailNotificationPolicy -Region $Region -DailySummary -ServiceEventAndCriticalAndWarningIssues
📝 Note
A service event refers to a failure that requires the creation of an HPE support case and may necessitate a service repair.
-
To review the current status of the email notification policy, use the following command:
Get-HPECOMEmailNotificationPolicy -Region $Region
Task 9 - Updating and Ensuring Server Firmware Compliance
This section outlines the procedures for configuring key server management functions in COM. It covers maintaining server firmware compliance to uphold security and performance standards, reviewing group firmware deviations, and scheduling group firmware updates. Adhering to these steps will enhance the efficiency of monitoring and maintaining your server infrastructure.
Step 1 - Checking group firmware compliance
The initial step in this process is to verify your group’s firmware compliance status. This compliance report provides a clear assessment of how closely your servers align with the firmware baseline established for your group. Not only does it indicate the number of components that are out of compliance, but it also offers a detailed breakdown—including the total download size required for all necessary firmware updates. This comprehensive view is essential for understanding the scope of updates needed and for planning any remediation actions efficiently.
-
To check your group’s current firmware compliance status, run this command:
Get-HPECOMGroup -Region $Region -Name $GroupName -ShowFirmwareCompliance
This command returns the following properties for the server:
-
Server: Server name
-
SerialNumber: Server serial number
-
Group: Group name the server belongs to
-
State: Compliance state (Compliant, Not Compliant, Unknown, etc.)
-
Score: Compliance score percentage (e.g., 25% indicates 25% compliant)
-
ErrorReason: Reason for compliance failure if applicable
-
Criticality: Severity level of the firmware update (Recommended, Critical, Optional)
-
Deviations: Number of firmware components that deviate from the group’s baseline
-
WillItRebootTheServer: Indicates if applying the update will reboot the server (Yes/No)
-
GracefullShutdownAttempt: Indicates if a graceful shutdown will be attempted before reboot (Yes/No)
-
TotalDownloadSize: Total size of firmware updates to download (e.g., 65 MB)
These properties describe the firmware compliance status of each group member. COM calculates the group compliance status by analyzing the group members for adherence to the server firmware settings configured in the group.
🔔 Note
You may achieve a perfect 100% compliance score with no deviations depending on the status of your allocated server.
-
Step 2 - Checking group firmware deviations
Before updating the server firmware, you can examine any deviations in firmware components from your group’s established baseline. This step allows you to accurately identify which specific components require updates to align with the group definition. The components identified for update correspond to the total firmware size of 65 MB, as indicated in the TotalDownloadSize column of the firmware compliance report.
-
To view your group’s firmware deviations, use:
Get-HPECOMServer -Region $Region -Name $SN -ShowGroupFirmwareDeviation
This command returns the following properties for each firmware component that deviates:
-
ComponentName: Name of the firmware component (e.g., System ROM, NIC, Boot Controller)
-
ExpectedVersion: Firmware version expected by the group’s baseline
-
InstalledVersion: Currently installed firmware version on the server
-
ComponentFilename: Filename of the firmware update package
-
⚠️ Note
If there are no deviations, this command will not return any response.
🔔 Note
The Firmware Compliance feature does not monitor HPE driver and software versions.
Step 3 - Scheduling group firmware update
After identifying the firmware deviation within the group definition, you may choose to perform a group firmware update. For this exercise, however, you will instead create a scheduled task to initiate the firmware update for all servers in your group during the upcoming weekend (in four days).
🎯 Note
A live group firmware update will not be performed in this lab because of time constraints and the potential impact on servers used by other sessions. Thank you for your understanding.
-
To create a scheduled firmware update task, you need to use the
Update-HPECOMGroupFirmwarecmdlet with the-ScheduleTimeparameter as shown below:Update-HPECOMGroupFirmware -Region $Region -GroupName $GroupName -AllowFirmwareDowngrade -InstallHPEDriversAndSoftware -ScheduleTime (Get-Date).AddDays(4)
This update, scheduled in four days, allows firmware downgrades and installs HPE drivers and software.
📝 Note
To benefit from HPE’s drivers and software update functionality, always make sure your servers fulfill the required prerequisites.
-
To list all scheduled tasks, you can use:
Get-HPECOMSchedule -Region $RegionThere are several other important parameters with the
Update-HPECOMGroupFirmware:The
-ServerSerialNumberparameter allows you to update only a specific server within the group instead of updating all servers in the group at once. Testing firmware updates on an individual server prior to deploying them across the entire group is a recommended best practice.By default,
Update-HPECOMGroupFirmwareruns updates in parallel across eligible servers. The-SerialUpdatesparameter ensures that only one server in the group updates at a time. This prevents all servers from being offline simultaneously. When you combine-SerialUpdateswith-StopOnFailure, the update process stops immediately if any server fails the firmware update, preventing further servers from being updated until you investigate the issue.The
-PowerOffAfterUpdateparameter automatically powers off servers after a successful firmware update, which can be useful for data center maintenance schedules or when you want to perform physical maintenance.The
-DisablePrerequisiteCheckparameter bypasses prerequisite validation checks before the update starts. Use this parameter only in trusted environments where you have already verified that all prerequisites are met, as skipping these checks can lead to failed updates.The
-SkipComponentUpdatesThatAreBlockedByKnownIssuesparameter automatically avoids updating specific firmware components that are known to cause problems or issues in your environment.The
-Asyncparameter returns control to your PowerShell prompt immediately without waiting for the firmware update to complete. This is useful when you want to schedule multiple operations or continue with other tasks while the firmware updates run in the background.
Task 10 - Essential Next Steps for Server Management and Sustainability
After completing setup and firmware updates, the next essential steps focus on ongoing server management and sustainability. Use HPE Compute Ops Management PowerShell cmdlets to monitor server performance and sustainability, generate utilization insights, and review energy reports. Streamline authentication for accessing iLO interfaces by implementing Single Sign-On (SSO), and confirm that your COM configuration of iLO settings is correct through practical verification.
Step 1 - Server utilization insights
Server utilization insights play a crucial role in optimizing data center efficiency and sustainability. Leveraging AI-powered analytics, these insights provide detailed visibility into key performance metrics such as CPU usage, memory utilization, bus activity, and I/O bus performance. By continuously monitoring and analyzing server workloads, administrators can proactively identify bottlenecks, balance resource allocation, and make informed decisions to maximize both performance and energy efficiency.
By default, COM automatically enables metrics data collection and utilization alerts. This feature allows COM to gather essential metrics for generating sustainability AI insights, creating utilization reports, and issuing utilization alerts.
-
To check the current configuration status, you can run:
Get-HPECOMMetricsConfiguration -Region $Region
COM metrics provides information on CPU, memory bus, and I/O bus usage. These insights help organizations monitor and manage the performance of their server infrastructure.
-
To view detailed CPU utilization insights for your server, use the following command:
Get-HPECOMServerUtilizationInsights -Region $Region -SerialNumber $SN -CPUUtilization
⚠️ Note
Please be advised that server utilization insights are only for HPE ProLiant Intel based servers and the utilization insight data might not be available at this time.
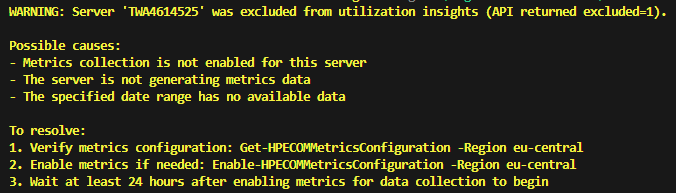
Since your server was only recently added to the COM instance, a minimum of one day is required for sufficient data collection. The screenshot is included to illustrate the anticipated output of the cmdlets after several days of data collection.
-
By default, this cmdlet provides CPU utilization data for the past 90 days. If you want to customize the reporting period, add the
-LookbackDaysparameter. For example, to see CPU utilization insights for the last 7 days, enter:Get-HPECOMServerUtilizationInsights -Region $Region -SerialNumber $SN -CPUUtilization -LookbackDays 7The cmdlet also offers several important metrics:
-
MemoryBusUtilization
-
IOBusUtilization
-
CPUInterconnectUtilization
These measurements give a broad view of your server’s resource usage, allowing you to make smart choices that boost performance and efficiency.
-
Step 2 - Server sustainability insights
The Server Sustainability Insights feature is essential for enhancing data center efficiency and promoting environmentally responsible operations. In today’s landscape, where sustainability is increasingly prioritized, it’s critical to monitor and optimize energy usage across server infrastructure. Compute Ops Management (COM) offers comprehensive sustainability insights by providing detailed reports on energy consumption, carbon dioxide (CO2) emissions, and associated energy costs.
These three report types—covering energy consumption, CO2 emissions, and cost savings—empower organizations to assess, track, and manage the environmental impact of their servers. With these insights, IT teams can make data-driven decisions to reduce their carbon footprint and operational expenses.
-
To access in-depth energy consumption data for a specific server, use the following command:
Get-HPECOMSustainabilityInsights -Region $Region -SerialNumber $SN -EnergyConsumption
By default, similar to the server utilization insights, this cmdlet provides the total estimated figures for the previous 90 days. Specifying your server’s serial number ensures that the results are focused on the server of interest.
⚠️ Note
Please be advised that sustainability insight data will not be available at this time. Since your server was only recently added to the COM instance, a minimum of one day is required for sufficient data collection. The screenshots are included to illustrate the anticipated output of the cmdlets after several days of data collection.
-
If you want to view aggregate sustainability metrics for all servers managed by your COM instance, use the following command:
Get-HPECOMSustainabilityInsights -Region $Region -EnergyConsumptionThis screenshot illustrates the output generated by a COM instance operating with multiple servers:
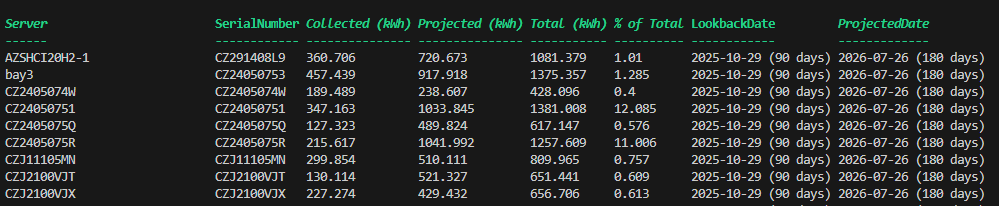
The report provides the total estimated energy consumption (in kilowatt-hours, kWh) for all servers in the specified region. The data includes collected values from the past 90 days (3 months), as well as projected consumption for the next 180 days (6 months) helping with planning and decision-making.
-
To retrieve this summary specifically for the EU Central region, use:
Get-HPECOMSustainabilityInsights -Region eu-central -EnergyConsumptionTotal
-
Additionally, you can explore other sustainability insights by modifying the parameters:
-
-EnergyCost: Displays energy cost data for your servers. -
-Co2Emissions: Provides information about carbon emissions.
-
-
To extend your historical data analysis, you can look back up to 180 days by using the
-LookBackDaysparameter. For example, to estimate future CO2 emissions based on trends from the past 3 months, run:Get-HPECOMSustainabilityInsights -Region $Region -Co2Emissions -LookBackDays 180This command returns projected CO2 emissions, allowing you to better assess and manage the environmental impact of your server operations.
Step 3 - Interacting with iLOs using Compute Ops Management SSO
Direct interaction with iLOs from this library is a key capability that enhances server management efficiency. Starting in January 2025, Compute Ops Management introduced support for single sign-on (SSO) access to iLO, significantly streamlining the authentication process. This advancement enables seamless integration with iLOs, allowing administrators to perform a range of tasks—from executing native iLO API RedFish commands to leveraging the HPEiLOCmdlets module for various iLO operations. The following section outlines how to generate an iLO access token and demonstrates several ways to interact with an iLO, making day-to-day management tasks more intuitive and secure.
To authenticate to your server’s iLO using single sign-on (SSO), follow these 4 steps for clarity and precision:
-
Generate an iLO SSO Session Object
Run the following command to obtain a session object for SSO authentication. Replace with your server’s serial number and ensure
$Regionis set appropriately.$SSOObject = Get-HPECOMServer -Region $Region -Name $SN | Get-HPECOMServeriLOSSO -GenerateXAuthToken -SkipCertificateValidationThis command generates an SSO session object, which you’ll use to authenticate with HPEiLOCmdlets.
-
To view the details of the session object, enter:
$SSOObject
⚠️ Note
SSO is currently not supported by servers managed through HPE OneView via HPE Compute Ops Management - OneView Edition (COM-OVE).
-
Install and import HPEiLOCmdlets
If not already installed, add the HPEiLOCmdlets module to your environment and import it:
Install-Module HPEiLOCmdlets Import-Module HPEiLOCmdlets -
Connect to iLO Using the SSO Token
Use the following command to establish a connection to your iLO, substituting with the appropriate IP address. The SSO token will be passed from the session object.
$connection = Connect-HPEiLO -Address $iLO_IP -XAuthToken $SSOObject."X-Auth-Token" -DisableCertificateAuthenticationIf the connection is successful, no error message will be returned.
-
To verify the connection, inspect the $connection object:
$connection
-
Perform iLO Operations
With the established connection, you can now execute various iLO management tasks. For example, to retrieve the iLO event log, use:
(Get-HPEiLOEventLog -Connection $connection).EventlogThese steps streamline the process of authenticating to iLO using Compute Ops Management SSO and enable you to manage your servers more efficiently with the PowerShell cmdlets.
Step 4 - Testing ILO settings configuration
In this task, you will verify that the iLO settings you configured in your group (Step6 – Task 1) have been correctly applied to your server. Specifically, you will check the AcceptThirdPartyFirmwareUpdates parameter, then change it and observe how COM detects the configuration drift and re-applies the correct settings.
-
Verify the current iLO firmware policy setting
Begin by querying the iLO directly with the HPEiLOCmdlets and your connection object to check the current firmware update policy. Use the following command to retrieve the firmware policy from your iLO:
 $FirmwareUpdatePolicy = Get-HPEiLOFirmwarePolicy -Connection $connection
 $FirmwareUpdatePolicy.Accept3rdPartyFirmware
 $FirmwareUpdatePolicy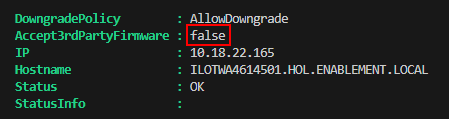
This command should return false, indicating that the AcceptThirdPartyFirmwareUpdates option is set to Disabled as per your group’s iLO policy. With this setting, installation of third-party firmware on your server is blocked, aligning with recommended security best practices.
-
Simulate a configuration drift by changing the setting in COM
Now you will change the iLO setting in COM from Disabled to Enabled to simulate a configuration change. This will cause your server to become non-compliant with the group’s iLO policy. Run this command to update the iLO setting:
Set-HPECOMSettingiLOSettings -Region $Region -Name $iLOSettingName -Description "iLO Settings for AI Servers" -VirtualMedia Enabled -PasswordComplexity Enabled -WebServerSSL Enabled -AcceptThirdPartyFirmwareUpdates Enabled
-
Check the compliance status
After changing the setting, check the group’s compliance status. You should see that the iLO settings are now marked as not compliant because the group policy expects Disabled but the setting now says Enabled:
Get-HPECOMGroup -Region $Region -Name $GroupName -ShowCompliance
The compliance check will show that your server’s iLO configuration no longer matches the group’s iLO policy.
-
Re-apply the correct iLO configuration
Now you will use COM to re-apply the correct iLO configuration to your server. This will change the AcceptThirdPartyFirmwareUpdates parameter back to Enabled on the iLO itself. Run the following command using the Async parameter so you don’t have to wait for the job to complete:
$task = Invoke-HPECOMGroupiLOConfiguration -Region $Region -GroupName $GroupName -ServerSerialNumber $SN -Async
The command returns the job status, indicating that it is currently in a Running state.
-
Monitor the job progress
While the iLO configuration is being applied, you can check the job status using these commands:
 Get-HPECOMJob -Region $Region -Category Group -ShowRunning
 Get-HPECOMJob -Region $Region -Category Group -JobResourceUri $task.resourceUri
Get-HPECOMJob -Region $Region -Category Group
The job will take approximately 1 to 2 minutes to complete.

-
Verify the setting has been applied
Once the job is completed, query the iLO again to verify that AcceptThirdPartyFirmwareUpdates has been changed back to Enabled on your iLO:
 $FirmwareUpdatePolicy = Get-HPEiLOFirmwarePolicy -Connection $connection
 $FirmwareUpdatePolicy.Accept3rdPartyFirmware
 $FirmwareUpdatePolicy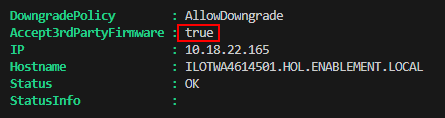
This should now return “true” confirming that COM successfully applied the new iLO configuration to your server.
Key Learnings:
-
Methods for connecting to an iLO via SSO without the requirement of a dedicated iLO account.
-
Techniques for directly querying iLO settings using HPEiLOCmdlets to verify current hardware configurations.
-
Processes by which COM identifies configuration drift when group policies differ from server configurations.
-
Use of Invoke-HPECOMGroupiLOConfiguration to re-apply relevant group policies to designated servers.
-
Approaches for monitoring COM jobs in order to track the progress of configuration changes.
These points illustrate the effectiveness of COM’s policy-based management approach, enabling administrators to specify desired states within group settings and allowing COM to automatically detect and remediate configuration drift across servers.
Task 11 - Clean the lab for the next participant
Before concluding the lab, follow these steps to clean up your environment. Skipping these steps may leave resources locked to your workspace, which could affect future lab sessions.
Step 1 - Remove your server from its service assignment
It is essential to remove a server from its current service assignment before onboarding it to a different workspace. Failure to complete this step will prevent successful reassignment of the server in another environment.
-
Ensure you remove all devices from their service assignment by running:
Get-HPEGLDevice | Remove-HPEGLDeviceFromService
-
Confirm that the server has been removed from its assignment by running:
Get-HPEGLDevice -ShowRequireAssignmentThe expected response should show no more service and region information:

Step 2 - Remove the subscription key
Subscription keys are single-use on the HPE GreenLake platform, so it’s also important to delete your key from your workspace.
-
To delete your subscription key, run:
Get-HPEGLSubscription | Remove-HPEGLSubscription
-
To verify that the subscription key has been removed, the following command should return no response:
Get-HPEGLSubscription
Step 3 - Remove the COM service instance
Next, remove the COM service instance (the $Region you set earlier)
from your workspace. This will permanently remove all the COM resources,
logs and settings you set during this lab. This helps reduce unused
resources and lowers your carbon footprint.
-
To remove the COM service instance, enter:
Get-HPEGLService -ShowProvisioned | Remove-HPEGLServiceThis action is permanent and cannot be undone. When you execute this cmdlet, you will receive a warning at runtime explaining the irreversible nature of the operation. The system will prompt you to confirm your choice.

-
Type
Yand press Enter to proceed with the removal
-
To verify that the COM service instance has been removed, the following command should return no response:
Get-HPEGLService -ShowProvisioned
Step 4 - Disconnect from HPE GreenLake
The cleanup process is now complete. The final task, which cannot be performed within the lab, is the deletion of the workspace itself. This step can only proceed once all associated data—including devices and users—has been removed from your workspace. These actions will be carried out by our lab reset script following this session. Your final responsibility is to disconnect from the HPE GreenLake platform, thereby ending your session and deleting both the temporary API credentials generated during connection and any related environment variables from your command line terminal.
-
Begin by checking which HPE-related environment variables are still active in your session. To do this, run the following command:
Get-Variable -Name hpe*
After completing the removal of the COM service instance in the previous task, you will observe that variables such as
$HPECOMRegionsare now empty. This confirms that the related resources have been successfully deleted from your environment. -
To complete your session and disconnect from the HPE GreenLake platform, enter:
Disconnect-HPEGL
This command will terminate your session, remove any temporary API credentials, and clear related environment variables from your command line terminal.
-
To ensure all environment variables have been cleared from your session, run the following command one final time:
Get-Variable -Name hpe*
This will display any remaining HPE-related variables. You may notice that several variables, such as
$HPEGreenLakeSession(session information),$HPECOMInvokeReturnData(recent request output),$HPEGLAPIClientCredentialName(API credentials created during login), and$HPEGLworkspaces(workspace references) are no longer present, confirming their successful removal.
Task 12 - Explore Zero Touch Automation with the Sample Script (Optional)
If you would like to see the true value of this library, you can run the Zero Touch Automation script available on GitHub: https://github.com/jullienl/HPE-COM-PowerShell-Library/blob/main/Examples/COM-Zero-Touch-Automation.ps1. This script offers complete end-to-end automation for everything you’ve accomplished in this lab, but this time through scripting. It demonstrates the power of the library by automating the entire lifecycle—from workspace provisioning and server configuration to policy management and scheduling a firmware update—all in one go. You’ll receive results messages for each step, making it easy to track progress.
-
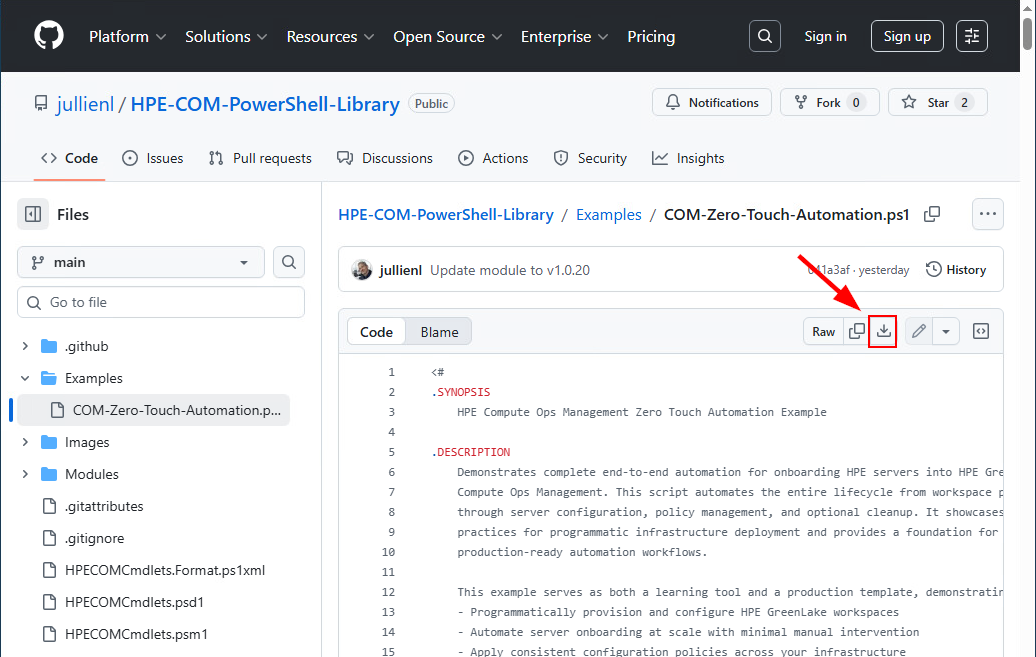
Open Chrome and visit https://github.com/jullienl/HPE-COM-PowerShell-Library/blob/main/Examples/COM-Zero-Touch-Automation.ps1
-
Click Download raw file.
-
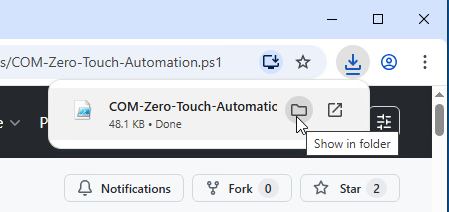
Chrome automatically saves the script to your desktop’s download folder; click Show in folder:
-
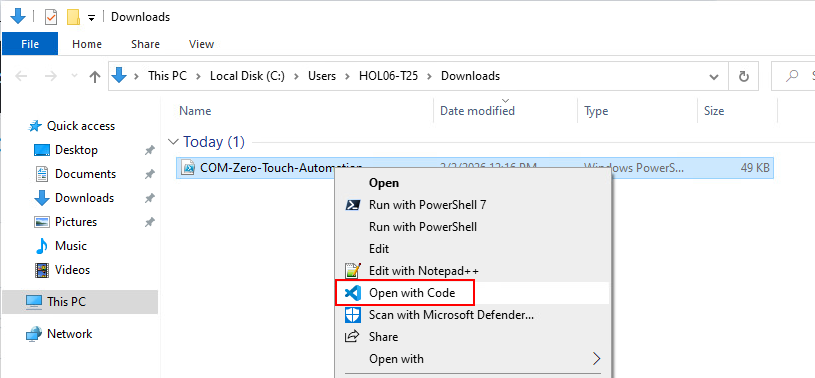
Then right-click the script and select Open with Code.
-
Update these 5 variables using your HPE account information and team details, which you can find in the lab’s login sheet:
-
For
$MyEmail, at line 251, substitute the value with your HPE account email you used earlier to connect to HPE GreenLake:
-
For
$AdditionalUser, at line 255, enter admin@hpelabs.us as shown below, replacing the existing value: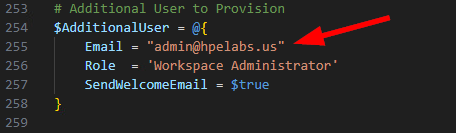
-
For
$SubscriptionKeys, at line 278, delete the second key and add the subscription key from the login sheet (make sure you remove the comma at the end of the line):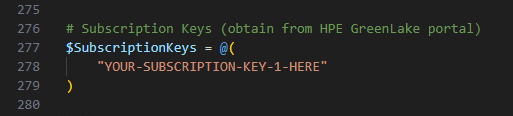
-
For
$Servers, at lines 282+, substitute the value with your server’s details (iLO IP and iLO password) found in the login sheet and remove the second server entry like below: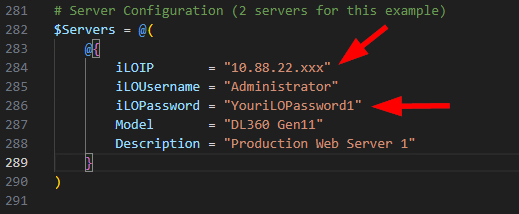
-
For
$ParkingLotWorkspace, at line 343, substitute the value with the name of your generated workspace. You may run$WorkspaceNameto retrieve the name you configured previously
-
-
After you finish changing the variables, save the file (File /Save) and switch back to the PowerShell terminal.
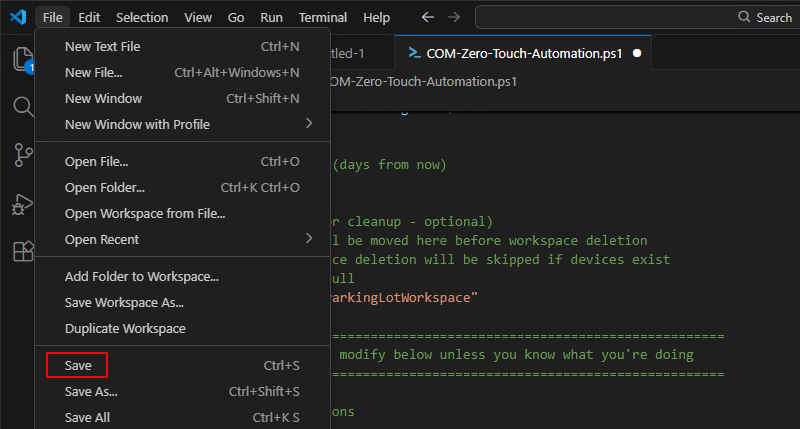
-
Navigate to the Download folder:
cd Download -
Set the execution policy:
Set-ExecutionPolicy -ExecutionPolicy Bypass -Scope Process -
Run the script:
.\COM-Zero-Touch-Automation.ps1 -
Enter your password when prompted.
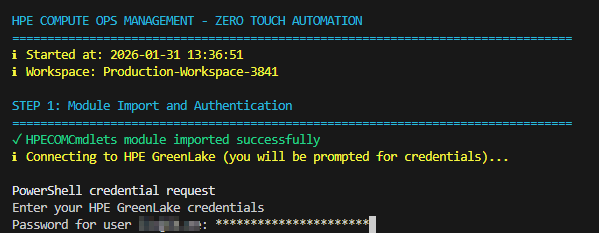
-
After provisioning is finished, you can check how long it took.
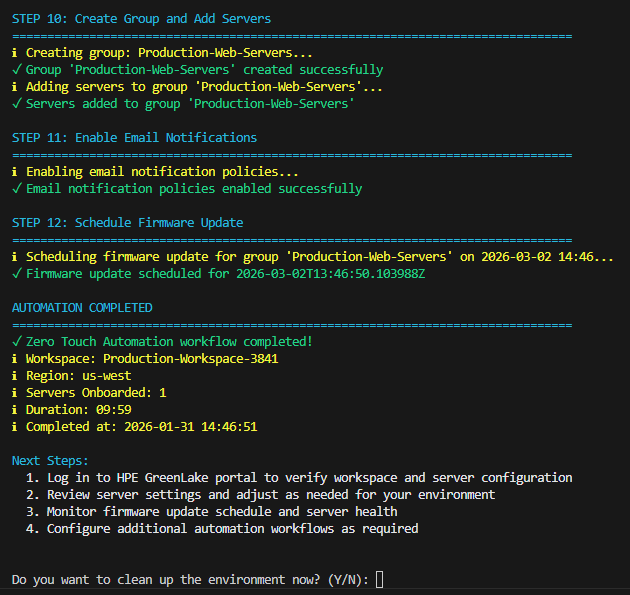
-
Then, press
Ywhen prompted with “Do you want to clean up the environment now? (Y/N)” to begin deprovisioning, which will remove everything, even the newly created workspace.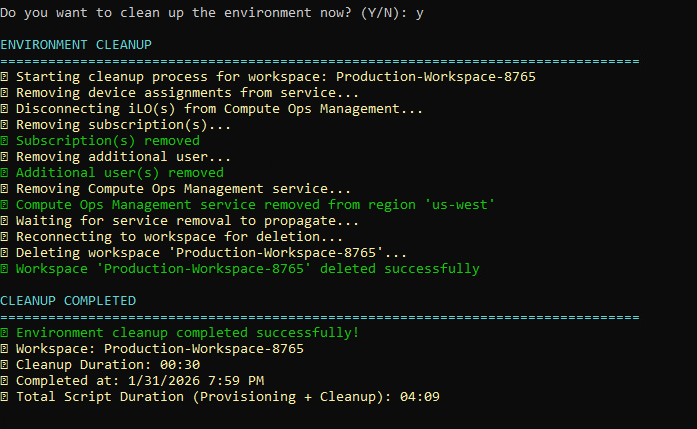
This completes the automation workflow, ensuring that your environment is both provisioned and then properly cleaned up, leaving no residual resources.
Leveraging this script with the PowerShell library for Compute Ops Management (COM) dramatically accelerates and streamlines the resource management process within the HPE GreenLake platform. Tasks that would traditionally require manual intervention—such as provisioning, configuration, and deprovisioning—are executed in a fraction of the time, minimizing human error and operational delays. By automating these critical steps, administrators can efficiently scale operations, maintain consistency, and respond rapidly to changing business needs, all while ensuring that resources are optimally utilized and securely managed from start to finish.
With this final step complete, you have successfully concluded the hands-on lab experience.
Summary
Throughout this lab, you explored how to automate server lifecycle management using the HPE Compute Ops Management PowerShell module. You:
-
Installed the HPECOMCmdlets library and authenticated to HPE GreenLake.
-
Created a workspace, added a user, provisioned a COM instance, configured a location, and installed a subscription key.
-
Onboarded a server to COM using an activation key, assigned location and tags, and verified device status.
-
Created configuration policies for BIOS, storage, firmware, and iLO, then applied them through a server group.
-
Checked and enforced compliance, monitored jobs, and retrieved detailed inventory, health, alerts, support, and warranty data.
-
Used COM SSO to access iLO, detected configuration drift, and automatically re‑applied policy.
-
Explored firmware compliance, scheduled updates, utilization insights, and sustainability metrics.
-
Finished by cleaning the lab: removed device assignments, deleted subscriptions, deleted the COM service instance, and disconnected.
-
Finally, executed the COM-Zero-Touch-Automation PowerShell script to automate and streamline the entire configuration workflow—from provisioning and policy application to deprovisioning—enabling consistent, efficient, and error-free server management within the HPE GreenLake platform.
Completing this lab provides you with a practical, end‑to‑end understanding of automated server management, enabling faster deployments, consistent configuration at scale, reduced manual effort, and improved operational reliability. It equips you with skills to streamline onboarding, enforce policy‑driven governance, automate compliance, and leverage sustainability and utilization insights for smarter infrastructure decisions.
Want more?
🚀 Looking to automate the onboarding of HPE servers into HPE GreenLake and Compute Ops Management, see Onboarding-Script.
🚀 Looking to demonstrate the power of scripting with HPE GreenLake and Compute Ops Management, see HPE Compute Ops Management Zero Touch Automation Example. This script automates the entire lifecycle from workspace provisioning through server configuration, policy management, and optional cleanup. It showcases best practices for programmatic infrastructure deployment and provides a foundation for building production-ready automation workflows.
🔔 Explore a variety of sample scripts designed for the Compute Ops Management API, including Ansible playbooks, PowerShell, and Python scripts. These resources offer practical examples to help automate and streamline server management tasks. Visit the GitHub project.
🛠️ Interested in using Ansible with COM? Visit this open source GitHub project dedicated to server provisioning. Originally developed to support ESXi, RHEL, and Windows Server platforms, the project demonstrates extensive COM API capabilities—from initial setup (Day 0 operations), through activation and configuration (Day 1), to ongoing management and maintenance (Day 2), such as automated firmware updates.
🖥️ When you’re ready to dive deeper, schedule a personalized session on the HPE Demonstration Portal.
✨ You can also request a 90-day evaluation of Compute Ops Management to experience its full capabilities.
your hub for all HPE software-related content!