Automating IT Operations with Compute Ops Management Webhooks
Jump to:
- What are webhooks?
- The magic of automation
- Available resources in Compute Ops Management
- Filtering options
- Secure handshake mechanism
- Securing webhook events with a shared secret
- Integrating COM webhooks with automation tools
- Using the Make On-premise agent
- Taking automation a step further?
- A production-ready reference implementation
- Wrapping up
In today’s fast-paced digital landscape, operational efficiency isn’t just nice to have; it’s a cornerstone of success. But what if I told you there’s a secret weapon that can turbocharge your operational processes? Enter webhooks—an incredibly powerful tool when integrated with HPE GreenLake for Compute Ops Management (COM).
Imagine having a high-powered alert system not just sounding alarms, but also triggering actions in real-time. That’s exactly what webhooks do! They’re like digital workhorses, tirelessly communicating between applications and kicking off automated workflows with precision.
Now, let’s peel back the layers to discover how this impacts organizations like yours.
What are webhooks?
At their core, webhooks are automated messages sent from apps when something happens. They’re a way for apps to communicate and pass information along instantly, setting off a chain reaction of tasks without the need for manual intervention.
The magic of automation
With Compute Ops Management, webhooks offer a seamless avenue for triggering events across your systems. When a specific event occurs—be it an outage, a new alert raised or a new server connection—webhooks spring into action, notifying your other tools and services, and initiating predefined operations tasks.
This integration translates to fewer hours lost to manual monitoring and more time reclaimed for innovation and strategy. It’s about letting technology take the wheel when it comes to routine, yet critical, tasks.
Take a common webhook use case: If a server unexpectedly goes offline—whether due to manual intervention or an automated script—a webhook can react immediately by dispatching an email notification to the relevant personnel and concurrently logging an incident in a designated database. This proactive approach ensures that teams are promptly alerted, allowing for swift action and minimizing potential downtime or disruptions.
In a webhook scenario, there is typically a source application (i.e., Compute Ops Management) that sends event notifications to a webhook endpoint (the destination URL) which is set up to receive and process these events.
(resource data)-->B
Here’s a simple sequence diagram that illustrates a webhook process with COM:
[Webhook endpoint] participant Handler as Event Handler User->>SourceApp: Perform action Note over SourceApp: Trigger event SourceApp->>WebhookURL: POST /event WebhookURL->>Handler: Invoke handler Handler->>WebhookURL: Process event
Description of the different steps:
-
Initiating the Process
A user starts interacting with Compute Ops Management or a specific state change occurs within the application, this is the point at which a webhook journey starts. -
The Trigger Event
As soon as a user performs an action or a specific state change occurs within the application, an event is triggered within Compute Ops Management. This event could be any number of activities pre-defined by the administrator as noteworthy—ranging from the deletion of a server group to the completion of a server firmware update, the addition of a new server, or the occurrence of unplanned events such as a server failure or an alert. -
Sending the Notification
The next step is crucial. Once an event occurs, Compute Ops Management—the source application—formulates an HTTP POST request. This request contains information about the event, essentially providing the most recent representation of the resource associated with that event. This POST request is directed towards a specific URL—the webhook URL—which is pre-configured to listen for such calls. -
Processing the Event
Upon receiving the POST request, the destination application at the webhook URL kicks into action. An event handler takes over, which is essentially a piece of code designed to process the incoming data. This handler might update a database, send out notification emails, or trigger other workflows as required. -
Completing the Loop
After the event has been processed according to the instructions laid out in the event handler, the loop comes to a close. The workflow ends until a new event is triggered, and the process starts all over again.
Available resources in Compute Ops Management
The concept of available resources in the context of webhooks refers to the different types of events or actions within an application or service that a webhook can be configured to listen for. With Compute Ops Management, you can be set up webhooks to monitor a large range of event resources such as servers, alerts, groups, server settings, jobs, compliance checks, and firmware bundles.
The process of creating webhooks in Compute Ops Management and the various resource types that are available are documented in the API documentation.
For each resource, certain specific properties are capable of initiating the dispatch of a webhook. These triggers are detailed in the table below:
| Resource Type | API Documentation | Monitorable Properties |
|---|---|---|
compute-ops/server |
Get v1 server by ID | hardware, state, firmwareInventory, softwareInventory, lastFirmwareUpdate, tags, autoIloFwUpdate |
compute-ops/alert |
Get v1 server alerts | N/A - no specific properties can be monitored. Will only send Created and Deleted events |
compute-ops/group |
Get v1beta2 group by ID | name, autoFwUpdateOnAdd, groupComplianceStatus, serverSettingsUris, devices, serverPolicies, autoAddServerTags |
compute-ops/server-setting |
Get v1beta1 server settings by ID | name, settings |
compute-ops/job |
Get v1beta3 job by ID | state |
compute-ops/group/compliance |
Get v1beta2 compliance by compliance ID | complianceStatus |
compute-ops/firmware-bundle |
Get v1beta2 firmware bundle by id | advistories, isActive |
More information about these monitorable properties can be found in the related API documentation which is linked in this table.
Filtering options
When setting up webhooks in Compute Ops Management, it is mandatory to specify filters using the eventFilter property. These filters determine which event payloads the webhook will transmit to its designated endpoint. The webhook operates on an opt-in basis, meaning that only events that align with the criteria defined in the eventFilter are dispatched to the receiving URL.
The following example illustrates a typical POST request payload that includes five mandatory attributes required to define a webhook via the COM API:
{
  "name": "Webhook for any server events whose health summary transitions out of an OK state",
  "destination": "https://webhook-test.com/baea2fa0f8be4d546445c98253392058",
  "state": "ENABLED",
  "eventFilter": "type eq 'compute-ops/server' and old/hardware/health/summary eq 'OK' and changed/hardware/health/summary eq True",
  "headers": {
  }
}
Filters defined by the eventFilter property can be based on various attributes such as:
- Event types: Using expressions like
type eqto match on the resource type. - Event operations: Specifying the operation with
operation eq Created,Deleted, orUpdated. - Event changes: Indicating modifications with
new,old, andchangedwhich relate to custom fields in the API’s payload structure.
The specifics of these filter attributes are described in the following table:
| Property | Description | Example Values | Example eventFilter | Result |
|---|---|---|---|---|
type |
Allows matching on resource types | compute-ops/job, compute-ops/server |
type eq 'compute-ops/job' |
Match all events related to jobs |
operation |
Allows matching on different operations | Created, Deleted, Updated |
type eq 'compute-ops/alert' and operation eq 'Created' |
Match all events related to created alerts |
changed |
Allows matching on monitorable properties if the value has changed | changed/name, changed/state |
type eq 'compute-ops/group' and changed/name eq True |
Match any events related to groups whose name property changed |
new |
Allows matching on monitorable properties of the current state of the resource | new/complianceStatus, new/isActive |
type eq 'compute-ops/group' and new/groupComplianceStatus ne 'Compliant' |
Match any events related to groups whose groupComplianceStatus is not currently Compliant |
old |
Allows matching on monitorable properties of the previous state of the resource | old/devices, old/settings |
type eq 'compute-ops/group' and old/name eq 'Group Name' |
Match any events related to a group whose previous name was "Group Name" until the group's name is changed again |
name |
Alias for new/name |
type eq 'compute-ops/group' and name ne 'New Group' |
Match any events related to groups whose current name is not "New Group" |
New and Old
new and old can be employed to determine when to trigger webhooks based on changes in data. These filters can be used to monitor for specific updates or modifications that occur.
When an event occurs that modifies data, the system can look at the new state (the updated data) and the old state (the data before it was updated). Using these two snapshots, you can apply filters to decide whether to fire a webhook.
Suppose a group named “Group1” is created at the initial stage (referred to as event 0) and then, after a sequence of n events, its name is altered to “Group2”. Using a filter with criteria such as type eq 'compute-ops/group' combined with new/name eq 'Group1', you would capture all events from the start (event 0) up to but not including the event where the change occurs (event n-1). In contrast, if the filter is set to old/name, it targets a different set of events, in this case from event 1 through to the event where the update happens (event n).
OData style filters
Filters use OData style filters as described in the HPE GreenLake specification.
The general syntax for an OData filter looks like property op value with:
propertyrefers to the field or property to filter on in the entity.opis the operator, such aseq(equals),ne(not equal),gt(greater than),ge(greater or equal),lt(less than),le(less or equal), etc.valueis the value to compare against the property.
Logical Operators can also be used to combine conditions using and, or, and not. The nesting separator to specify a nested resource is / (e.g. property eq 'compute-ops/group').
Filter examples
Filtering with OData allows for both simple and complex querying possibilities, here are some examples:
-
To receive webhooks for all servers that transition to an unhealthy status (raise):
type eq 'compute-ops/server' and old/hardware/health/summary eq 'OK' and changed/hardware/health/summary eq True=> Match any server events whose health summary transitions out of an
OKstate -
To receive webhooks for all servers that recover to a healthy status (clear):
type eq 'compute-ops/server' and new/hardware/health/summary eq 'OK' and changed/hardware/health/summary eq True=> Match any server events whose health summary transitions back into an
OKstateNote: This is the mirror image of the previous filter. The raise filter keys off
old/...summary eq 'OK'(the server was healthy and just left that state), whereas the clear filter keys offnew/...summary eq 'OK'(the server is now healthy again after having been degraded). Together they capture both edges of the health transition. See Pairing raise and clear webhooks for ticketing systems below for how these two are typically used together. -
To receive webhooks for all servers that are shut down (raise):
type eq 'compute-ops/server' and old/hardware/powerState eq 'ON' and changed/hardware/powerState eq True=> Match any server events whose power state transitions from
ONtoOFFNote: Make sure that the Boolean value
Trueis used without quotes, as it represents a logical Boolean change (TrueorFalse) for thepowerStateproperty.oldspecifies the previous state of thepowerStateproperty (ON). -
To receive webhooks for all servers that are powered back on (clear):
type eq 'compute-ops/server' and new/hardware/powerState eq 'ON' and changed/hardware/powerState eq True=> Match any server events whose power state transitions back to
ONNote: This is the mirror of the previous filter — the raise keys off
old/...powerState eq 'ON'(the server was on and just went off), whereas the clear keys offnew/...powerState eq 'ON'(the server is now back on). See Pairing raise and clear webhooks for ticketing systems. -
To receive webhooks for all servers that get disconnect from Compute Ops Management (raise):
type eq 'compute-ops/server' and old/state/connected eq True and changed/state/connected eq True=> Match any server events whose connected state transitions from
TruetoFalseNote: The
connectedproperty of the servers API is a Boolean as indicated in the API reference, therefore ensure you use the Boolean valueTruewithout enclosing it in quotation marks as they represent Boolean literals for both expressions because quotation marks would indicate a string type rather than a Boolean type: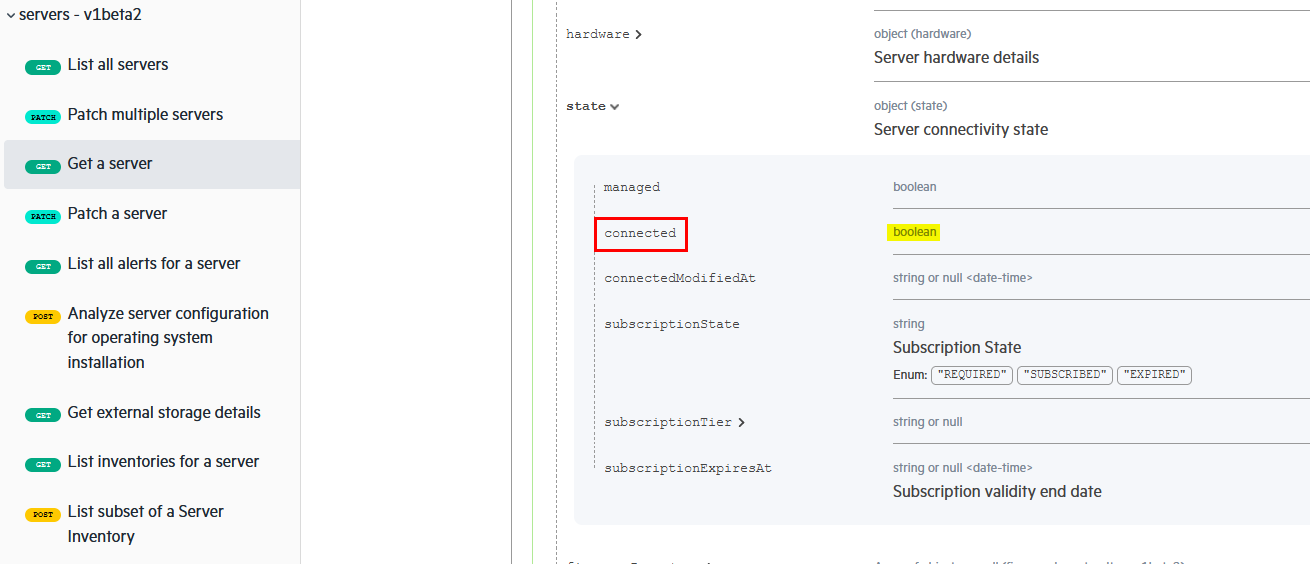
-
To receive webhooks for all servers that reconnect to Compute Ops Management (clear):
type eq 'compute-ops/server' and old/state/connected eq False and changed/state/connected eq True=> Match any server events whose connected state transitions out of a
falsestate, which occurs after the iLO establishes (or re-establishes) a connection with COMNote: This is the mirror of the disconnect filter above and closes the loop: the disconnect filter (
old/state/connected eq True) is the raise, and this one (old/state/connected eq False) is the clear. The same filter also matches a brand-new server connecting to COM for the first time. See Pairing raise and clear webhooks for ticketing systems. -
To receive webhooks for all jobs that run a server firmware update:
type eq 'compute-ops/job' and contains(name, 'FirmwareUpdate.New') and new/state eq 'RUNNING'=> Match any firmware update job events that have a new
stateset toRUNNING -
To receive webhooks for all events within a specified group:
type eq 'compute-ops/group' and contains(name, 'Production')=> Match all group events that have a
namecontaining “Production” -
To receive webhooks for all new firmware bundles that are available:
type eq 'compute-ops/firmware-bundle' and operation eq 'Created'=> Match all events related to created firmware bundles
-
To receive webhooks for all servers added to COM that require activation:
type eq 'compute-ops/server' and operation eq 'Created'=> Match any events related to servers that are assigned to a COM instance but with iLOs not connected to COM
Pairing raise and clear webhooks for ticketing systems
When you integrate COM webhooks with a ticketing or event-management system (ServiceNow, Jira, PagerDuty, an ITSM tool, etc.), you rarely want to be notified of a problem only. You also want the case that was opened for that problem to be closed automatically once the condition clears, so that operators are not left manually reconciling stale tickets.
This is where a key characteristic of COM webhooks matters: a webhook is opt-in and single-directional. Its eventFilter describes one transition, and COM only sends the events that match it. A single filter such as old/hardware/health/summary eq 'OK' and changed/hardware/health/summary eq True captures the moment a server leaves the healthy state, but it will never fire when the server recovers. There is no “both directions” operator.
The common pattern is therefore to create two webhooks that point to the same destination URL, one for the raise transition and one for the clear transition:
| Purpose | Ticketing action | eventFilter |
|---|---|---|
| Raise (fault appears) | Open / create the ticket | type eq 'compute-ops/server' and old/hardware/health/summary eq 'OK' and changed/hardware/health/summary eq True |
| Clear (fault resolved) | Resolve / close the ticket | type eq 'compute-ops/server' and new/hardware/health/summary eq 'OK' and changed/hardware/health/summary eq True |
A few practical points when implementing this pattern:
- Correlate the two events. Your receiver needs to match the clear against the ticket opened by the raise. Use a stable identifier from the payload (for example the server’s
id/serial, and ideally the affected component) as the ticket’s correlation/deduplication key, so the clear closes the right ticket. - The same idea applies to any monitorable transition, not just health. You can pair power state (
powerStateON↔OFF), connectivity (state/connectedTrue↔False), or group compliance (groupComplianceStatusCompliant↔not compliant) the same way — one webhook per direction. - Alerts are a different model. The
compute-ops/alertresource only emitsCreatedandDeletedevents (no property transitions). If you prefer to drive tickets from alerts rather than from health transitions, mapoperation eq 'Created'to open andoperation eq 'Deleted'to close instead. - Both webhooks share the destination, but are independent objects — each has its own
id, its own handshake, and its own status in COM. Enable, disable, or rotate the shared secret on each one individually.
Secure handshake mechanism
Compute Ops Management uses webhook verification through challenges in headers. This is a common security measure used by providers to verify the receiver’s endpoint authenticity before starting to send webhook data.
Here’s an overview of typical API request interactions that take place between Compute Ops Management and a webhook endpoint when a user initiates webhook creation:
(webhook receiver's endpoint) User->>SourceApp: POST /webhooks Note right of User: Webhook creation
with among others
destination and filter
in json payload SourceApp->>User: 201 Created Note left of SourceApp: Acknowledge creation response
Returns webhook id
and webhook status as `PENDING` SourceApp->>WebhookURL: Verification GET Request (Challenge) Note right of SourceApp : Send request with a verification header:
x-compute-ops-mgmt-verification-challenge:<token> WebhookURL->>SourceApp: Challenge response Note left of WebhookURL : Response must return:
verification:<token>
content-type: application/json
status code: 200 User->>SourceApp: GET /webhooks/<id> Note right of User: Retrieve webhook <id> information SourceApp->>User: webhook data response Note left of SourceApp: Returns webhook status as `ACTIVE`
Description of the different requests:
-
Stage 1: Webhook creation (API Reference)
-
POSTRequest: Compute Ops Management offers an API that lets you register your webhook endpoint by sending a POST request containing the URL of your webhook listener, the events you wish to subscribe to, a name, a state and a header:POST /compute-ops-mgmt/v1beta1/webhooks Content-Type: application/json{ "name": "Webhook event for servers that get unhealthy", "destination": "https://hook.eu2.make.com/4wt8t3dswckl1s7hm98jilgv5fg6p", "state": "ENABLED", "eventFilter": "type eq 'compute-ops/server' and old/hardware/health/summary eq 'OK' and changed/hardware/health/summary eq True", "headers": { } }When creating a webhook, five attributes are mandatory however it is not necessary to include extra headers so the
headersfield can be defined as an empty object{}at the time of creation.
-
-
Stage 2: Creation confirmation response
-
Compute Ops Management acknowledges the creation and sends back a confirmation response. This response includes a
"status": "PENDING"and anidassociated with the webhook creation.HTTP/1.1 201 Created{ "name": "Webhook event for servers that get unhealthy", "destination": "https://hook.eu2.make.com/4wt8t3dswckl1s7hm98jilgv5fg6p", "state": "ENABLED", "eventFilter": "type eq 'compute-ops/server' and old/hardware/health/summary eq 'OK' and changed/hardware/health/summary eq True", "type": "compute-ops-mgmt/webhook", "id": "200039ff-0c27-4d1f-aa7b-791d40dc4348", "generation": 1, "createdAt": "2024-04-16T15:22:58.205785Z", "updatedAt": "2024-04-16T15:22:58.245366Z", "status": "PENDING", "statusReason": "User enabled the webhook.", "resourceUri": "/compute-ops-mgmt/v1beta1/webhooks/200039ff-0c27-4d1f-aa7b-791d40dc4348", "deliveriesUri": "/compute-ops-mgmt/v1beta1/webhooks/200039ff-0c27-4d1f-aa7b-791d40dc4348/deliveries" }
-
-
Stage 3: Verification Challenge
-
GETRequest / Challenge-Response: Compute Ops Management sends a verification challenge to ensure the endpoint is valid before sending actual event data. The challenge involves the webhook endpoint responding with a specific body that includes the challenge string.GET https://hook.eu2.make.com/4wt8t3dswckl1s7hm98jilgv5fg6p Header: x-compute-ops-mgmt-verification-challenge: <verification_value>
-
-
Stage 4: Challenge response
-
The webhook endpoint responds to the verification challenge by returning the challenge parameter received in the GET request. This confirms to Compute Ops Management that the endpoint is prepared to receive events.
HTTP/1.1 200 OK Content-Type: application/json{ "verification": "<verification_value>" }If the endpoint fails to respond with a response body containing the verification key and the corresponding string from the header, the webhook handshake will fail, leaving the webhook disabled.
-
-
Stage 5: Webhook verification
-
GETRequest: The user retrieves webhook details usingid, the webhook identifier associated with webhook creation.GET /compute-ops-mgmt/v1beta1/webhooks/200039ff-0c27-4d1f-aa7b-791d40dc4348
-
-
Stage 6: Webhook data response
-
After a successful handshake, the Compute Ops Management response to the webhook GET request is:
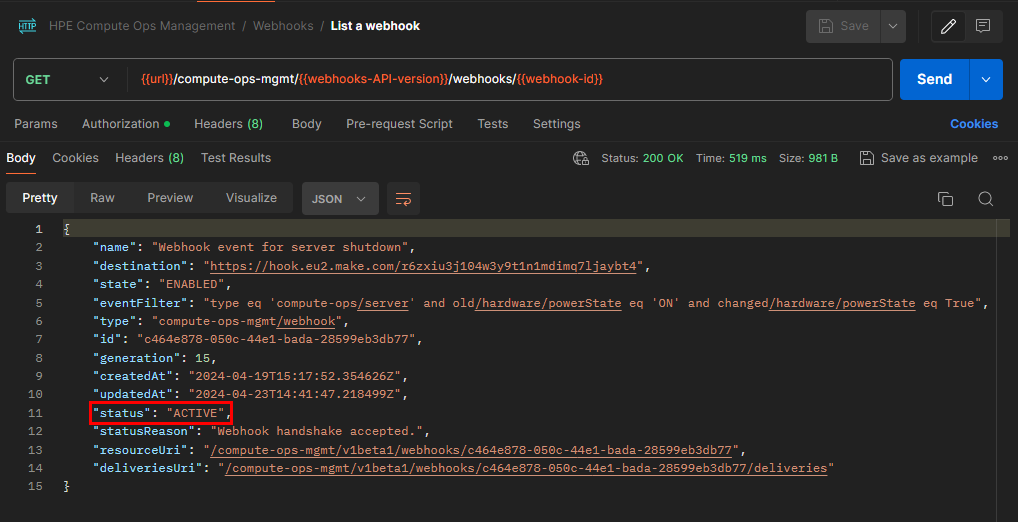
HTTP/1.1 200 OK{ "name": "Webhook event for servers that get unhealthy", "destination": "https://hook.eu2.make.com/4wt8t3dswckl1s7hm98jilgv5fg6p", "state": "ENABLED", "eventFilter": "type eq 'compute-ops/server' and old/hardware/health/summary eq 'OK' and changed/hardware/health/summary eq True", "type": "compute-ops-mgmt/webhook", "id": "200039ff-0c27-4d1f-aa7b-791d40dc4348", "generation": 1, "createdAt": "2024-04-16T15:22:58.205785Z", "updatedAt": "2024-04-16T15:22:58.245366Z", "status": "ACTIVE", "statusReason": "Webhook handshake accepted.", "resourceUri": "/compute-ops-mgmt/v1beta1/webhooks/200039ff-0c27-4d1f-aa7b-791d40dc4348", "deliveriesUri": "/compute-ops-mgmt/v1beta1/webhooks/200039ff-0c27-4d1f-aa7b-791d40dc4348/deliveries" }The webhook transitions to a
stateofENABLEDand astatusofACTIVEwhen the endpoint successfully responds with the expected verification body and returns a200status code. In addition,statusReasonindicatesWebhook handshake accepted. -
After an unsuccessful handshake, the response is:
HTTP/1.1 200 OK{ "name": "Webhook event for servers that get unhealthy", "destination": "https://hook.eu2.make.com/4wt8t3dswckl1s7hm98jilgv5fg6p", "state": "DISABLED", "eventFilter": "type eq 'compute-ops/server' and old/hardware/health/summary eq 'OK' and changed/hardware/health/summary eq True", "type": "compute-ops-mgmt/webhook", "id": "200039ff-0c27-4d1f-aa7b-791d40dc4348", "generation": 1, "createdAt": "2024-04-16T15:22:58.205785Z", "updatedAt": "2024-04-16T15:22:58.245366Z", "status": "WARNING", "statusReason": "Incorrect handshake response.", "resourceUri": "/compute-ops-mgmt/v1beta1/webhooks/200039ff-0c27-4d1f-aa7b-791d40dc4348", "deliveriesUri": "/compute-ops-mgmt/v1beta1/webhooks/200039ff-0c27-4d1f-aa7b-791d40dc4348/deliveries" }The webhook transitions to a
stateofDISABLEDand astatusofWARNINGwhen the endpoint fails to respond with the expected body or when it returns a non-200 status code. In addition,statusReasonindicatesIncorrect handshake response.
-
Securing webhook events with a shared secret
The handshake mechanism described above validates your endpoint to COM, but it does not solve the reverse problem: how does your endpoint know that an incoming request genuinely comes from COM?
By design, a webhook destination must be publicly reachable so that COM can post events to it. Unfortunately, “publicly reachable” also means that anyone on the internet who discovers your destination URL can send POST requests to it. Without an additional check, a malicious caller could inject forged events into your pipeline, resulting in bogus notifications, false tickets, or even a denial-of-service flood.
This is where the headers property of the webhook definition becomes useful. So far in this article the headers field has been left empty ({}), but it is designed precisely for this purpose: any key/value pair you define there, COM attaches to every webhook request it sends to your destination. By placing a secret token in this field, you create a shared secret that only COM and your receiver know.
Defining the shared secret at webhook creation
When creating (or updating) the webhook, add a custom header containing a long, random, unguessable value:
{
"name": "Webhook event for servers that get unhealthy",
"destination": "https://example.com/webhookDestination",
"state": "ENABLED",
"eventFilter": "type eq 'compute-ops/server' and old/hardware/health/summary eq 'OK' and changed/hardware/health/summary eq True",
"headers": {
"X-Webhook-Secret": "s3cr3t-long-random-value-only-COM-and-your-endpoint-know"
}
}
From now on, every event COM delivers to your destination will carry the header X-Webhook-Secret: s3cr3t-....
Treat the webhook creation payload as sensitive, since it contains your secret. You can pick any header name you like (e.g.
X-Webhook-Secret,X-Api-Key), as long as your receiver checks for the same one.
Validating the shared secret at the receiver
Your event handler must then inspect this header on every incoming POST request, before processing the payload:
EXPECTED_SECRET = get_secret("webhook-shared-secret") # from a vault / secrets manager
def handle_webhook(request):
received = request.headers.get("X-Webhook-Secret")
# Constant-time comparison to avoid timing attacks
if not received or not hmac.compare_digest(received, EXPECTED_SECRET):
return Response(status=401) # Reject: not from COM
process_event(request.body) # Accept: genuine COM event
return Response(status=200)
- If the header matches, the caller knows the secret, so the request came from your COM webhook and is processed.
- If the header is missing or incorrect, the request is rejected (
401/403) and dropped, so forged events from anonymous callers never enter your workflow.
This is the same shared-secret model used by providers such as GitHub and Stripe to authenticate their webhook calls.
The following diagram illustrates the decision the receiver makes on each incoming request:
to webhook destination"] --> B{"Is the shared
secret header
present?"} B -- No --> R["Reject
HTTP 401 / 403"] B -- Yes --> C{"Does it match the
expected secret?
(constant-time compare)"} C -- No --> R C -- Yes --> P["Accept
Process the event
HTTP 200"] R --> Z["Event dropped
(never enters workflow)"]
Security considerations
A few important points to keep in mind when relying on this mechanism:
| Consideration | Detail |
|---|---|
| Always use HTTPS | The header is transmitted in clear text inside the request. TLS is what prevents it from being intercepted in transit, so your destination must be an https:// endpoint. |
| Shared secret, not a signature | COM sends a static header value (a bearer-style secret), not an HMAC signature computed over the payload. It proves the caller knows the secret, but does not, on its own, guarantee that the body was not altered. Over HTTPS this is generally sufficient. |
| Constant-time comparison | Compare the header using a constant-time function (e.g. hmac.compare_digest) to avoid leaking information through timing attacks. |
| Store secrets securely | Never hard-code the secret. Keep it in a secrets manager (e.g. HashiCorp Vault, Azure Key Vault, AWS Secrets Manager) on the receiver side. |
| Rotate periodically | To rotate the secret, PATCH the webhook headers with the new value and update your receiver’s stored secret accordingly. |
Combining the handshake (which authenticates your endpoint to COM) with a shared secret header (which authenticates COM to your endpoint) gives you mutual assurance: COM knows it is talking to the right receiver, and your receiver knows it is processing genuine COM events.
Integrating COM webhooks with automation tools
To manage webhook events, you can use any programming language—such as Node.js, Python, or PHP—to set up a server that listens for webhook events. Alternatively, you can use tools like Zapier or Make (formerly known as Integromat), which have become very popular in the no-code/low-code arena. There are also solutions available from major providers like Google Cloud, Amazon Web Services (AWS), and Microsoft Azure.
Typical scenarios involving these tools include responding to server lifecycle events (e.g., startup, shutdown), auto-provisioning actions based on new server connections, handling maintenance notifications (such as when new firmware bundles are released), and deploying server updates. These tools help automate responses to webhooks for operational efficiency and provide real-time updates within the IT infrastructure.
When an event occurs—for instance, a server shutdown—Compute Ops Management sends a webhook to the configured endpoint with details. The receiver can then:
- Log the event in a third-party application like a CSV file, Google Sheets, Notion database, Airtable, etc.
- Send alerts via email, SMS, or chat applications such as Slack
- Trigger backup procedures
- Scale down operations in a load balancer
- Create a record in ServiceNow
And more - there are numerous potential applications!
A step-by-step workflow creation guide with Make
To illustrate this, let’s explore how to create a typical workflow using Make (formerly known as Integromat).
Make is a powerful no-code/low-code automation tool that greatly enhances Compute Ops Management’s webhook capabilities to streamline and automate workflows without requiring extensive coding knowledge. With its intuitive visual interface, complex integrations between various online services become much simpler, significantly reducing the time spent on manual tasks.
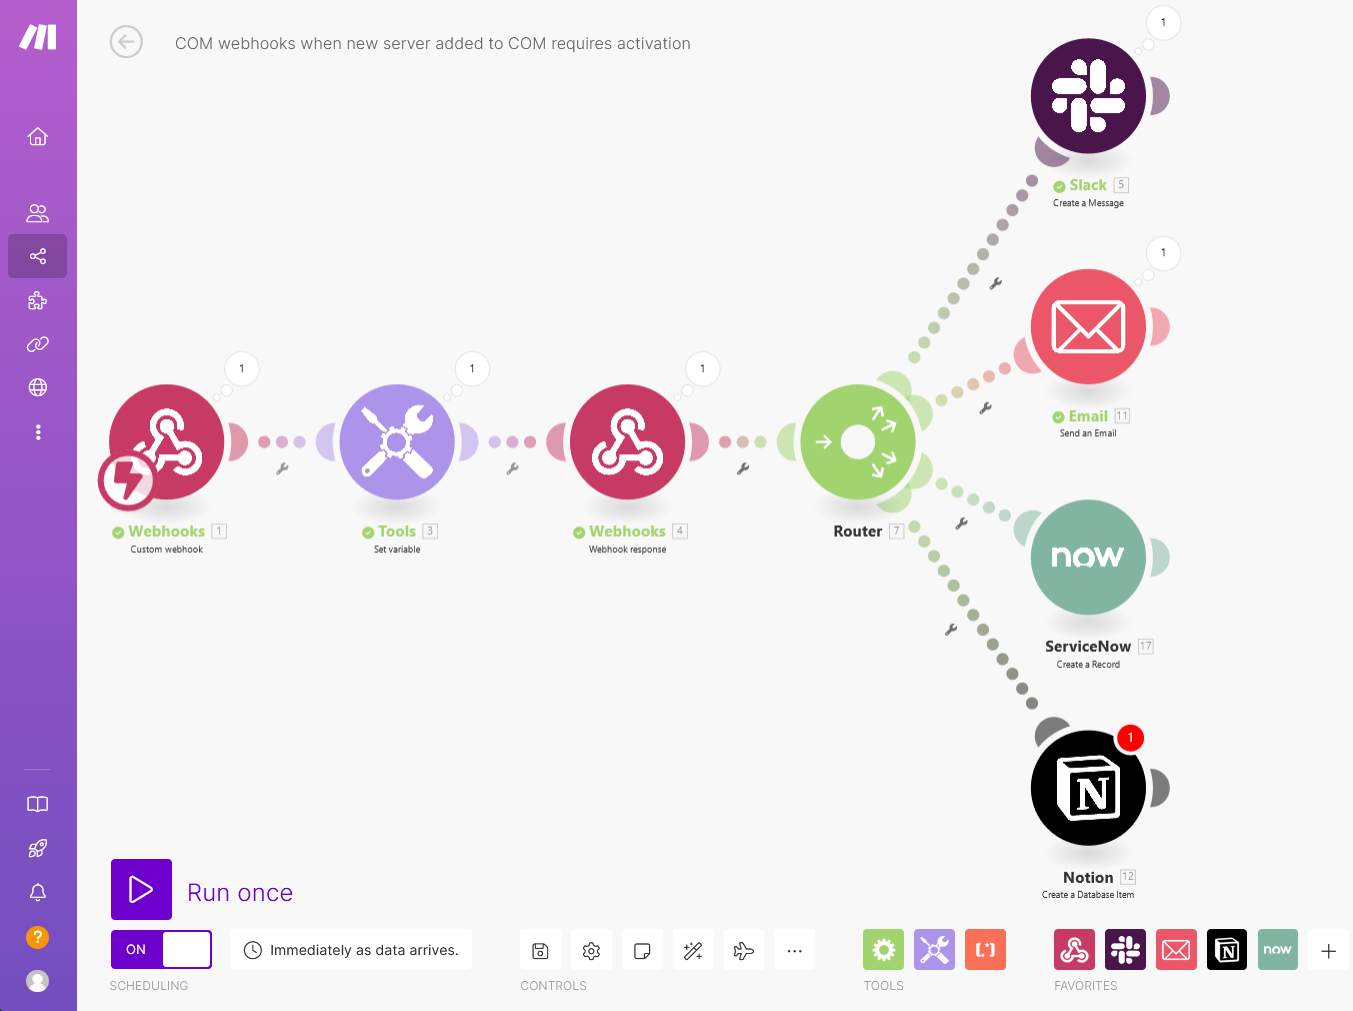
Despite being no-code friendly, Make doesn’t compromise on complexity. It supports multi-step integrations, enabling users to craft detailed processes that perform several actions across different platforms seamlessly.
The multifaceted automated workflow must handle the initial validation challenge issued during the setup of the COM webhook but also execute several actions each time a webhook is triggered by a server shutdown event. The workflow will include the following actions:
- Dispatch an email notification containing information about the impacted server to a designated inbox.
- Post an update to a specified Slack channel, detailing the shutdown server.
- Create a new record in a Notion database, cataloguing particulars of the affected server.
The following steps describe how to implement this scenario in Make:
- Setup your Make account
- Create a new scenario
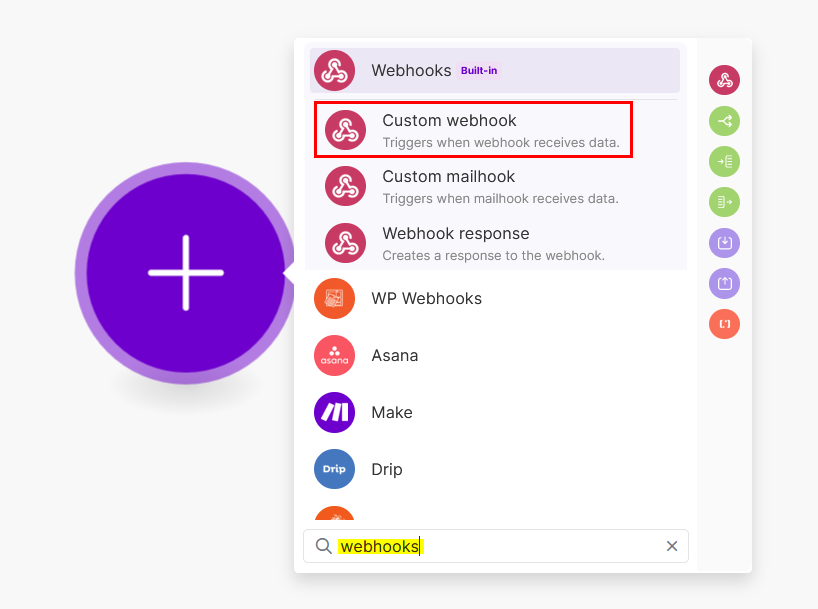
- Search and add the webhooks module
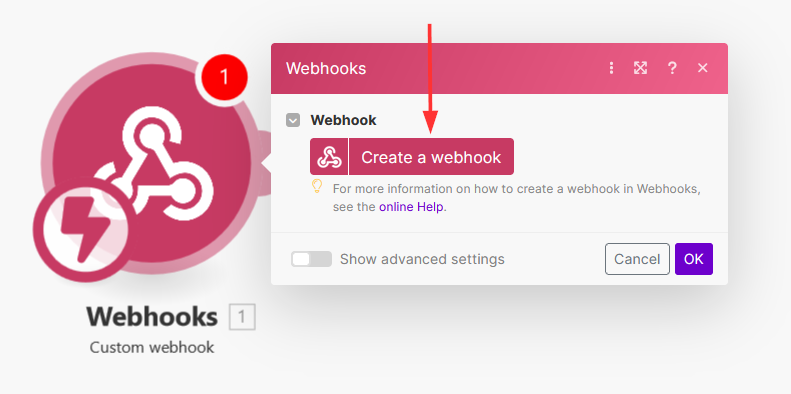
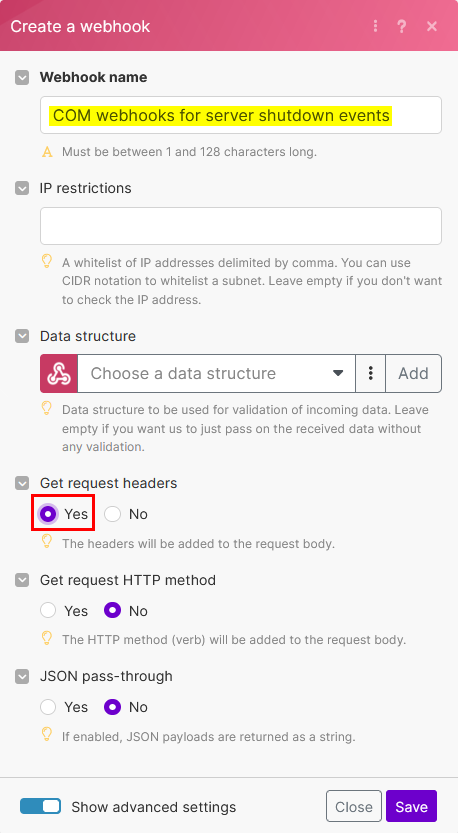
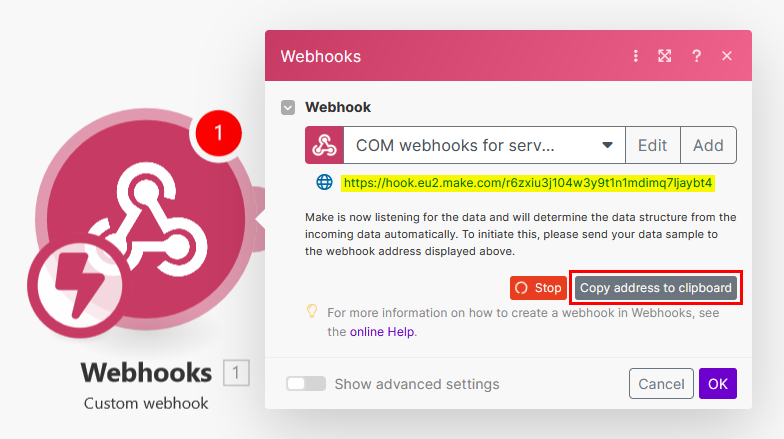
- Configure the webhook trigger
- Run the webhooks module once
- Create the webhook using the COM API
- Create a variable to capture the verification challenge sent by COM
- Renegotiate the webhook handshake to set the variable
- Use the verification challenge in the webhook response
- Renegotiate the webhook handshake to generate the response
- Check the webhook status in COM (optional)
- Enable header capture and validate the shared secret in Make
- Configure a variable to store the server tags
- Configure the event handlers
- Scheduling and Activation
- Trigger a webhook to test the full flow
-
Setup your Make account
-
Sign in to your Make account.
-
If you don’t have an account, create one from https://www.make.com/en.
Make offers a free plan that includes 1,000 operations per month. This can be a good option if you’re looking to test your COM webhooks. The operations quota can comfortably accommodate testing your COM webhook setup to see how the integration works and ensure that your workflow is correctly configured. If your testing phase or ongoing usage consumes more than the allotted operations, you may need to consider upgrading to a higher-tier plan.
-
-
Create a new scenario
-
Search and add the webhooks module
-
Configure the webhook trigger
-
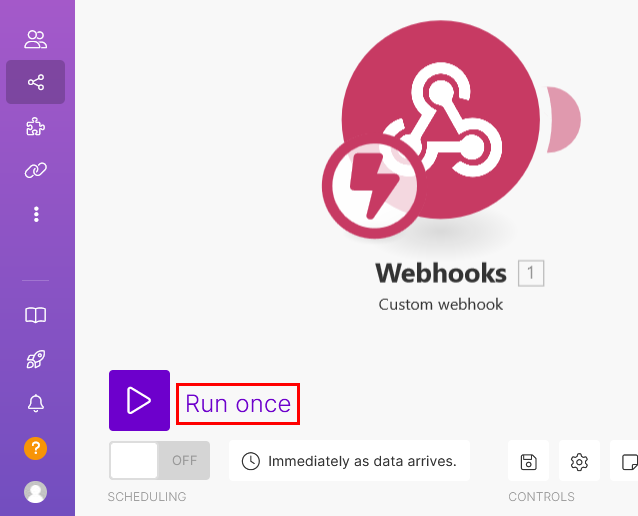
Run the webhooks module once
-
Create the webhook using the COM API
-
While the module in Make awaits incoming data, proceed with the following steps using your preferred tool or programming language:
- Construct a COM API request.
- Use the webhook URL you copied in step 4 as the destination attribute.
- Apply the proper filter for server shutdown events. This filter should include:
- The server resource type.
- The state change of the powerState property.
The request should use:
POST /compute-ops-mgmt/v1beta1/webhooks
Content-Type: application/json
{ "name": "Webhook event for server shutdown", "destination": "<PASTE THE WEBHOOK URL COPIED EARLIER IM MAKE>", "state": "ENABLED", "eventFilter": "type eq 'compute-ops/server' and old/hardware/powerState eq 'ON' and changed/hardware/powerState eq True", "headers": { "X-Webhook-Secret": "s3cr3t-long-random-value-only-COM-and-your-scenario-know" } }For this step, you can refer to my Postman public collection for Compute Ops Managment. In the Webhooks folder, you’ll find several examples of webhook creation requests including the webhook for server shutdown events.
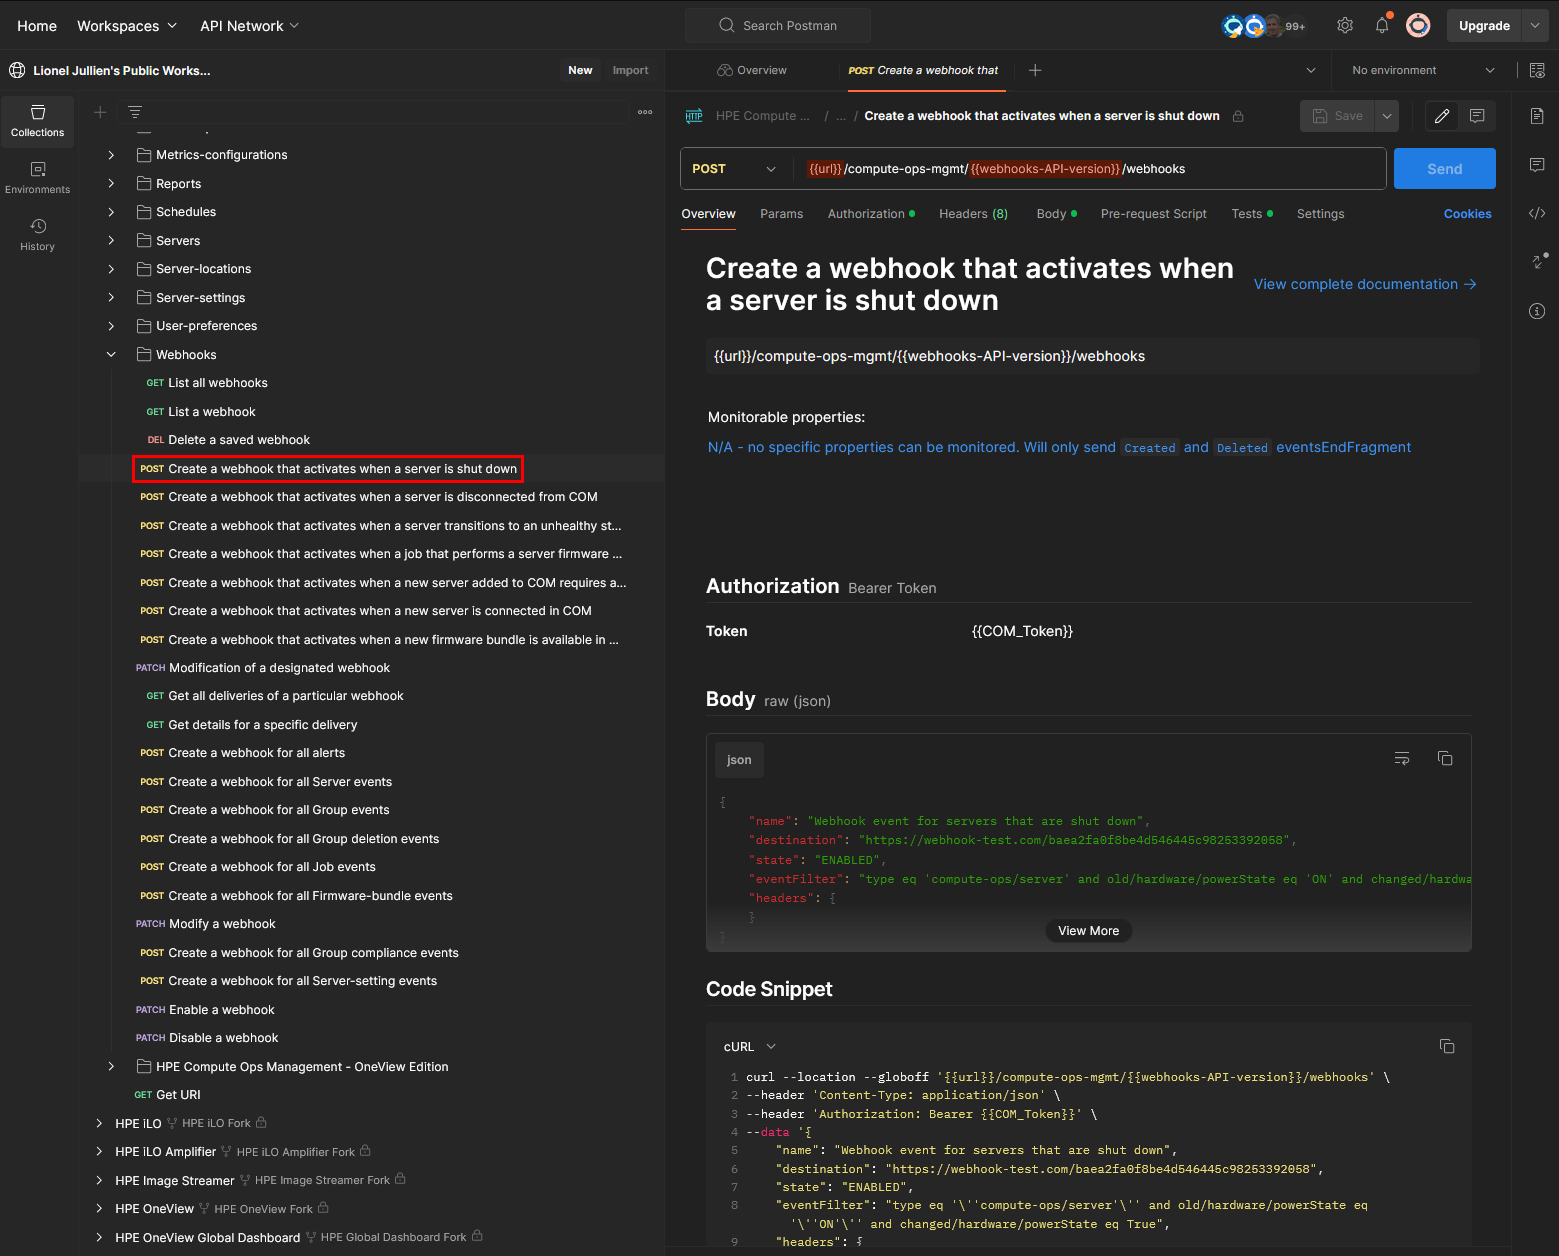
These examples should assist you in creating your own webhooks successfully.
Adding a shared secret header (recommended): In the payload above, the
headersfield includes a customX-Webhook-Secretheader, as described in the Securing webhook events with a shared secret section. COM will attach this header to every event it sends to your Make endpoint, allowing your scenario to reject any request that does not carry the correct secret. Since a Make webhook URL is publicly reachable, this is strongly recommended to prevent anyone who discovers the URL from injecting forged events into your scenario. The steps below explain how to validate it in Make. -
Send the request to create the webhook. Verify that the COM API responds with a
201 Createdstatus code, indicating successful creation. The response body should indicate a status ofPENDING.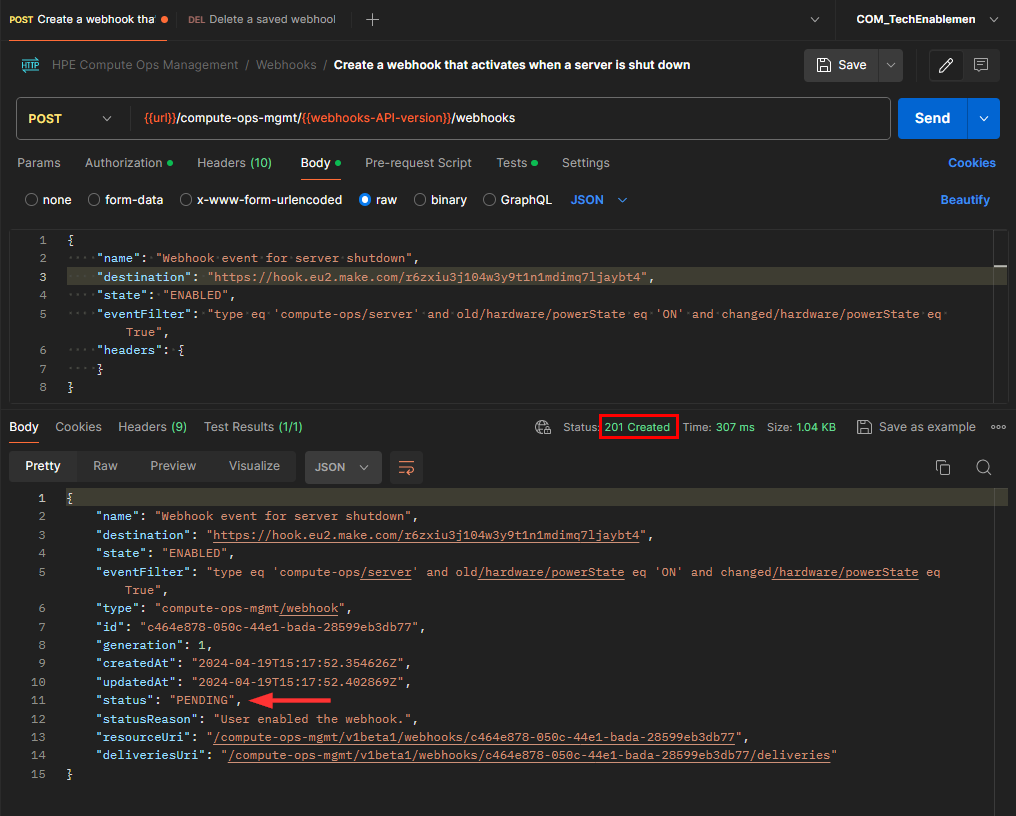
-
Ensure you record the Webhook ID returned by the webhook creation request. You will need this ID later to update the webhook in order to renegotiate the handshake.
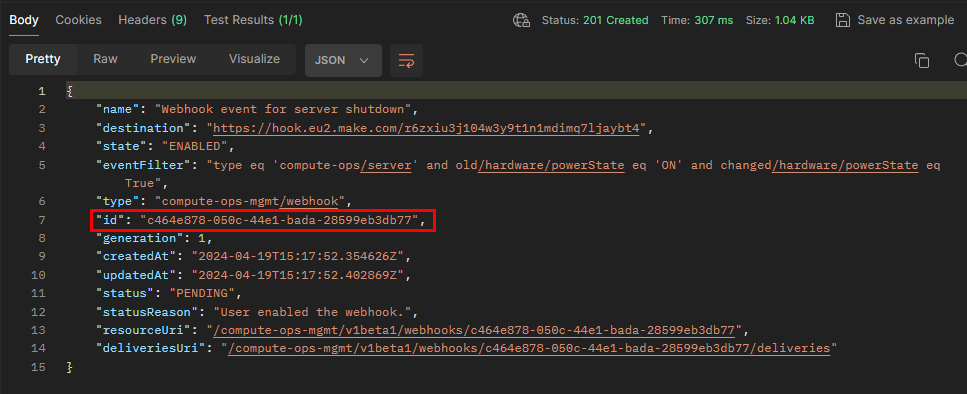
Note: If you run a
GET /compute-ops-mgmt/v1beta1/webhooks/<webhook-id>, you should notice that the webhook status is set toWARNINGwith the reason being anIncorrect handshake response. This behavior is expected because Make has not responded with the verification challenge as COM anticipates. Steps 7 and 8 are designed to address this issue.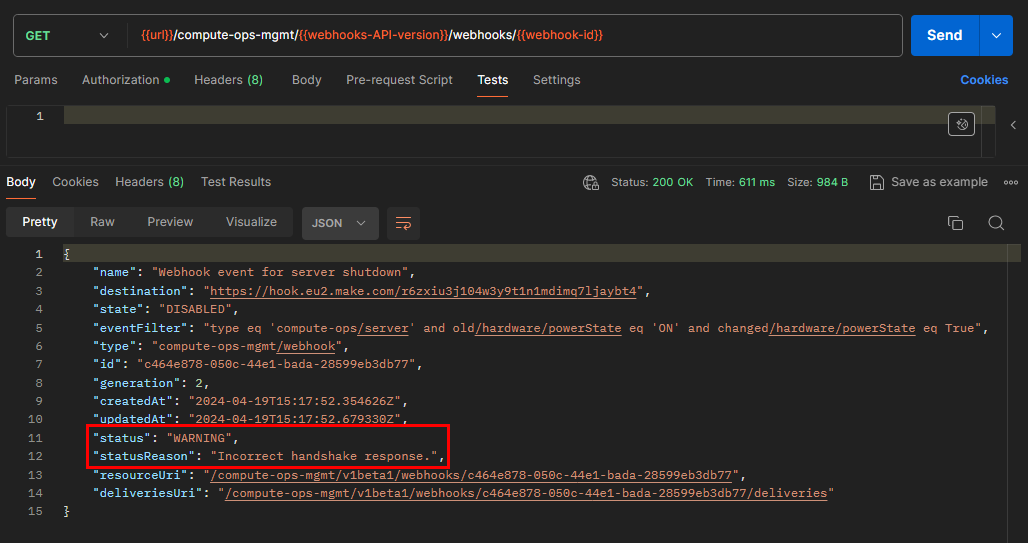
-
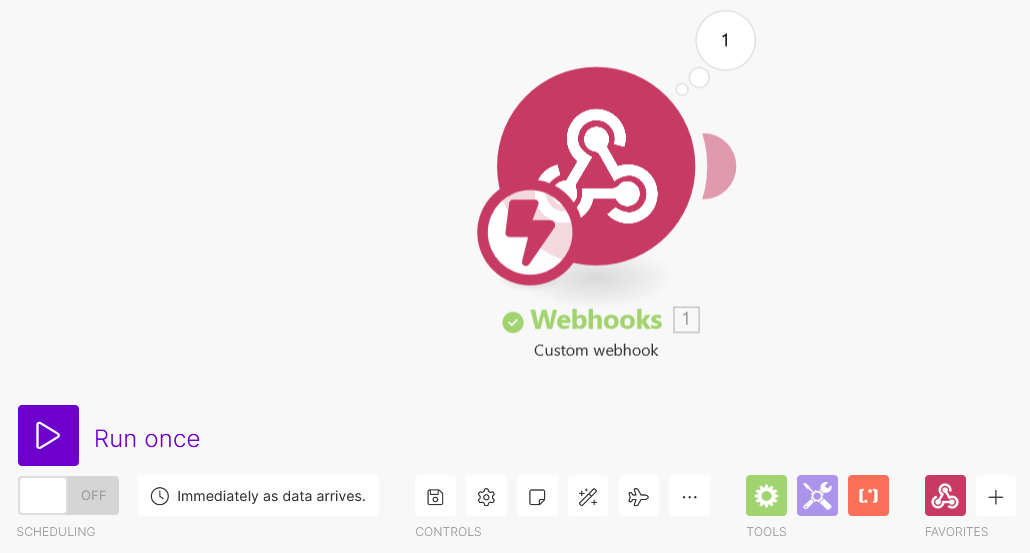
In Make, check that the Run once task has stopped and that the webhooks module has turned green, indicating that data has been received.
-
-
Create a variable to capture the verification challenge sent by COM
-
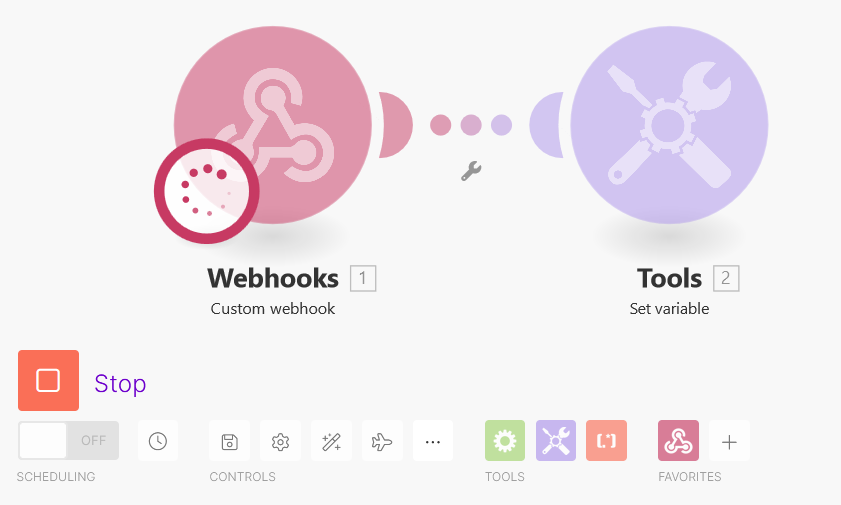
Click on + to add another module
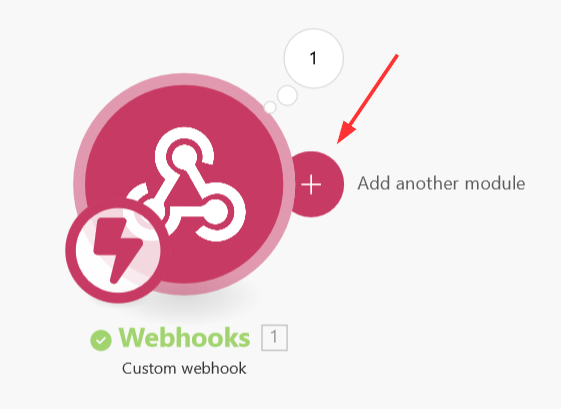
-
Search for the Tools module then select Set variable
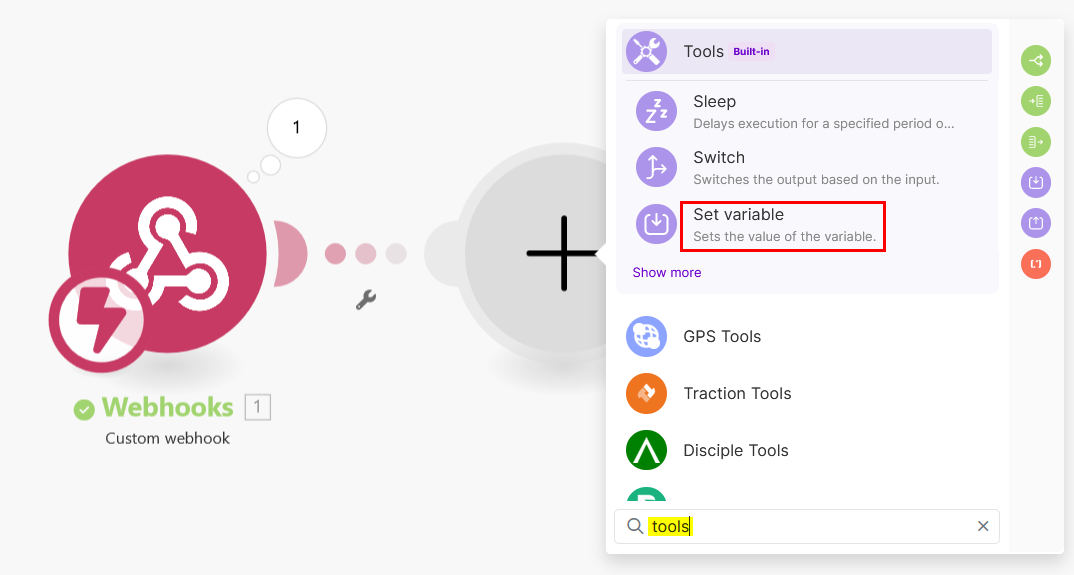
-
Enter verification as the variable name and for the variable value, enter:
{{get(toCollection(;"name";"value"); "x-compute-ops-mgmt-verification-challenge")}}
The
toCollection()function is being called with arguments. This function converts the HTTP header object into a collection for easier access. Theget()is used to retrieve the value ofx-compute-ops-mgmt-verification-challengeavailable in the header collection.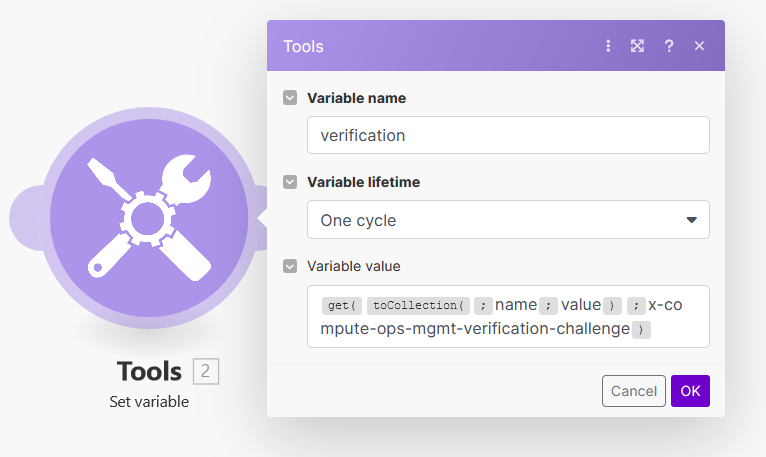
-
Click just after
toCollection(: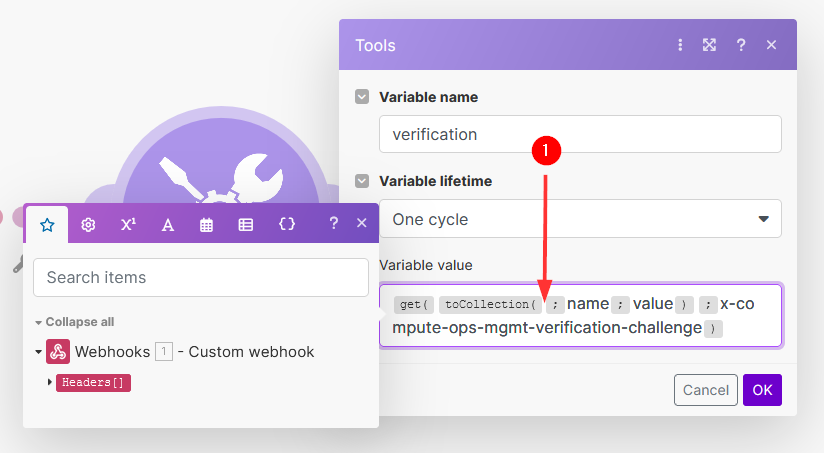
-
Click on the
Headers[]item from the Make mapping pane: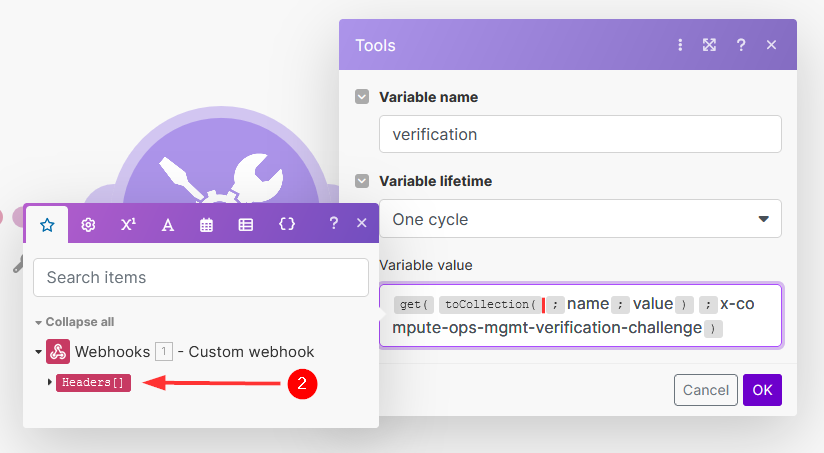
The Make mapping pane allows users to connect data outputs from one module to inputs in another. It enables drag-and-drop functionality for easy mapping, and supports the use of functions and formulas to manipulate data as it moves between modules. This feature is central to creating workflows that automate tasks by integrating various apps and services within Make scenarios.
Headers[]represents the variable holding headers from the first module, the Webhooks module. This is where the verification challenge sent by COM is found. -
Click on OK:
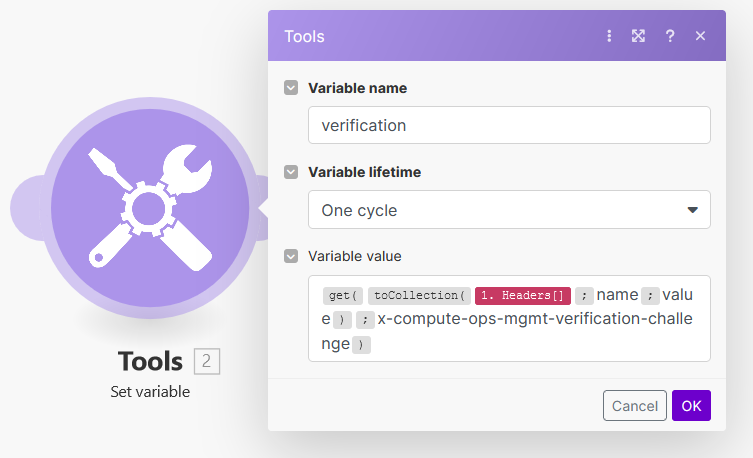
-
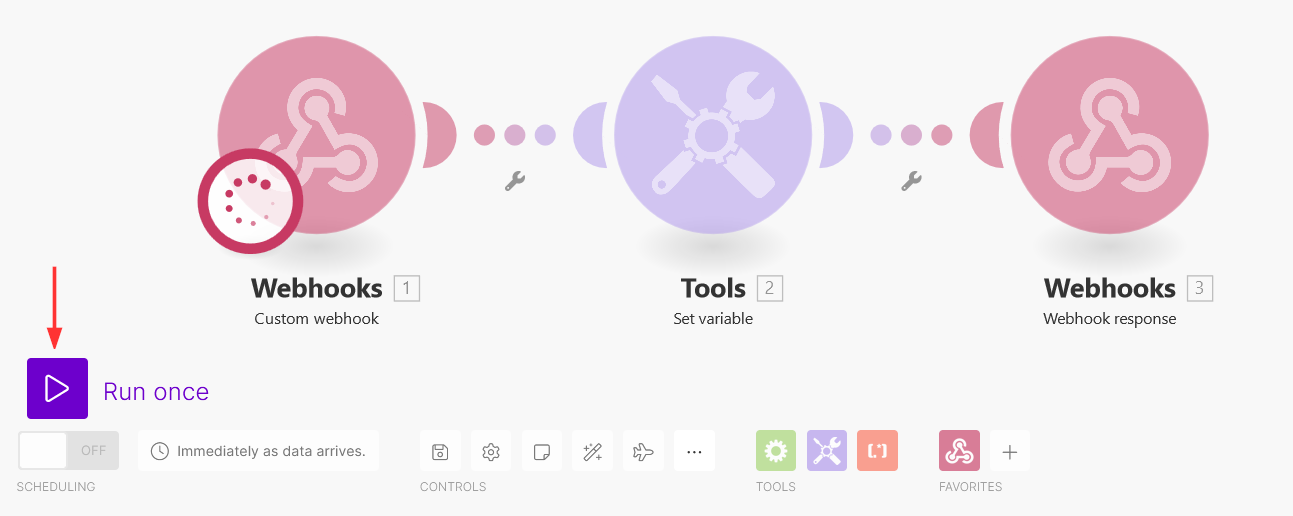
Click on Run once
-
-
Renegotiate the webhook handshake to set the variable
-
For the moment, the
verificationvariable just set is not populated, and you need to ask COM to renegotiate the handshake again. To do so, you have to modify the existing webhook by sending aPATCHrequest with the previously used payload, targeting the webhook ID recorded earlier:PATCH /compute-ops-mgmt/v1beta1/webhooks/<webhook-id> Content-Type: application/merge-patch+json{ "name": "Webhook event for server shutdown", "destination": "<PASTE THE WEBHOOK URL COPIED EARLIER IM MAKE>", "state": "ENABLED", "eventFilter": "type eq 'compute-ops/server' and old/hardware/powerState eq 'ON' and changed/hardware/powerState eq True", "headers": { "X-Webhook-Secret": "s3cr3t-long-random-value-only-COM-and-your-scenario-know" } }Note: Since this is a
merge-patchrequest, be sure to include theX-Webhook-Secretheader again in theheadersfield. Sending an emptyheaders: {}would remove the shared secret you defined in step 6.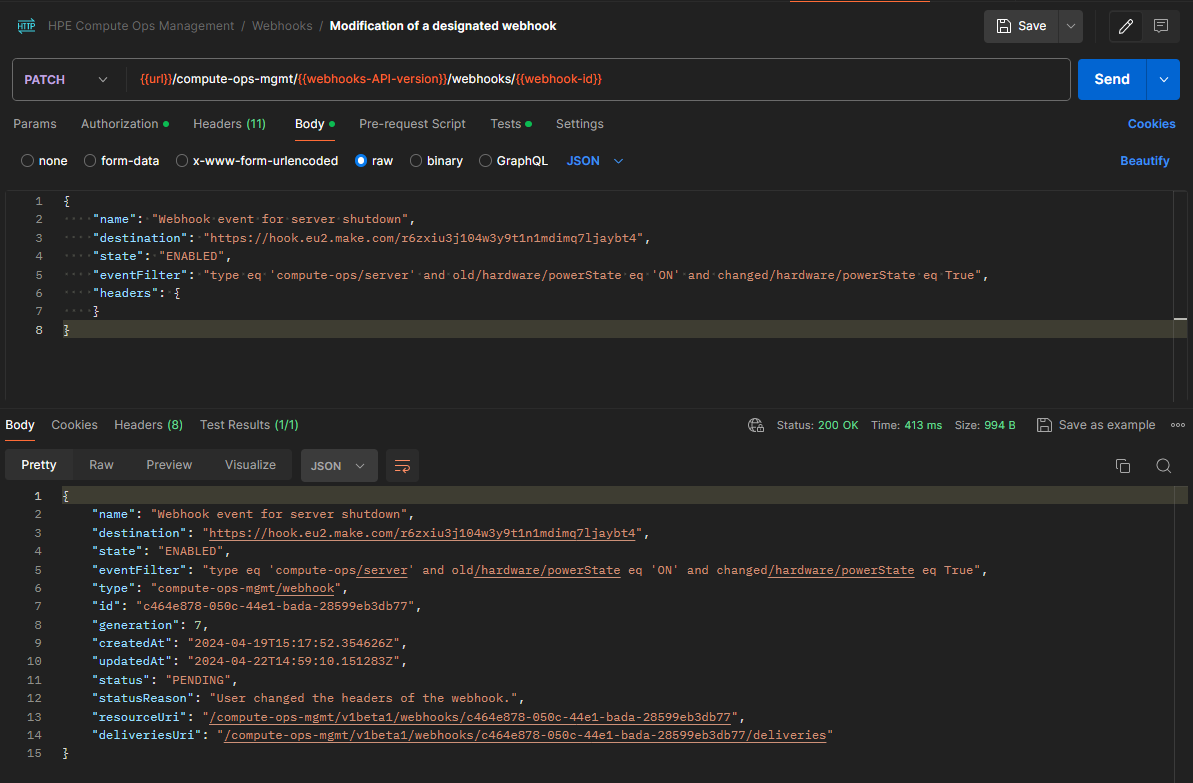
-
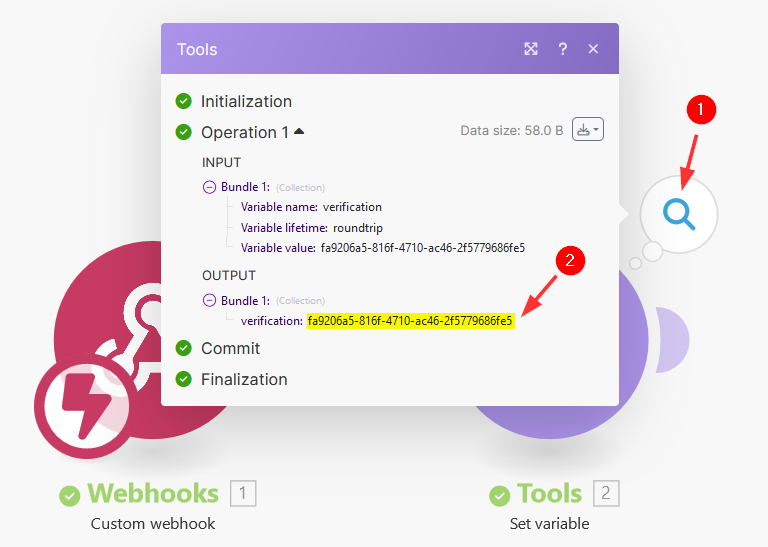
Once the request has been sent, return to the Make interface and verify that the execution stopped and the status of all modules is green:
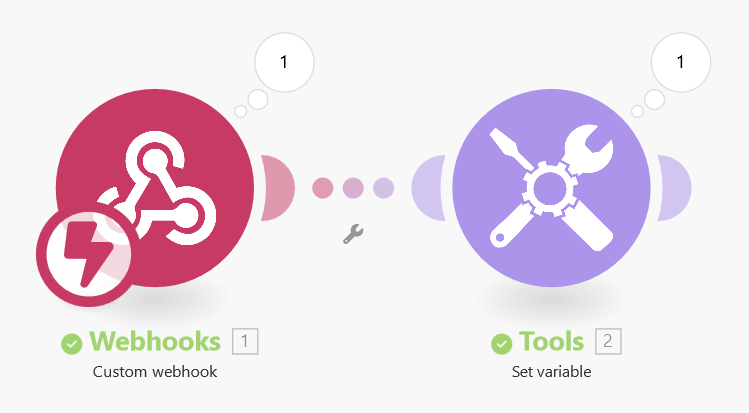
-
You can click on the output details and verify that the
verificationvariable value is now populated:
-
-
Use the verification challenge in the webhook response
-
In the next step, you need to add another module that will generate the response expected by COM. From the Tools module, click on + and add the Webhook response module.
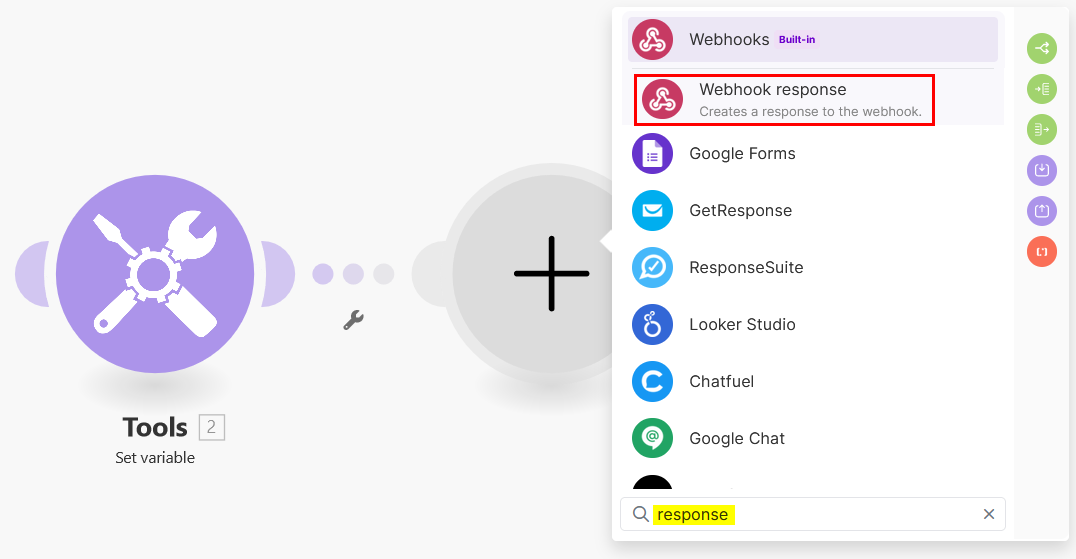
-
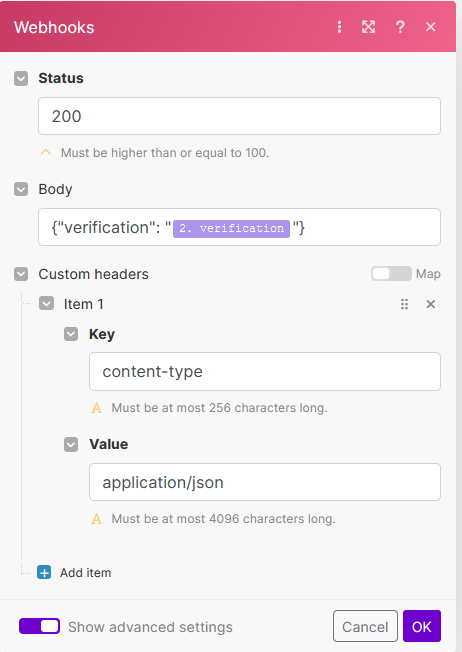
Leave the status as 200. Click on the body field, and enter:
{"verification": ""}
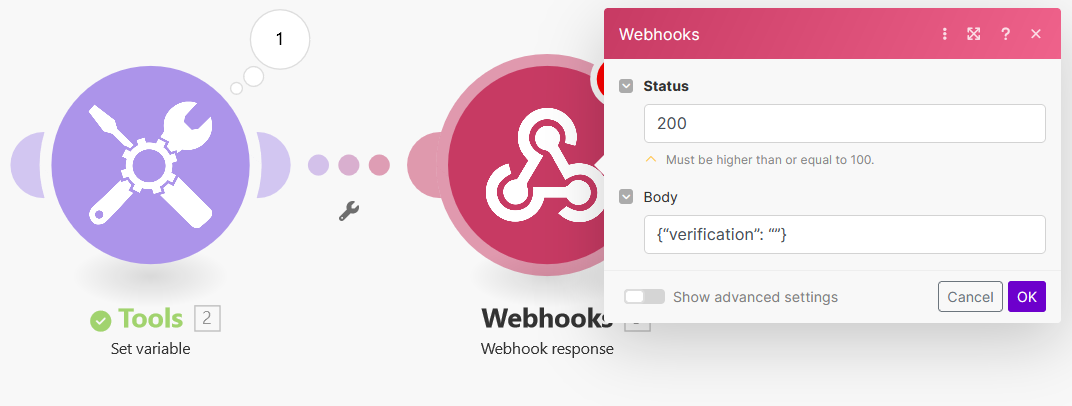
-
Then drag and drop
verificationfrom the Make mapping pane between the last two quotes: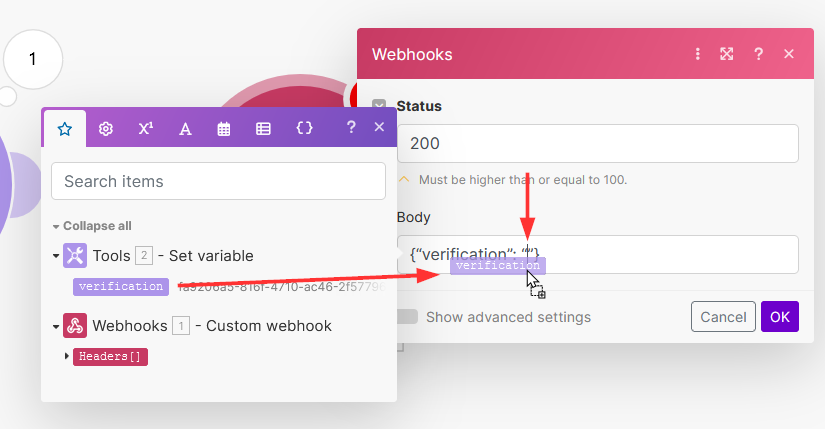
- Click on Show advanced settings then Add item then enter the following header:
- Key:
content-type - Value:
application/json
- Key:
-
Click on OK then click on Run once
-
-
Renegotiate the webhook handshake to generate the response
-
The Make scenario is now ready to return the verification challenge key to COM to enable the handshake mechanism. To force renegotiation, you can run the PATCH request again using the same payload content targeting the same webhook ID.
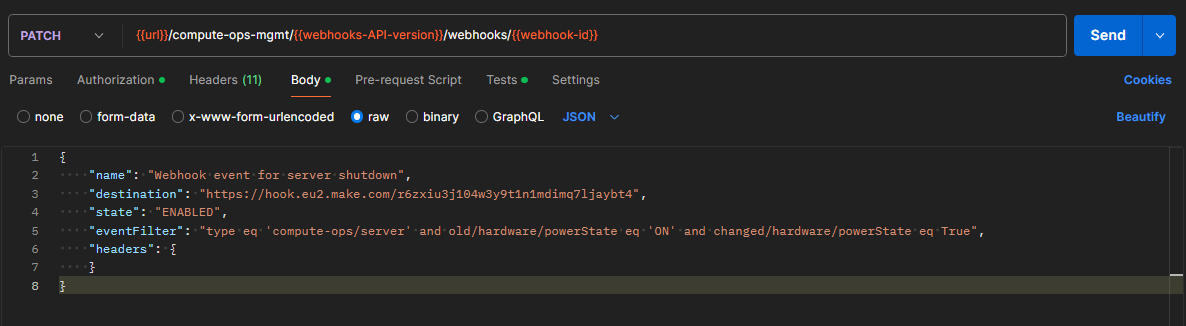
-
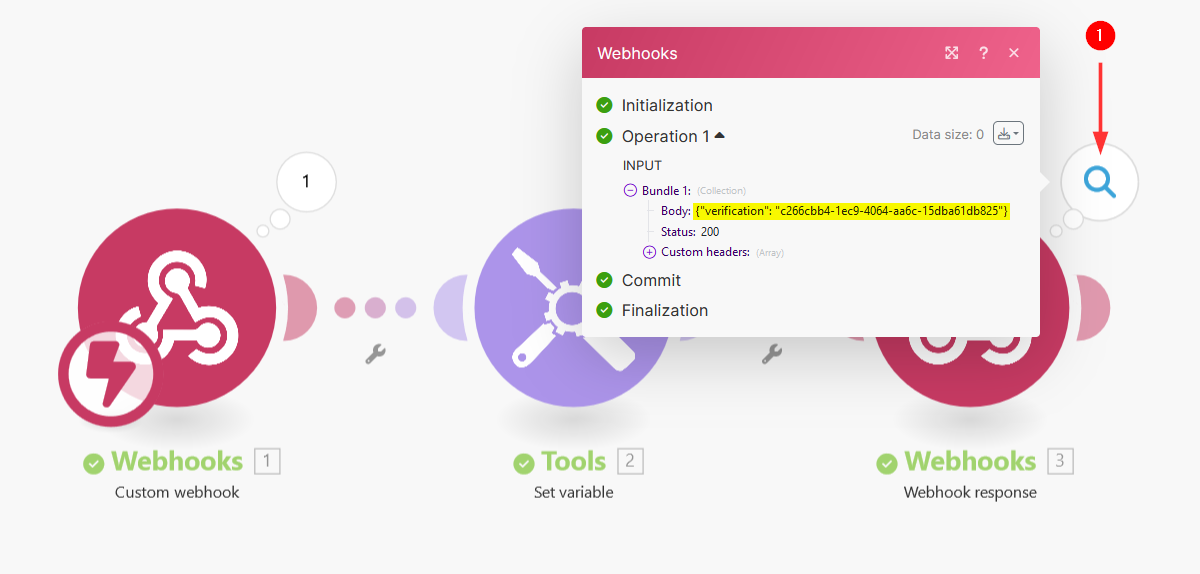
Once the
PATCHrequest has been executed, return to Make and verify that all modules are displaying a green status and that the response body now includes the verification token:
-
-
Check the webhook status in COM (optional)
-
Enable header capture and validate the shared secret in Make:
Because the Make Webhooks module was configured with Get request headers set to Yes in step 4, the incoming
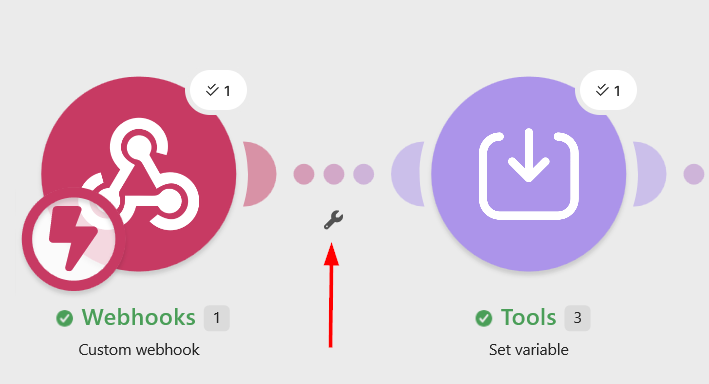
X-Webhook-Secretheader sent by COM is available in this scenario. To ensure only genuine COM events are processed, add a filter on the connection leaving the Webhooks module so that the flow only continues when the header matches your expected secret:-
Hover over the connection line just after the Webhooks module and click the wrench (Set up a filter) icon.
- Give the filter a label such as
Valid shared secret. -
In the first condition field, build the following expression to extract the header value from the incoming request:
{{get(toCollection(Headers[]; "name"; "value"); "x-webhook-secret")}}
Important: Do not type
Headers[]as plain text:Headers[]is a mapped variable, not literal text. You must insert it by clicking theHeaders[]item in the Make mapping pane (the output of the Webhooks module), exactly as you did in step 7. To build the expression, typeget(toCollection(, then click theHeaders[]item from the mapping pane to insert the real reference, and finish typing; "name"; "value"); "x-webhook-secret"). If you type the wordHeaders[]by hand instead of mapping it,toCollection()receives an invalid input, returns an empty value, and the filter blocks every request.This reuses the same
toCollection()/get()technique used earlier in step 7 to capture the verification challenge header, but this time it retrieves thex-webhook-secretheader instead.Header name case: use the header name in lowercase (
x-webhook-secret), even though you defined it asX-Webhook-Secretin the webhook payload. Make normalizes all incoming HTTP header names to lowercase when it stores them in theHeaders[]collection, and theget()function is case-sensitive. Looking upX-Webhook-Secretwould return an empty value and your filter would block every request. This is the same reason the verification challenge header in step 7 is referenced in lowercase. - Set the operator to Text operators: Equal to.
-
In the second field, enter the exact secret value you defined in the webhook payload (e.g.
s3cr3t-long-random-value-only-COM-and-your-scenario-know).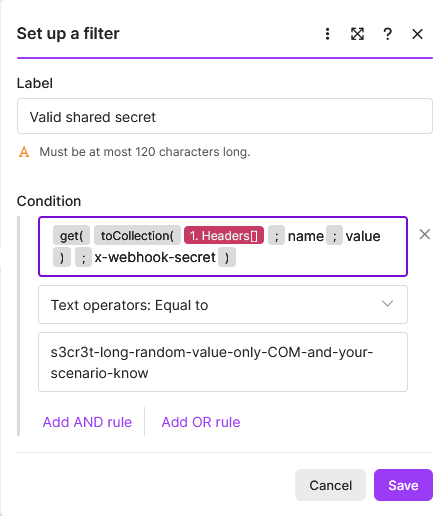
- Click Save.
With this filter in place, any request that does not carry the correct
X-Webhook-Secretvalue is discarded and the downstream modules never run, so forged events from anonymous callers are ignored.Security tips: store the secret in a Make custom variable rather than hard-coding it inline, always keep your endpoint on HTTPS (the header travels in clear text inside the request), and rotate the secret periodically by updating both the COM webhook
headers(via aPATCHrequest) and the value referenced in your scenario.
-
-
Configure a variable to store the server tags
The webhook data that Make will receive from COM will include server resource data, including Tags information.
Server tags are a form of metadata used in COM to categorize and organize server resources. It serves an essential role in facilitating the search, filter, and management of resources according to various specified criteria, such as purpose, owner, environment, among others. The
tagsproperty is structured into key-value pairs as shown below:"tags": { "Location": "Houston", "Owner": "James" }Given the importance of tags in facilitating server identification, it’s clear that our Make scenario must include a mechanism to process tag information found within the server resource.
Toward the end of this blog, I’ll demonstrate an enhanced scenario utilizing tags.
This process will involve converting the key-value pair structure into a human-readable text format, which might look like the following:
  Tag1:Location/Houston
  Tag2:Owner/James
To do this, you need to add 3 modules:
-
Transform the tags structure into an array:
-
Add the module Tools: Set variable.
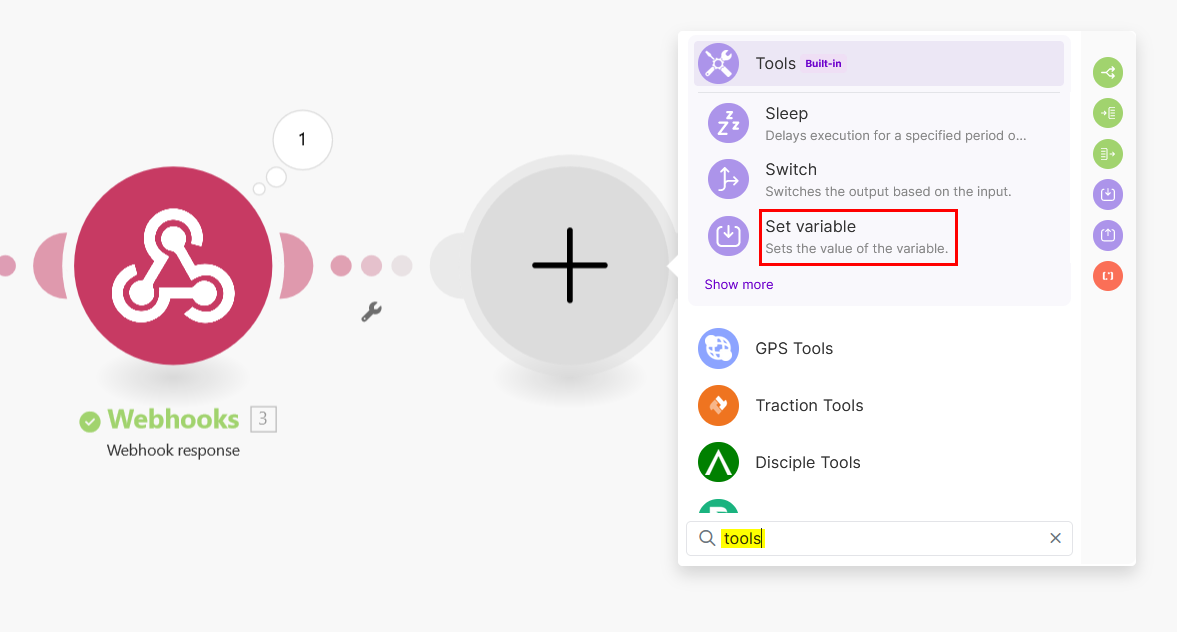
-
For the variable name, enter
tagsArrayand for the value{{toArray(1.tags)}}.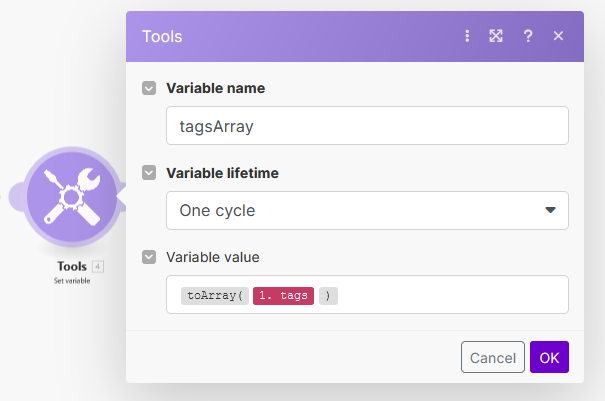
-
-
Split the array into individual elements:
-
Add the module Iterator.
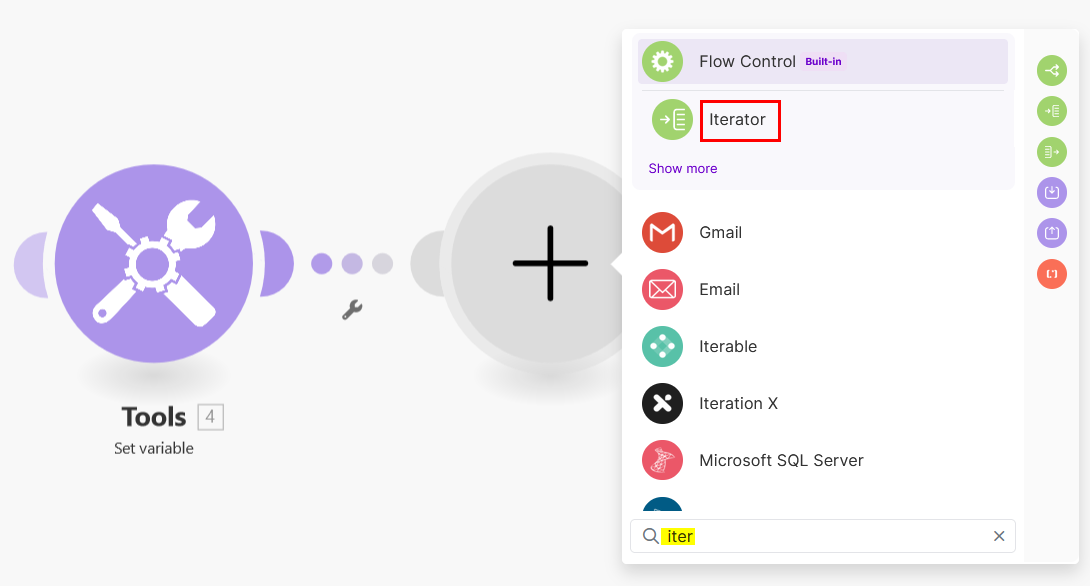
-
In the Array field, drag and drop the
tagsArrayvariable from module4: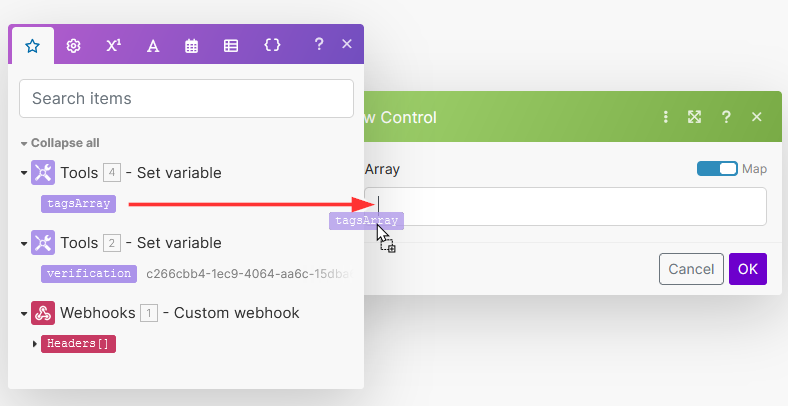
-
-
Combine multiple tag items into a single text block:
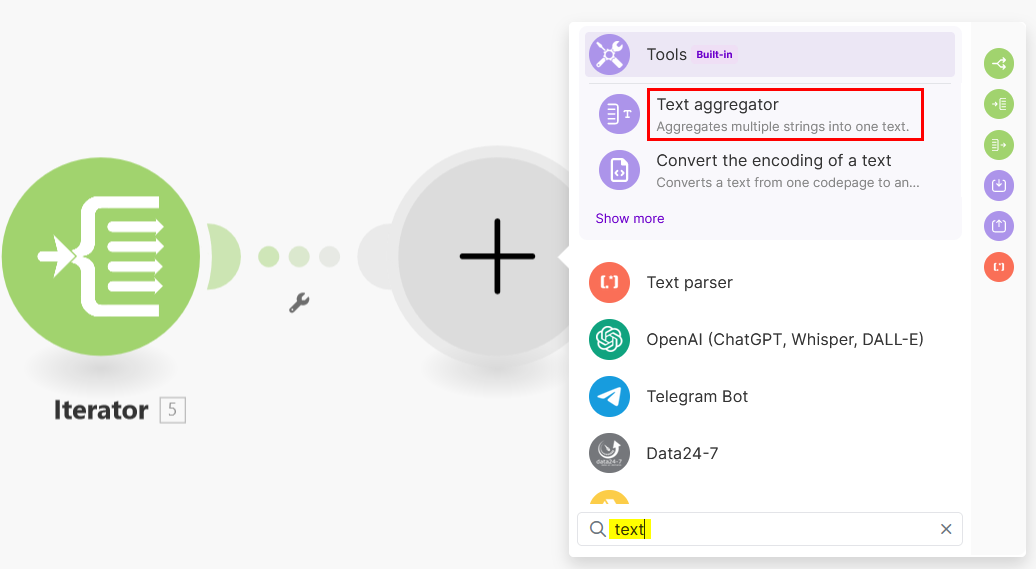
-
Add the module Tools: Text aggregator.
-
For the source module, select
Iterator [5]and for the text, enter:Tag:{{5.value}}/{{5.key}}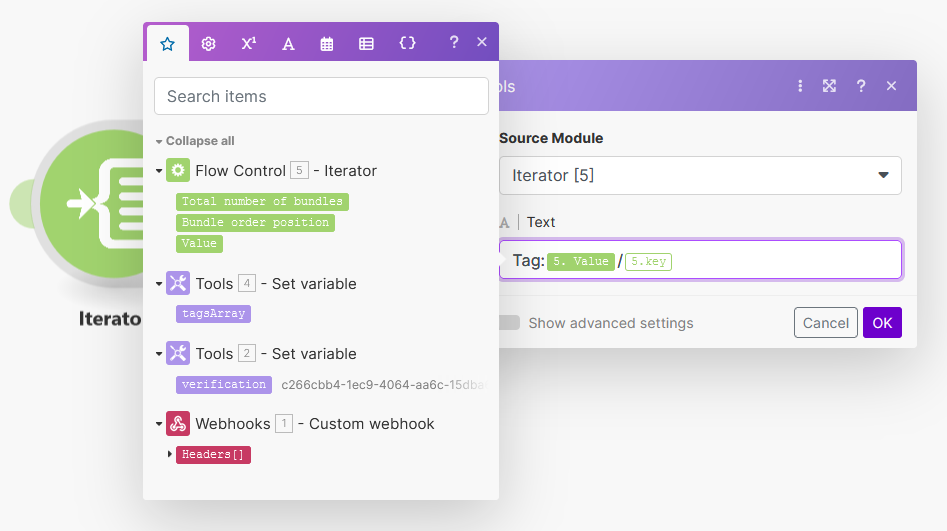
-
Then drag and drop the
Bundle order positionvariable from module5between Tag and :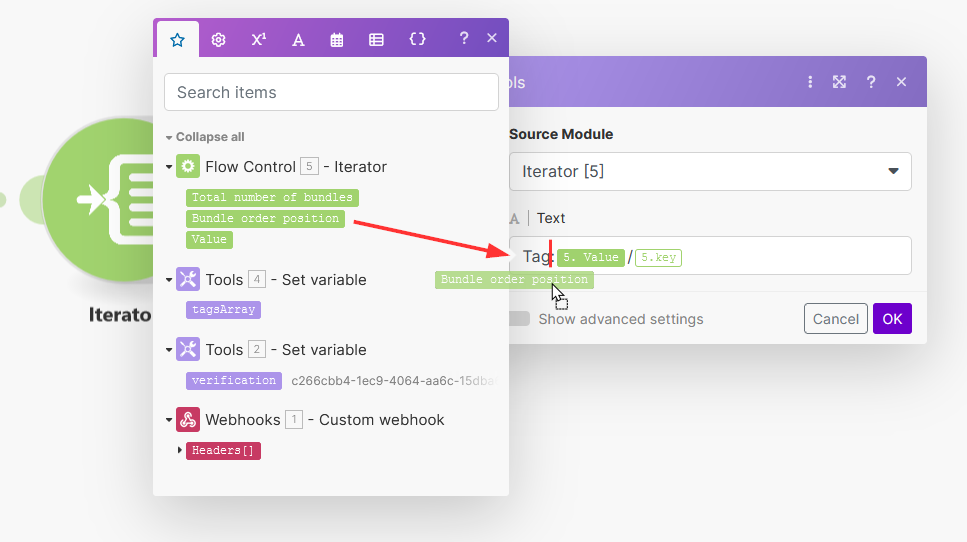
-
Click on Show advanced settings, then select New row for the Row separator option:
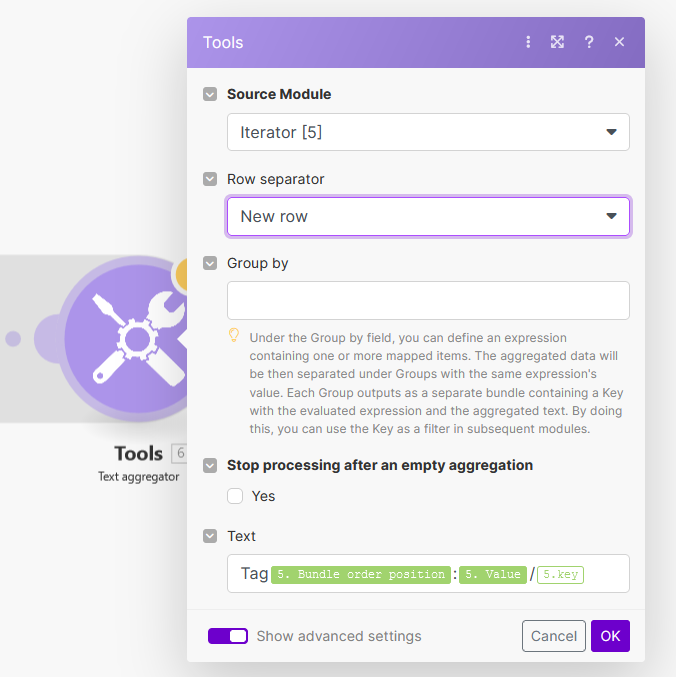
This aggregator module will generate text in the format of
Tag1:Owner/Jameswhen there is one tag. When there are two or more tags, the row separator option ensures that additional tags are displayed on new lines such as:Tag1:Location/Houston Tag2:Owner/James
-
The initialization process has been successfully completed.

You may now proceed to configure the event handlers, which will enable the triggering of specific actions.
-
-
Configure the event handlers
To configure the following actions: sending an email, posting on a Slack channel, and adding a record in a Notion database, a router module in Make is essential. The router module enables you to create multiple branches within your scenario, allowing different actions to take place either conditionally or in parallel. For this particular scenario, no conditions will be used since I want to trigger various actions from the same webhook event concurrently. The router effectively manages these simultaneous executions, ensuring that each action is processed without the need for any conditional logic.
-
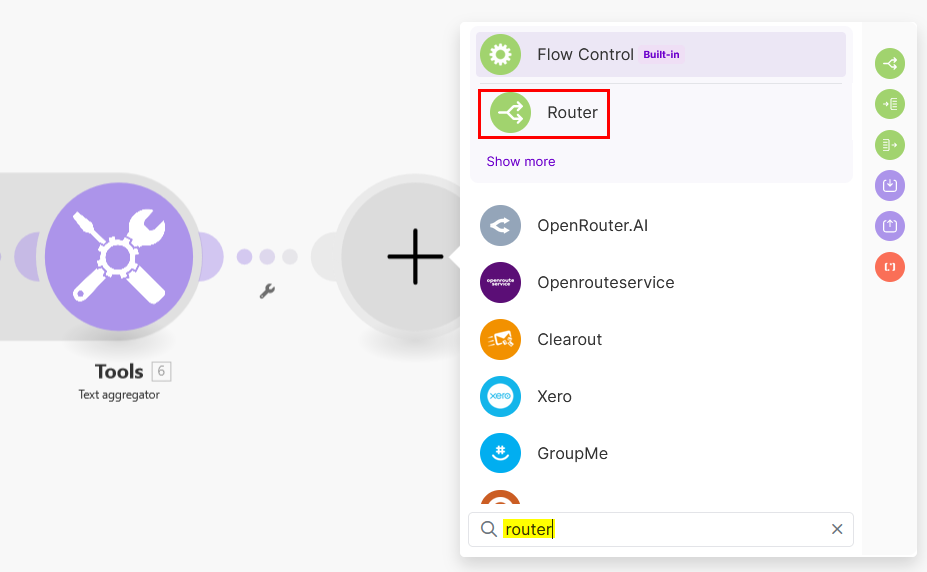
From the Webhooks response module, click on + and add the Router module:
-
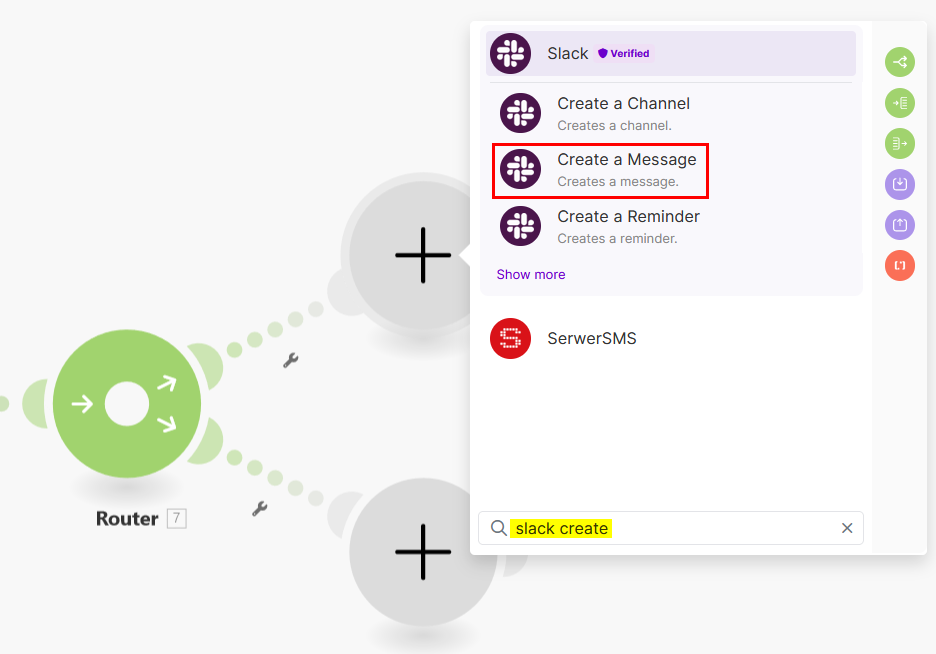
Let’s begin with the action to post a message on a Slack channel, click on the first + sign to add a new module, then select the Slack: Create a message module:
-
Once you select the Create a message action, you will need to configure it with the necessary details:
- Connect to your Slack account if not already connected. Refer to the Make online help for more information.
- Select the channel where the message will be posted.
-
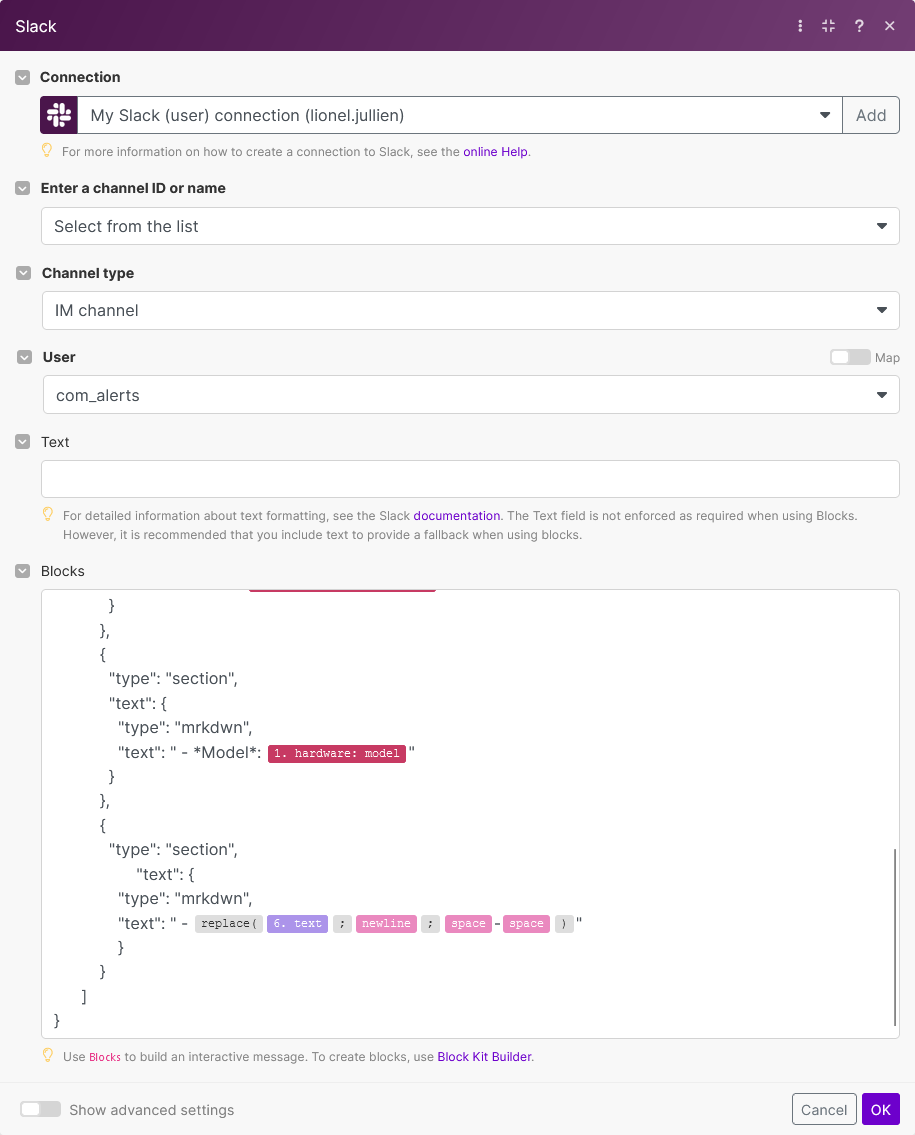
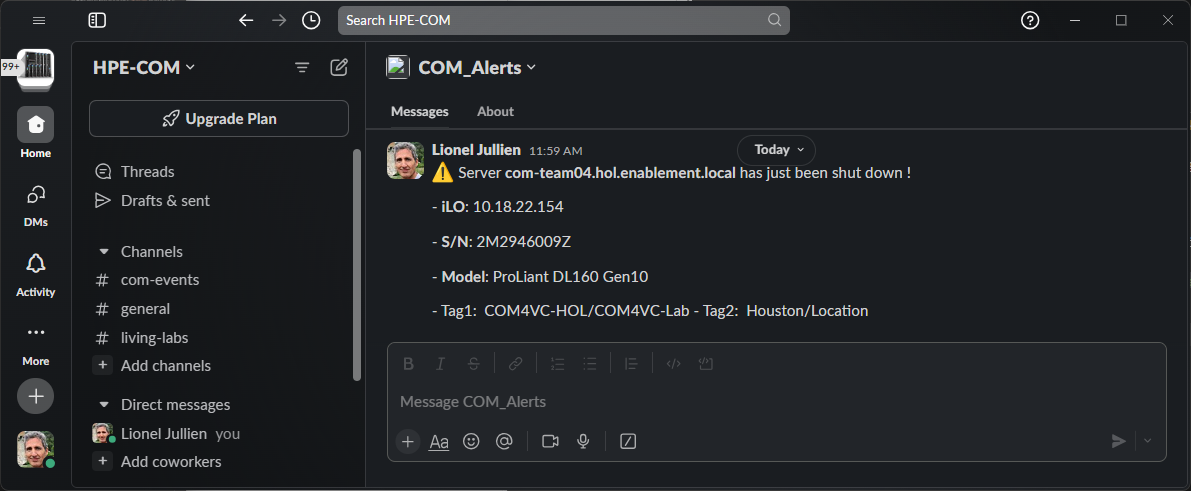
Enter the message you want to send. As an example, you can use the following content in the block field:
{
      "type": "home",
      "blocks":  [
          {
            "type": "section",
            "text": {
                  "type": "mrkdwn",
                  "text": ":warning: Server *{{1.name}}* has just been shut down ! "
            }
          },
          {
            "type": "section",
            "text": {
              "type": "mrkdwn",
              "text": " - *iLO*: {{1.hardware.bmc.ip}}"
            }
          },
          {
            "type": "section",
            "text": {
              "type": "mrkdwn",
              "text": " - *S/N*: {{1.hardware.serialNumber}}"
            }
          },
          {
            "type": "section",
            "text": {
              "type": "mrkdwn",
              "text": " - *Model*: {{1.hardware.model}}"
            }
          },
          {
            "type": "section",
                  "text": {
              "type": "mrkdwn",
              "text": " - {{replace(6.text; newline; space + "-" + space)}}"
              }
          }
      ]
}
This example includes variable names defined with double curly braces, such as
{{1.hardware.model}}; this syntax is used to define variables in Make. The prefix1.specifies the first module, andhardware.modelaccesses the model attribute within the hardware property of the webhook data sent by COM. The goal is to display the server’s model, serial number, tags, and iLO IP address in the Slack message to provide better insight into the system’s details. Thereplace()function is used for tags, to remove newline characters contained in the text variable that was constructed earlier in module6.To build an interactive block message, you can use Block Kit Builder.
-
Once the block is set, click OK.
-
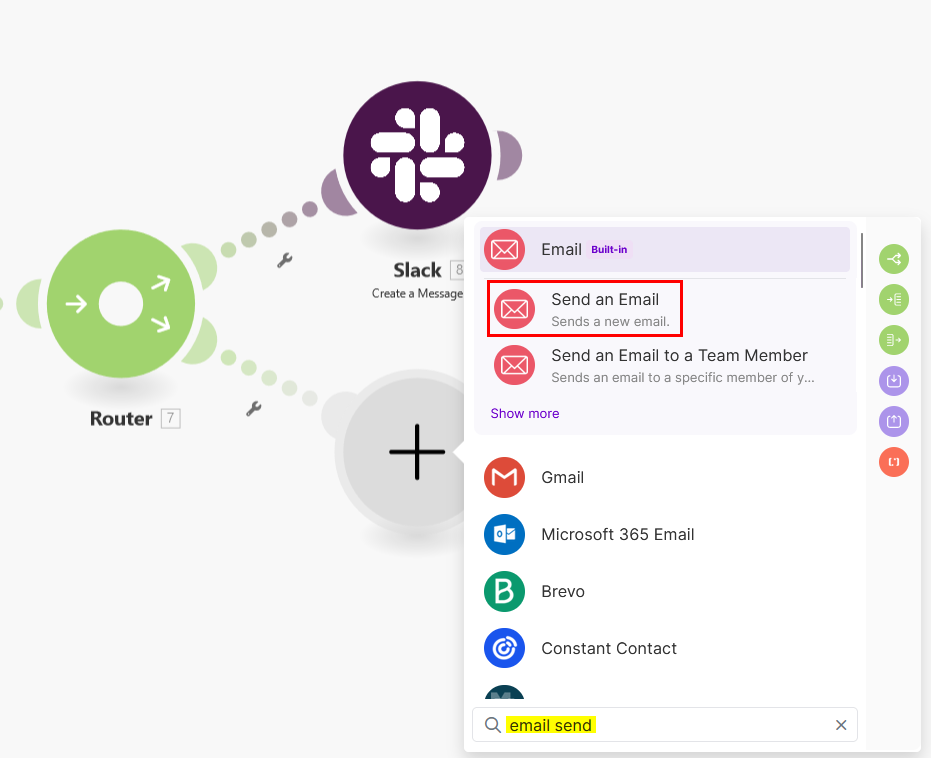
Let’s continue with the action to send a message to an email recipient, click on the second + sign to add another module, then select the Email: Send an Email module:
-
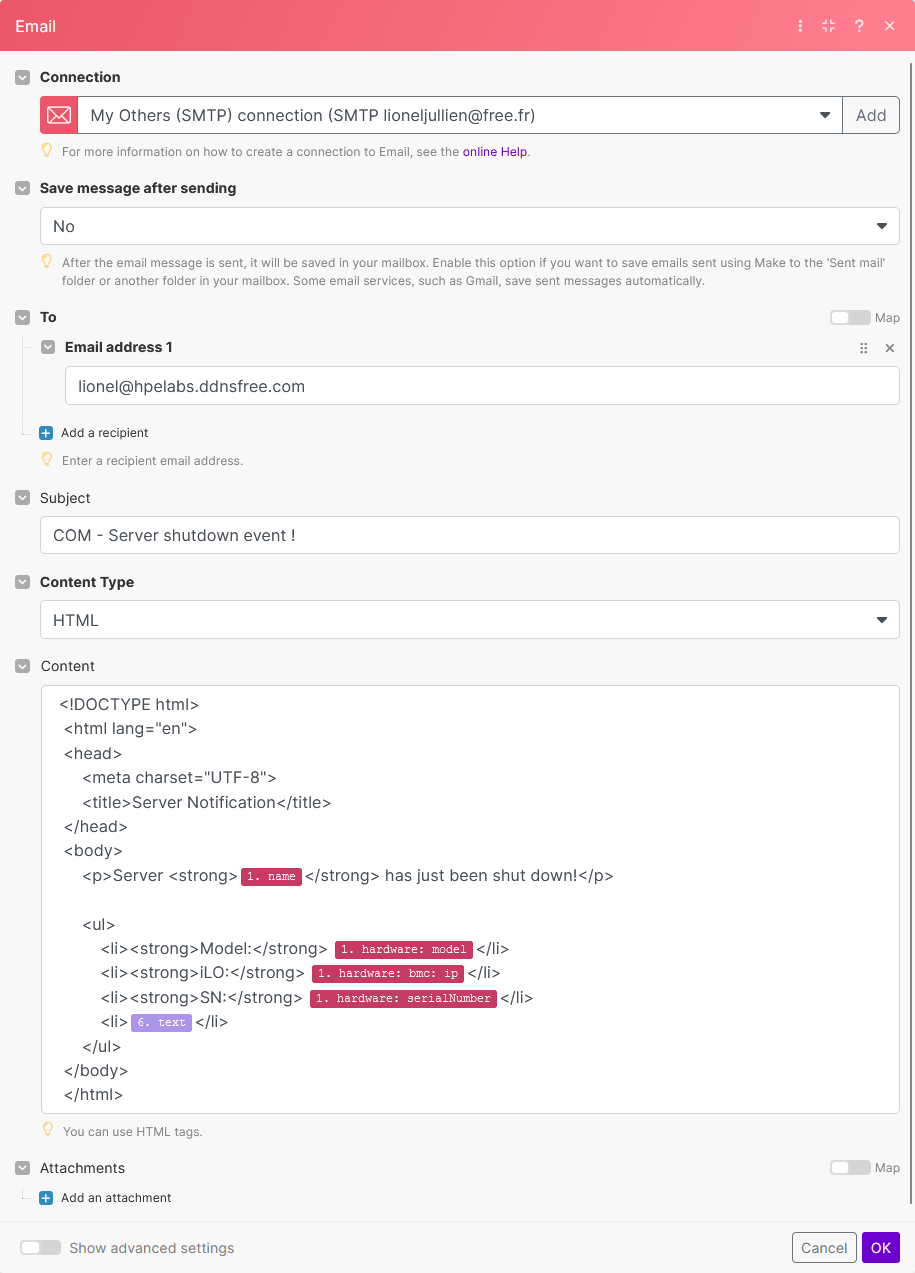
Once you select the Send an Email action, you will need to configure it with the necessary details:
-
Create a connection to your email account if not already done. You can connect your email account to Make using different methods such as using a Gmail account, an IMAP, or a Microsoft SMTP/IMAP OAuth connection. Refer to the Make online help for more information.
-
In the To field, add a recipient email address and enter the subject you want to have.
-
Enter the message you want to send. As an example, you can use the following HTML in the content field:
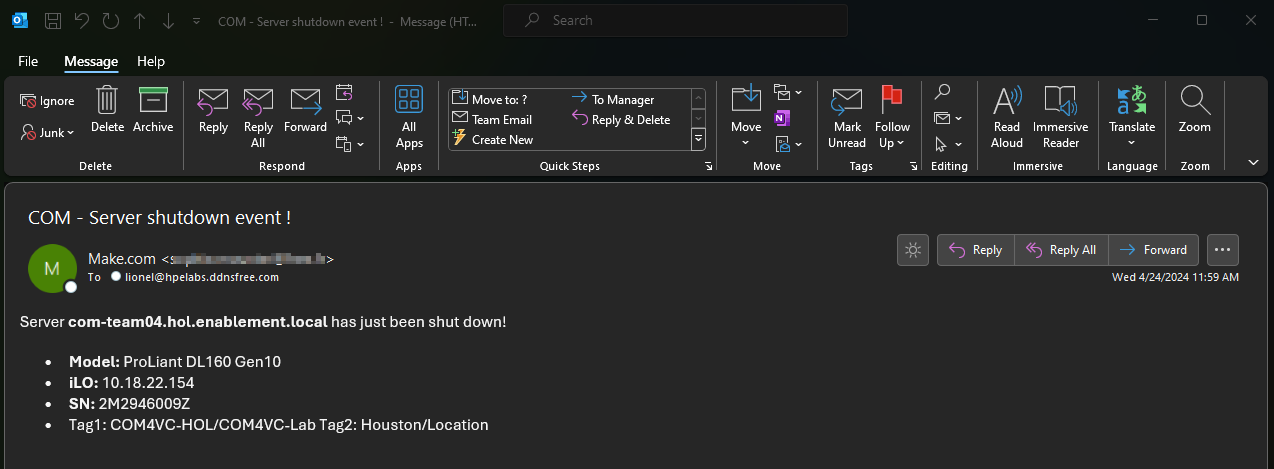
<!DOCTYPE html> <html lang="en"> <head> <meta charset="UTF-8"> <title>Server Notification</title> </head> <body> <p>Server <strong>{{1.name}}</strong> has just been shut down!</p> <ul> <li><strong>Model:</strong> {{1.hardware.model}}</li> <li><strong>iLO:</strong> {{1.hardware.bmc.ip}}</li> <li><strong>SN:</strong> {{1.hardware.serialNumber}}</li> <li>{{6.text}}</li> </ul> </body> </html> -
Configure any additional options then click OK.
-
-
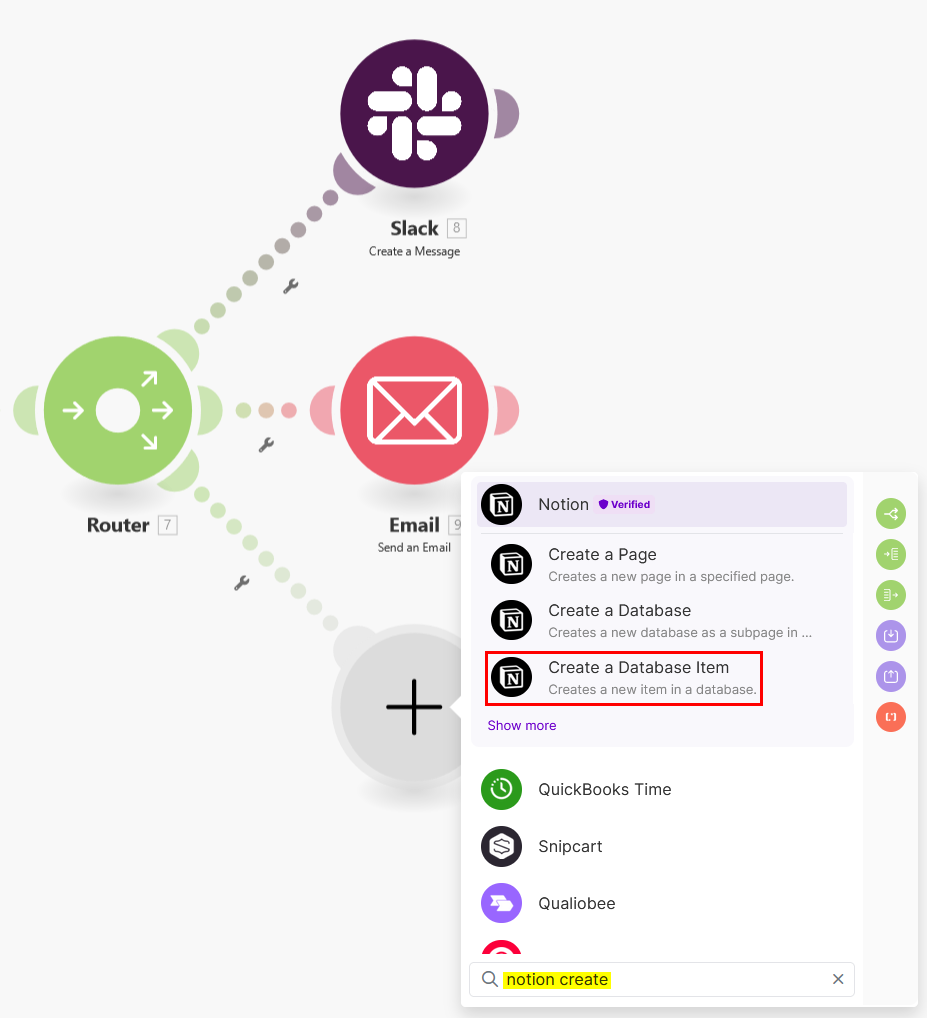
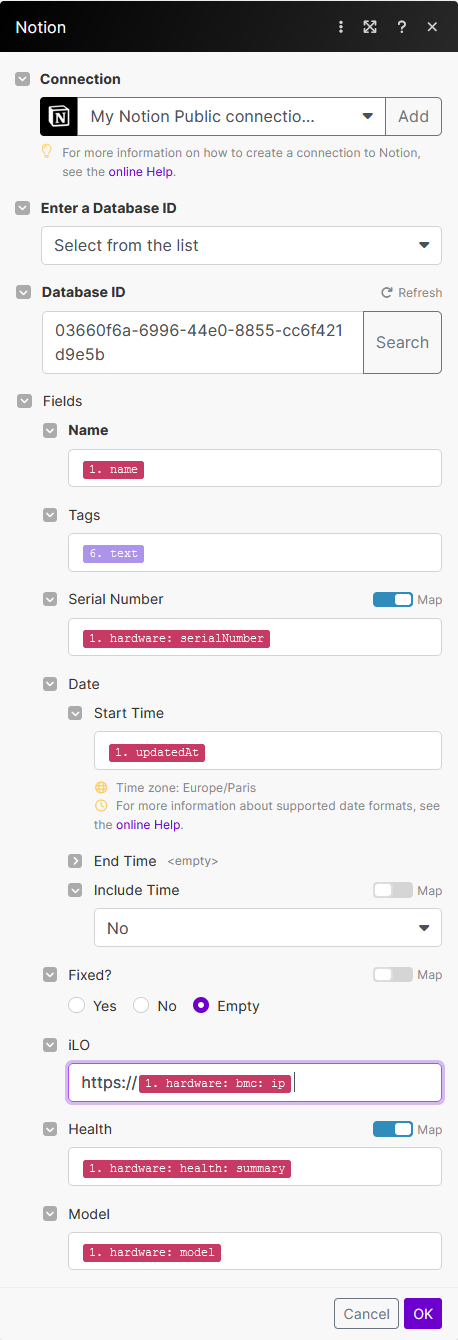
For the final action in this scenario, I aim to create a record in a Notion database to capture historical activity. Click on the router module to add another module, and then select the Notion: Create a Database Item module:
-
Connect to your Notion account if not already connected. Refer to the Make online help for more information.
Notion is an all-in-one workspace application that allows users to create, organize, and collaborate on notes, tasks, databases, and documents. It combines the functionalities of note-taking, project management, and database management into a single, flexible platform for personal use or team collaboration.
-
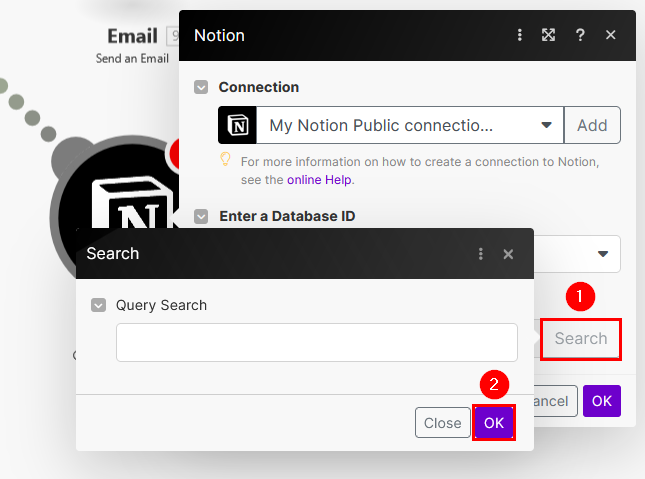
Select the database where the record will be created. Use the Select from the list option, then click on the Search button. You can press the OK button directly afterward, even without providing any query parameters:
-
Then select the database to record the shutdown events:
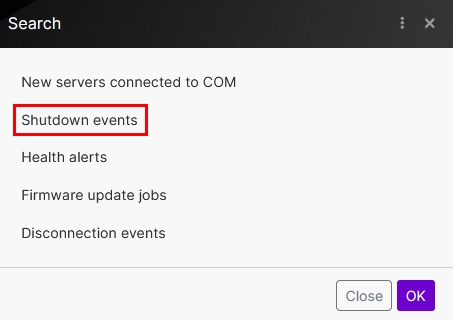
To learn about Notion database and how to create one, see Intro to databases and Creating a database.
-
For this example, you need to create a database in Notion with the following properties:
- Date, Type:
Date - Name, Type:
Title - Serial Number, type:
Multi-select - Model, Type:
Text - Health, Type:
Status- Show as:Select- To-do:OK(Green),WARNING(Orange),CRITICAL(Red),NOT_PRESENT,READY,UNKNOWN - iLO, Type:
URL - Fixed?, Type:
Checkbox - Tags, Type:
Text
The
Fixed?property is used as a Boolean flag to indicate the resolution status of a server shutdown problem.
- Date, Type:
-
For the Notion module in Make, configure the following options:
- Name:
{{1.name}} - Tags:
{{6.text}} - Serial Number:
{{1.hardware.serialNumber}} - Start Time:
{{1.updatedAt}} - iLO:
https://{{1.hardware.bmc.ip}} - Health:
{{1.hardware.health.summary}} - Model:
{{1.hardware.model}}
- Name:
-
-
-
Scheduling and Activation
-
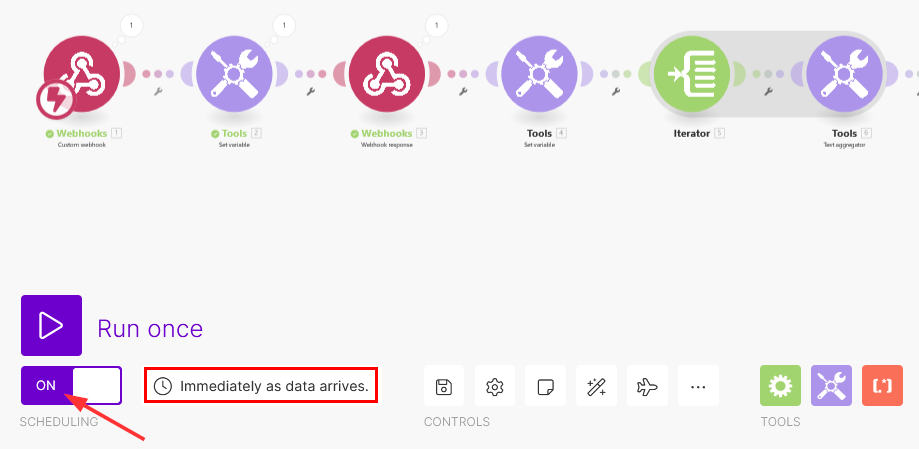
To ensure the scenario runs automatically every time webhook data is received from COM, click on the Scheduling button and make sure the Immediately as data arrives option is selected:
-
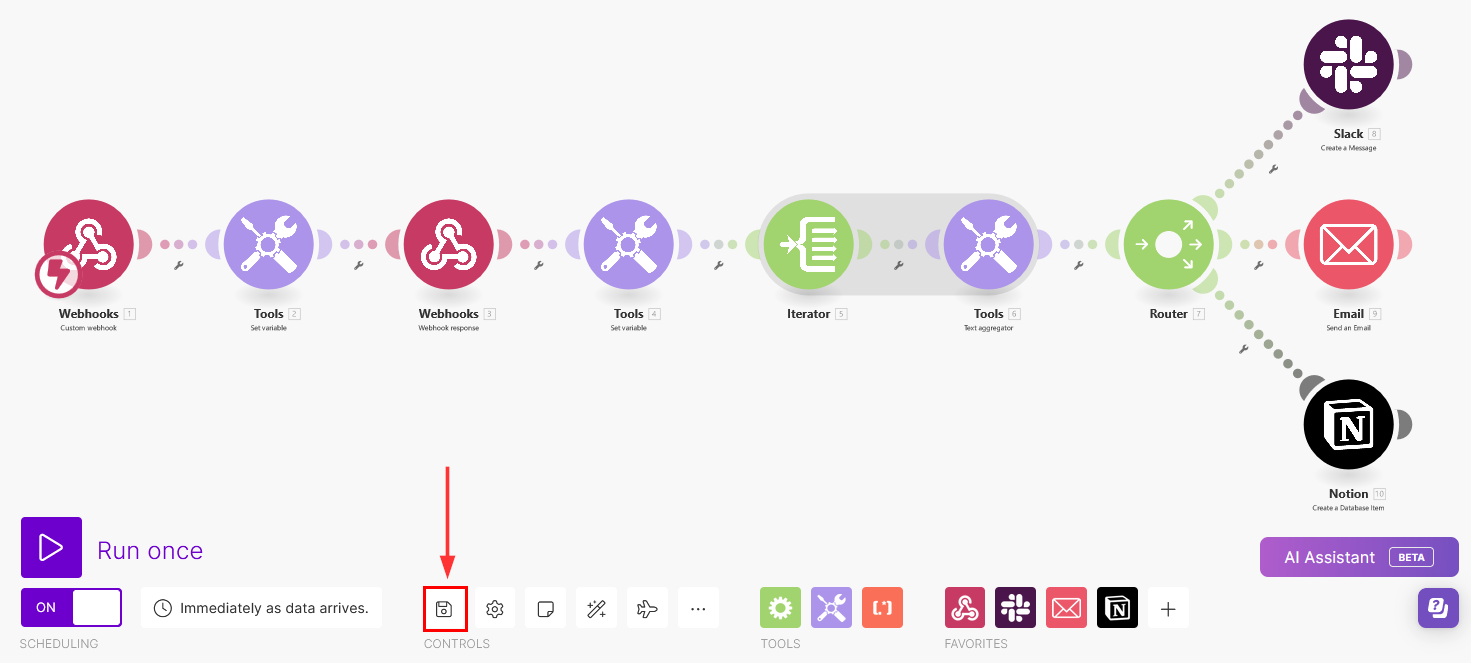
Finally, save your scenario by clicking on the Save button:
This completes the configuration of the scenario. You are ready to test the full flow.
-
-
Trigger a webhook to test the full flow
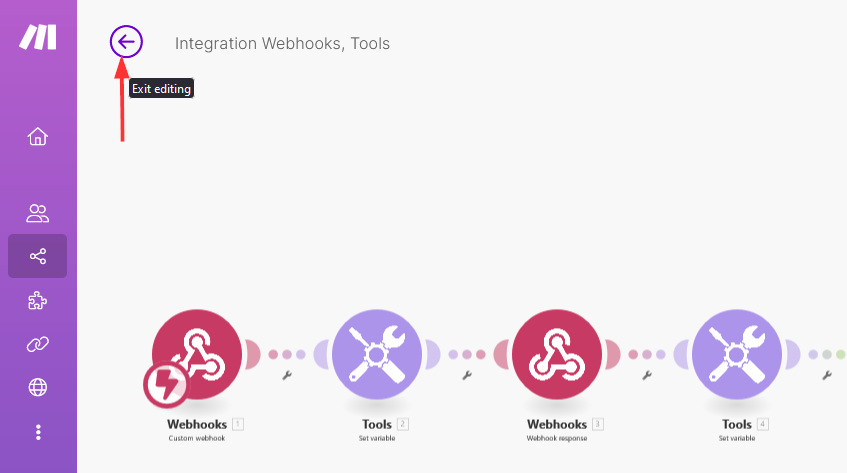
The last step will be the testing phase where you’ll verify that everything operates as expected. Exit the editor to monitor the scenario and check logs for any issues:
To trigger a webhook, you can choose from two options:
-
Shut down a server for real in COM using the GUI to test the entire flow:
- Navigate to the control panel within your COM user interface.
- Identify the server you want to stop.
-
Use the server options to initiate a shut down.
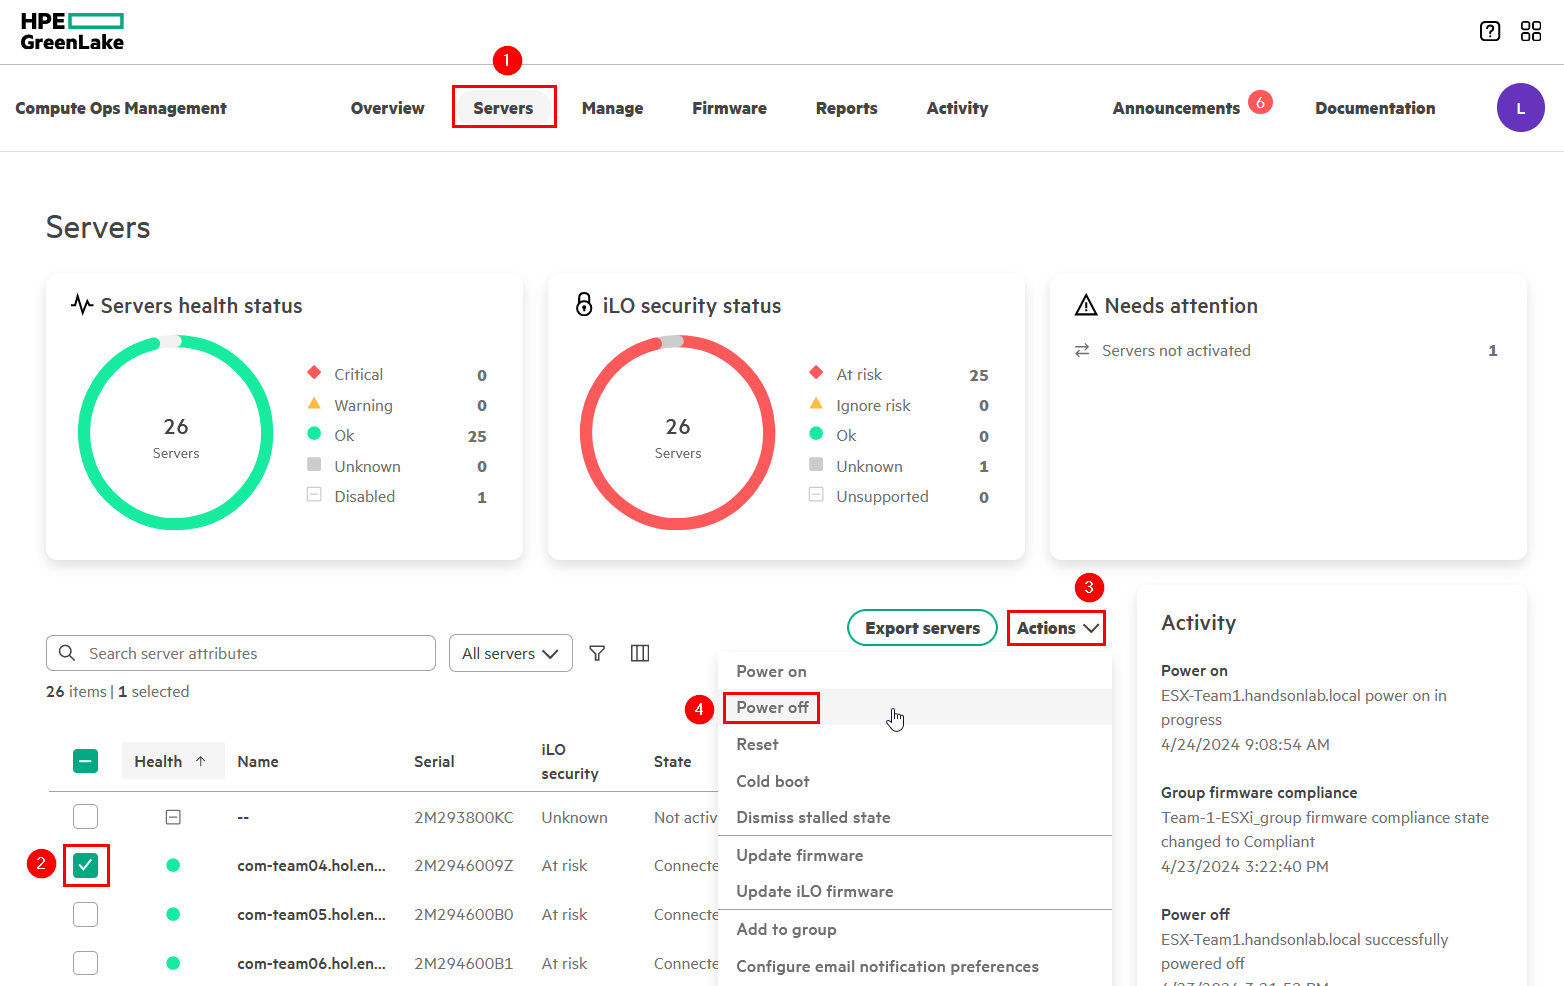
-
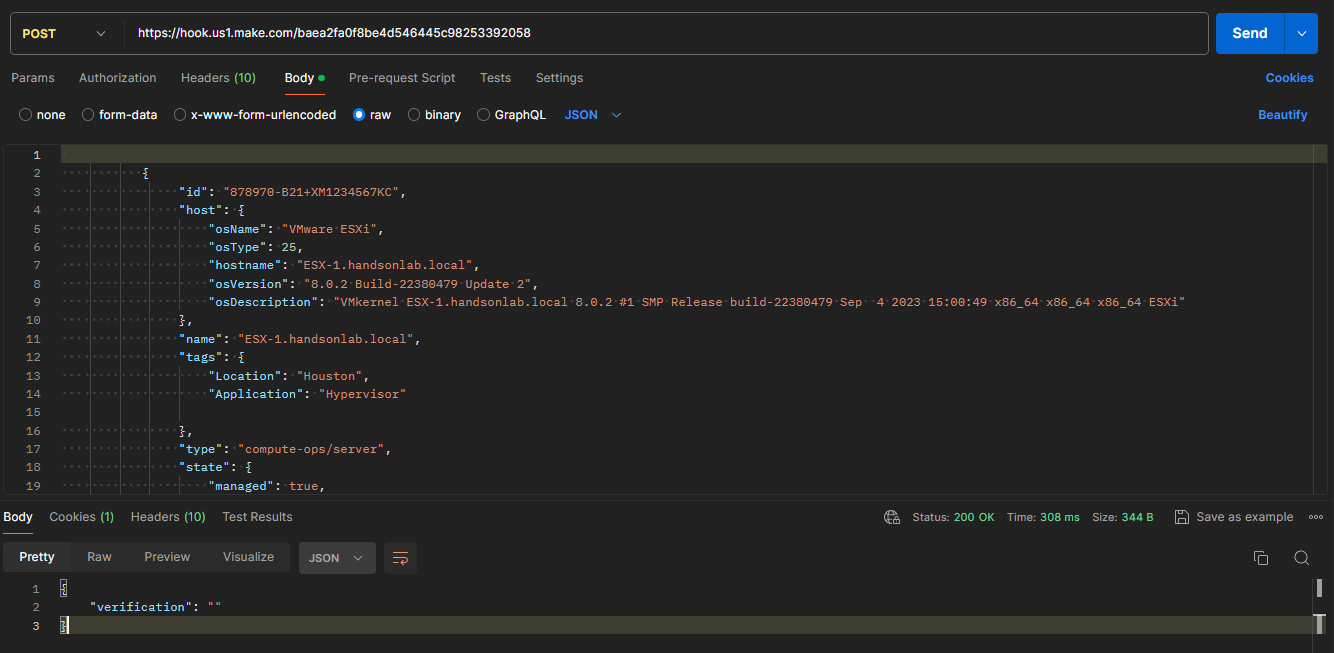
Simulate a webhook using a POST request:
- Prepare a POST request with the necessary payload data.
-
Send this request to your Make endpoint URL.
Example of a webhook test sending server data:
  POST https://your.make.endpoint.url/webhook
  Content-Type: application/json
{ "id": "878970-B21+XM1234567KC", "host": { "osName": "VMware ESXi", "osType": 25, "hostname": "ESX-1.handsonlab.local", "osVersion": "8.0.2 Build-22380479 Update 2", "osDescription": "VMkernel ESX-1.handsonlab.local 8.0.2 #1 SMP Release build-22380479 Sep 4 2023 15:00:49 x86_64 x86_64 x86_64 ESXi" }, "name": "ESX-1.handsonlab.local", "tags": { "Location": "Houston", "Application": "Hypervisor" }, "type": "compute-ops/server", ... }Replace
https://your.make.endpoint.url/webhookwith your actual Make endpoint URL and adjust the JSON payload as required for your scenario. A webhook test example can be found on my Postman collection.The advantage of this method is that you can easily send numerous webhook tests without relying on COM. This significantly streamlines the troubleshooting process and is particularly useful for populating the module variable mappings of your scenario. However, it’s critical to understand that this approach will not test or validate your webhook configurations and filter operations within COM.
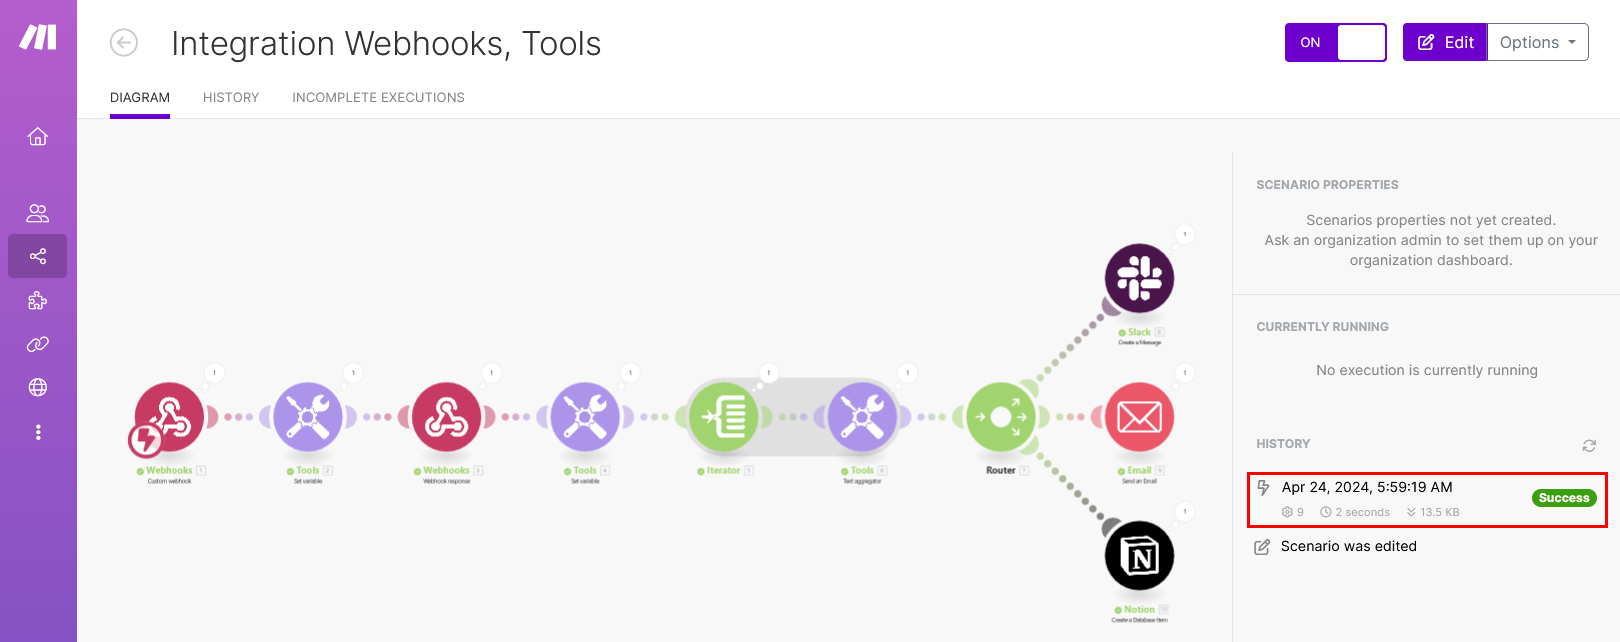
In Make, monitor the scenario. Ensure that the webhook is received and that it triggers the corresponding actions. Check the Make history for any issues. All modules should turn green, indicating success, with no errors displayed:
You should receive the following message template in Slack:
You should receive the following message template in your mailbox:
You should have a new record in your Notion database:

-
Using the Make On-premise agent
In this Make scenario with COM, you’ve learned how to create actions using public resources, such as Slack, Email, Notion. But what happens when someone wants to interact with local files, databases, and services?
Good news, Make offers an On-premise agent designed to bridge the gap between Make’s cloud-based integration platform and an organization’s private, on-premises resources. This software component enables users to securely automate workflows that require local network access. For instance, if you want to create an action on iLOs, such as restarting a server that was accidentally shutdown, the On-premise agent makes this possible by allowing your Make scenarios to communicate with and control local systems.
To learn more, see Using the On-premise agent.
According to the Make website as of April 2024, the On-premise agent is still in beta and is exclusively available with their Enterprise plan.
Taking automation a step further?
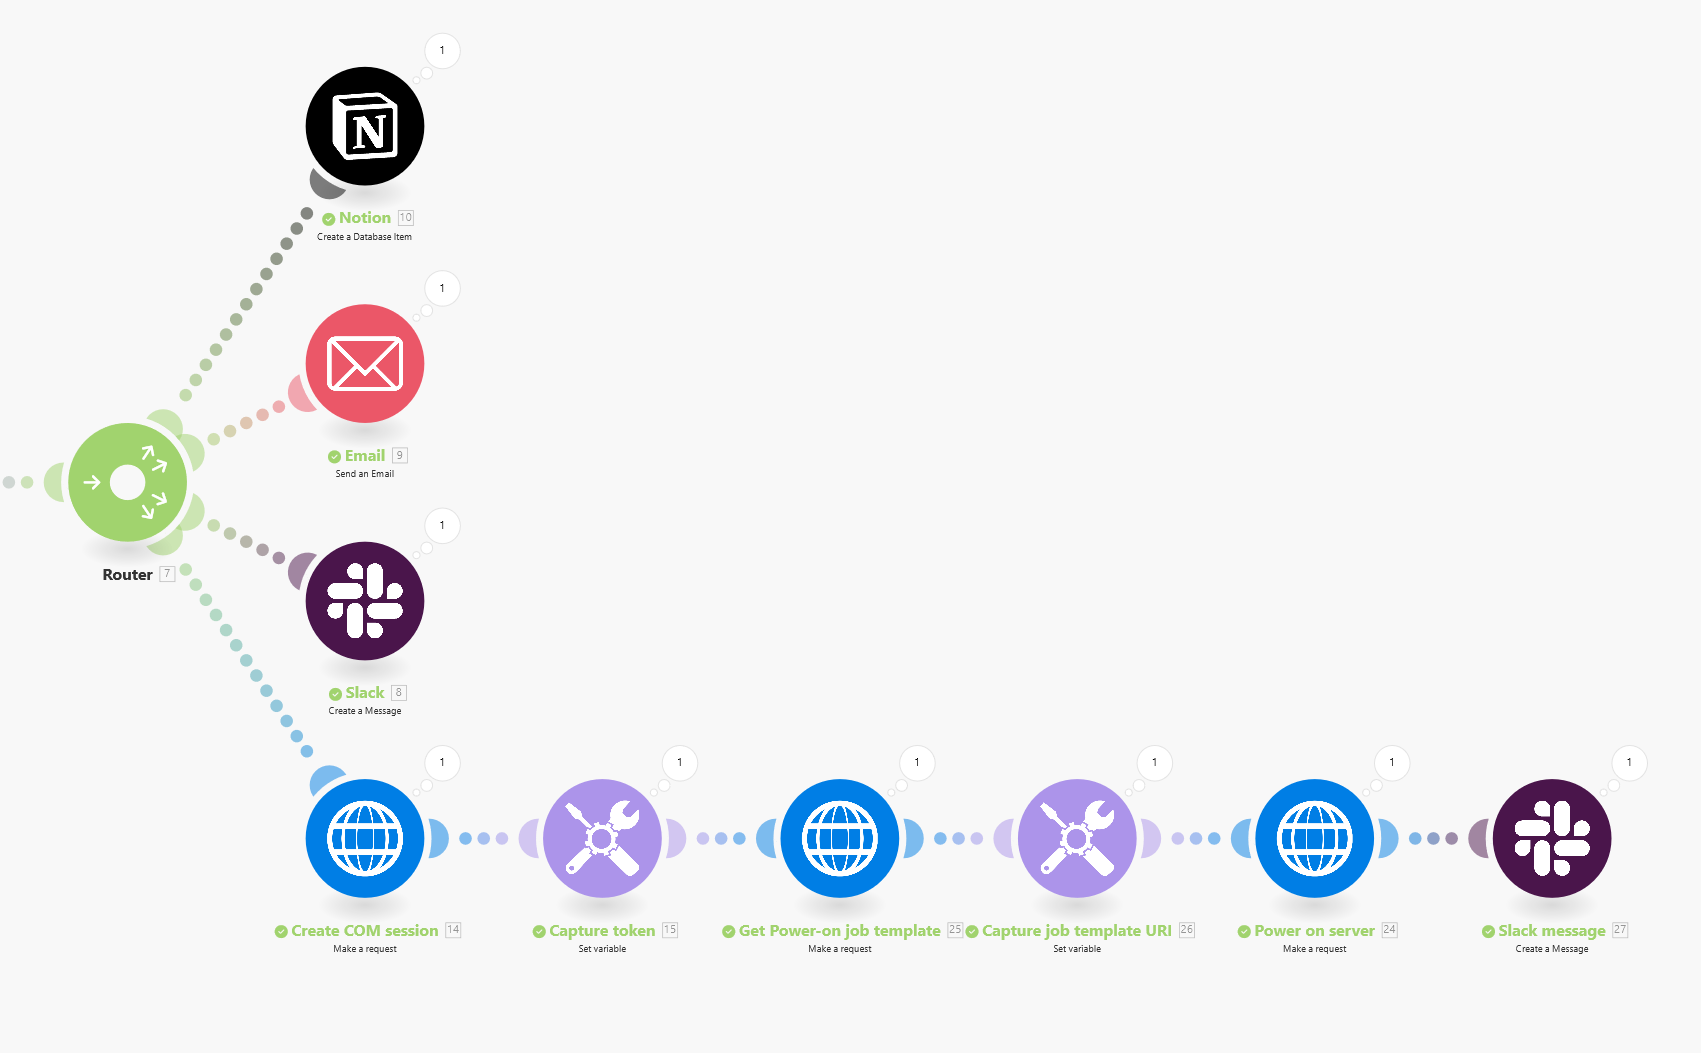
An enhanced scenario could incorporate more sophisticated actions, such as sending HTTP requests to Compute Ops Management to execute tasks informed by data received from a webhook. For example, expanding on the initial scenario, I could introduce an additional action to automatically restart a server. This enhancement would necessitate the integration of several modules:
Moreover, using filters, offers another layer of automation. Consider a webhook that activates upon the integration of new servers into the HPE GreenLake platform. In this case, it’s feasible to automate diverse operations within Make. For instance, servers can be automatically added to specific groups utilizing filters based on their tag values — such as location or application type — to apply particular configurations and firmware levels:
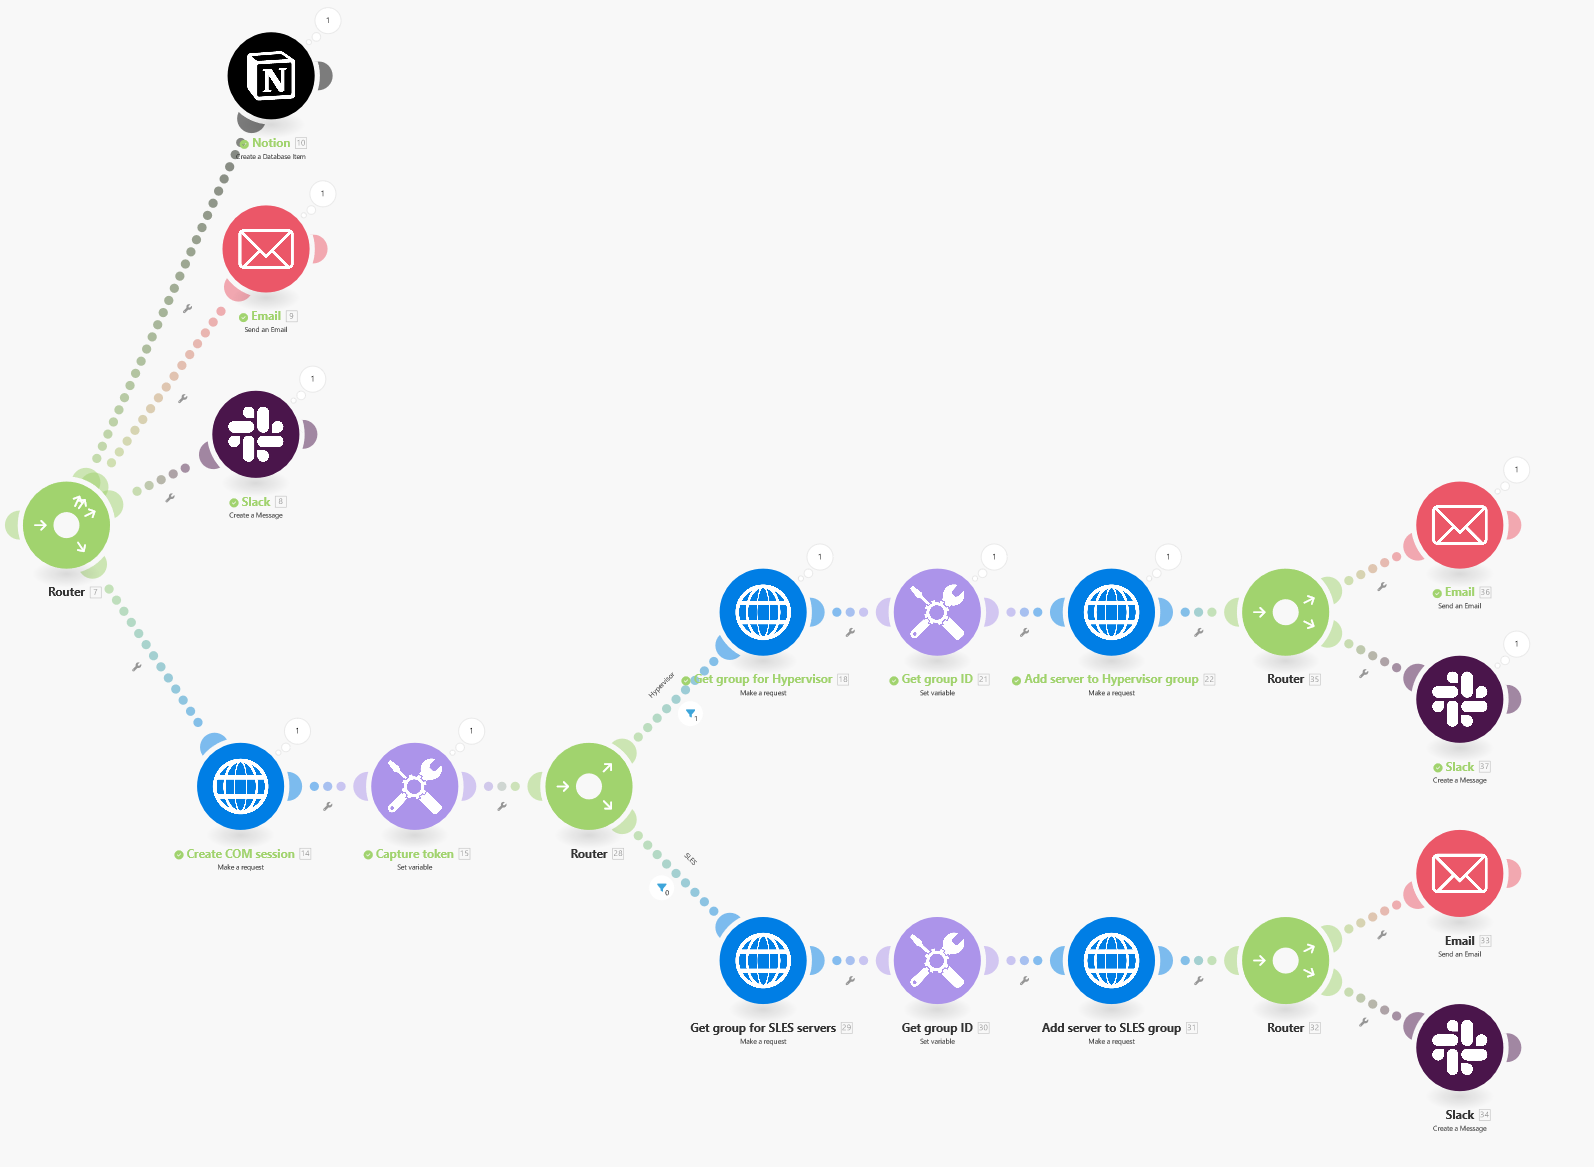
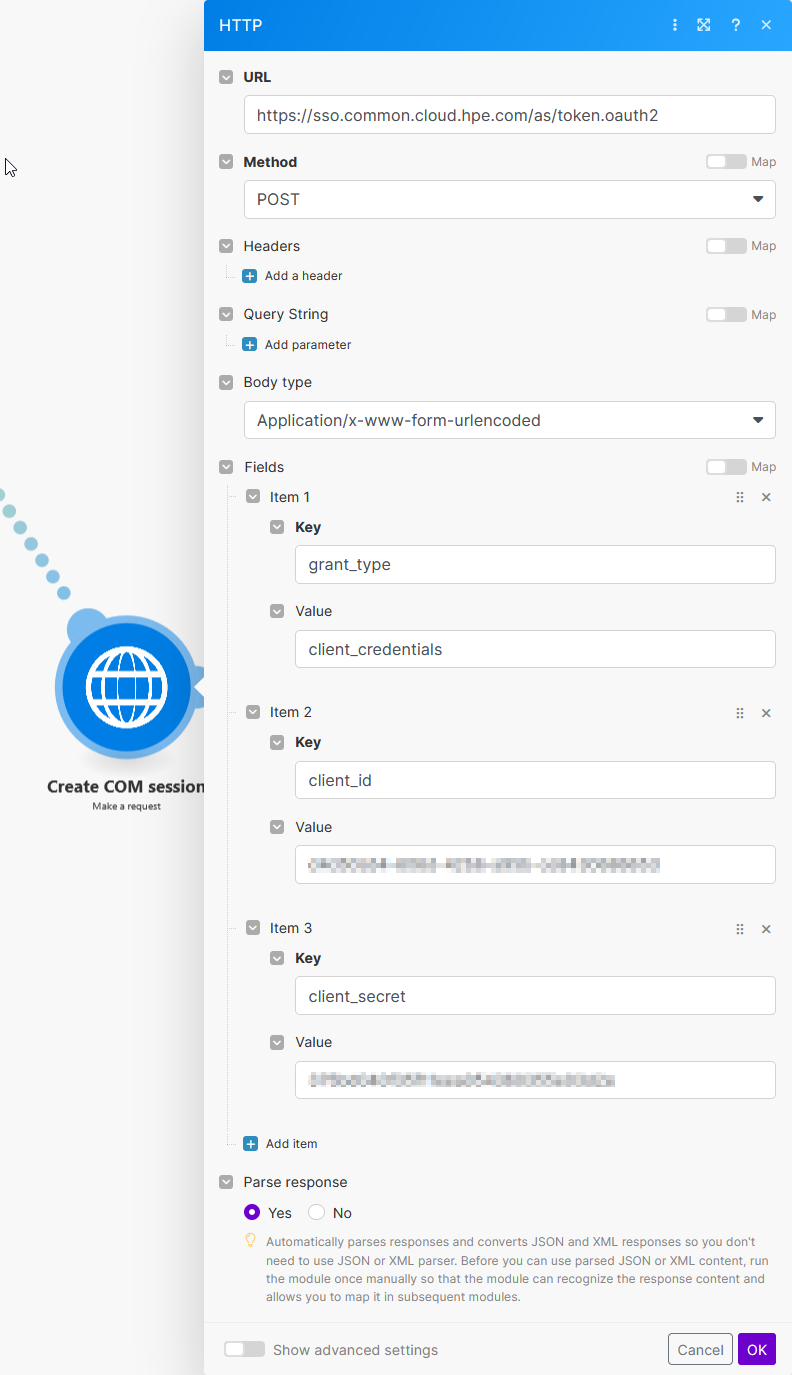
Details about the different modules to use in Make to interact with COM:
-
To create a COM session, you can use the HTTP: Make a request module with the following configuration:
-
To capture the COM access token, use:
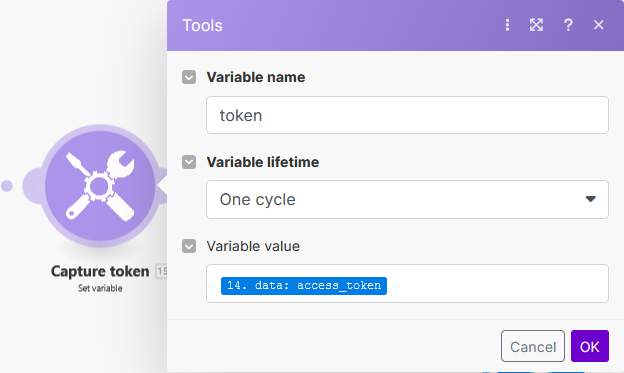
-
To create a GET request, use:
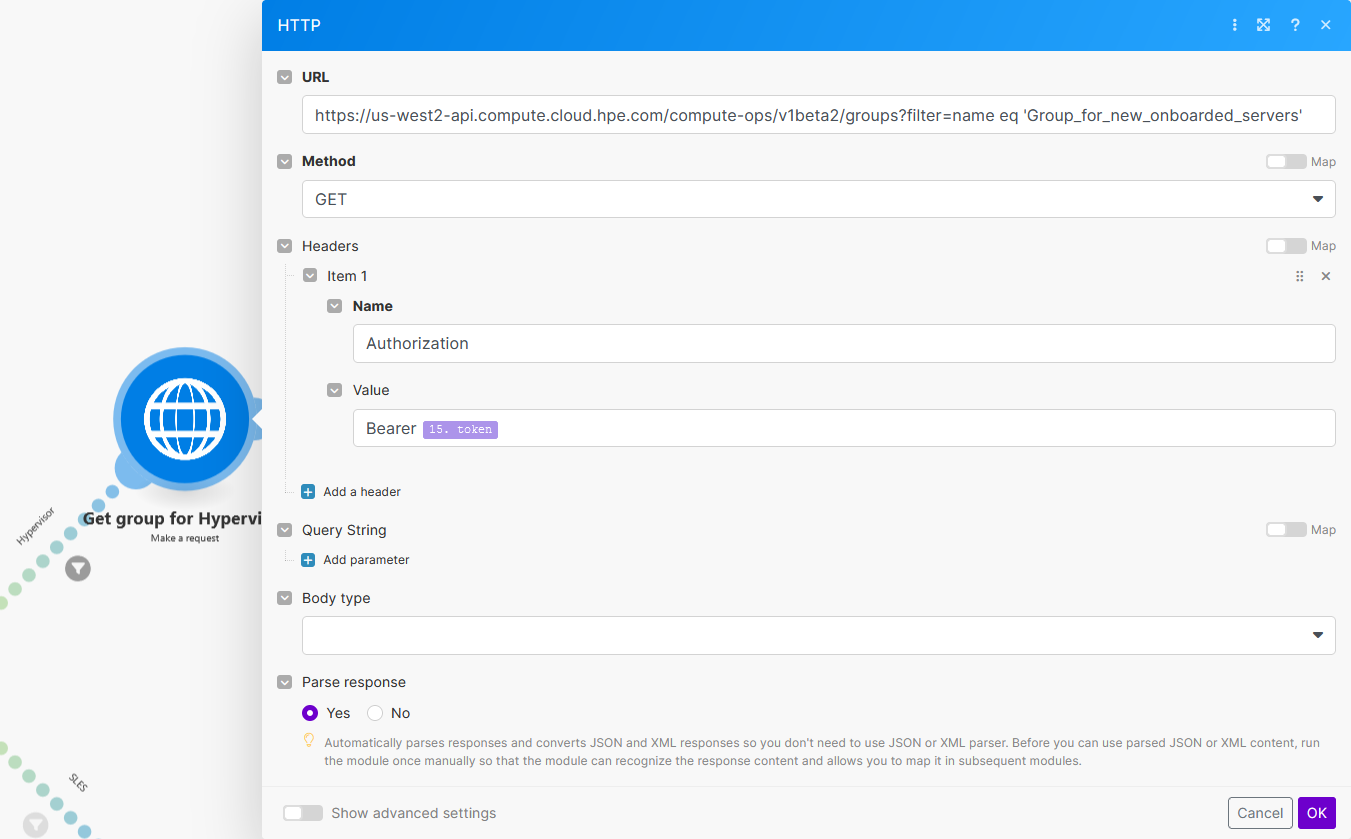
-
To capture the GET response into a variable:
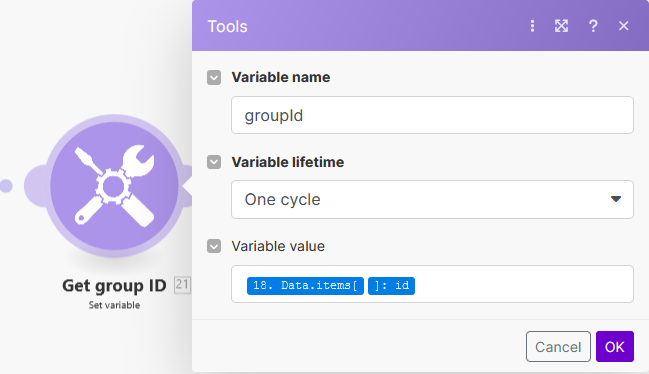
-
To create a POST request with a particular payload, use:
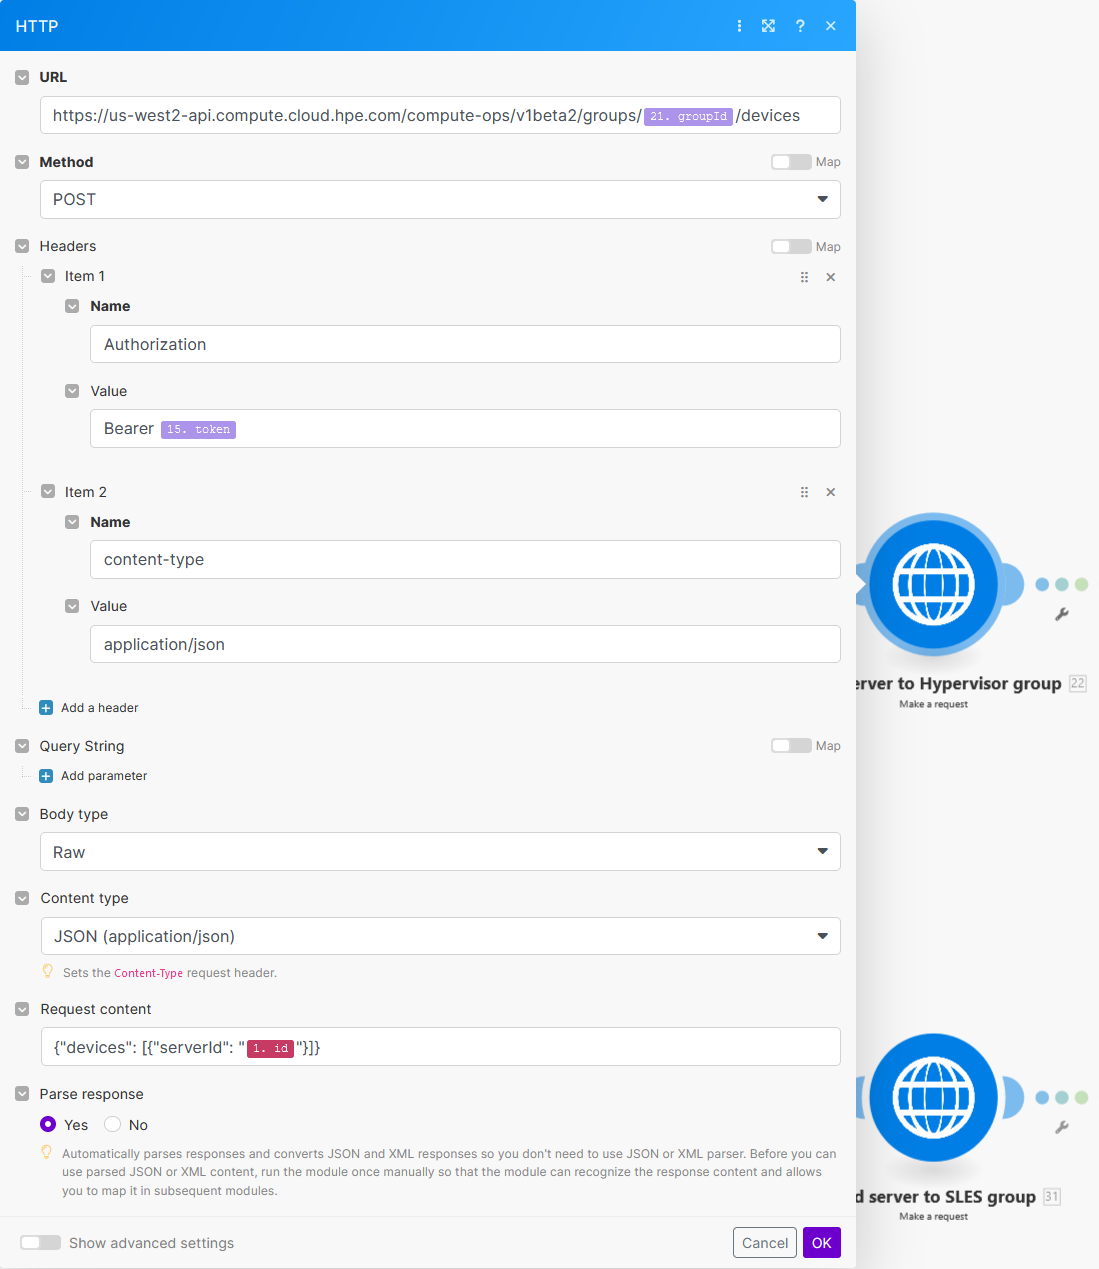
Note that you must remove all spaces in the JSON payload for the COM API to accept the request.
-
Filters used to detect the application name in the Tag values, must be configured with the
textvariable where the server tags have been stored from module6and must use theContains()operator with the string value that you want to filter: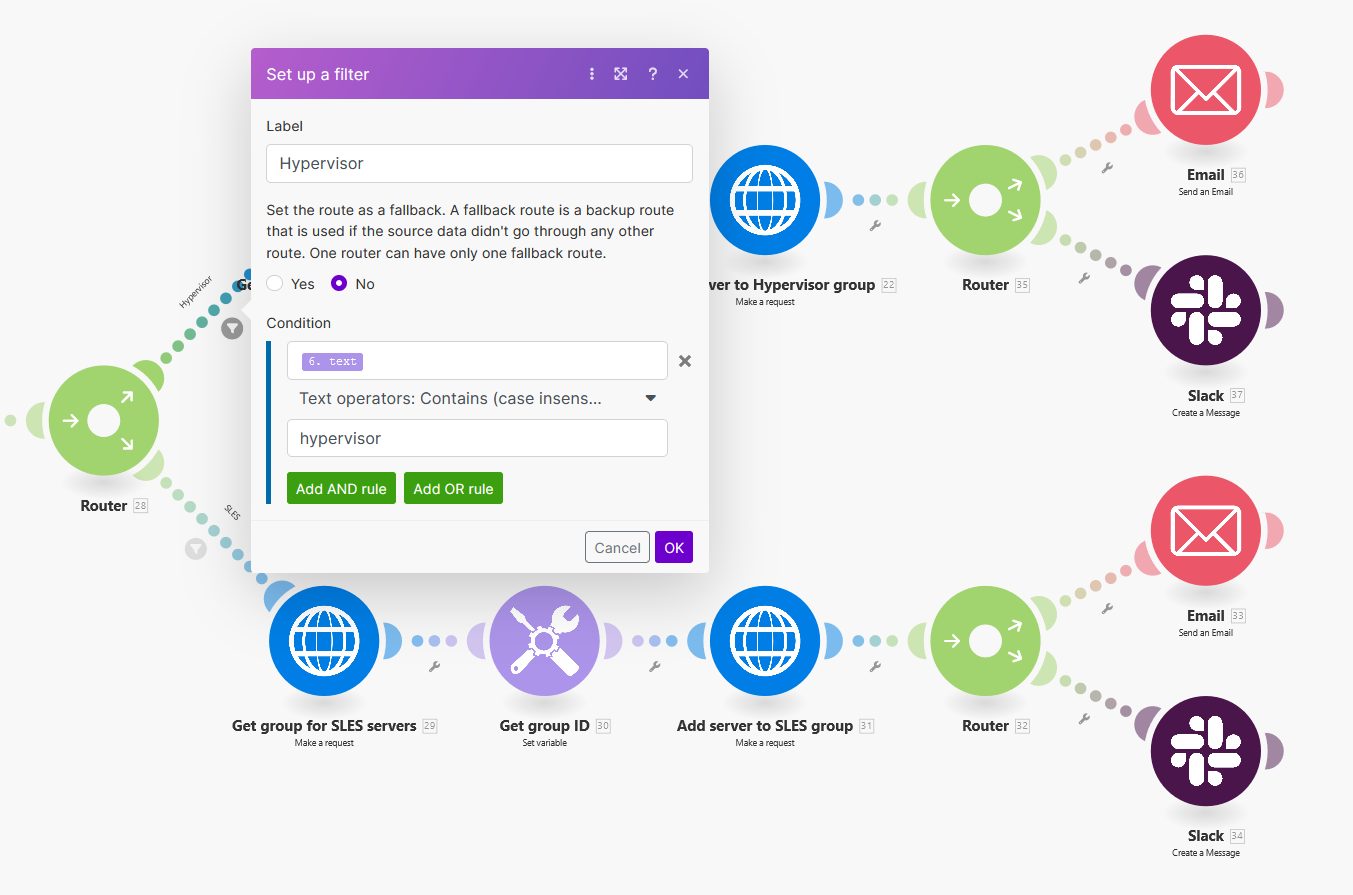
A production-ready reference implementation
The Make scenario above is perfect for prototyping and no-code automation, but if you need to forward COM events into an enterprise tool — an event/monitoring system (HPE OpsRamp, OBM), an ITSM/ticketing system (ServiceNow), or a SIEM (Splunk) — in a robust, self-hosted way, I’ve put together an open-source set of reference implementations:
HPE-COM-Event-Integrations — reference receivers that take COM webhook events and forward them to OBM, ServiceNow, Splunk, or any generic webhook target.
It implements, in real code, everything this article describes — the verification handshake, shared-secret validation, and the raise/clear ticketing pattern — plus event normalisation, de-duplication, and retry, so you don’t have to build those from scratch. It comes in two deployment shapes depending on your constraints:
- Cloud relay + on-prem shim — a managed public receiver (Azure Container Apps / AWS App Runner) enqueues events, and an outbound-only shim running next to your target drains the queue. No inbound ports on-prem.
-
Single on-prem box — one container that receives, transforms, and forwards in a single process with a local disk spool for durability, for when no cloud service can be used.
If you already run HPE OpsRamp or ServiceNow, note that both have a native COM integration, so you may not need a custom receiver at all — the repo’s README explains when to use which.
Wrapping up
To wrap things up, I’m genuinely excited about the opportunities here! The combination of COM webhooks with some nifty tools opens up a world of possibilities for automating all sorts of things in HPE GreenLake. Imagine having complicated tasks just flow smoothly on their own—less manual work for us humans, and you get a server management system that’s agile and super responsive. By tapping into the magic of webhooks through Compute Ops Management, you’re looking at a real game-changer for boosting how you handle IT operations and making everything run like a well-oiled machine. It’s pretty awesome what you can achieve with this tech! 🚀
your hub for all HPE software-related content!