Configuring OIDC SSO Authentication with HPE GreenLake: Microsoft Entra ID, Okta, and Ping Identity, with HPECOMCmdlets Integration
Jump to:
- Introduction
- OIDC vs. SAML 2.0 in HPE GreenLake
- Prerequisites
- How the HPE GreenLake OIDC Wizard Works
- Part 1: Configuring OIDC SSO with Microsoft Entra ID
- Part 2: Configuring OIDC SSO with Okta
- Part 3: Configuring OIDC SSO with Ping Identity
- Granting Users Access with Local Role Assignments
- Testing OIDC SSO Authentication
- Troubleshooting
- Conclusion
- Additional Resources
Configuration steps verified with Okta, Microsoft Entra ID, and PingOne as of November 2026.
In my SAML SSO guide, I walked through federating HPE GreenLake with the three most popular enterprise identity providers using SAML 2.0. HPE GreenLake also supports OpenID Connect (OIDC), and since version 1.0.27, the HPECOMCmdlets PowerShell module signs in to OIDC-federated workspaces exactly like SAML ones. This post shows how to configure an OIDC SSO connection with Microsoft Entra ID, Okta, and Ping Identity.
Introduction
OIDC is an identity layer built on OAuth 2.0. Instead of exchanging SAML metadata and signing certificates, you register an application in your identity provider and give HPE GreenLake its client ID and client secret. HPE GreenLake then discovers the identity provider endpoints automatically from its discovery URL.
This guide covers:
- What changes compared to SAML 2.0, and when OIDC is the right choice
- Configuring an OIDC SSO connection with:
- Microsoft Entra ID
- Okta
- Ping Identity
- Granting users access to HPE GreenLake with local role assignments
- Testing the sign-in from a browser and with HPECOMCmdlets
- Troubleshooting tips
Time Required: 30-45 minutes per identity provider
Skill Level: Intermediate (identity management experience recommended)
OIDC vs. SAML 2.0 in HPE GreenLake
Both protocols provide the same federated authentication: HPE GreenLake trusts your identity provider to verify who the user is, and never stores their password. Domain claiming, authentication policies, recovery users, and the passwordless and MFA setup for HPECOMCmdlets work the same way. The differences are:
| SAML 2.0 | OIDC | |
|---|---|---|
| Exchanged with the IdP | Metadata (Entity ID, ACS URL, signing certificate) and attribute claims | Discovery URL, client ID, and client secret |
| Credential to maintain | IdP signing certificate, updated in HPE GreenLake when it rotates | Client secret, renewed in HPE GreenLake before it expires |
| Authorization mode | Local role assignments or IdP-managed (hpe_ccs_attribute) |
Local role assignments only |
| HPECOMCmdlets support | v1.0.18 and later | v1.0.27 and later |
⚠️ Important: An OIDC connection only supports local role assignments. Your identity provider authenticates users, but their workspace access and roles are defined in HPE GreenLake (manually, by script, or with SCIM). If you need your identity provider to drive roles through
hpe_ccs_attribute, use SAML 2.0 instead.
Prerequisites
HPE GreenLake Requirements:
- A workspace with enhanced IAM and enterprise capabilities enabled
- The Workspace Administrator or Identity domain and SSO administrator role
- A verified domain for SSO. Domain claiming is identical for SAML and OIDC: follow Step 2: Register Entra ID in HPE GreenLake in the SAML guide
Identity Provider Requirements (one of the following):
- Microsoft Entra ID: Application Administrator or Global Administrator role (granting admin consent requires a role allowed to consent for the tenant)
- Okta: Super Administrator or Organization Administrator role
- Ping Identity: Environment Administrator access to PingOne
Optional (for HPECOMCmdlets):
- PowerShell 7+
- HPECOMCmdlets module v1.0.27 or later
- A mobile device with an authenticator app (Microsoft Authenticator, Okta Verify, or PingID) for passwordless sign-in or MFA (push notification or TOTP code)
How the HPE GreenLake OIDC Wizard Works
For every identity provider, the configuration alternates between HPE GreenLake and the identity provider, because each side needs a value from the other:
- HPE GreenLake: start the Create SSO connection wizard, select OIDC, and enter the identity provider discovery URL. The wizard then displays the GreenLake redirect URL.
- Identity provider: create an OIDC web application with that redirect URL, and copy its client ID and client secret.
- HPE GreenLake: enter the client ID and secret, finish the wizard, and create an authentication policy that links your verified domain to the new connection.
- HPE GreenLake: add the users and assign their roles (local role assignments).
Keep the wizard open in one browser tab and the identity provider console in another.
Part 1: Configuring OIDC SSO with Microsoft Entra ID
Microsoft Entra ID (formerly Azure Active Directory) is Microsoft’s cloud identity and access management service. In this part, you register HPE GreenLake as an OIDC web application in Entra ID, restrict it to a security group, and connect it to HPE GreenLake with its client ID and secret.
Before you begin: Your domain must be claimed and verified in HPE GreenLake. If you have not done it yet, follow Claim and verify a domain in the SAML guide. This step is identical for SAML and OIDC, and only needs to be done once per domain.
Step 1: Get the Entra ID discovery URL
-
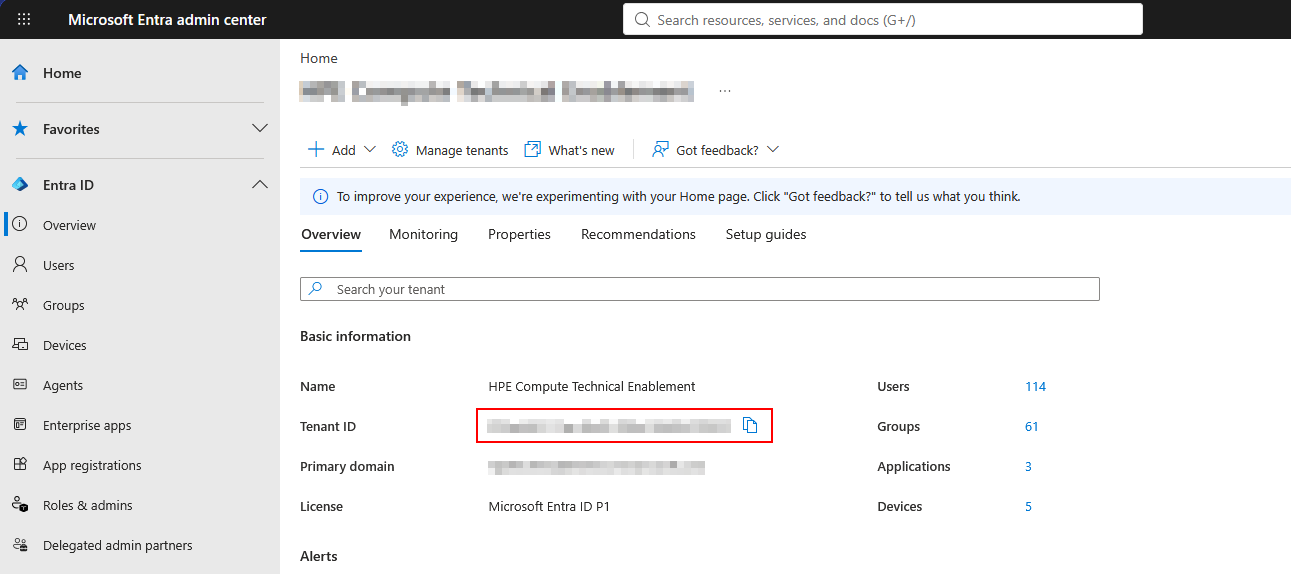
In the Microsoft Entra admin center, open Entra ID → Overview and copy your Tenant ID.
-
Build the tenant-specific OIDC discovery URL by replacing
<TENANT-ID>with that value:https://login.microsoftonline.com/<TENANT-ID>/v2.0/.well-known/openid-configurationTip: Open this URL in a browser to check that it returns a JSON document. See Microsoft’s OpenID Connect on the Microsoft identity platform documentation.
Step 2: Start the OIDC connection in HPE GreenLake
-
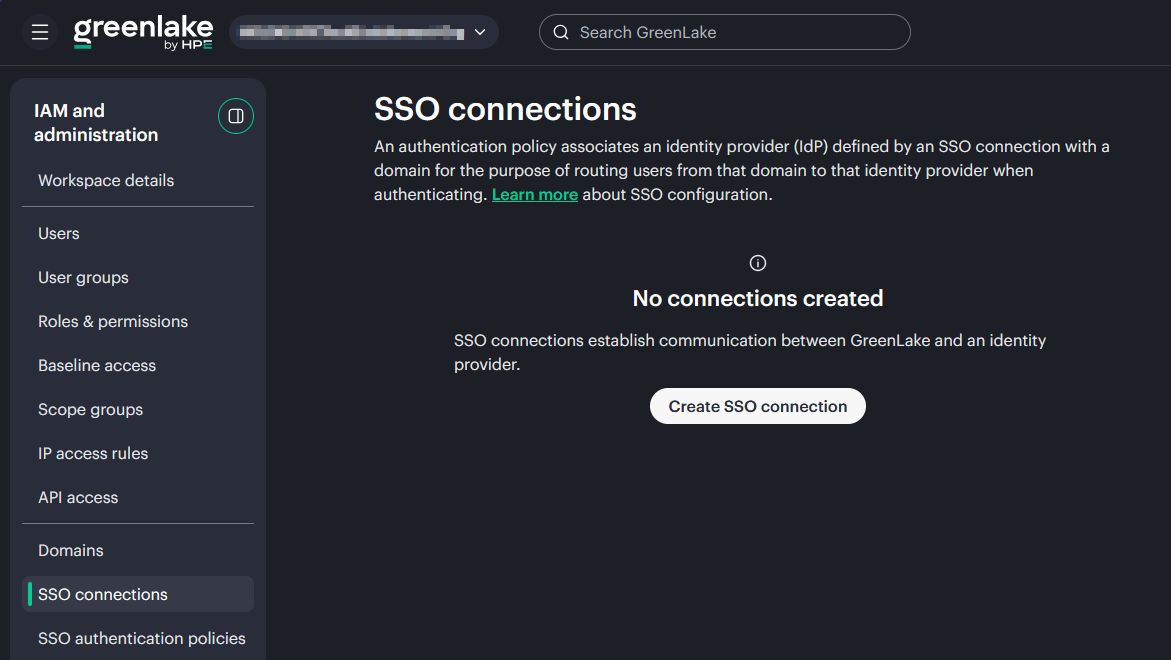
Log in to HPE GreenLake at https://common.cloud.hpe.com/, navigate to Manage Workspace → SSO configuration, and click Create SSO connection.
-
Enter a descriptive SSO connection name (e.g.,
EntraID-OIDC) and select OpenID Connect (OIDC).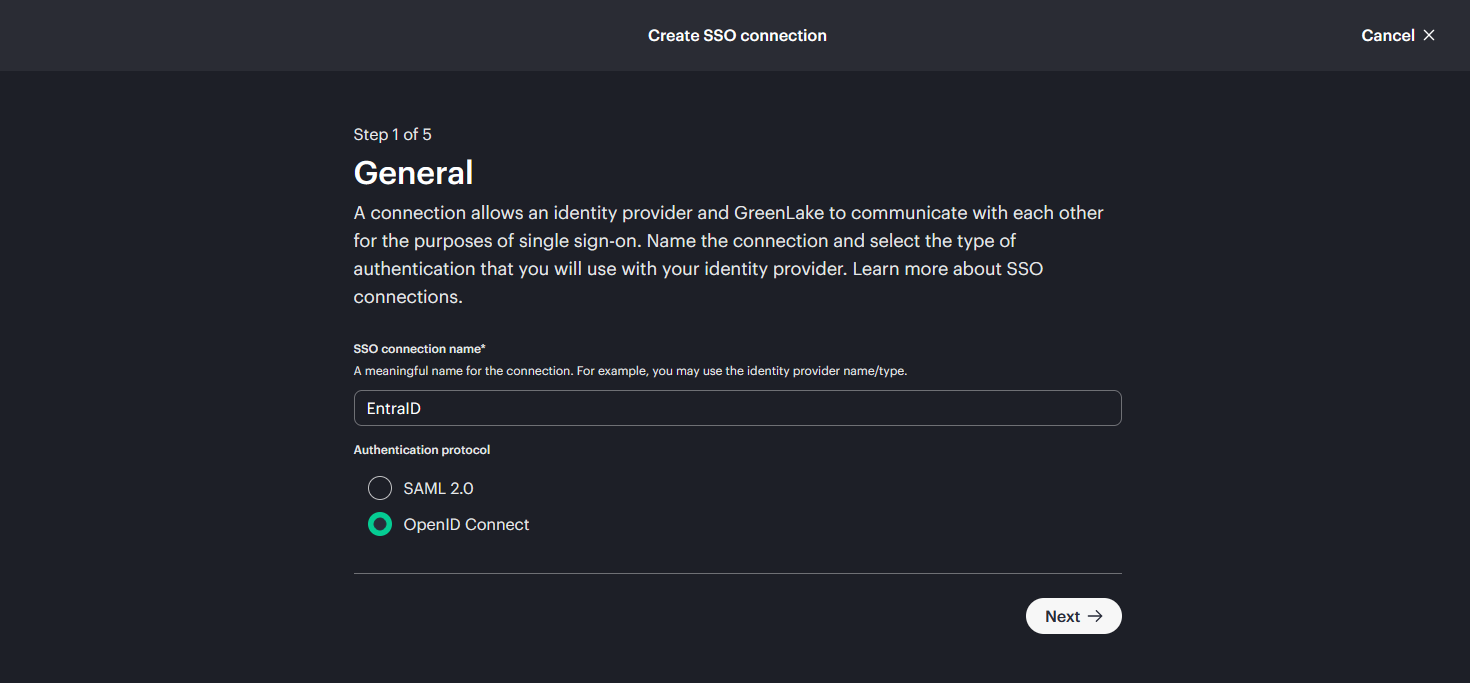
-
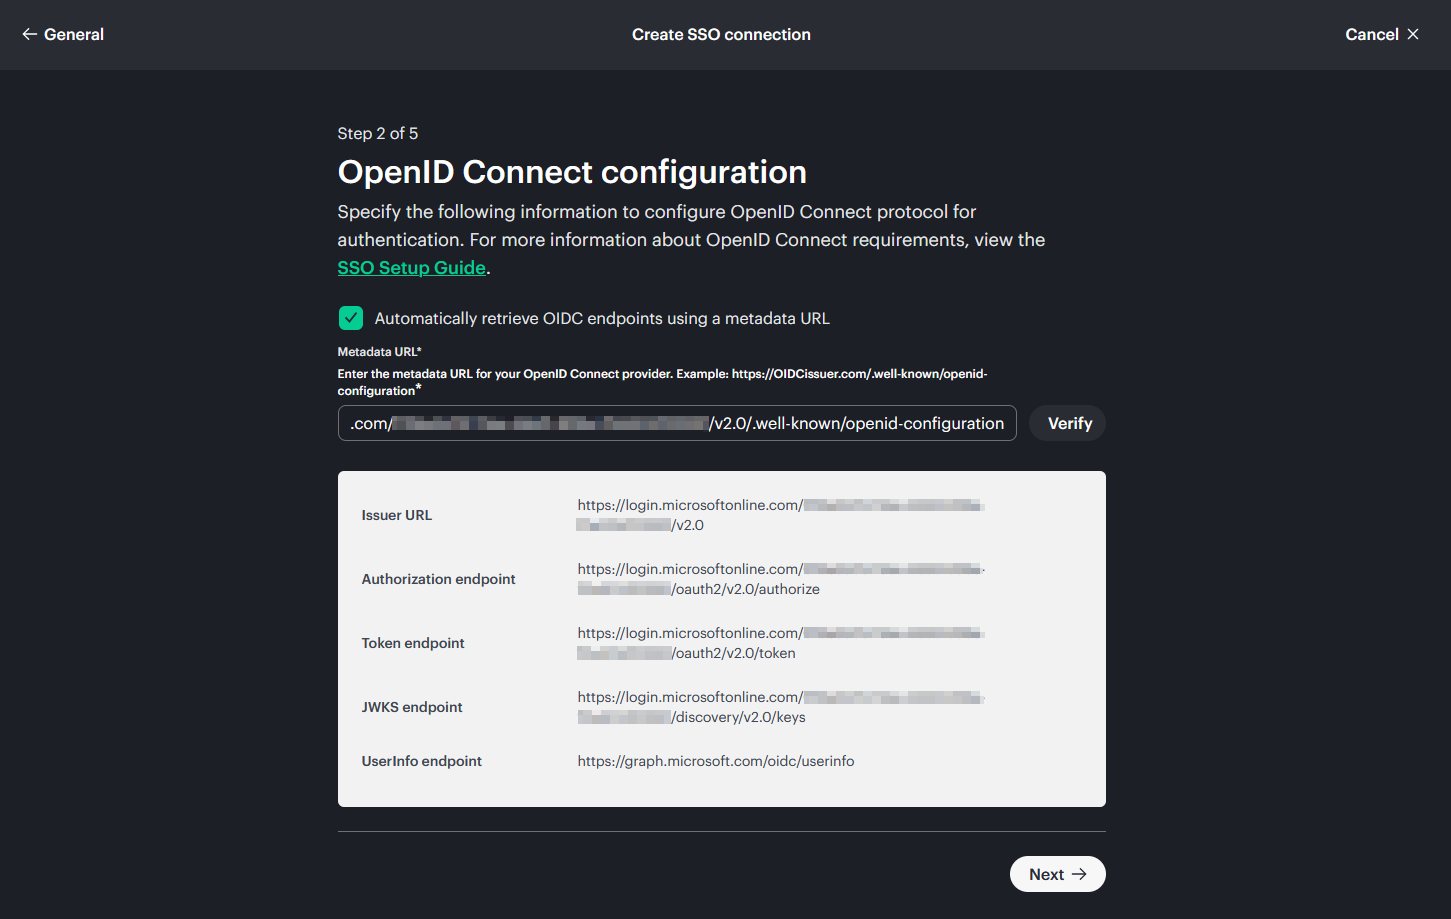
Leave Automatically retrieve OIDC endpoints using metadata URL selected, paste the discovery URL built in Step 1, and click Verify.
-
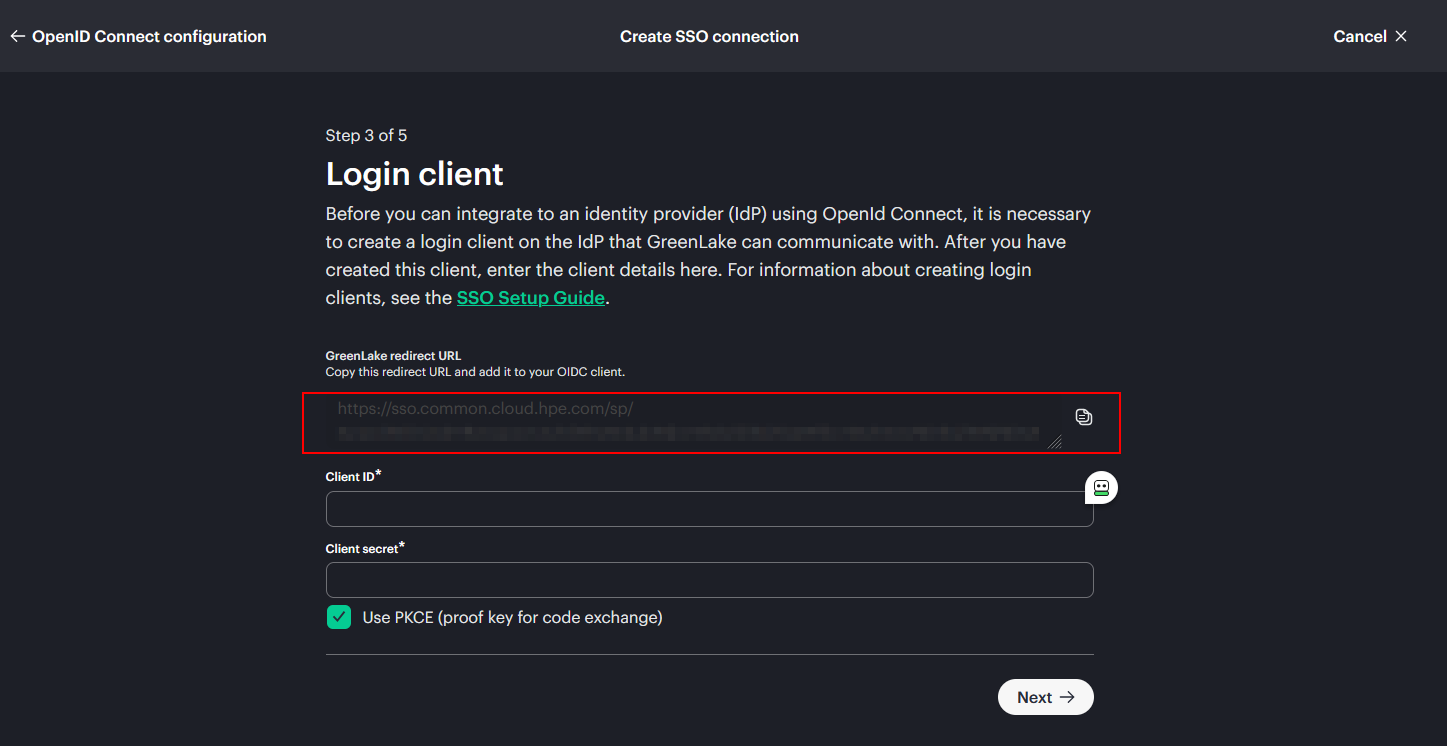
Click Next. On the Login client page, copy the GreenLake redirect URL exactly as displayed. Keep this HPE GreenLake tab open: you will come back to it in Step 4 to enter the client ID and secret.
Step 3: Register the application in Entra ID
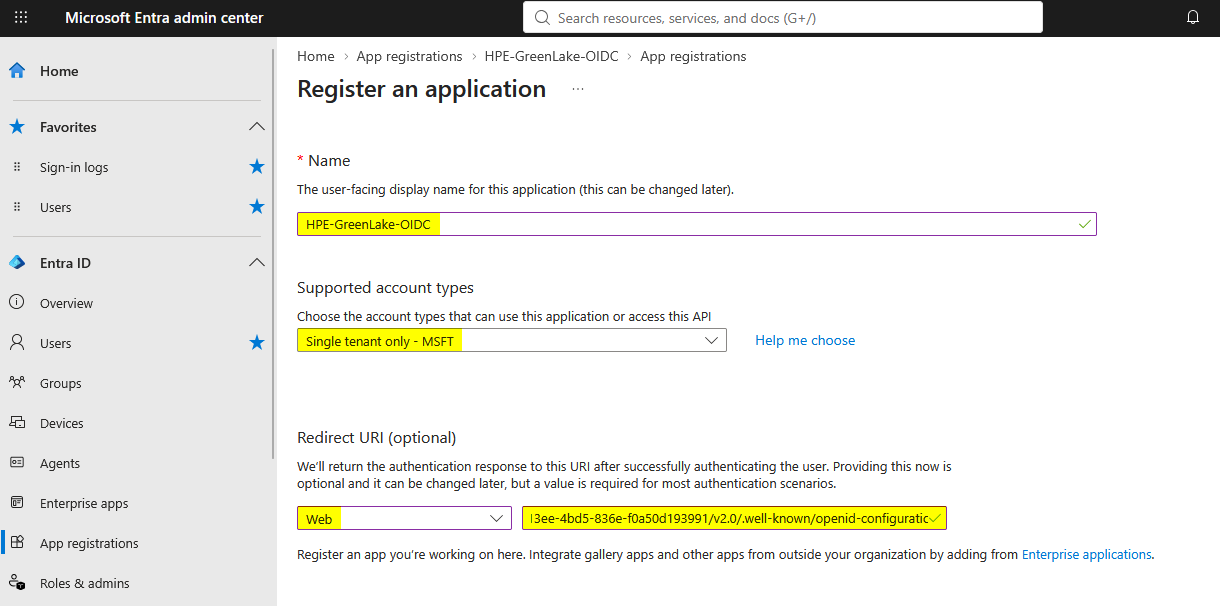
1. Create the app registration
- In the Microsoft Entra admin center, go to Entra ID → App registrations → New registration.
- Enter:
- Name: for example,
HPE-GreenLake-OIDC - Supported account types: Single tenant only (accounts in your organizational directory)
- Redirect URI: platform Web, and paste the GreenLake redirect URL copied in Step 2
- Name: for example,
-
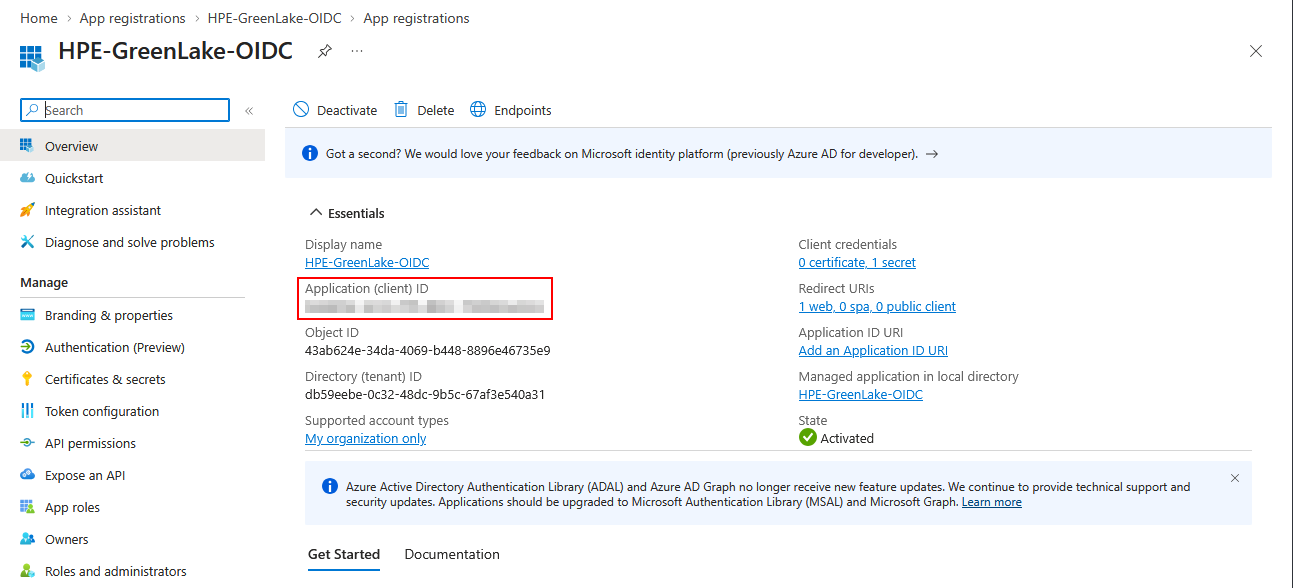
Click Register. On the Overview page, copy the Application (client) ID.
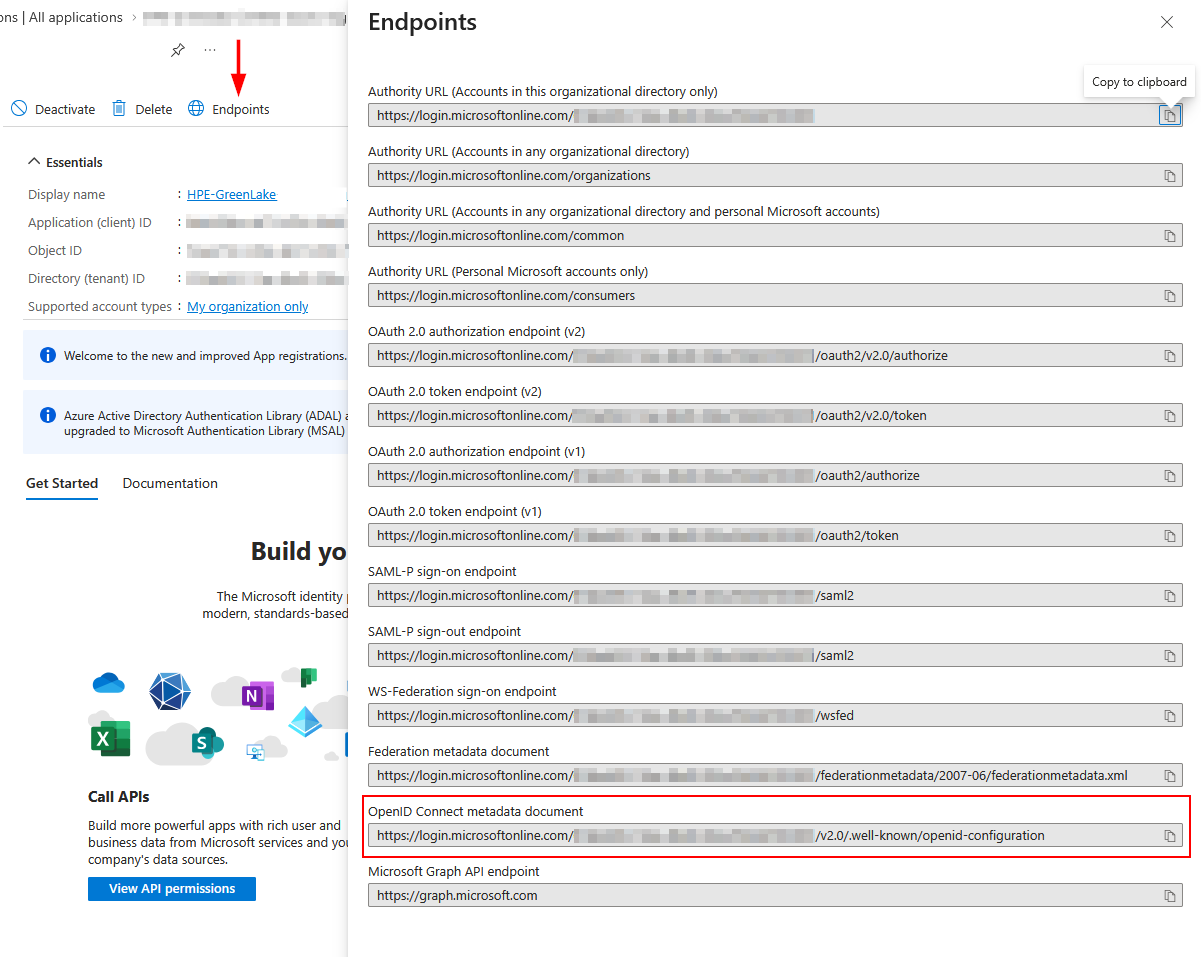
Note: The discovery URL is also available under Overview → Endpoints → OpenID Connect metadata document (v2.0). It is the same URL you built in Step 1.
2. Create the client secret
- In the app registration, open Certificates & secrets → Client secrets → New client secret.
-
Enter a description (e.g.,
GreenLake-OIDC), choose an expiry consistent with your organization’s policy, and click Add.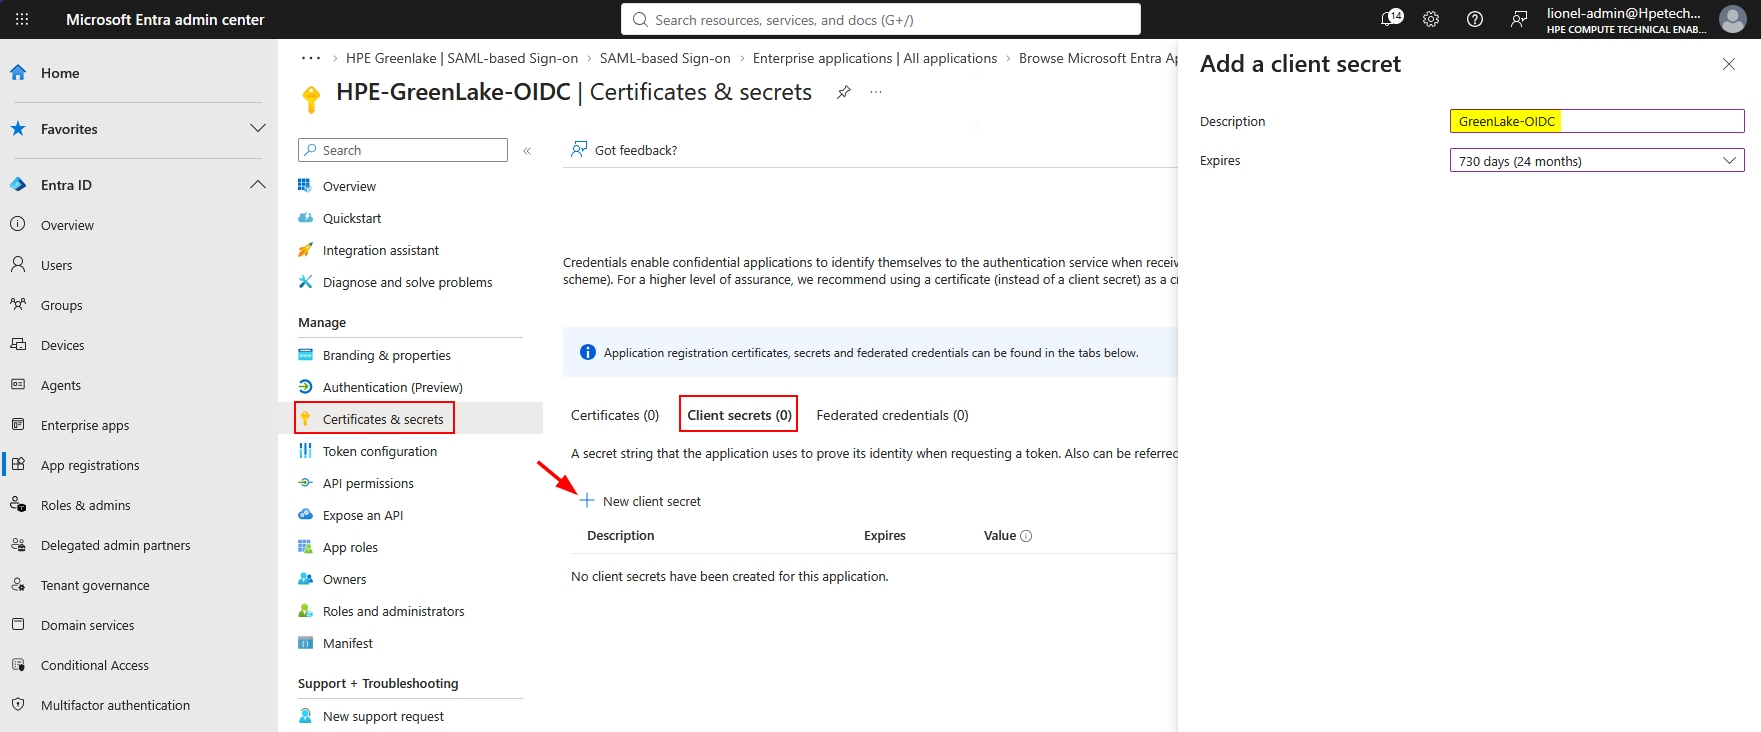
-
Immediately copy the secret’s Value, not its Secret ID. The value is displayed only once.
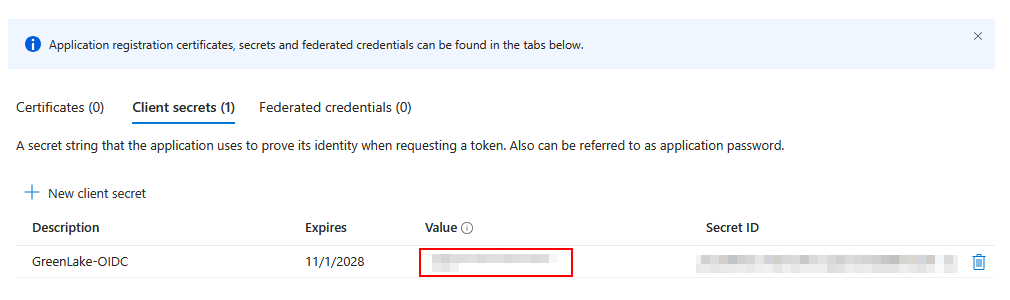
Important: Record the expiry date. When the secret expires, all SSO sign-ins through this connection fail, so create a new secret and update it in HPE GreenLake before that date. See Microsoft’s Add credentials documentation.
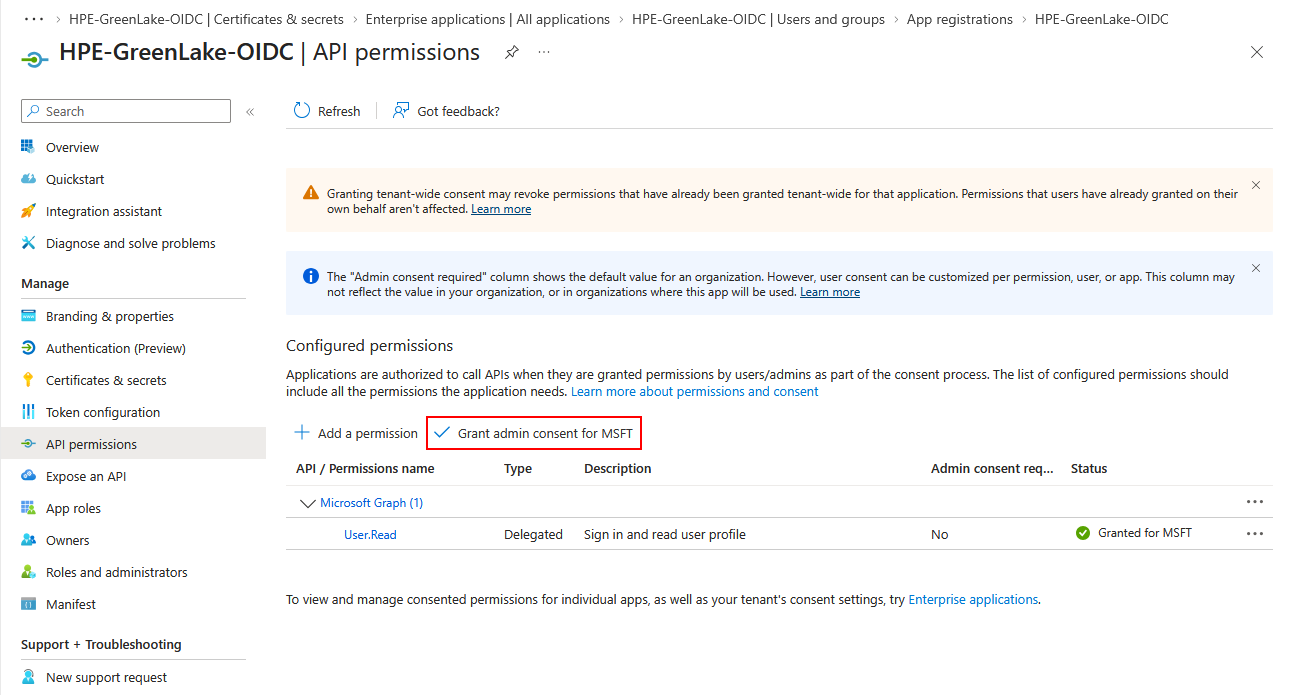
3. Grant admin consent
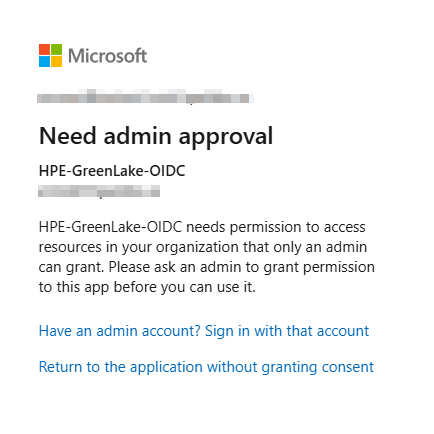
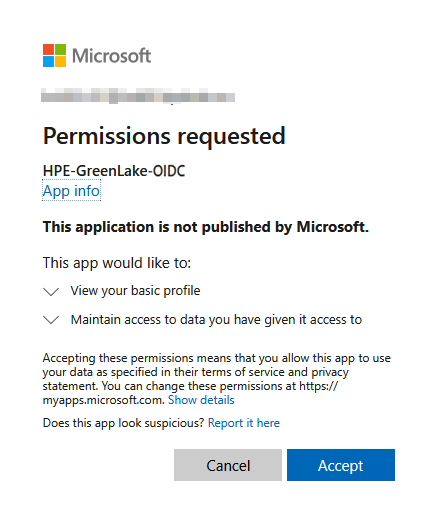
Without admin consent, each user is asked to approve the application’s permissions at first sign-in:
-
To avoid this prompt, open API permissions, click Grant admin consent for <your tenant>, and confirm.
4. Restrict access to a group
By default, any user in the tenant can sign in to the application. To limit access to a security group:
- Go to Enterprise applications and open the OIDC application (it has the same name as the app registration).
-
Under Properties, set Assignment required? to Yes and click Save.
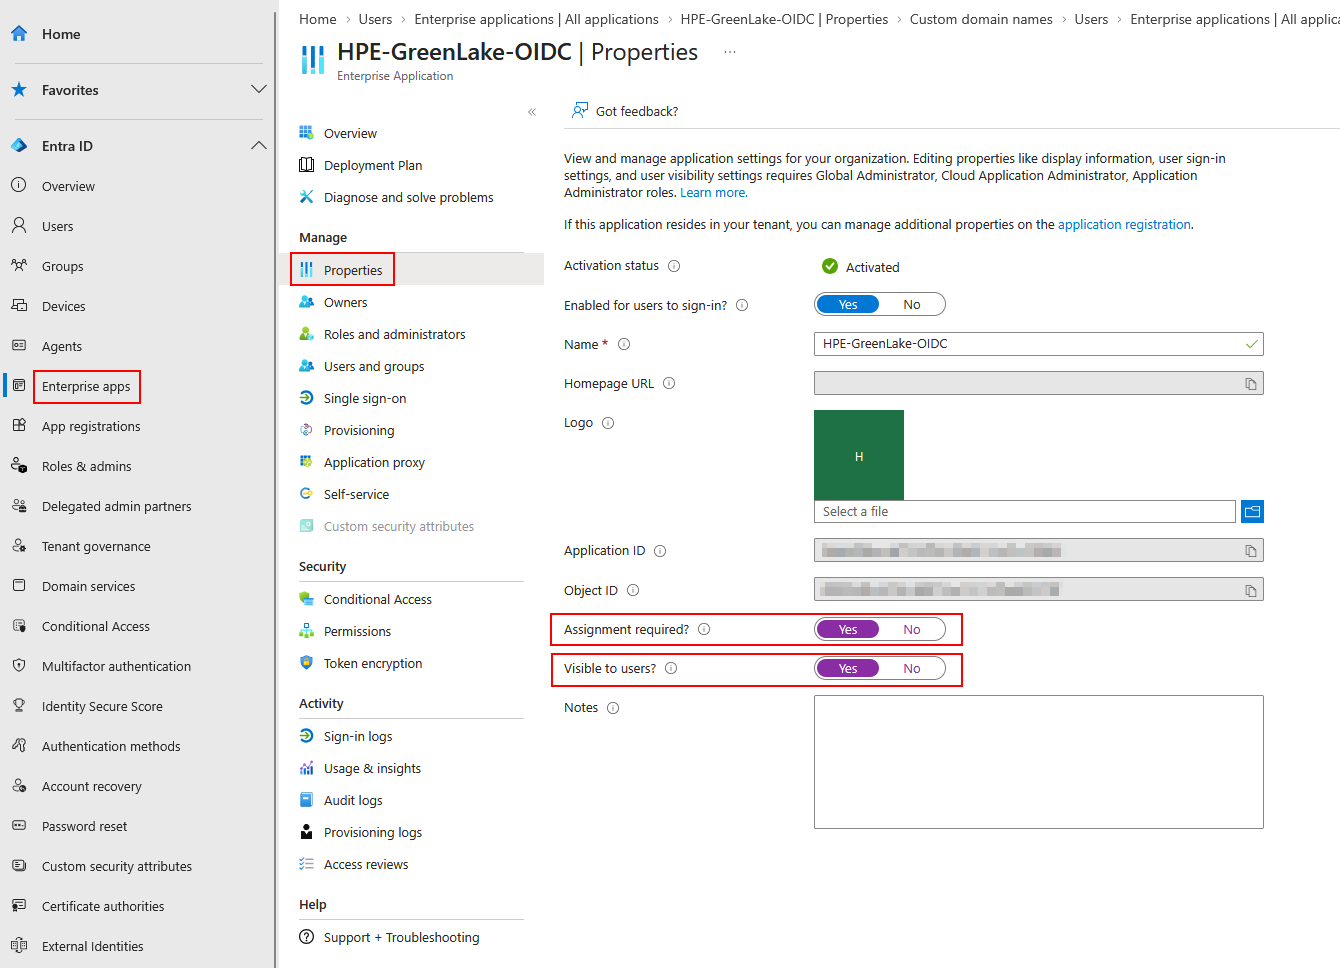
You can also enable the Visible to users option to make users see the application on My Apps and O365 app launcher.
-
Under Users and groups, click Add user/group and select the group (or users) allowed to sign in to HPE GreenLake.
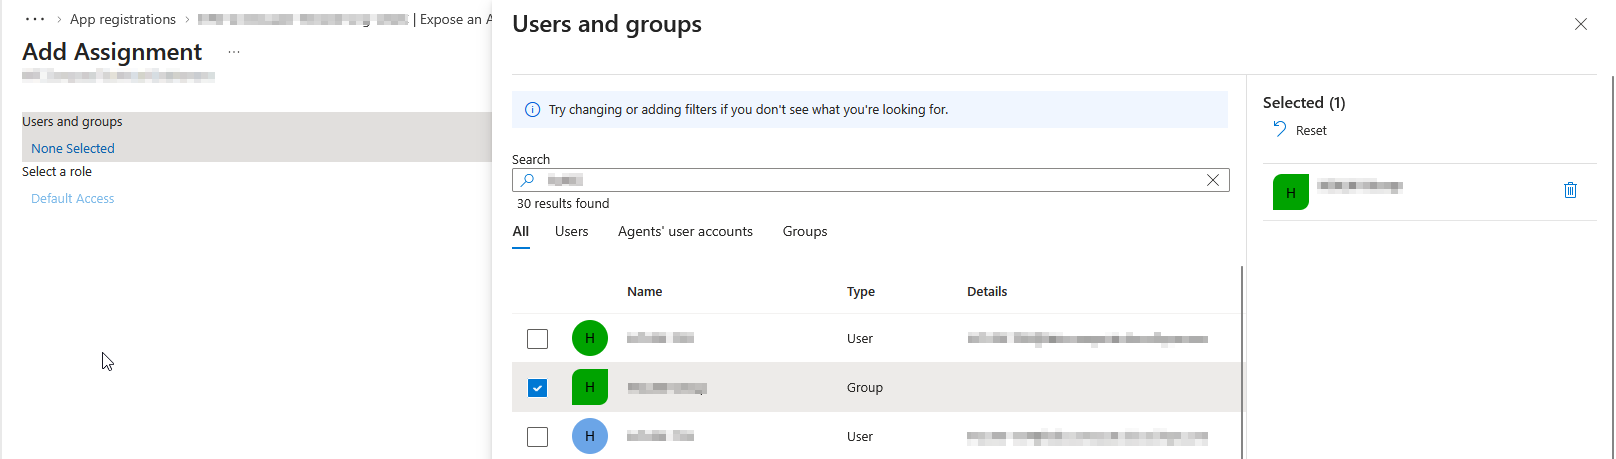
Users who are not assigned get error
AADSTS50105at sign-in.
Step 4: Complete the OIDC connection in HPE GreenLake
-
Return to the HPE GreenLake browser tab where the Create SSO connection wizard is still open on the Login client page (from Step 2), and enter the values copied from Entra ID:
HPE GreenLake setting Entra ID value Client ID Application (client) ID Client secret Client secret Value Use PKCE Leave enabled, as HPE recommends 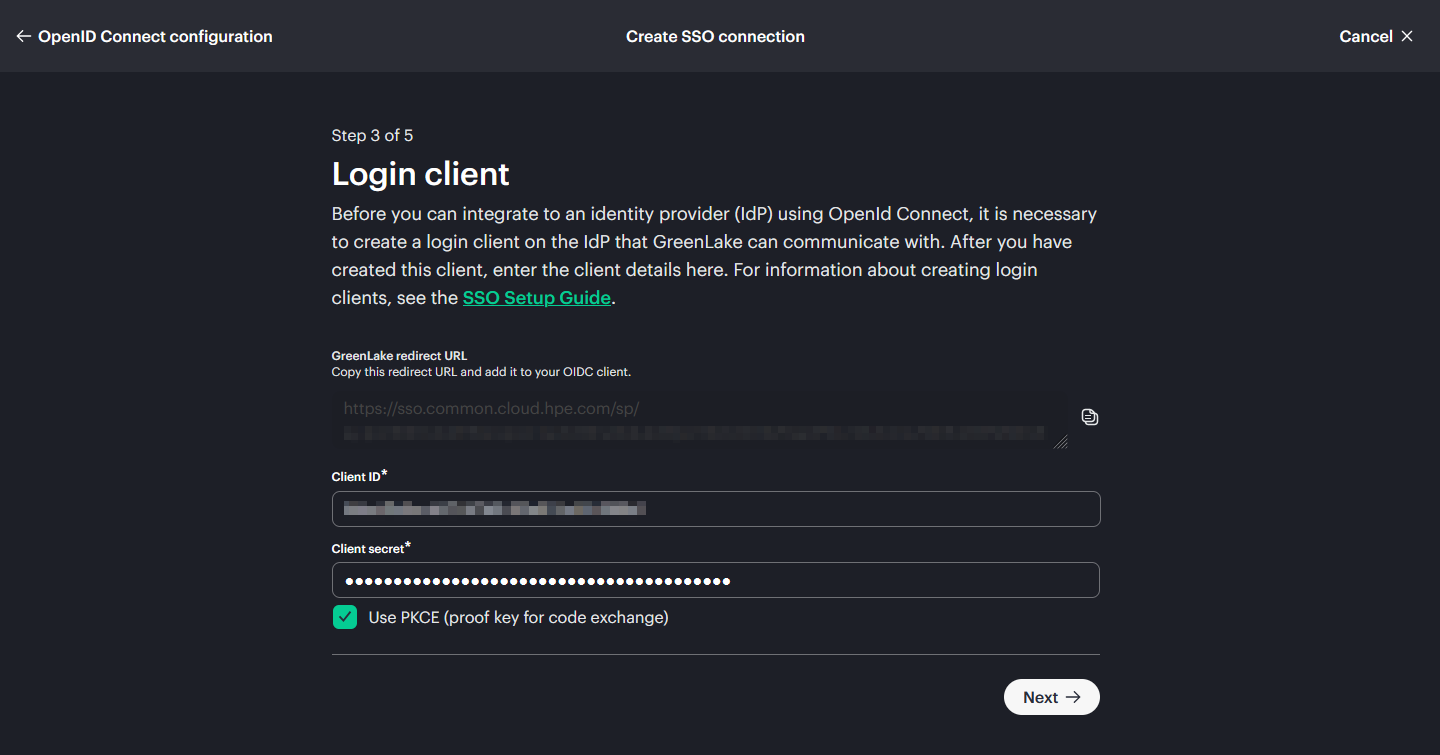
-
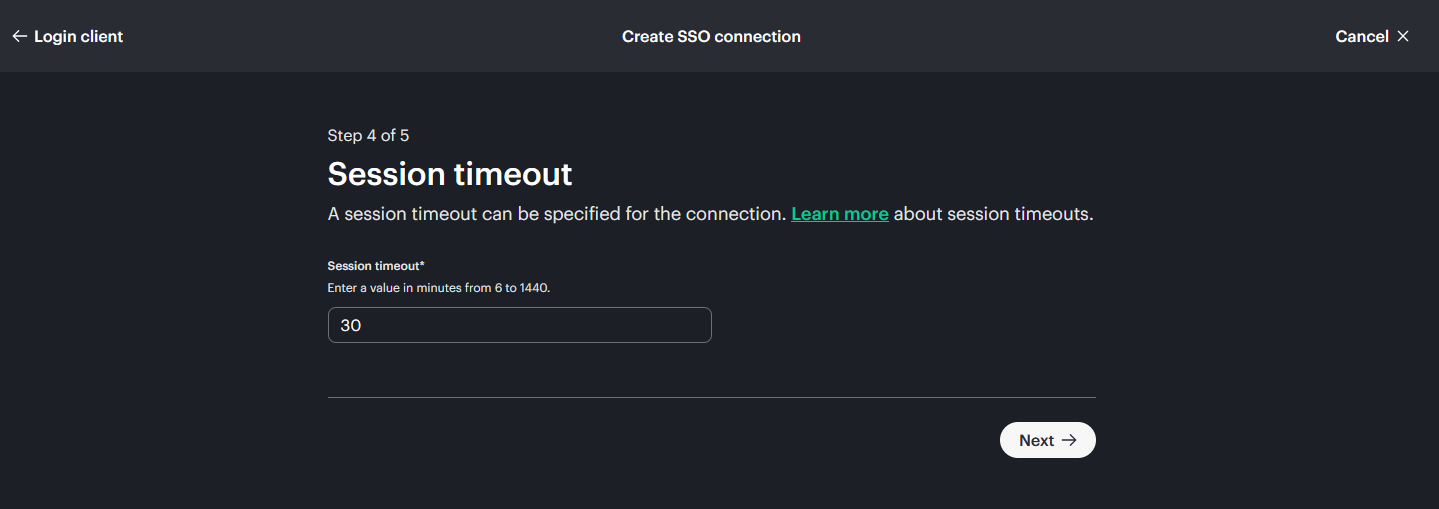
On the Session timeout page, enter the desired session duration and click Next.
-
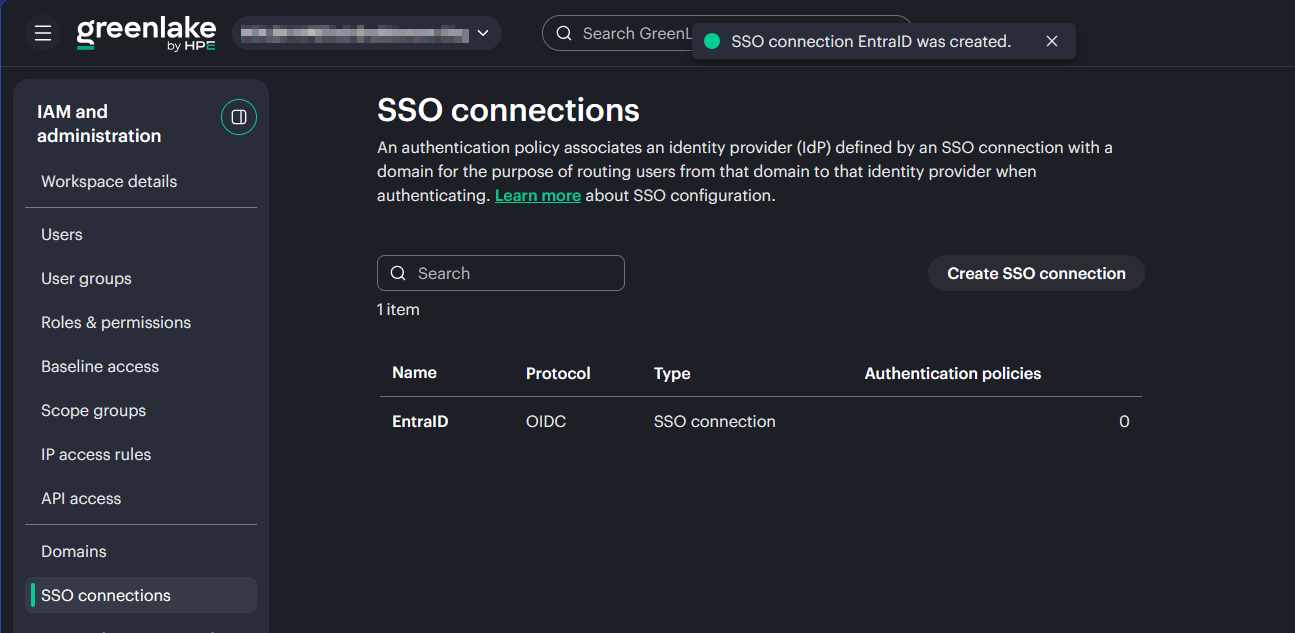
Review the settings and click Create SSO connection.
Step 5: Create the authentication policy
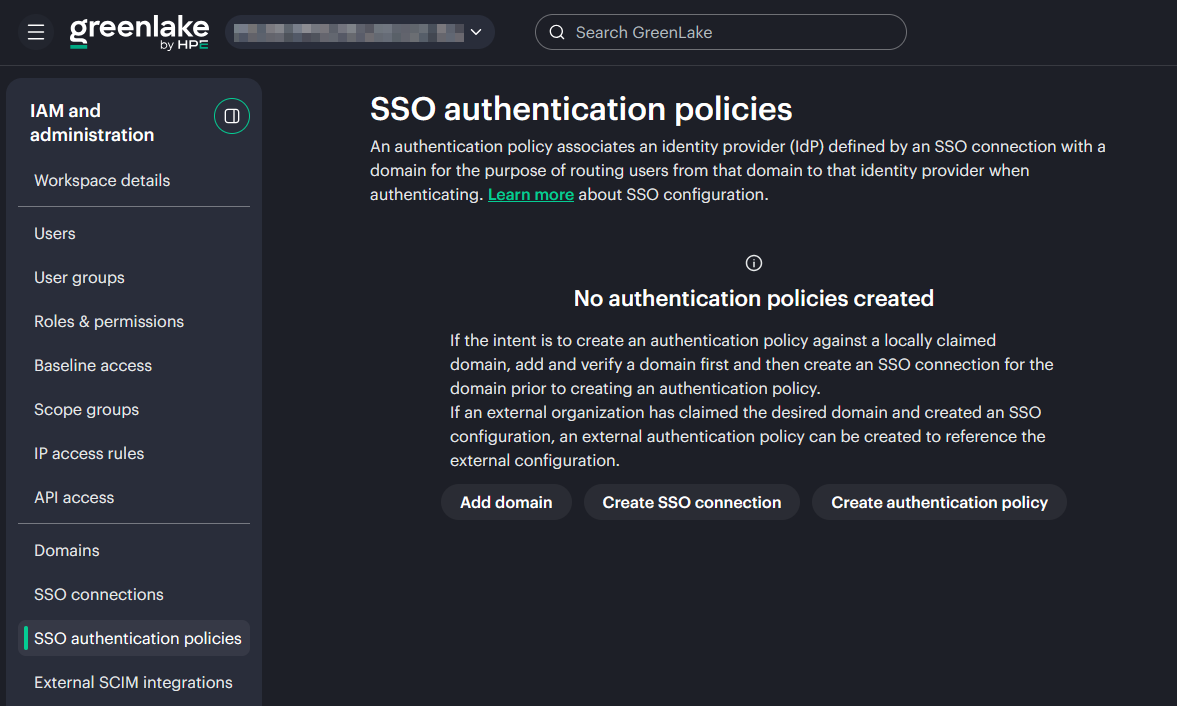
The authentication policy links your verified domain to the OIDC connection and activates SSO for its users.
-
After creating the connection, create a new authentication policy.
-
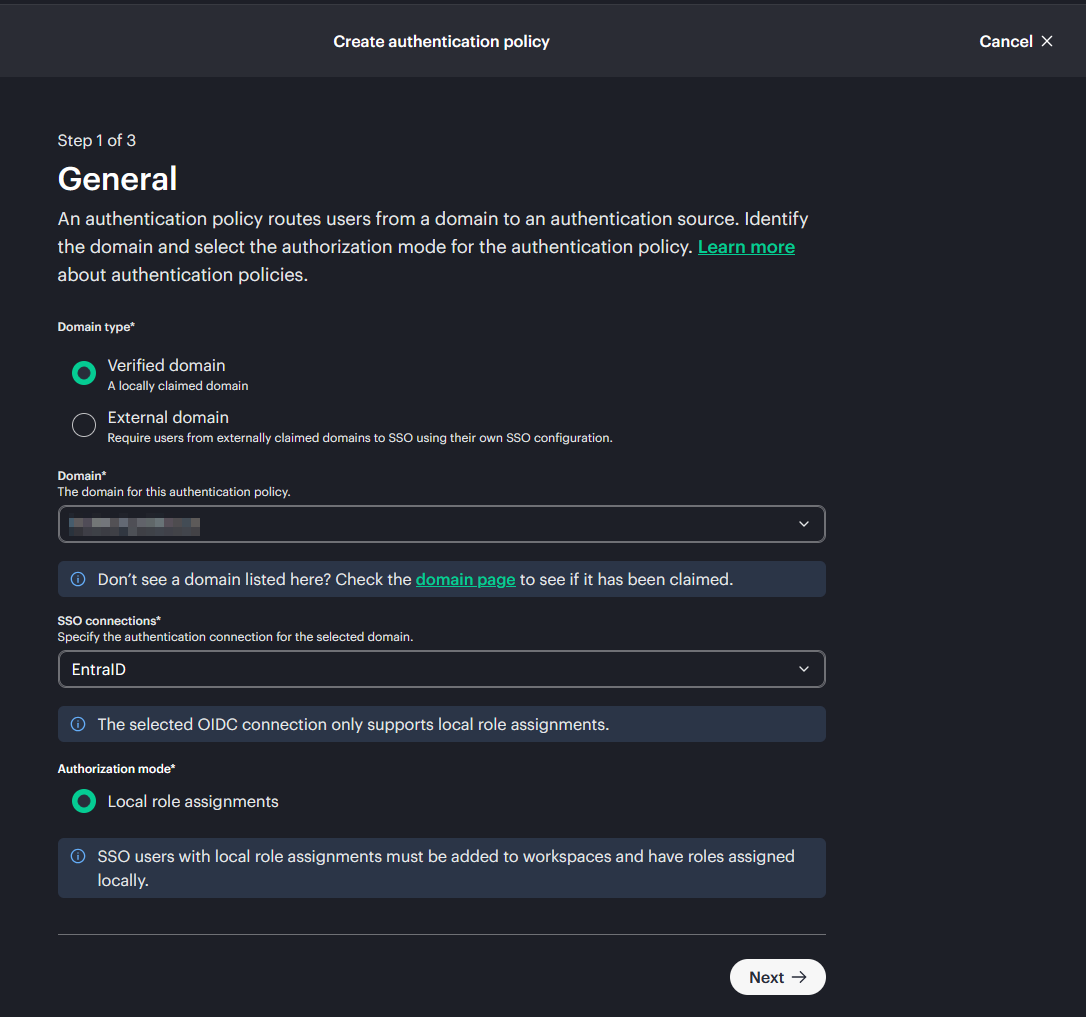
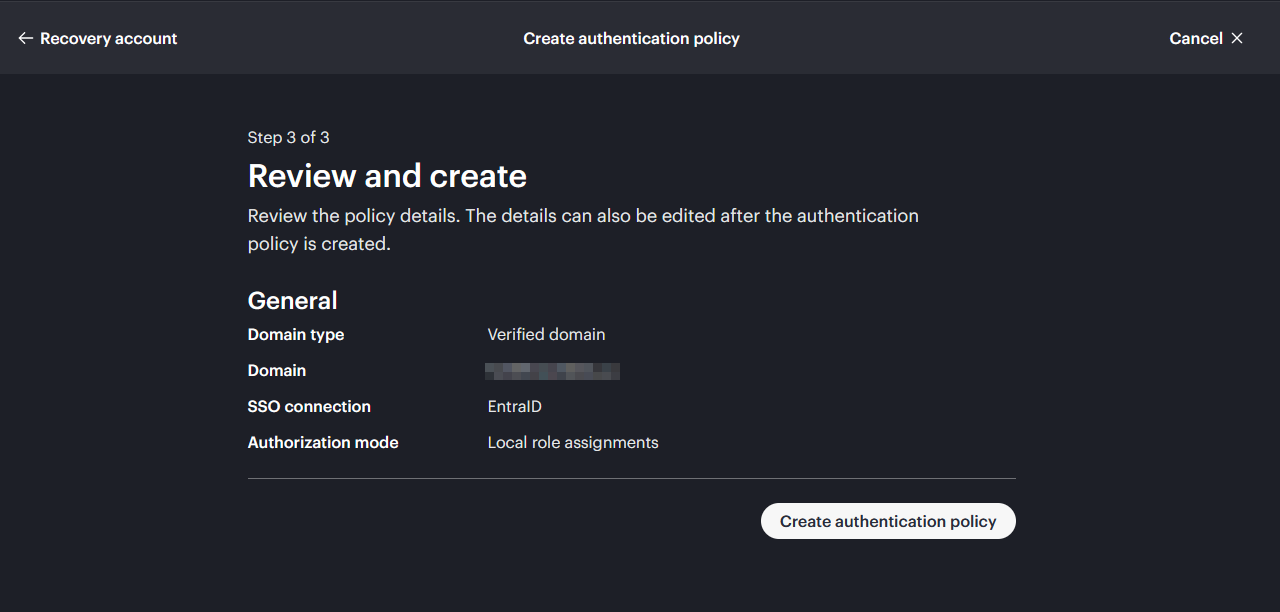
Select your verified domain and the OIDC SSO connection. The authorization mode is Local role assignments, the only mode available with OIDC.
-
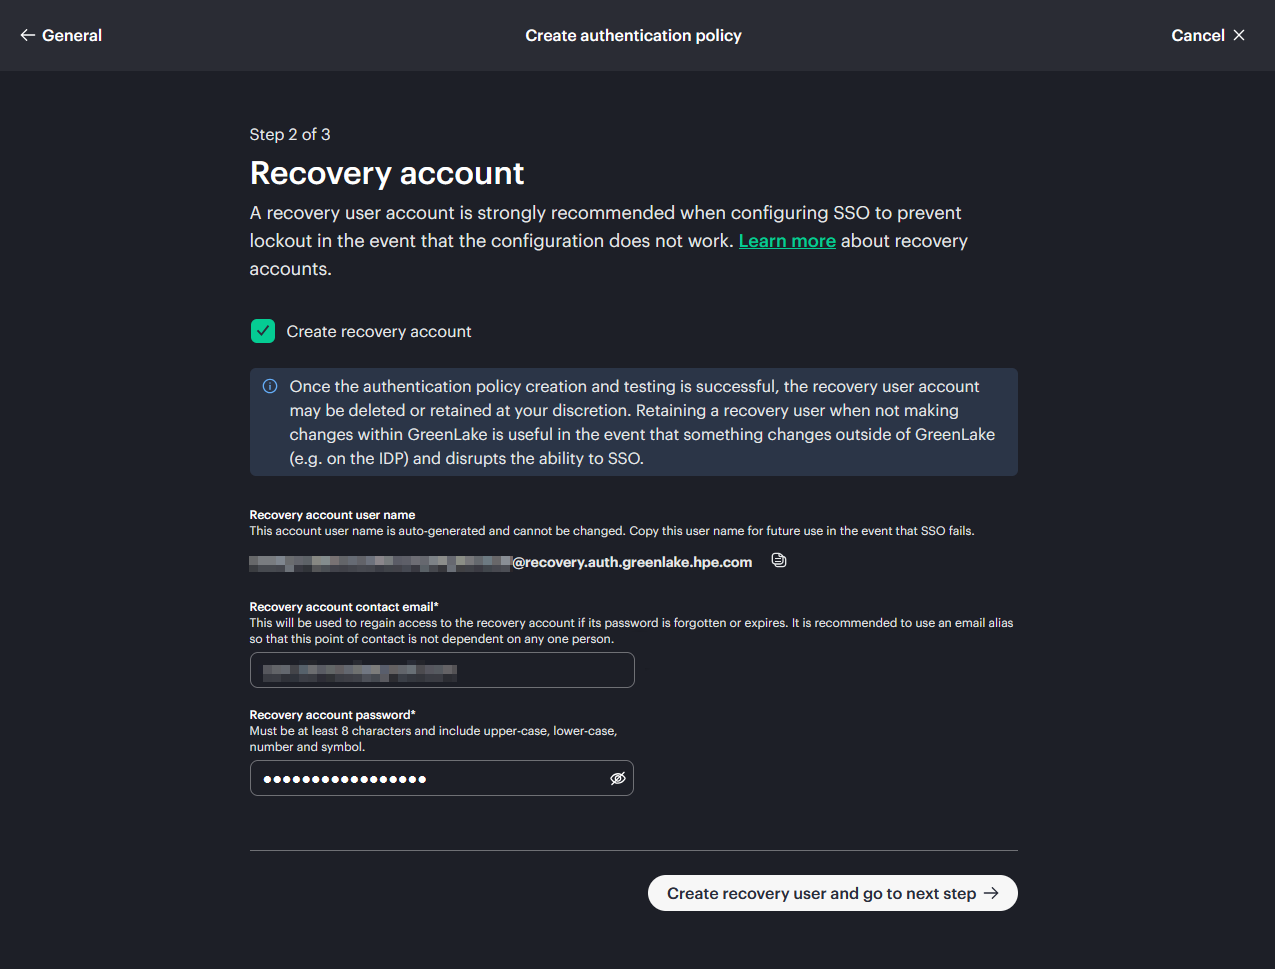
Create a recovery user. This local account lets you sign in to HPE GreenLake if the SSO connection stops working (for example, after the client secret expires). Store its credentials securely.
-
Click Create.
-
The authentication policy is created and SSO is now active for the domain.
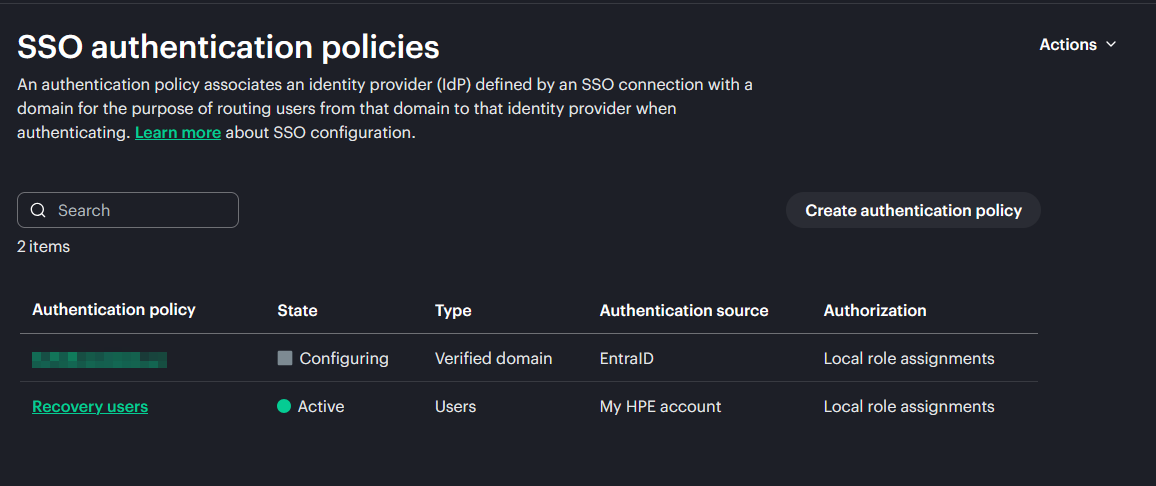
Next: Add the users and assign their roles, as described in Granting Users Access with Local Role Assignments. Successful authentication alone does not give access to a workspace.
Step 6: Passwordless and MFA setup for HPECOMCmdlets
The Entra ID authentication methods and Conditional Access policies for passwordless sign-in and MFA do not depend on the federation protocol. Follow Step 4 of the SAML guide for Entra ID, and target the new OIDC enterprise application in your Conditional Access policies instead of the SAML one.
Part 2: Configuring OIDC SSO with Okta
Okta is a cloud identity platform widely used for workforce single sign-on. In this part, you create an OIDC web application in Okta, assign it to a group, apply your sign-in policies, and connect it to HPE GreenLake with its client ID and secret.
Before you begin: Your domain must be claimed and verified in HPE GreenLake. If you have not done it yet, follow Claim and verify a domain in the SAML guide. This step is identical for SAML and OIDC, and only needs to be done once per domain.
Step 1: Start the OIDC connection in HPE GreenLake
- Log in to HPE GreenLake at https://common.cloud.hpe.com/, navigate to Manage Workspace → SSO configuration, and click Create SSO connection.
- Enter a descriptive SSO connection name (e.g.,
Okta-OIDC) and select OpenID Connect (OIDC). -
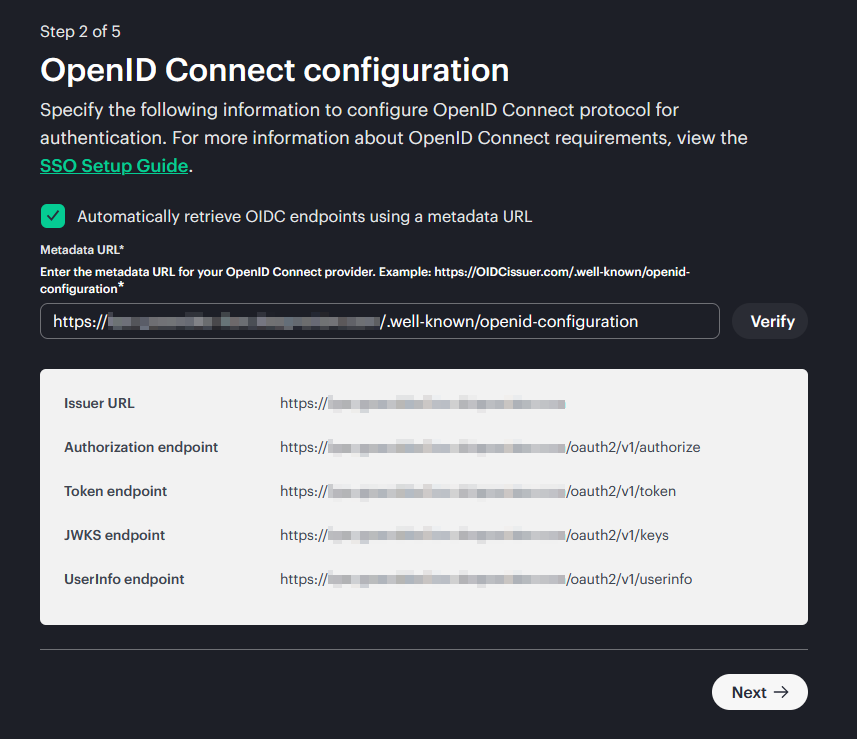
Leave Automatically retrieve OIDC endpoints using metadata URL selected and enter your Okta discovery URL. For the Okta organization authorization server, the format is:
https://<your-company>.okta.com/.well-known/openid-configuration -
Click Verify.
-
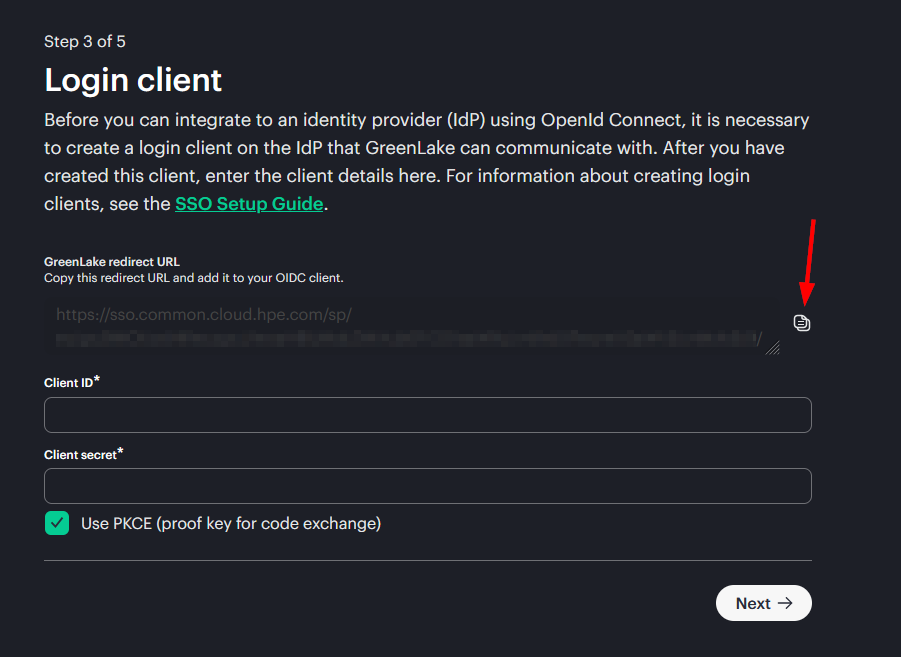
On the Login client page, copy the GreenLake redirect URL exactly as displayed. Keep this HPE GreenLake tab open: you will come back to it in Step 5 to enter the client ID and secret.
Step 2: Prepare users and a group in Okta
-
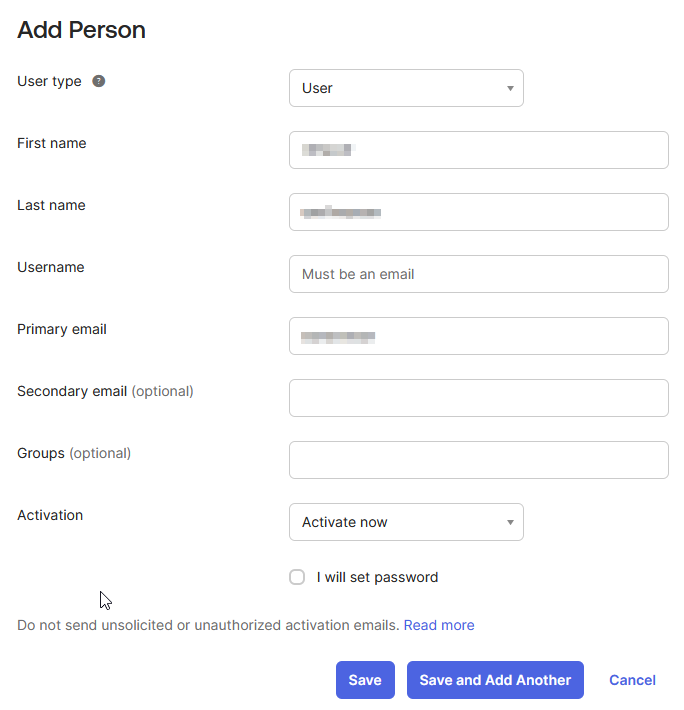
If needed, create the users in Directory → People → Add person, using the email address of your verified domain.
-
In Directory → Groups → Add group, create a group such as
HPE-GreenLake-OIDCand add the members allowed to sign in to HPE GreenLake.
Step 3: Create the OIDC application in Okta
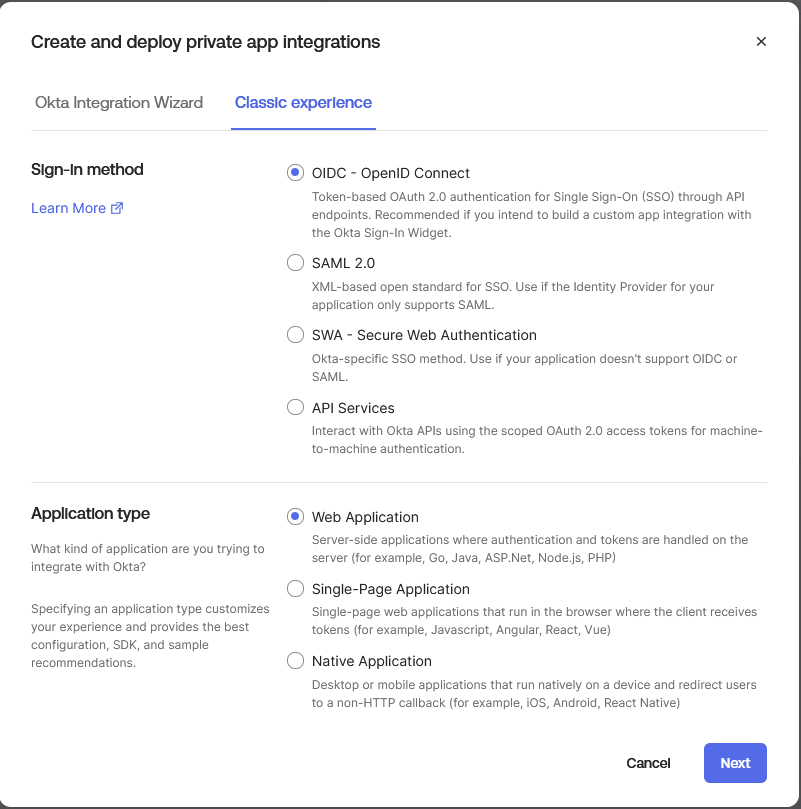
- In the Okta Admin Console, navigate to Applications and Resources → Applications → Create App Integration → Classic experience.
-
Select OIDC - OpenID Connect, then Web Application, and click Next.
-
Configure the application:
Okta field Setting App integration name HPE GreenLake OIDCGrant type Client Credentials and Authorization Code Sign-in redirect URIs The exact GreenLake redirect URL copied in Step 1 Controlled access Limit access to the HPE-GreenLake-OIDCgroup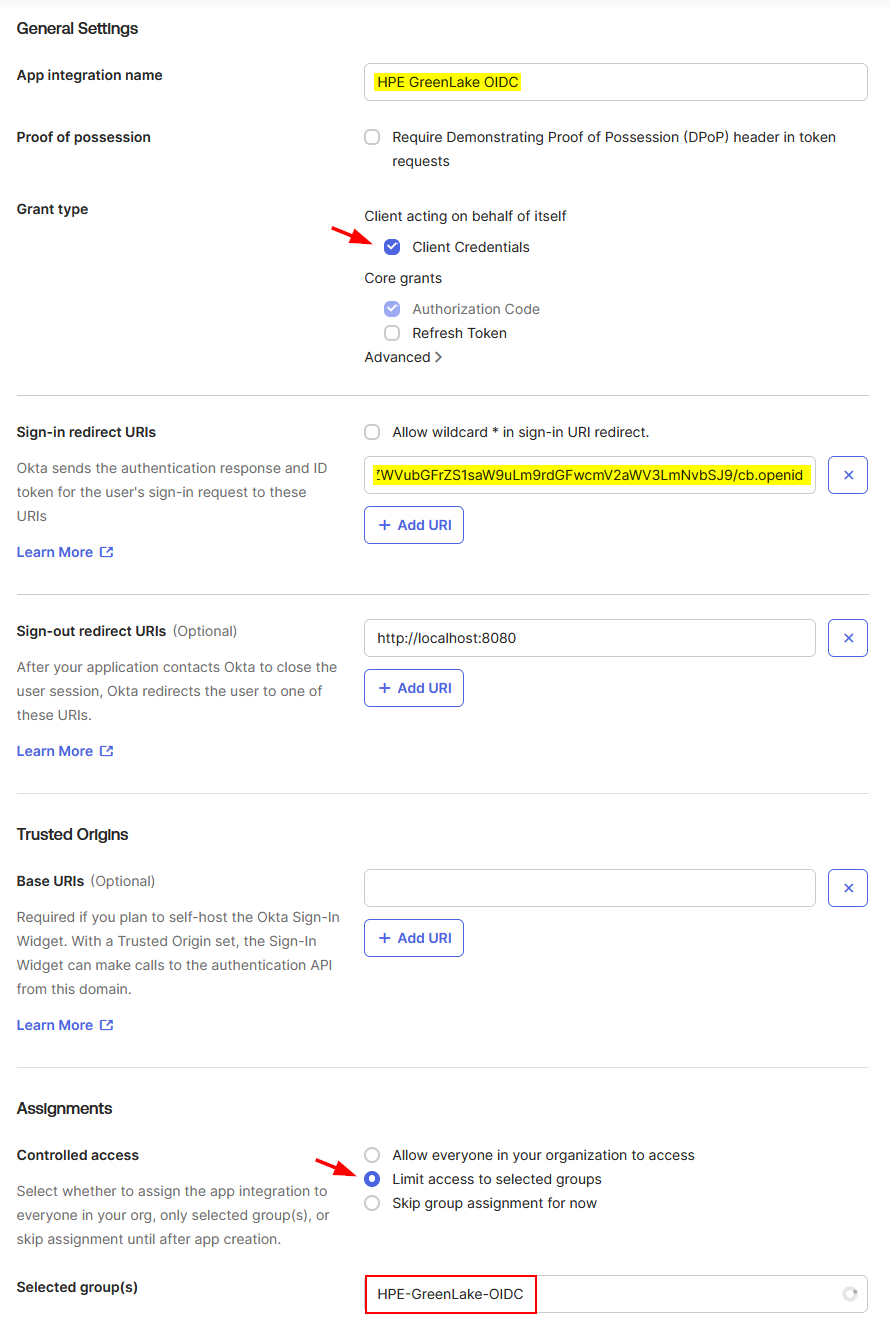
-
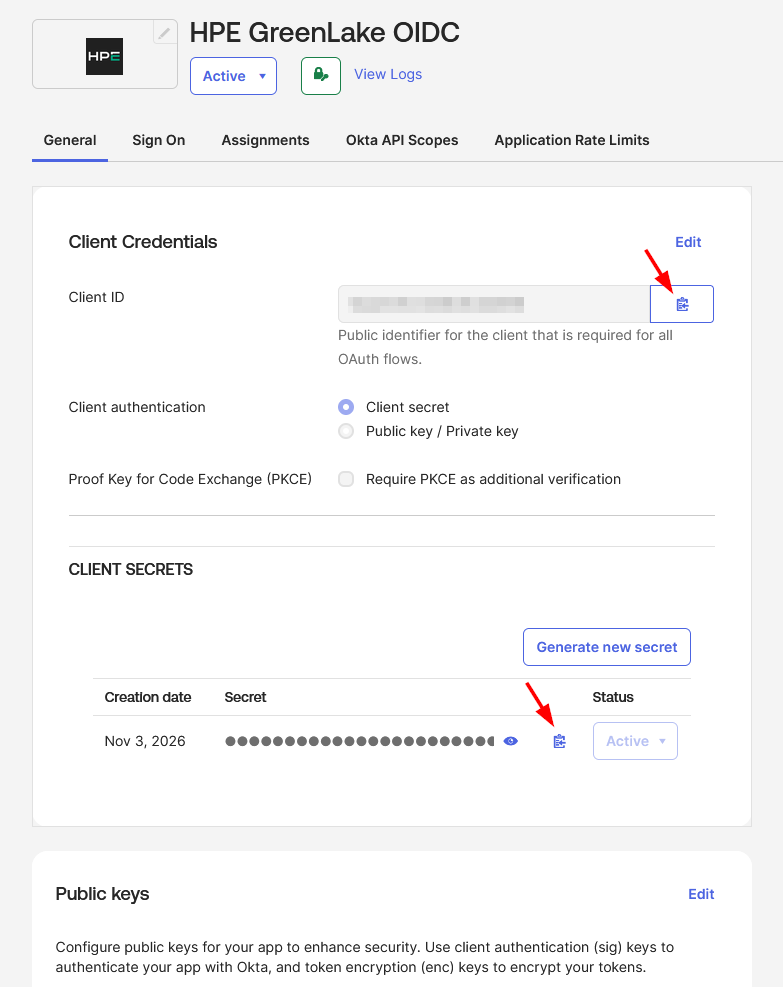
Click Save. Under General → Client Credentials, copy the Client ID and Client Secret.
-
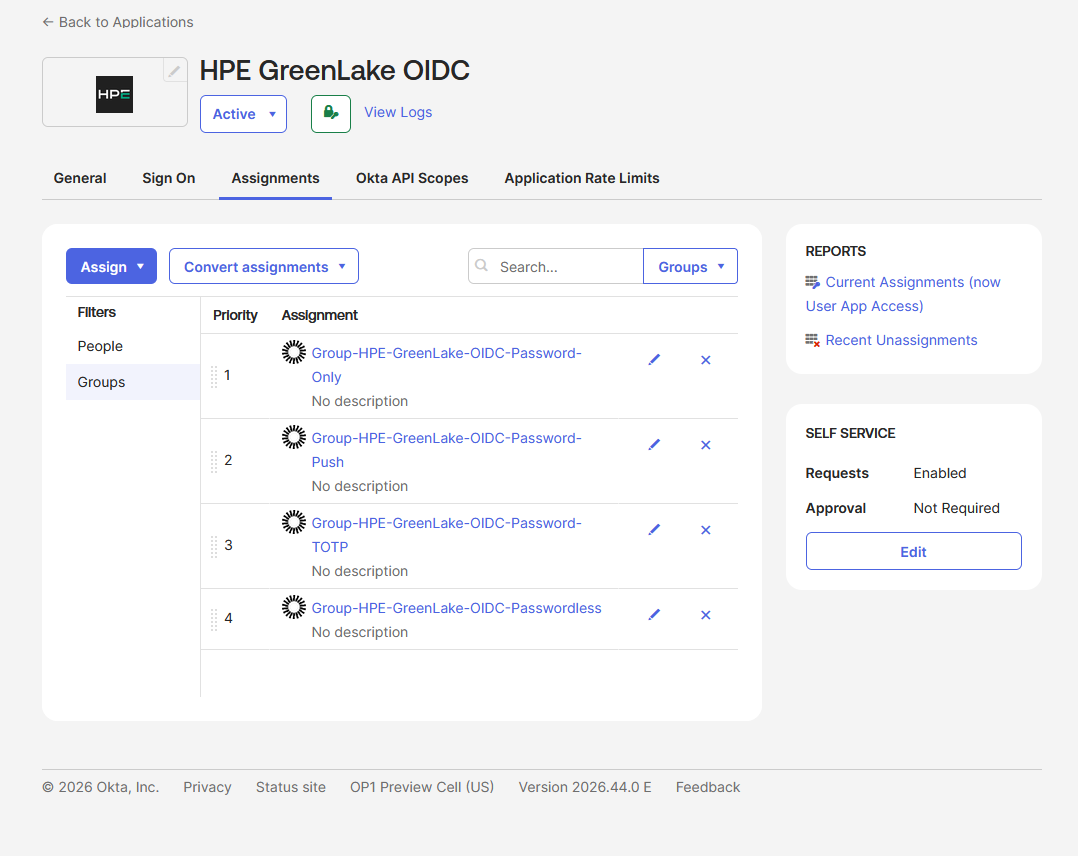
Under Assignments, check that the group(s) allowed to sign in are assigned.
-
Optional: show the application on the Okta dashboard. Open General → General Settings → Edit. If Login initiated by is App Only, the application does not appear as a dashboard tile. Select Either Okta or App, enable Display application icon to users, and set Initiate login URI to
https://common.cloud.hpe.com/.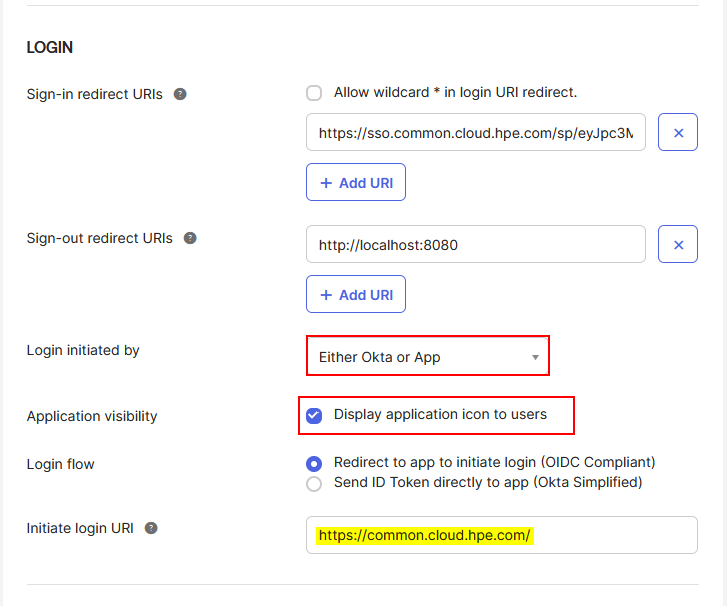
Note: The tile simply opens HPE GreenLake, which then starts the regular sign-in flow. OIDC has no equivalent to the SAML IdP-initiated flow.
Step 4: Apply your Okta sign-in policies
The Okta policies used for passwordless sign-in and MFA with HPECOMCmdlets are the same as for SAML: follow Step 4 of the SAML guide for Okta. For the OIDC application, make sure that:
-
App sign-in policy: the authentication policy is assigned to the new OIDC application, and its rules (for example, the Okta Verify TOTP rule) include the
HPE-GreenLake-OIDCgroup under User’s group membership includes.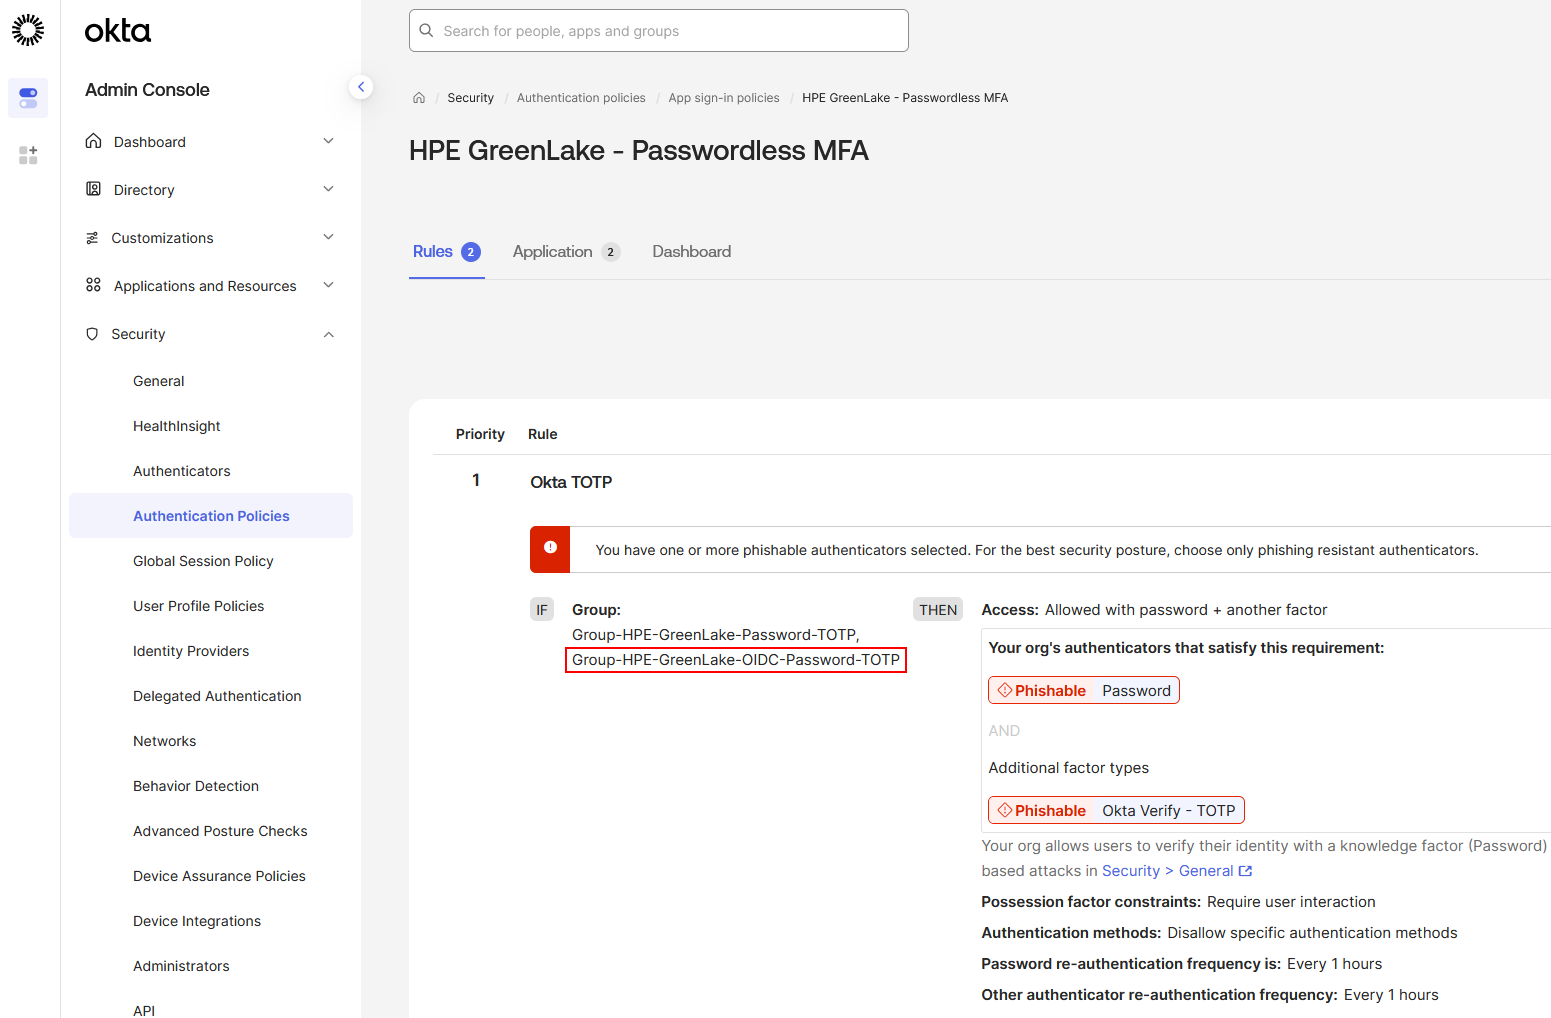
-
Authenticator enrollment policy: in Security → Authenticators → Enrollment, the Okta Verify enrollment policy includes the
HPE-GreenLake-OIDCgroup.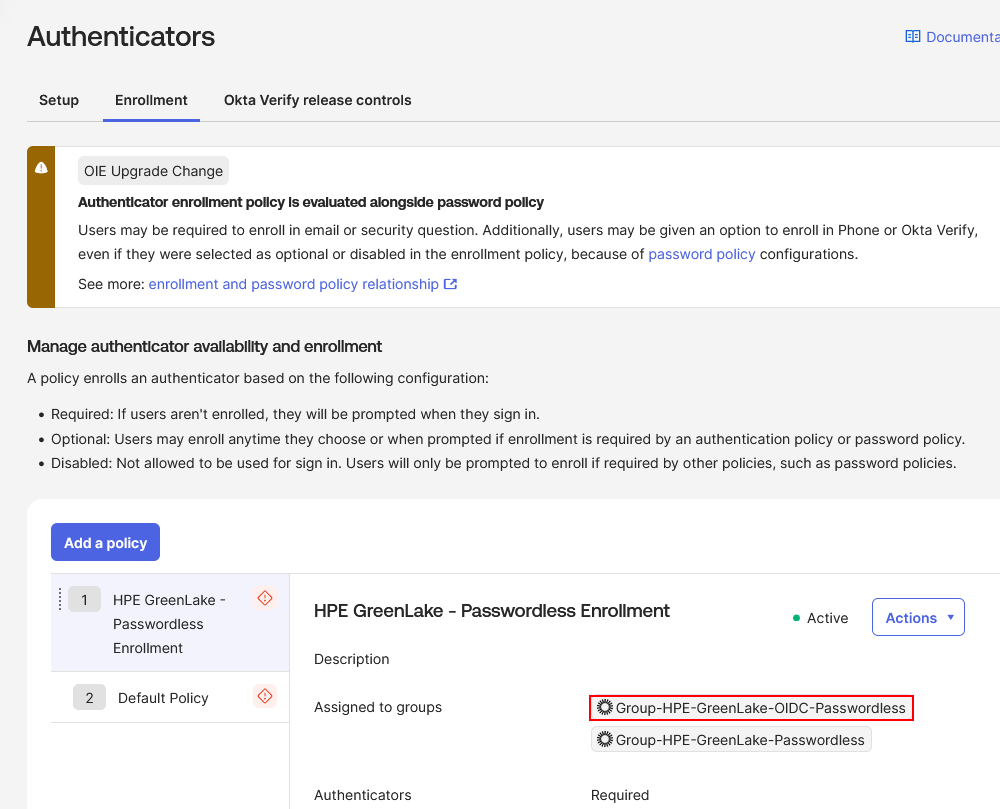
-
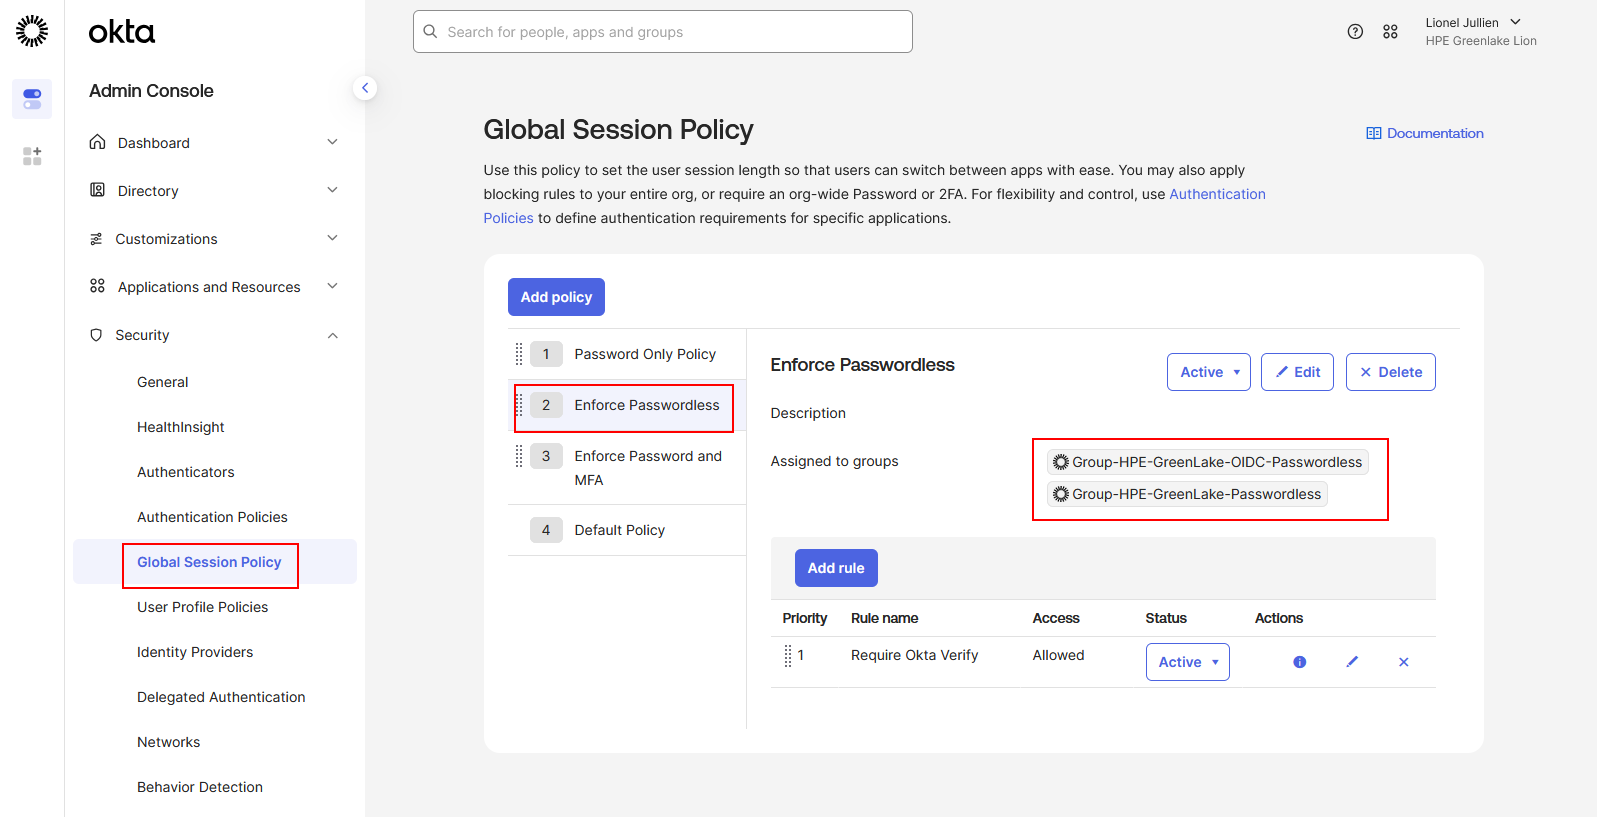
Global session policy: in Security → Global Session Policy, the policies apply to the correct groups.
Step 5: Complete the OIDC connection in HPE GreenLake
-
Return to the HPE GreenLake browser tab where the Create SSO connection wizard is still open on the Login client page (from Step 1), and enter the values copied from Okta:
HPE GreenLake setting Okta value Client ID Okta application Client ID Client secret Okta application Client Secret Use PKCE Enabled 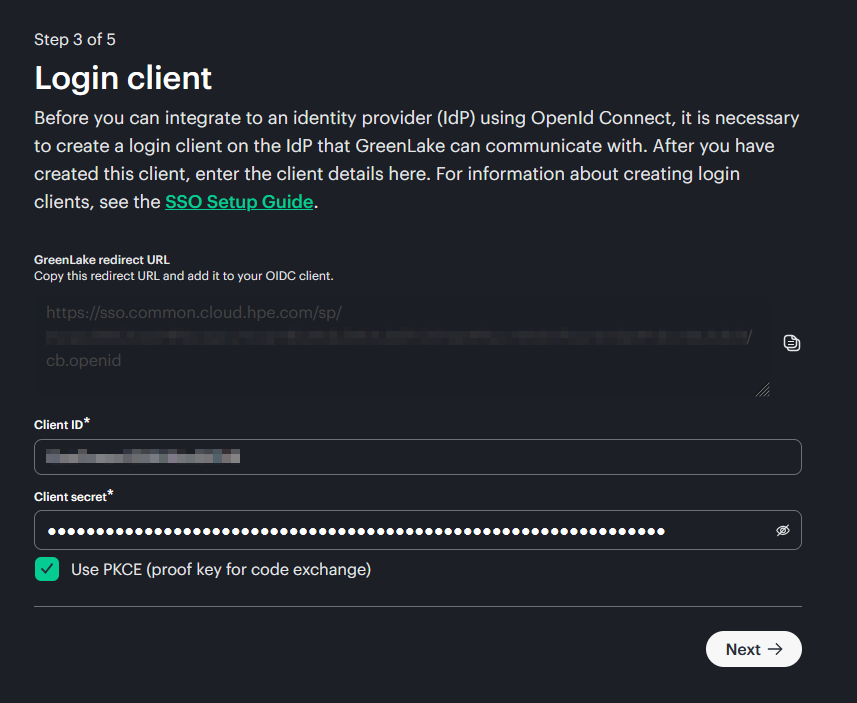
-
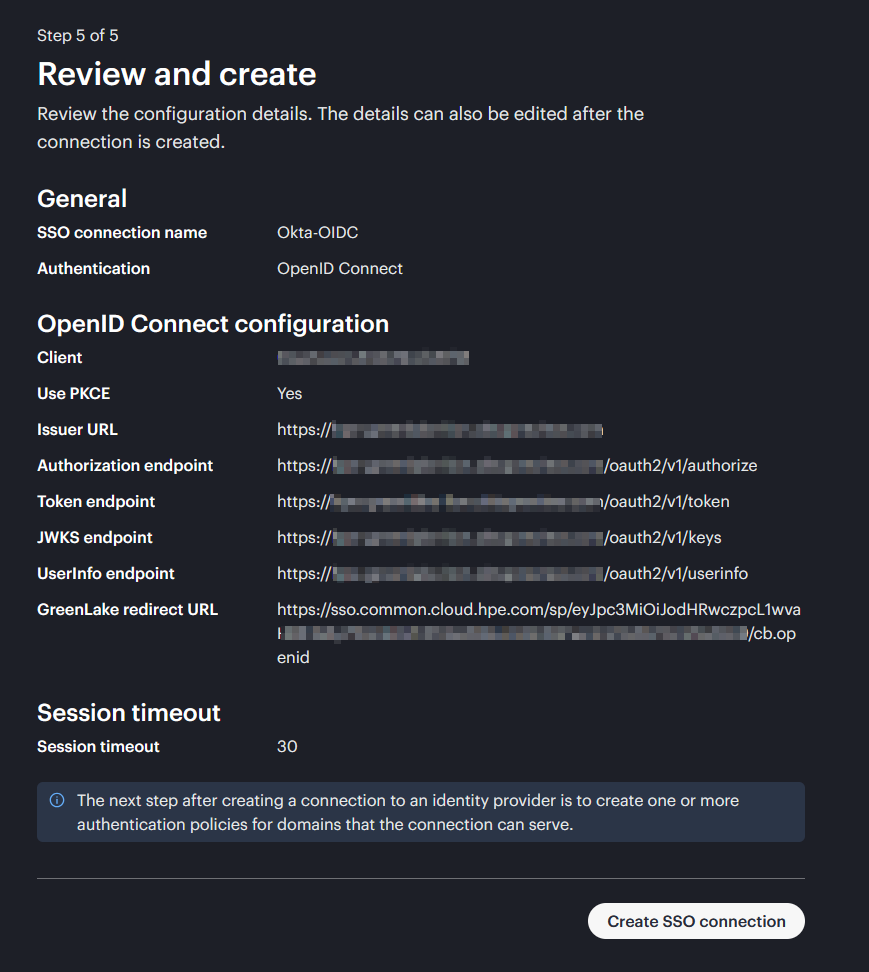
Complete the remaining wizard steps (session timeout, review) and click Create SSO connection.
-
Create the authentication policy as described in Part 1, Step 5: select your verified domain, the Okta OIDC connection, Local role assignments, and configure the recovery user.
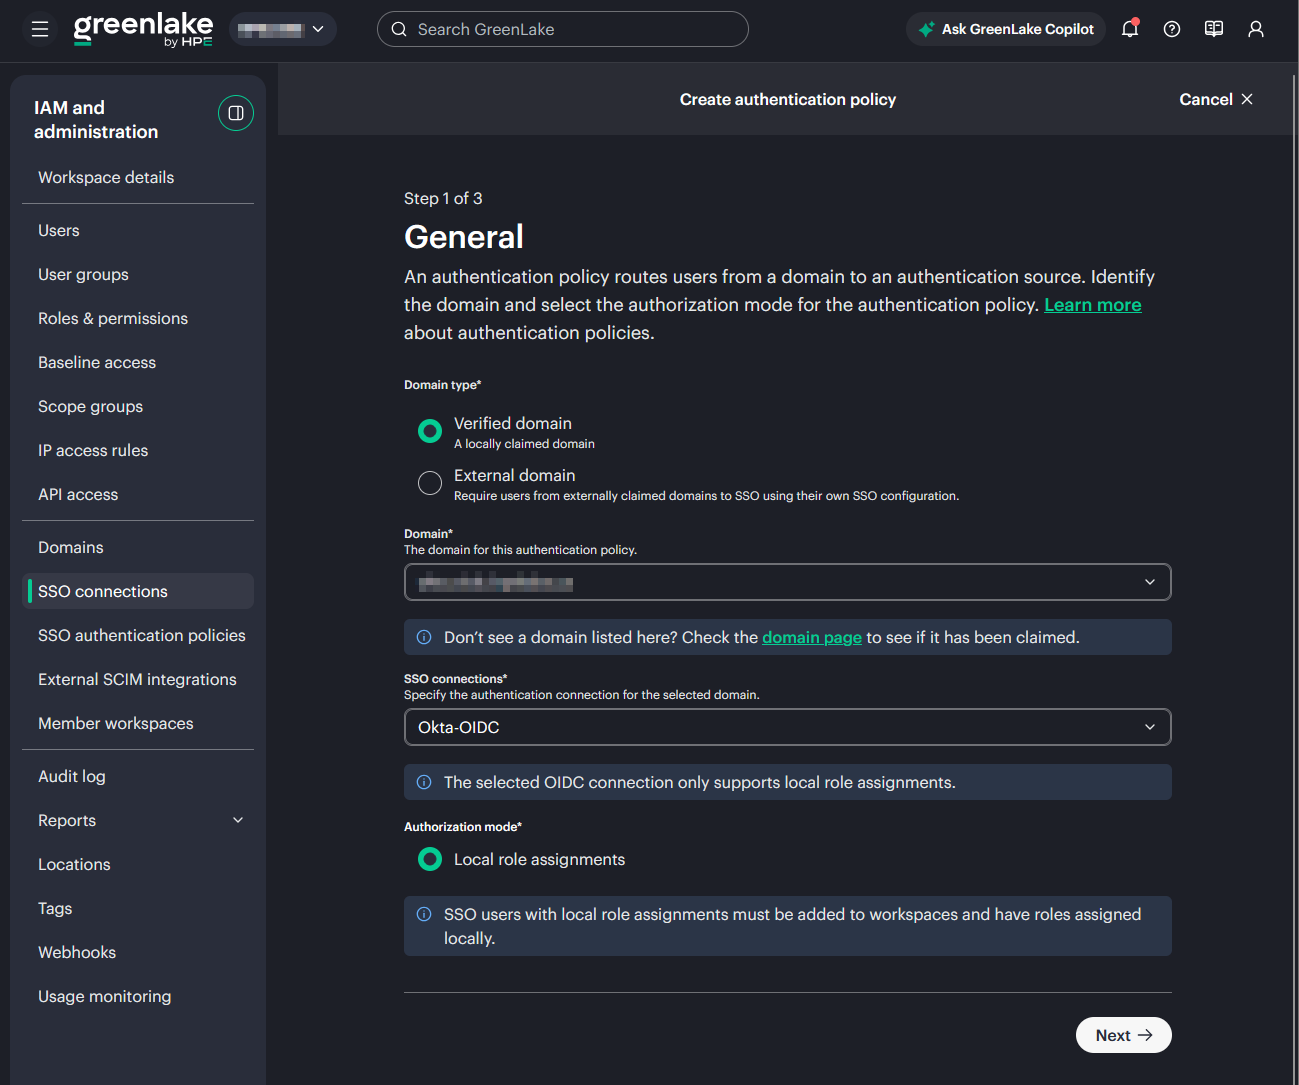
Next: Add the users and assign their roles in HPE GreenLake, as described in Granting Users Access with Local Role Assignments. Assigning the application in Okta allows users to authenticate; HPE GreenLake role assignments determine what they can access.
Part 3: Configuring OIDC SSO with Ping Identity
PingOne is Ping Identity’s cloud identity platform, with PingID providing multi-factor authentication. In this part, you create an OIDC web application in PingOne, grant it to a group, assign your authentication policy, and connect it to HPE GreenLake with its client ID and secret.
Before you begin: Your domain must be claimed and verified in HPE GreenLake. If you have not done it yet, follow Claim and verify a domain in the SAML guide. This step is identical for SAML and OIDC, and only needs to be done once per domain.
Step 1: Start the OIDC connection in HPE GreenLake
- Log in to HPE GreenLake at https://common.cloud.hpe.com/, navigate to Manage Workspace → SSO configuration, and click Create SSO connection.
- Enter a descriptive SSO connection name (e.g.,
PingOne-OIDC) and select OpenID Connect (OIDC). -
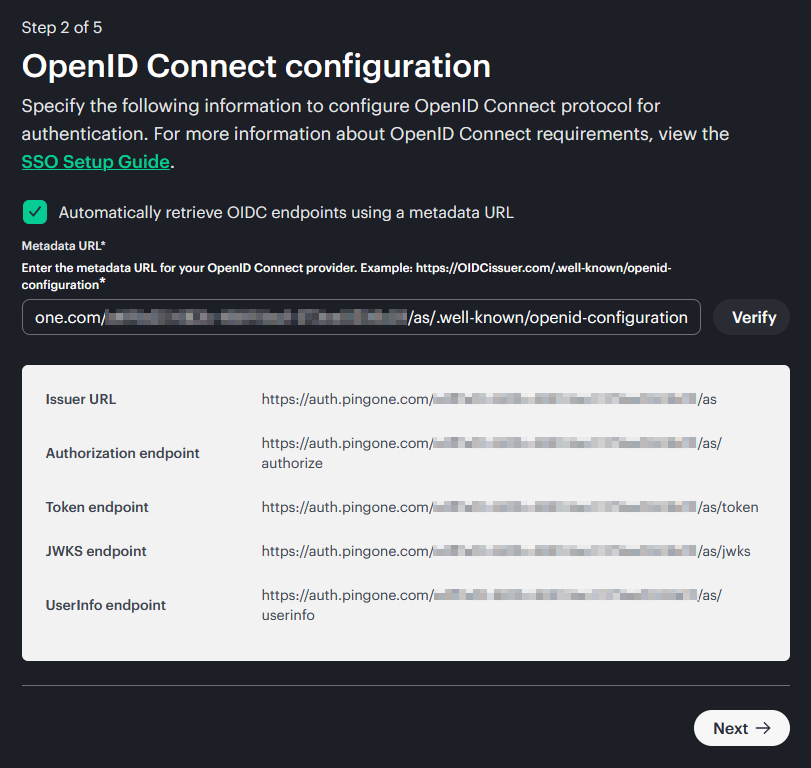
Leave Automatically retrieve OIDC endpoints using metadata URL selected and enter your PingOne discovery URL:
https://auth.pingone.<region>/<environment-ID>/as/.well-known/openid-configurationWhere
<region>is the top-level domain of your PingOne region (for examplecom,eu, orasia). You can also copy the exact URL from the application details in Step 4. -
Click Verify.
-
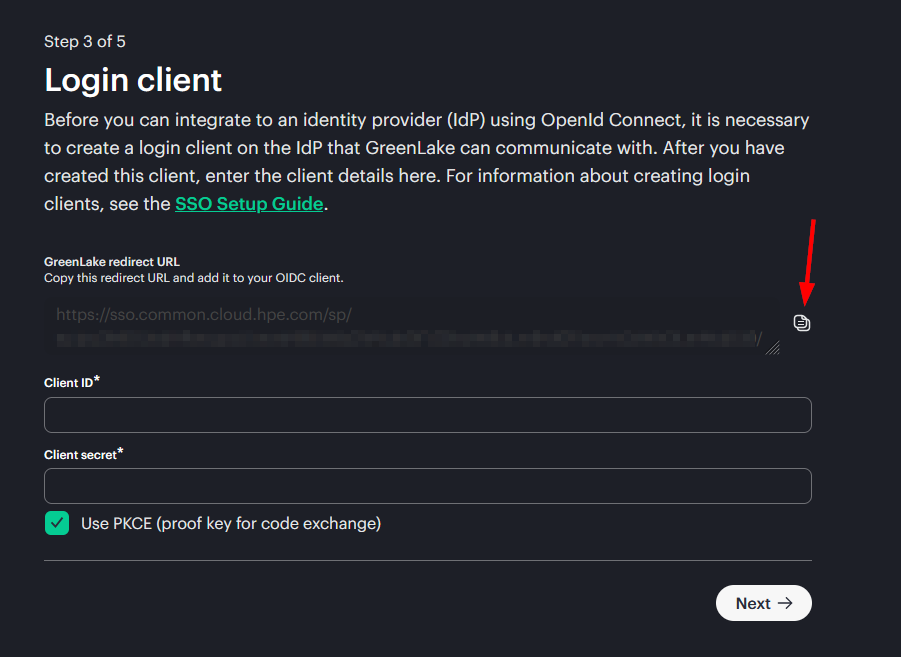
On the Login client page, copy the GreenLake redirect URL exactly as displayed. Keep this HPE GreenLake tab open: you will come back to it in Step 5 to enter the client ID and secret.
Step 2: Prepare users and a group in PingOne
- If needed, create the users in Directory → Users → Add User, using the email address of your verified domain.
-
In Directory → Groups, create a group such as
HPE-GreenLake-OIDCand add the members allowed to sign in to HPE GreenLake.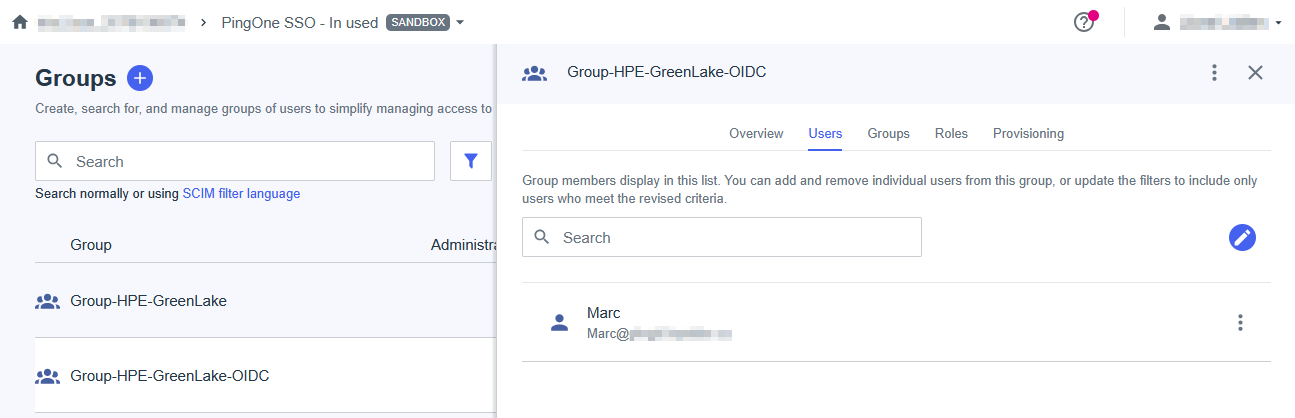
Step 3: Create and configure the OIDC application in PingOne
- In PingOne, select the environment containing your users and go to Applications → Applications.
-
Click +, enter a name such as
HPE GreenLake OIDC, select OIDC Web App, and click Save.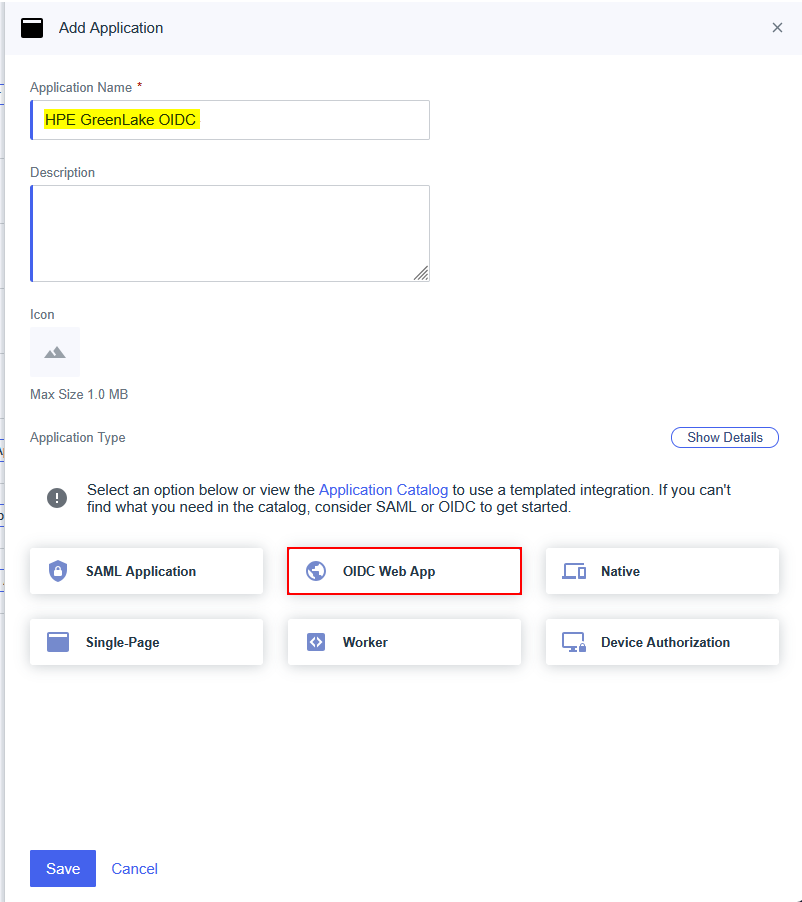
-
Open the application’s Configuration tab and edit its settings:
PingOne setting Configuration Response type Code Grant type Authorization Code Redirect URIs The exact GreenLake redirect URL copied in Step 1 Token endpoint authentication method Client Secret Post Initiate login URI (Optional) https://common.cloud.hpe.com/, to show the application in the users’ PingOne app portal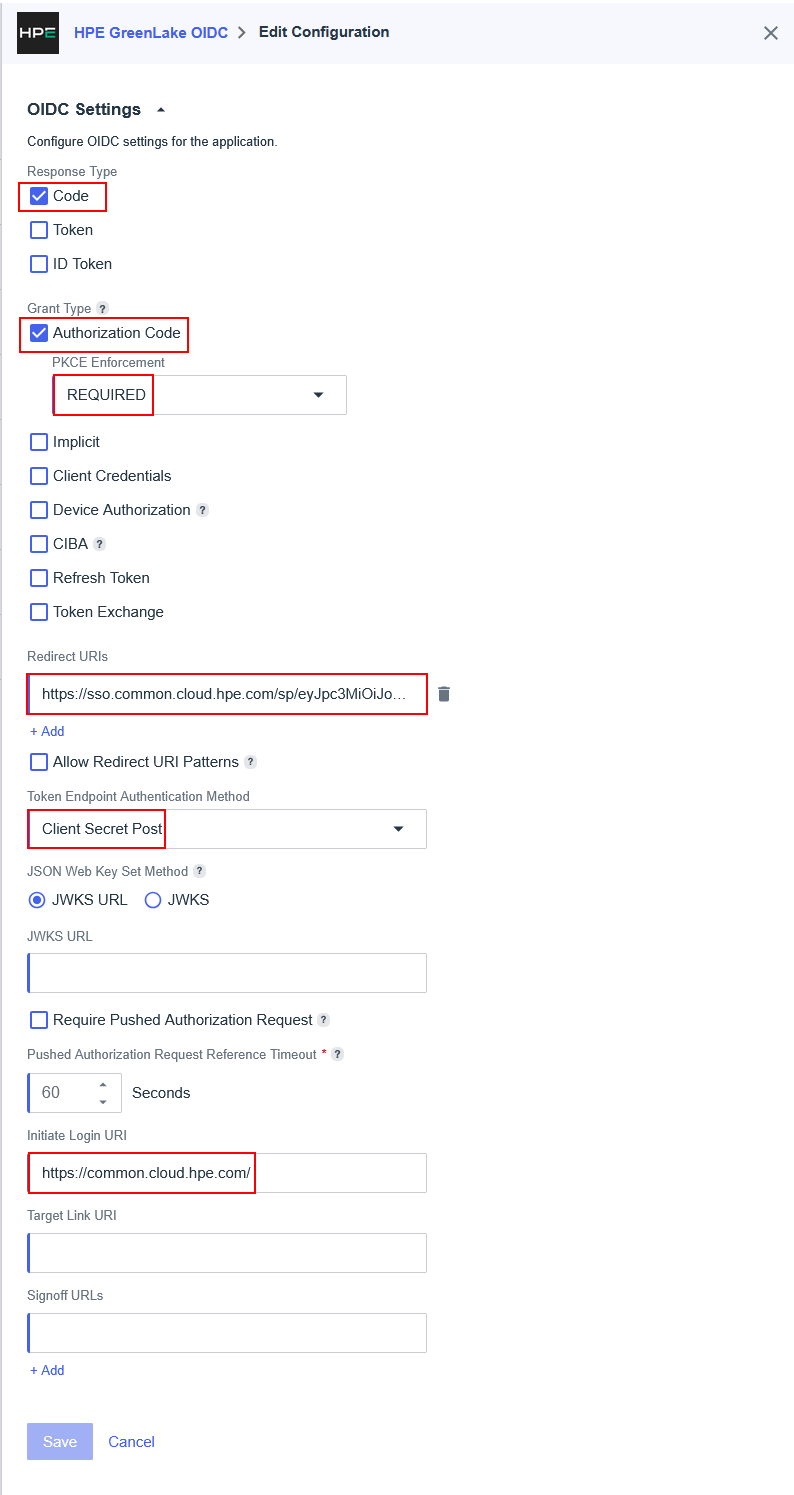
⚠️ Important: The Token endpoint authentication method must be Client Secret Post. With another method, HPE GreenLake rejects the sign-in with error
HPE_GL_IDENTITY_OIDC_REQUEST_INVALID_4606, even in a browser. -
In the Access tab, select Display this application in the application portal and authorize the
HPE-GreenLake-OIDCgroup.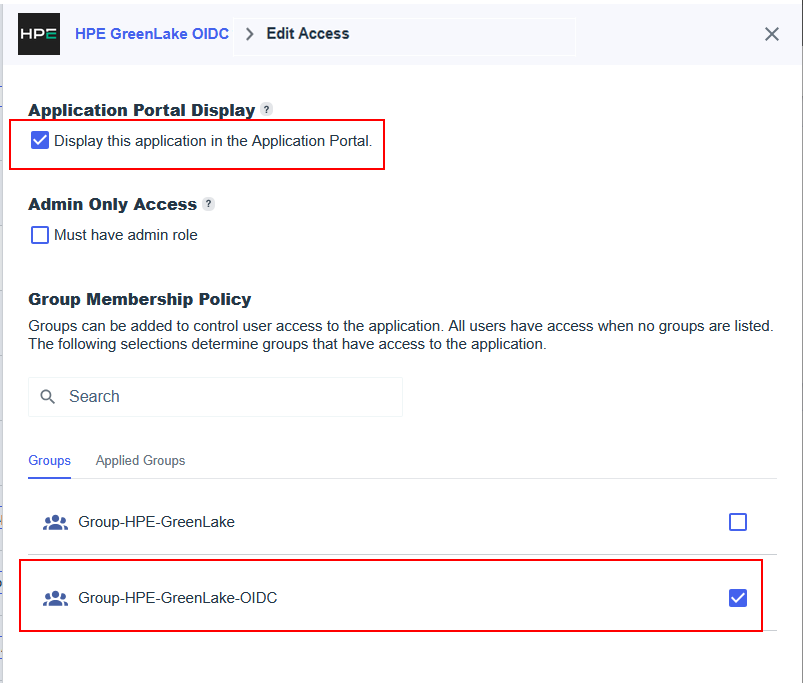
-
In the Policies tab, assign the authentication policy you use for HPE GreenLake, including the PingID MFA step. For passwordless sign-in or MFA with HPECOMCmdlets, use the policy described in Step 4 of the SAML guide for PingID.
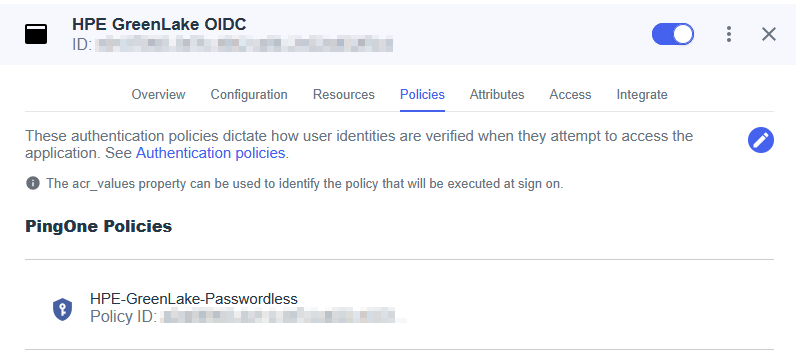
- Enable the application with its toggle.
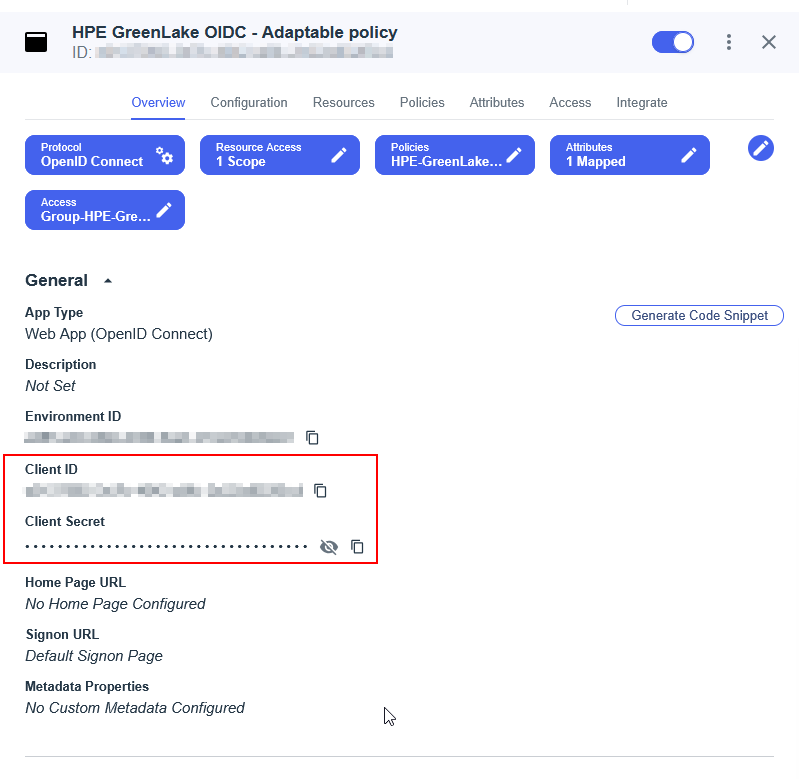
Step 4: Collect the PingOne client values
On the application’s Overview tab, copy the Client ID and Client Secret. The Configuration tab also lists the OIDC Discovery Endpoint and Issuer for your region and environment.
Step 5: Complete the OIDC connection in HPE GreenLake
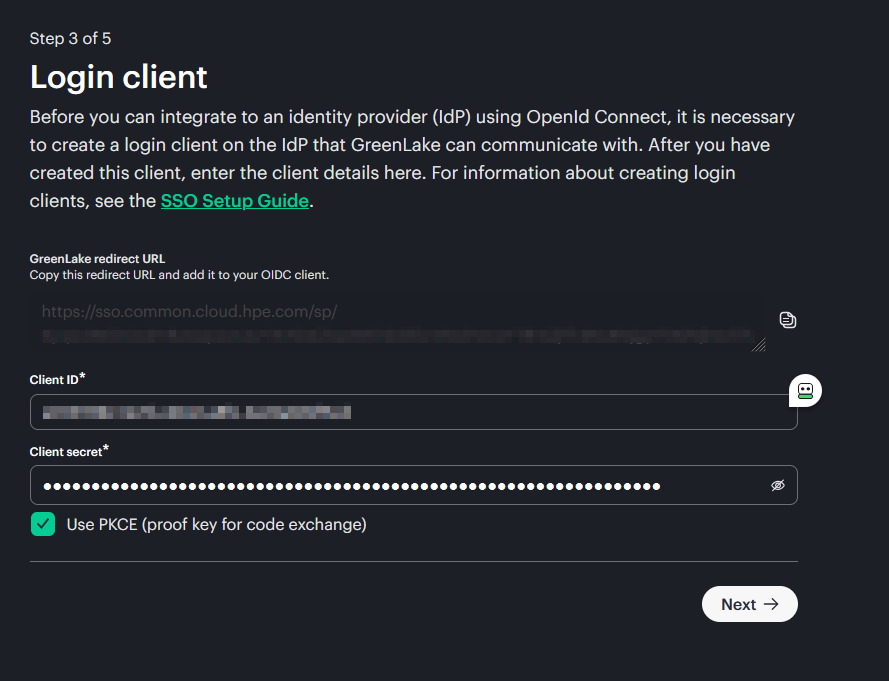
-
Return to the HPE GreenLake browser tab where the Create SSO connection wizard is still open on the Login client page (from Step 1). Enter the PingOne Client ID and Client secret copied in Step 4, and keep Use PKCE enabled.
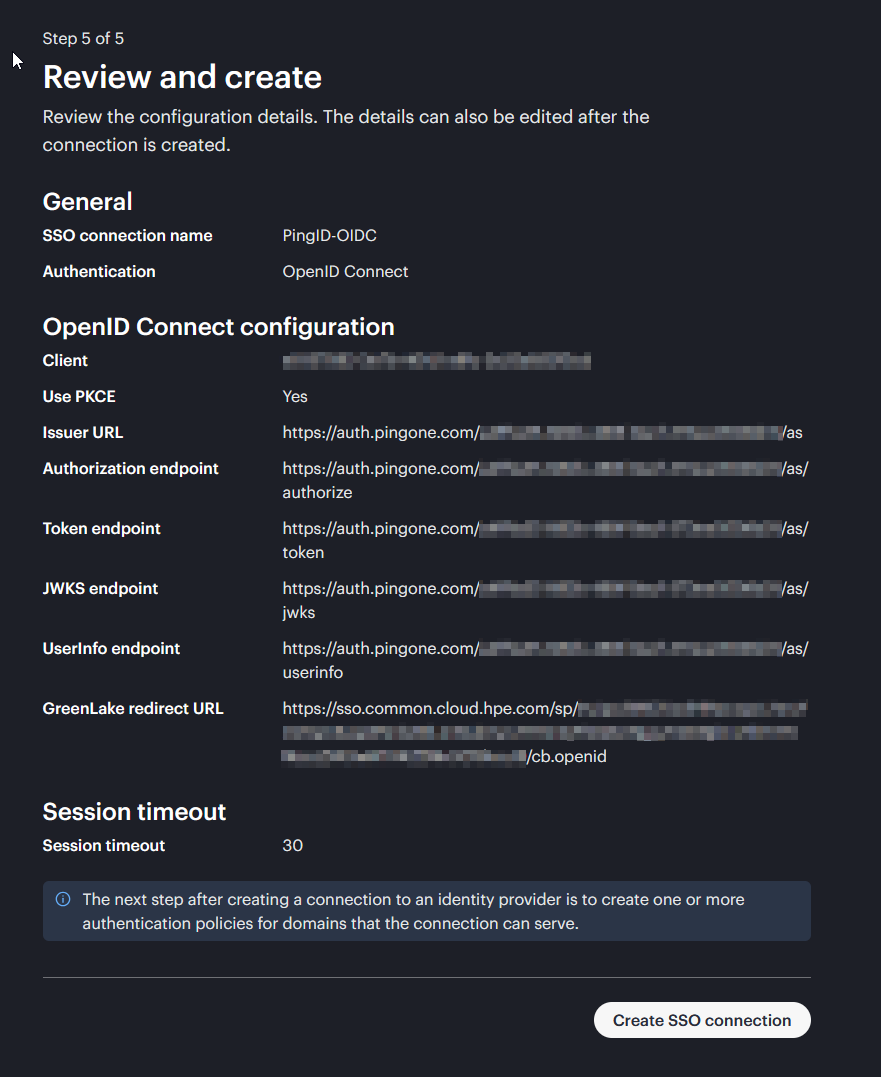
-
Complete the remaining wizard steps and click Create SSO connection.
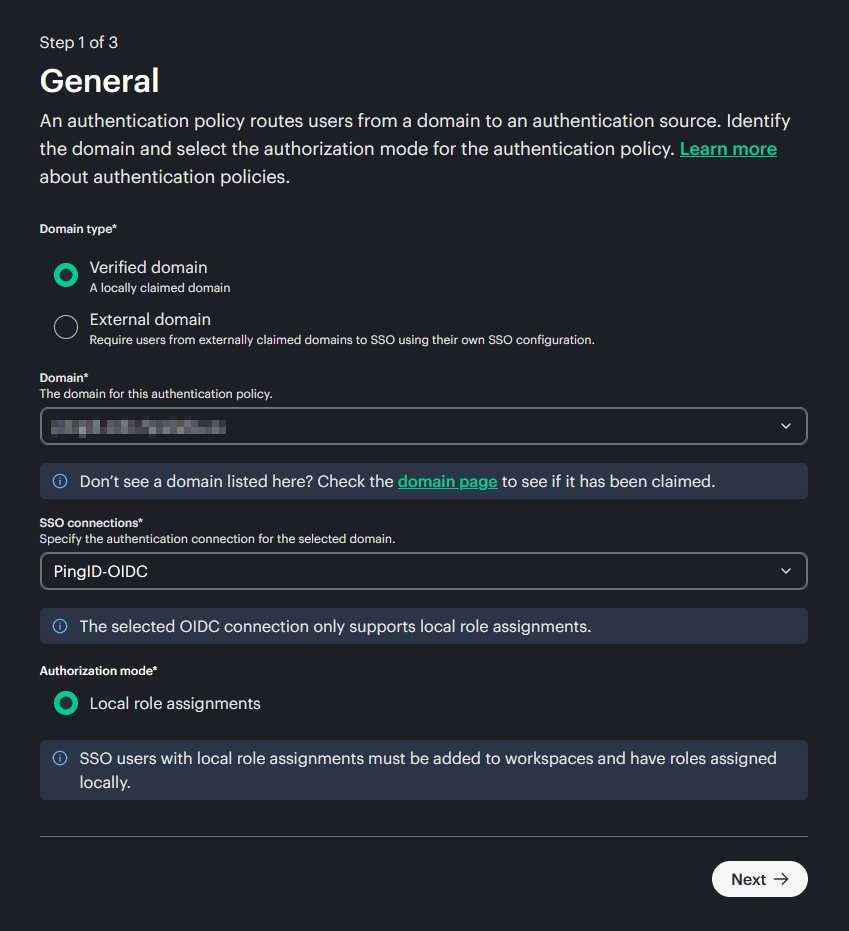
-
Create the authentication policy as described in Part 1, Step 5: select your verified domain, the PingOne OIDC connection, Local role assignments, and configure the recovery user.
Next: Add the users and assign their roles in HPE GreenLake, as described in the next section.
Granting Users Access with Local Role Assignments
With OIDC, your identity provider only authenticates users. To access a workspace, each SSO user must exist in HPE GreenLake and have roles assigned there, either directly or through a user group. Assigning roles to user groups is the easiest model to maintain.
Important: The email address returned by the identity provider must match the email address of the user in HPE GreenLake.
Option 1: Manually in HPE GreenLake
-
In the target workspace, open IAM and administration → User groups, create a group (e.g.,
COM-Operators), and assign the required workspace and service roles to it. A group must have role assignments for its members to get workspace access.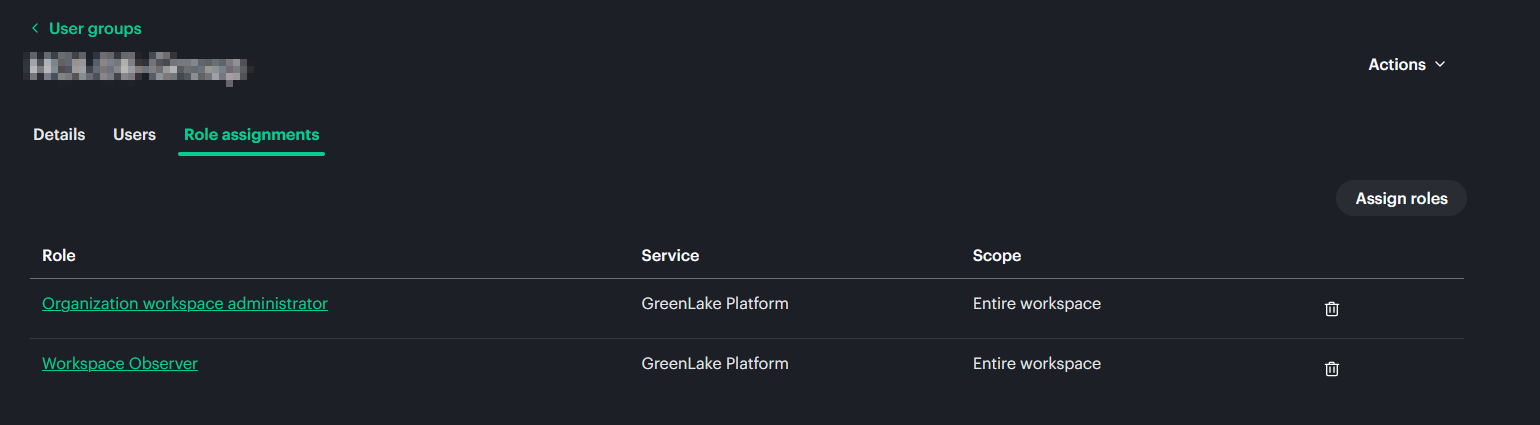
-
Open IAM and administration → Users → Add user:
- Select New user if the user is not yet in the organization directory, or User from identity directory if it already exists
- Enter the full email address and add the user to the group
- Click Add user
Option 2: With HPECOMCmdlets
Since v1.0.27, users can be created with membership in user groups only, so their permissions come entirely from the group roles:
Connect-HPEGL -Credential $recoveryCredential -Workspace "Production"

'user1@company.com', 'user2@company.com' | New-HPEGLUser -UserGroupName 'COM-Operators'
Option 3: With SCIM provisioning
Options 1 and 2 work well for a few users, but they create a second list of users to maintain: when someone joins, changes team, or leaves, you must update both your identity provider and HPE GreenLake. SCIM (System for Cross-domain Identity Management, RFC 7644) removes this double work by letting your identity provider keep HPE GreenLake up to date automatically.
How it works
SCIM is a standard REST API for creating, updating, and deleting users and groups. Your identity provider acts as the SCIM client and HPE GreenLake as the SCIM server: the identity provider pushes changes to HPE GreenLake, never the other way around.
| What happens in your identity provider | What SCIM does in HPE GreenLake |
|---|---|
| A user is assigned to the SCIM application (directly or through a group) | Creates the user in the organization directory |
| A user’s name or attributes change | Updates the user |
| A user joins or leaves a pushed group | Updates the group membership |
| A user is unassigned or disabled | Deactivates or removes the user |
SCIM synchronizes identities and group memberships, not permissions. Roles are still assigned in HPE GreenLake, which is exactly the local role assignment model required by OIDC. The recommended pattern is:
- Push groups from your identity provider (for example,
GL-COM-OperatorsandGL-Workspace-Admins). - In HPE GreenLake, assign roles once to each synchronized group.
- From then on, manage access only in your identity provider: adding a user to
GL-COM-Operatorsgives them the corresponding HPE GreenLake roles at the next synchronization, and removing them takes the roles away.
Note: Users and groups provisioned by SCIM are owned by your identity provider. Change them in the identity provider, not in HPE GreenLake, or the next synchronization overwrites your changes.
How to set it up
- In HPE GreenLake, create a SCIM integration for your organization. HPE GreenLake provides the SCIM endpoint URL and an access token that the identity provider uses to authenticate. Store the token securely.
- In your identity provider, enable provisioning for HPE GreenLake: enter the SCIM endpoint URL and token, test the connection, and check the attribute mappings (the user’s email address must map to the SCIM
userName). - Scope the synchronization by assigning the users and groups that should exist in HPE GreenLake, and select the groups to push.
- Start provisioning, then check in HPE GreenLake that the users and groups appear.
- Assign roles to the synchronized groups in HPE GreenLake.
Timing: Synchronization is not instantaneous. Microsoft Entra ID, for example, runs an initial cycle and then incremental cycles roughly every 40 minutes, so a new team member may wait a little before getting access. Use Provision on demand in Entra ID to push a single user immediately when testing.
The exact screens and values depend on your identity provider. See the HPE GreenLake User Guide:
- Setting up a SCIM integration
- Configuring the SCIM integration in Microsoft Entra ID
- Configuring the SCIM integration in Okta
- Define SSO users with local role assignments (SCIM)
Testing OIDC SSO Authentication
Test with a browser
- Open a private browser window and go to https://common.cloud.hpe.com/.
- Enter the full email address of a test user and click Next. You are redirected to your identity provider.
- Complete the authentication (password and/or MFA, depending on your policy).
- Confirm that you land in HPE GreenLake with the expected workspace and services available.
Test with HPECOMCmdlets
HPECOMCmdlets v1.0.27 and later detects the federation protocol automatically, so the commands are the same as for SAML:
# Install or update the module
Install-Module -Name HPECOMCmdlets -MinimumVersion 1.0.27

# Passwordless: approve the push notification on your phone
Connect-HPEGL -PasswordlessSSOEmail "user@company.com" -Workspace "Production"

# Password-based: password, then MFA step-up if your identity provider requires it
$cred = Get-Credential -UserName "user@company.com"
Connect-HPEGL -Credential $cred -Workspace "Production"
| Identity provider | Passwordless (-PasswordlessSSOEmail) |
Password-based (-Credential) |
|---|---|---|
| Microsoft Entra ID | Microsoft Authenticator push (number matching) | Password only, or password + Authenticator push or TOTP |
| Okta (Identity Engine) | Okta Verify push or TOTP | Password only, or password + Okta Verify |
| Ping Identity (PingOne SSO) | PingID push or OTP | Password only, or password + PingID |
Troubleshooting
HPE_GL_IDENTITY_OIDC_REQUEST_INVALID_4606(Ping Identity): set the PingOne application’s Token endpoint authentication method to Client Secret Post.AADSTS50105(Entra ID): the user is not assigned to the enterprise application. Add the user, or a group they belong to, under Users and groups.- Redirect URI mismatch error from the identity provider: the redirect URI registered in the application must match the GreenLake redirect URL exactly. Copy it again from the Login client page.
- Authentication succeeds but the user has no workspace access: OIDC uses local role assignments only. Add the user to HPE GreenLake and assign roles, directly or through a user group.
- All sign-ins suddenly fail: check whether the client secret has expired. Create a new secret in the identity provider, update it in the HPE GreenLake SSO connection, and use the recovery user if you are locked out.
Connect-HPEGLsays the sign-in flow has changed: you are running an HPECOMCmdlets version older than 1.0.27. RunUpdate-Module -Name HPECOMCmdlets.-
Sharing logs for support: since v1.0.27,
-Verboseoutput masks email addresses, tokens, authorization codes and cookies, so you can capture it safely:Connect-HPEGL -Credential $cred -Workspace "Production" -Verbose *> signin-log.txt
Conclusion
OIDC is the simplest way to federate HPE GreenLake with Microsoft Entra ID, Okta, or Ping Identity: a web application with a client ID and secret replaces SAML metadata and signing certificates. Keep in mind that it relies on local role assignments, and plan the renewal of the client secret. With HPECOMCmdlets v1.0.27 and later, your PowerShell automation works unchanged whether a workspace uses SAML 2.0 or OIDC.
I hope you find this guide useful.
Drop a comment below with your setup wins!
Additional Resources
your hub for all HPE software-related content!